Your First Automation
To be able to start with the package development in Pia, you will need to have the role of 'Engineer' in Pia portal and the following permissions:
- Sandbox Permissions
- Edit/Draft Permissions for: Package Editor, Form Editor and Activity Editor
- View Permissions for: Chatbot
🦸♀️ Of course 'SuperAdmin' will have automatic access to all features in Pia portal.
If you do not have the above permissions, ask your admin to provide you with the required access.
Step 1️: Create your The fallback content to display on prerendering
Start by creating a sandbox so that you can work on your automation in a (fairly) isolated environment.
A sandbox in Pia allows you to create custom automation in isolation from live mode. In fact, you can only create them when you are in a sandbox!
With a sandbox, you only have the activities and forms required for the development of a single package.
Read more
- Using the Package Editor, you can only view and save packages for the sandbox you have selected
- Using the Form Editor, you can only view and save packages for the sandbox you have selected
- Using the Activity Editor, you can only view and save packages for the sandbox you have selected
- Using the Client Dashboard the client tags, package configuration and global configuration options are all specific to that sandbox
- Using the Live Packages view, you can only see packages which you are running inside that sandbox
- Using the Pia Chatbot, while in sandbox mode, you can only see packages which are available inside that sandbox.
Differences Between Sandbox and Live Mode
There are also some minor differences in functionality between sandbox mode and live mode:
- In sandbox mode, you cannot use scheduled packages - if you attempt to schedule a package with a cron expression, it simply will not execute. Scheduled packages will only work when in live mode. If you want to test a package that you will later schedule, use the "Test Execute" function or add conditions for Pia Chatbot so you can use it in Pia for testing
- Certain other conditions will be restricted in sandbox mode. To understand more about specific restrictions, navigate to the article for the relevant condition
- Sandbox mode does not have versions functionality. Live mode is the only place where you can view and restore the previous version of a package, activity or form.
- Certain restrictions to the automations you can execute apply in sandbox mode. These restrictions are built into the system to ensure that you can safely create automations without executing commands on client agents. Refer to the Whitelist Feature.
How to use a Sandbox
Once you have created a sandbox, you can create new packages, forms and activities directly or copy them from live mode and other sandboxes.
Often, the process for developing changes to an existing package (i.e. one you have previously published) involves:
- Navigate to the package you wish to modify in live mode
- Select "Copy to Sandbox" in the toolbar at the top of the editor
- Select the sandbox you wish to copy to and click Go
- You will be prompted with a list of associated forms and activities which will be copied into the sandbox. If you already have forms and activities of the same name in the sandbox, Pia will do a comparison and give you an option of overriding changes if required
- You will be redirected to the sandbox where the package has been copied. You can make changes here
Once you are finished development of a package in sandbox mode, you can use the "Promote to Live" feature to publish and "Activate" the package.
💡 Learn How
- In the top bar of the portal, select view all sandboxes
- '+ New Sandbox' to create your sandbox
- Give it a simple, easy to remember name
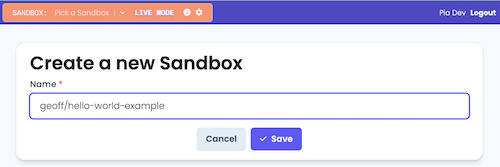
prefixing your sandboxes with your name can make them easy to find
Step 2️. Create your The fallback content to display on prerendering definition
Create your automation with a name of 'My First Automation' or something equally imaginative.
💡 Learn How
- Open the "Package Editor" from the left-hand menu
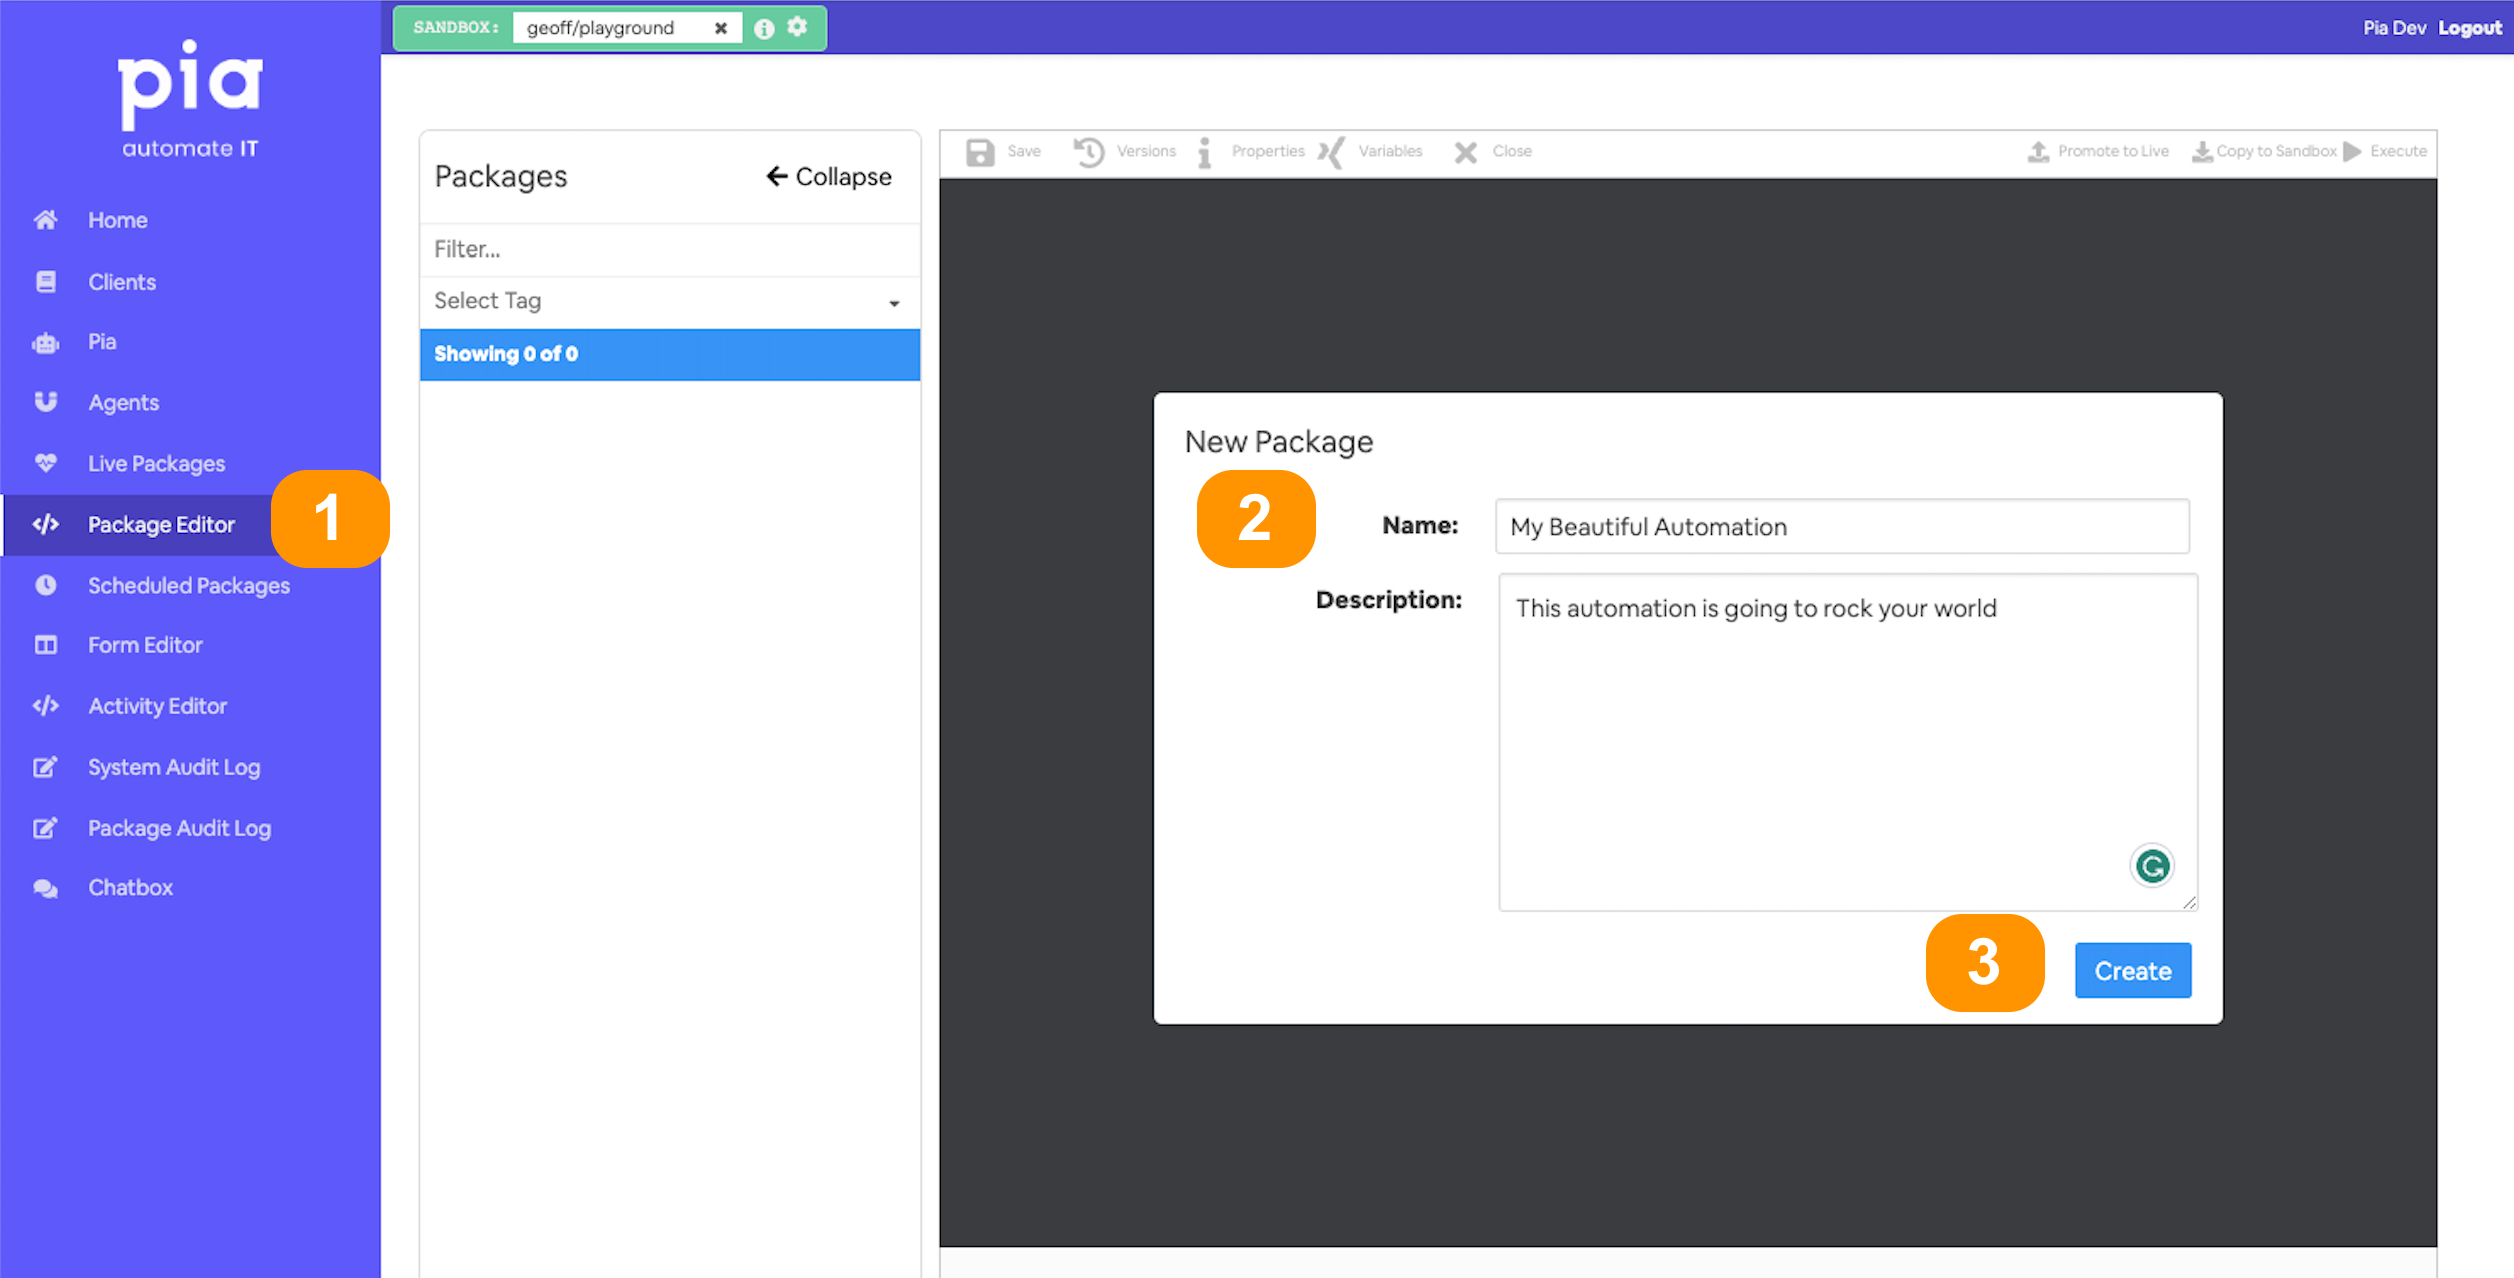
- Give your automation a memorable name;
- and a description (optional)
- You'll land in the automation definition editor
Step 3. Add your Package Conditions
For this new package, we will be using the
The package will now show as below:
# Orchestrator package
conditions:
- name: 'client_filter'
  optMode: 'OptIn'
  category: 'Testing'

- name: 'chat'
  option_button: 'Test Package'
  option_text: 'This is a test package.'
  option_category: 'Test Category'

steps:
- task: wait
  inputs:
    minutes: '5'
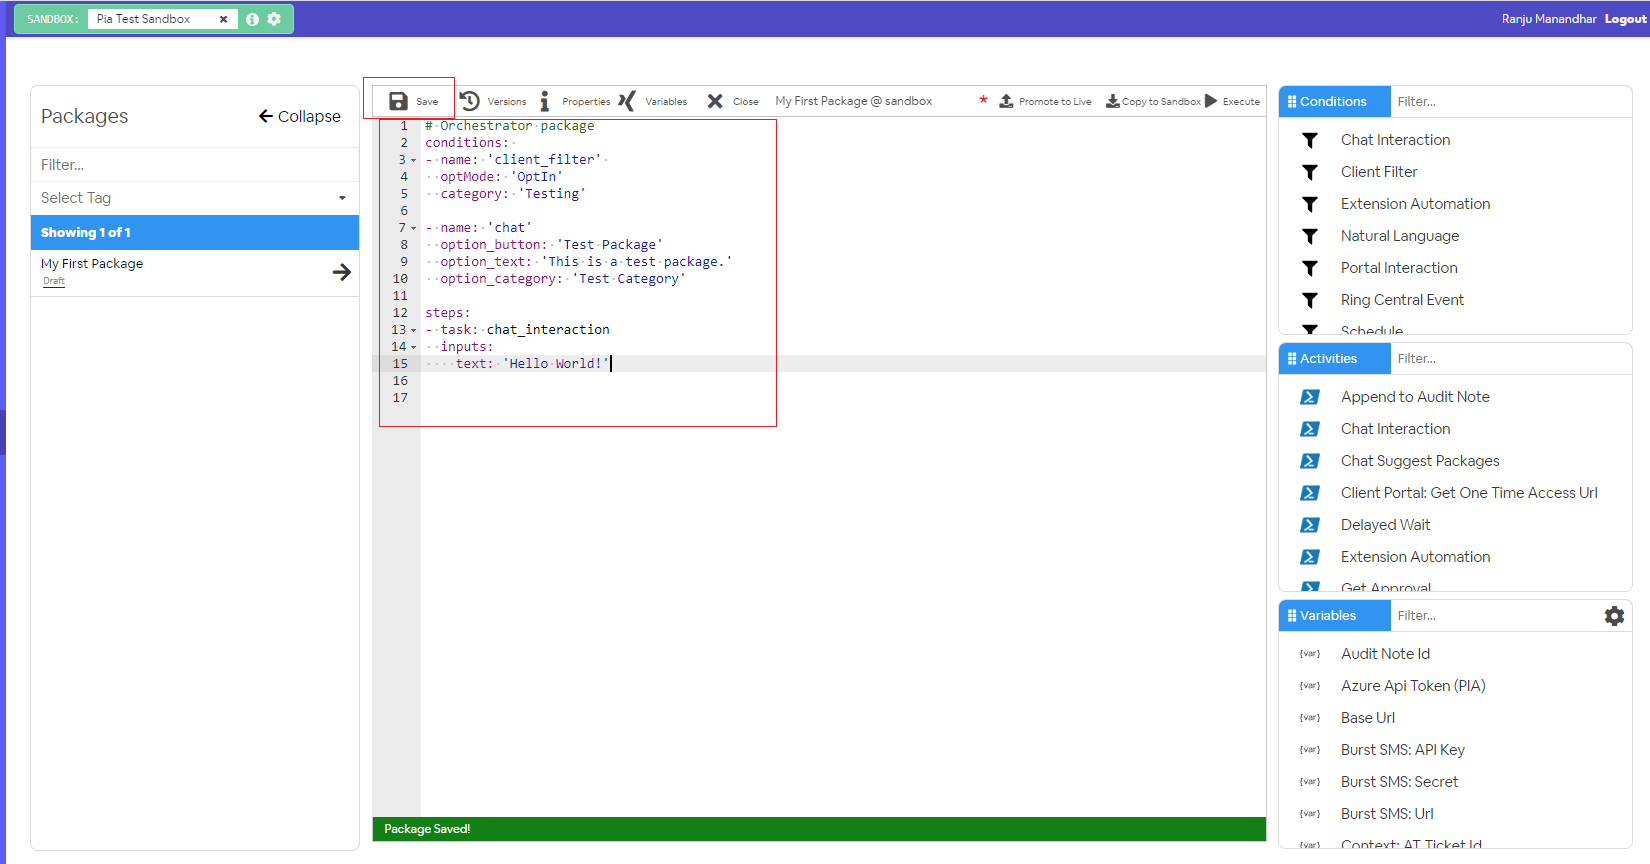
Step 4. Add a Package Activity
Just like conditions, a list of available activities are displayed under the 'Activities' section at the right menu. You may select from the available activities or choose to create your own activity using the Activity Editor.
For this example, we will be using the
# Orchestrator package
conditions:
- name: 'client_filter'
  optMode: 'OptIn'
  category: 'Testing'

- name: 'chat'
  option_button: 'Test Package'
  option_text: 'This is a test package.'
  option_category: 'Test Category'

steps:
- task: chat_interaction
  inputs:
    text: 'Hello World!'
Hit the save button and there you go! You have just created your first package 🚀.
📸 screenshot
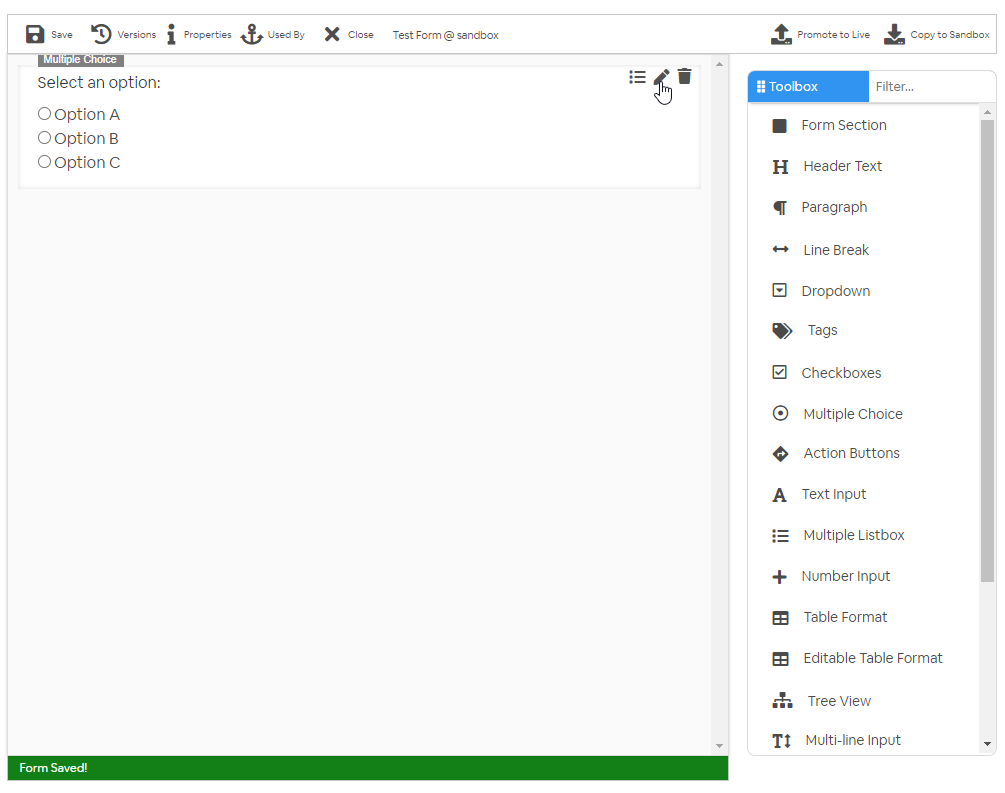
Step 5: Create a form
To add interaction to your automation, you can use different forms available in the Form Editor screen. Forms are used in Pia package to:
- Receive Inputs from the user required for the automation
- Provide user with information as the automation runs
You can either choose an existing form or create on new one. For this example, let's create a new one.
To get started create a multiple choice option allowing the user to select between three options.
💡 Learn how
- Go to form editor in your sandbox where you will see "New Form" section.
- Fill in the name and static name of the form you want to create. You can make changes to the other option as per your requirement:
- Once you click on the 'Create' button, you will be taken to the Form Editor screen where you can start editing your form.
📸 screenshot
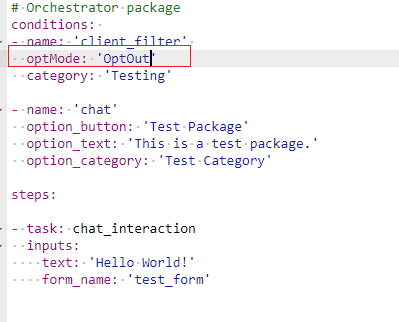
Step 6: Associate the form with a The fallback content to display on prerendering
After the form has been created and saved, you can link your form to your package using the
Here, you need to add the static name of the form as the value for 'form_name' input property.
# Orchestrator package
conditions:
- name: 'client_filter'
  optMode: 'OptIn'
  category: 'Testing'

- name: 'chat'
  option_button: 'Test Package'
  option_text: 'This is a test package.'
  option_category: 'Test Category'

steps:
- task: chat_interaction
  inputs:
    text: 'Hello World!'
    form_name: 'test_form'
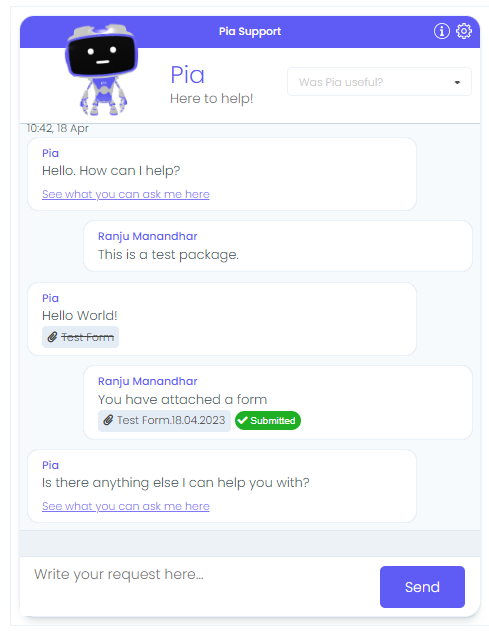
Step 7: Running the package in Pia Chatbot
To run in the chatbot, a valid ticket number from your ticketing system is required.
To run your package in Pia chatbot (in
(?) Check your condition
- Go to the Pia chatbox screen and enter the ticket number at the ticket id section above the chatbot.
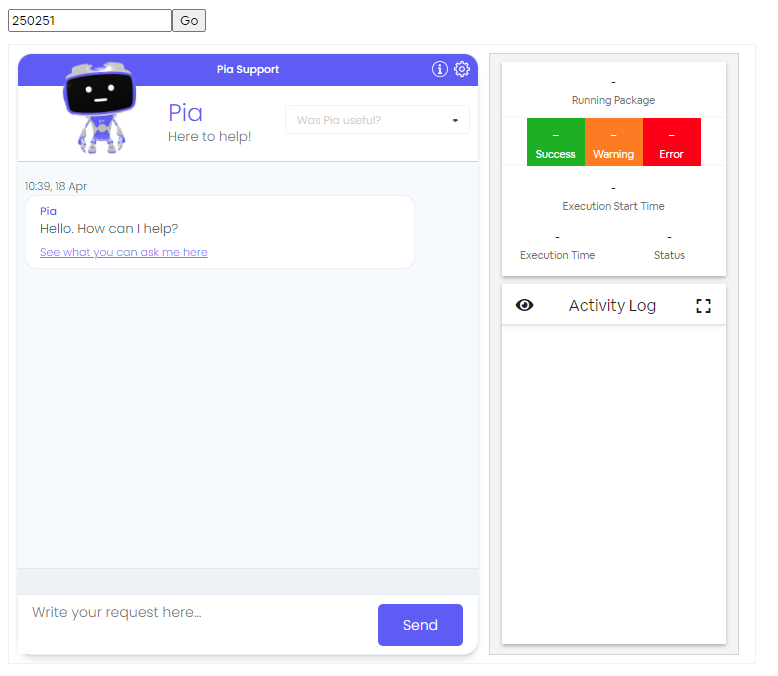
- You can now search for your package clicking on "See what you can ask me here" link.
see it
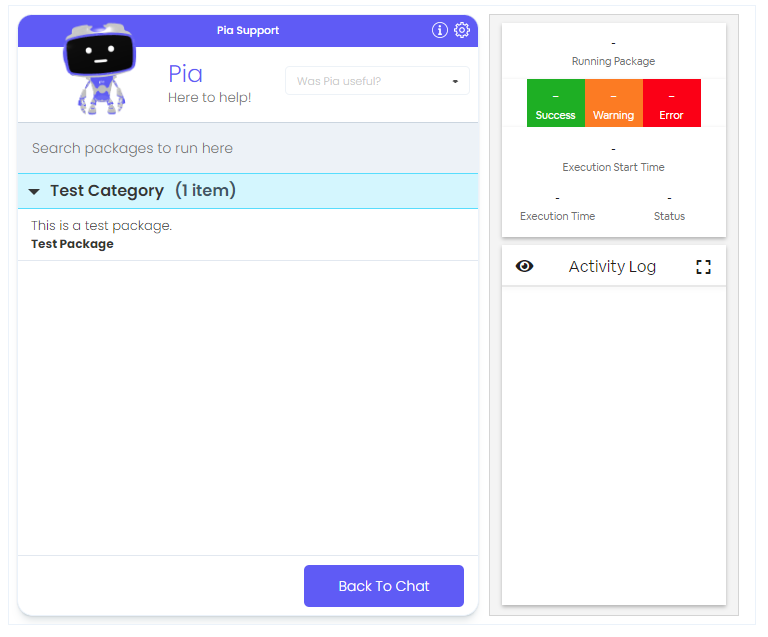
- Select the package you have just created and Pia will run the package for you.
see it