Configuring Automated Time Logging in Pia aiDesk
In Pia aiDesk Platform 16, we introduced a new feature for Automated Time Logging, allowing MSPs to log time entries automatically in their PSA once an automation package is completed. This ensures that engineers' time is accurately tracked, providing transparent billing for clients.
Why Use Automated Time Logging?
Automated Time Logging allows MSPs to:
- Track time effortlessly: Automatically log the time spent on automation tasks without manual entries.
- Increase billing accuracy: Ensure all tasks are properly billed to clients based on time spent by engineers.
- Improve operational efficiency: Minimize the risk of time entry errors and focus on delivering services.
Supported PSAs: ConnectWise, Autotask, and HaloPSA.
How to Configure Automated Time Logging
Step 1: Access the Pia Portal
In the Pia aiDesk portal, navigate to Configuration from the main menu on the left sidebar.
Under Configuration, click on Tenant Settings.
Step 2: Enable Automated Time Logging
Scroll down to the Automated Time Logging section.
Toggle the Status switch to “Yes” to enable the feature.
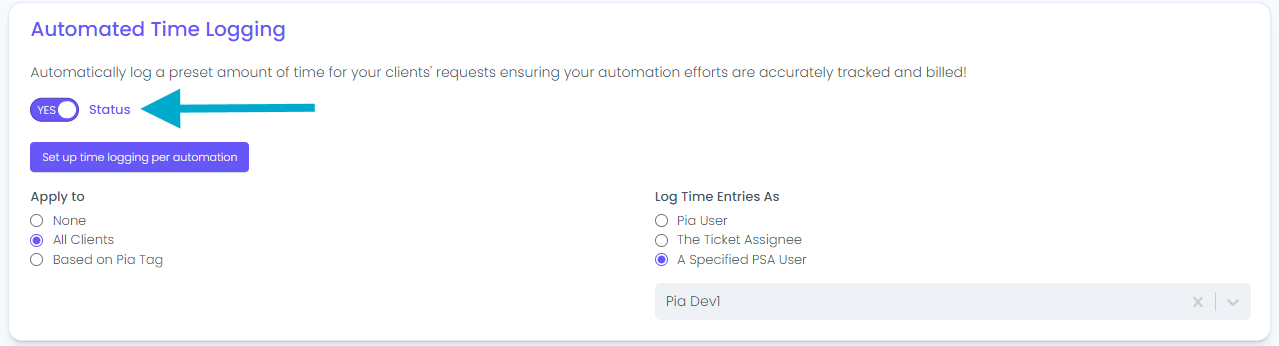
By enabling this feature, Pia will automatically log time for completed automation tasks.
Step 3: Configure Logging Settings
In the Apply to section, you can choose how you want time logging to be applied:
- None: Disable time logging for all clients.
- All Clients: Enable time logging for every client.
- Based on Pia Tag: Enable time logging for clients based on specific tags.
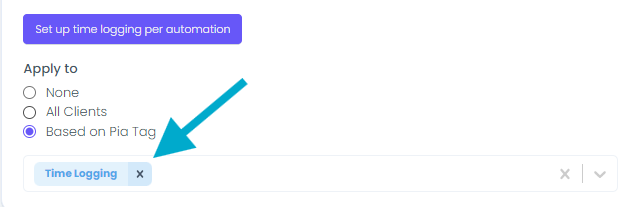
Choosing Based on Pia Tag gives you the flexibility to assign time logging rules to specific client categories. For example, you can create a brand new tag in the Pia portal, such as "Time Logging," to track automation tasks for general purposes, or create a tag based on the client's contract, like "Ad-hoc," to monitor tasks tied to non-standard agreements.
Select who the time entries should be logged as under Log Time Entries As:
- Pia User: Logs time as the user who starts the automation package.
- The Ticket Assignee: Logs time under the ticket's assigned engineer.
- A Specified PSA User: Logs time entries against a specific user in your ticketing system.
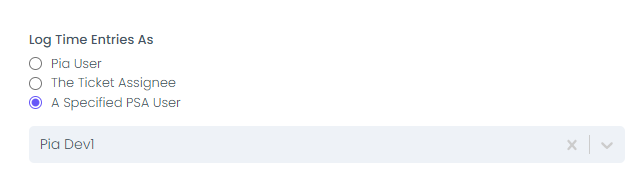
This option is particularly useful if your clients are using SmartForms, or if you want to log automated entries under a generic static user like piatimelogging@yourmsp.com. This ensures consistent and predictable tracking of automated time entries across your PSA.
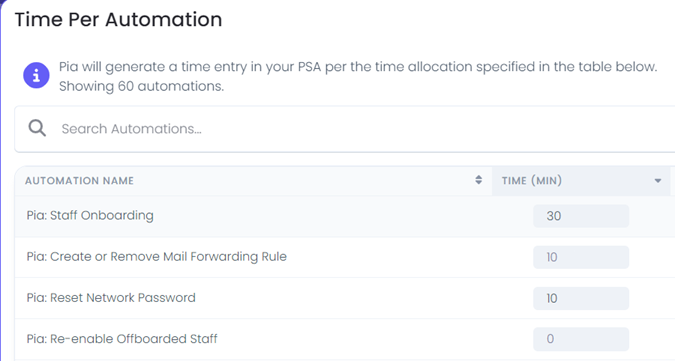
Step 4: Set Time Logging Per Automation
Click on Set up time logging per automation to configure specific time logging for each individual automation package.
You can adjust the time logged for each Pia automation, ensuring that the correct amount of time is reflected in your PSA for different types of tasks.
Step 5: Save Changes
- After configuring the settings, ensure you click on the Save button to apply your configurations.
Step 6: Verify Time Entries in Your Ticketing System
Once the automation task is completed, Pia will create a time entry in your ticketing system. The entry will include:
- Start time: The time the automation began.
- End time: The time the automation finished.
- Ticket notes: Any relevant details about the automation task, automatically logged within the ticket.
You can verify the time entry under the ticket in your PSA to ensure it accurately reflects the time spent on the task.
You can verify the time entry under the ticket in your PSA to ensure it accurately reflects the time spent on the task.
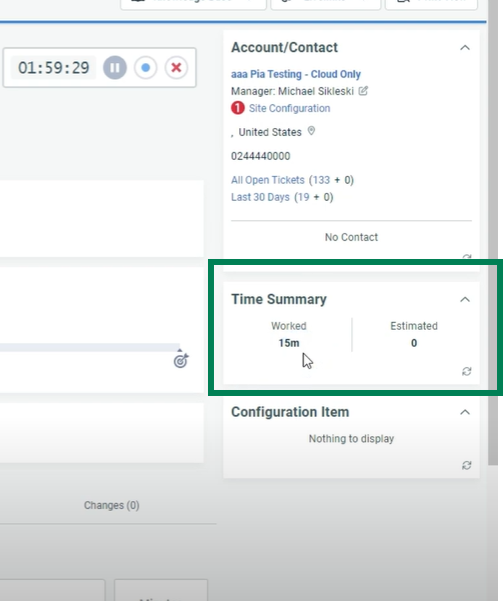
Time Entry Verification for Different PSAs
- ConnectWise
- Autotask
- HaloPSA
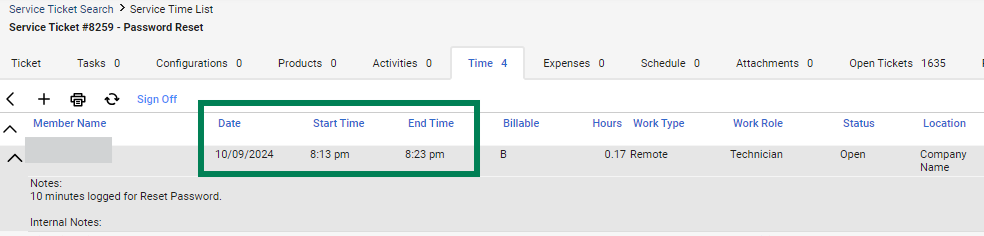
In ConnectWise, the Billable field will be automatically stamped based on the customer's agreement, ensuring correct billing.
In ConnectWise, time entries must be recorded up to the current time, meaning future time entries are not allowed. As a result, when Pia generates a time entry, it adjusts the start and end times to fit within the current time frame. For example, if a 20-minute time entry is generated at 12:30 PM, the end time cannot be set to 12:50 PM. Instead, the entry will reflect time "in the past" and will show as Start Time 12:10PM - End Time 12:30PM to ensure compliance with ConnectWise’s time tracking rules.
In Autotask, if you don't see the amount of time appearing immediately, you may need to click the refresh button located at the bottom right of the section to update the time entry.
Additional Setting required in Autotask
By default, Autotask allows owner of the ticket to add, update or delete the time entries of their own. So, if the option in the time logging setting is set to Ticket Assignee, the Time Logging feature works without any issue. However, this feature also offers an option to log time on behalf of a specific user "A Specified PSA User". For Pia to be able to log time on behalf of the user in Autotask, you will need to update the Proxy Time Entry setting available in Autotask portal.
Refer to Autotask documentation here for more info.

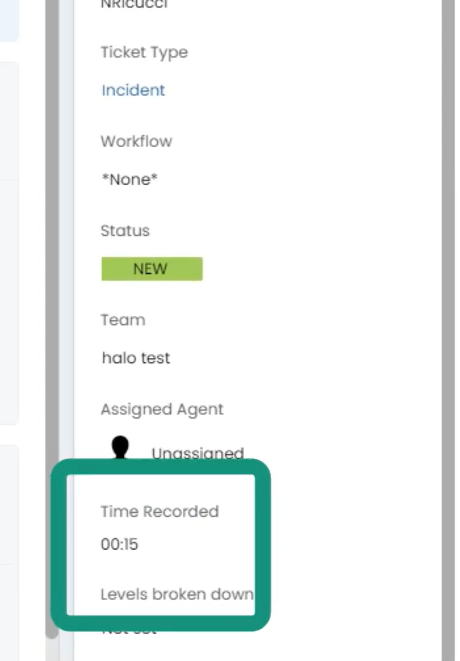
In HaloPSA it may take a few seconds for the logged time to appear and add up to the total time recorded counter. There's no need to refresh the page manually.