Agent Configuration
Installing your Agents
Agent installation and configuration
In this section, we will deep dive into deploying the Pia Agent into your environment.
The Pia Agent is required to be installed on any device which is to be supported in terms of running packages on the device. At present, Pia is supported on the following Operating Systems and Classes:
- Windows Server 2016 or higher
- Windows 10 or higher
- ConnectWise Automate
- Datto RMM
- Kaseya VSA
- N-Central
- Other RMMs
This packages includes the following:
- An EDF to define Pia values per Client
- Install, uninstall and reinstall scripts
- Searches for determining whether Pia is installed
- Groups to categorise endpoints based on the search above
You can download this package from here: https://piavideos.blob.core.windows.net/videos/CW%20Automate%20Pia%20Deployment%20Setup%20+%20Scripts.zip
Note 1: As the .xml contents of the package are not readable to determine the actions prior to import, we have provided screenshots in the .zip file to show the expected result after import.
Note 2: Please import the .xml file called "Group - Pia.xml" first BEFORE importing any of the other .xml files provided in the .zip file. Not doing so risks causing database corruption.
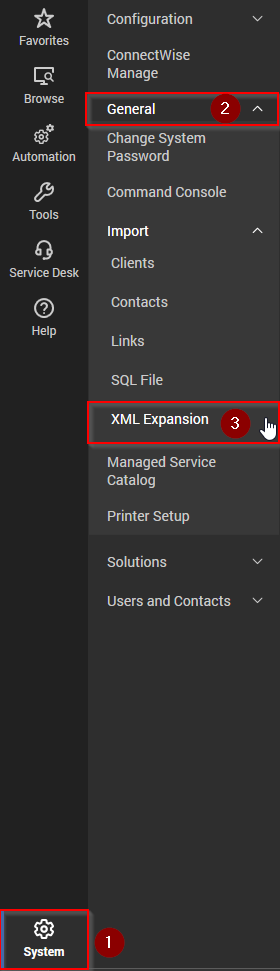
- Import the .xml files by going to System > General > Import > XML Expansion
After importing each .xml file, please check the Groups, Searches, Scripts and EDF sections to confirm that the items are visible as per the provided screenshots.
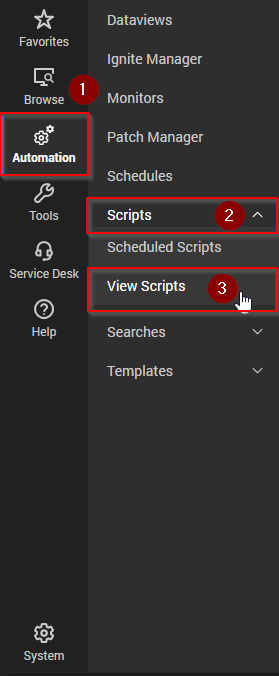
The imported scripts to install and reinstall Pia require editing to point to your Pia Tenant FQDN. Navigate to Automation > Scripts > View Scripts
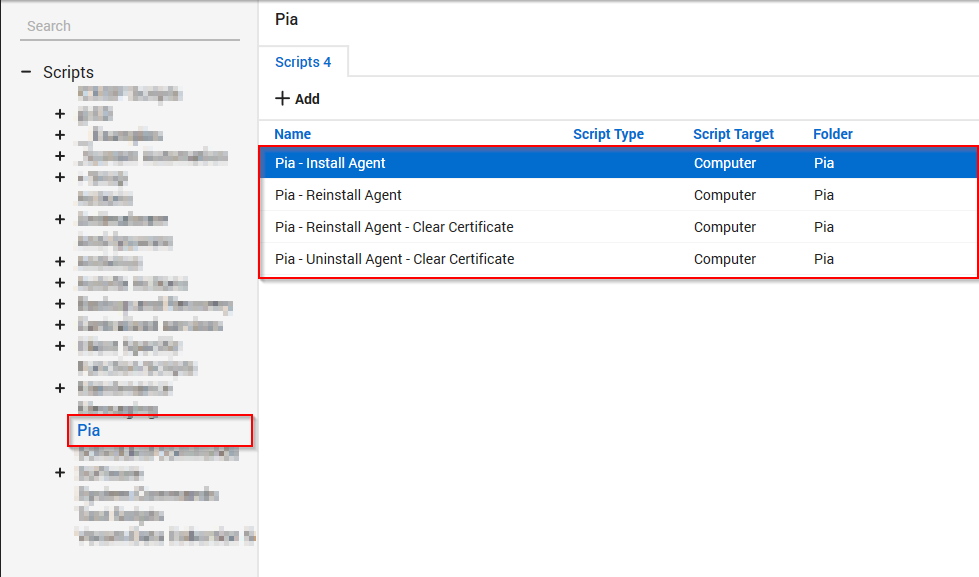
- Select the "Pia" folder under the scripts pane. You will see the scripts for Pia listed in the main pane.
Right-click on the "Pia - Install Agent" script and choose "Open".
In the script, navigate to the "Then" section and double-click on step number 8. You will see the install string has the -tenantname argument entered as "tenantname.pia.ai" - change this to your tenant name FQDN(same as the Pia Portal).
Save the changes to the script.
Repeat steps 4 to 6 for the scripts called "Pia - Reinstall Agent" and "Pia - Reinstall Agent - Clear Certificate"(step numbers to update the tenantname are different in these scripts).
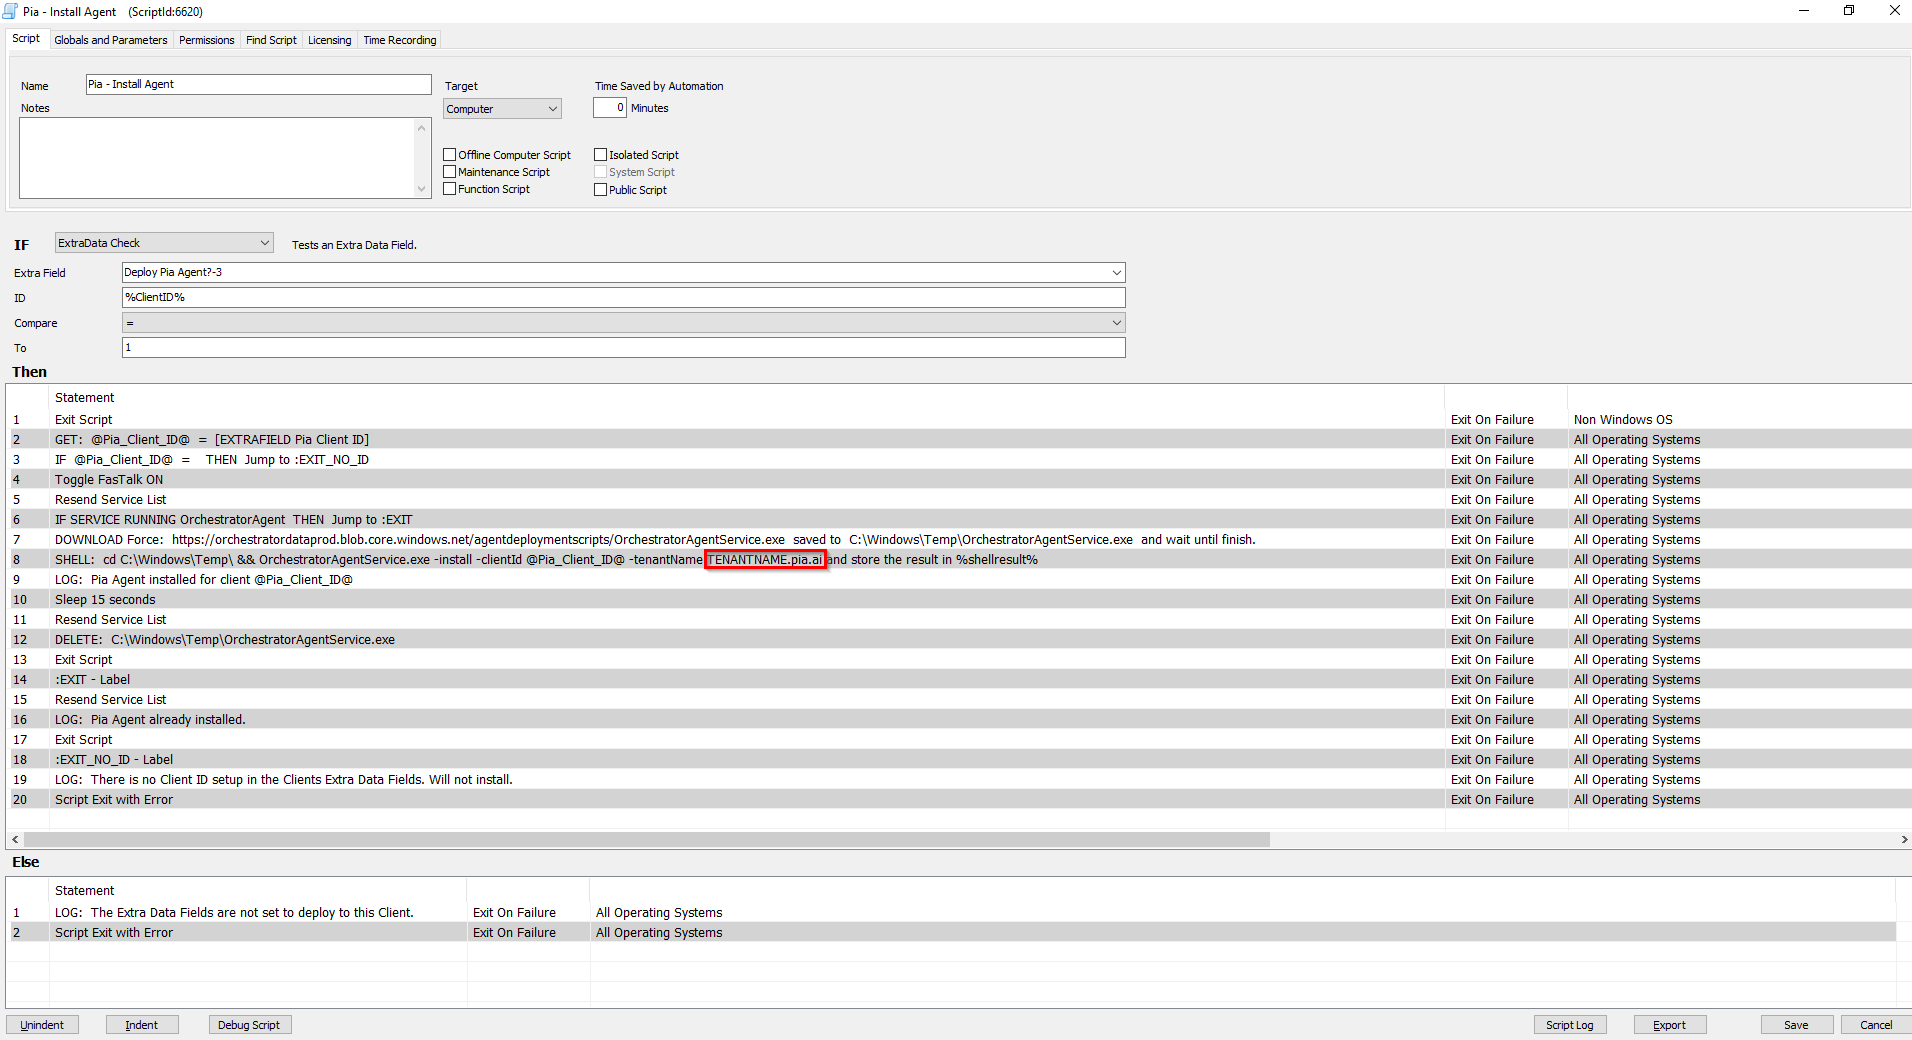
In the above screenshot, the link displayed in Statement 7 is to an Azure Blob Storage located in Australia. If you have geo-filtering enabled and are in the United States, we have the following US Azure Storage Blob which is hosted locally that you can utilise:
https://piatenantadminprodus.blob.core.windows.net/piareleases/Pia.OrchestratorAgentService.exe
Replace the link in Statement 7 of the screenshot with the above link if you are in United States.
At this point, it is time to commence filling out the EDF for Clients. In the Clients list, right-click on a Client and choose "Open". Then in the Client Properties window which appears, navigate to Info > Pia tab.
In the Pia tab you will be presented with 2 options, a tickbox to deploy the Pia Agent and a Client ID. Tick the box to Deploy Pia Agent and enter in the Pia Client ID Number. For a list of your Pia Client Id's , please refer to the Id column on the Clients page in your Pia tenant portal.
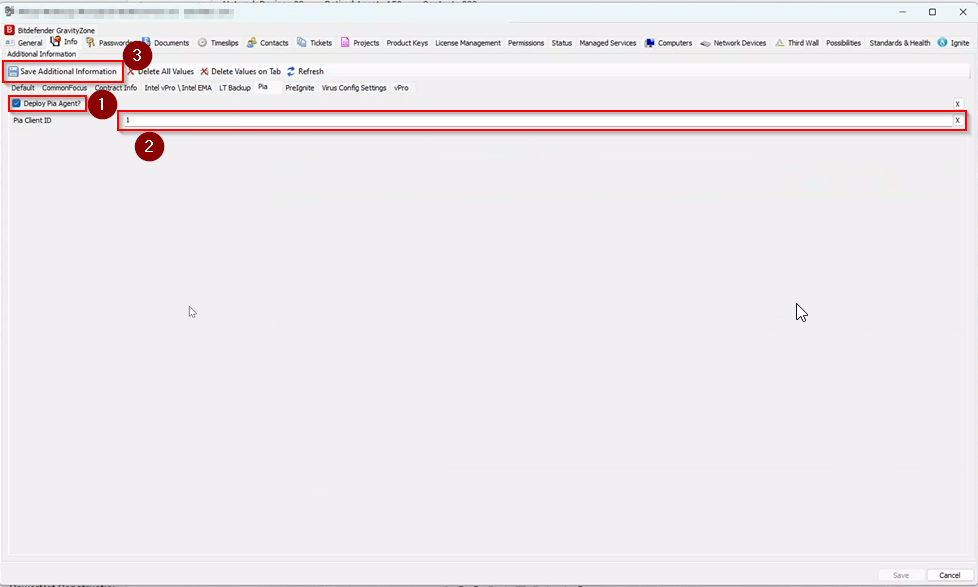
After entering in the information, click "Save Additional Information".
After some time, the endpoints for the Client will appear in the "Pia - Not installed" group after the search has ran.
When you are ready to deploy the Pia Agent to your endpoints, the final step is to configure a scheduled script on the "Pia - Not installed" group.
Navigate to Browse > Groups(tab) > Pia(folder) > Pia - Not Installed
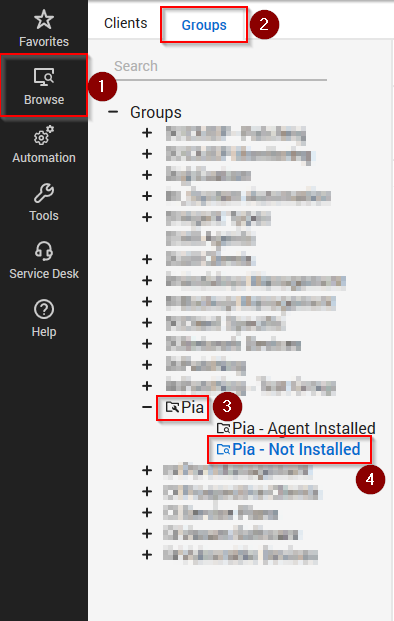
Right-click on "Pia - Not Installed" and choose "Open".
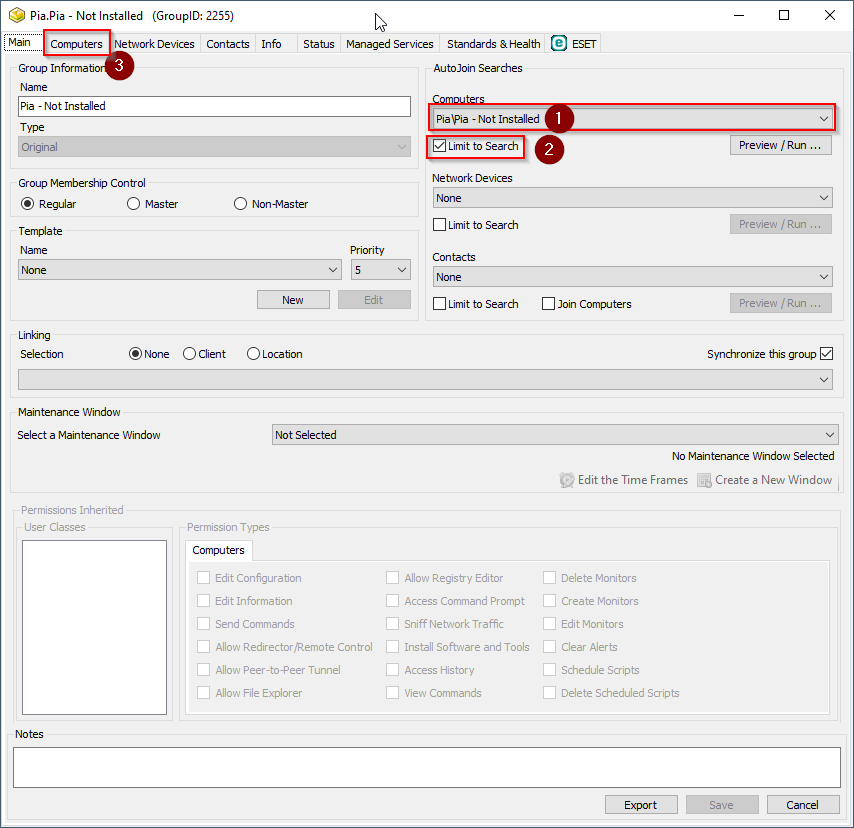
In the "AutoJoin Searches" section under the "Computers" dropdown, choose the group "Pia\Pia - Not Installed" from the list and tick "Limit to Search". Then, click on the "Computers" tab.
Click on the "Scheduled Scripts" tab.
Set the script to "Pia\Pia - install Agent" and then set the "Limit to Search" dropdown to "Pia\Pia - Not Installed". We recommend a weekly schedule starting at 9am and running over normal business hours.
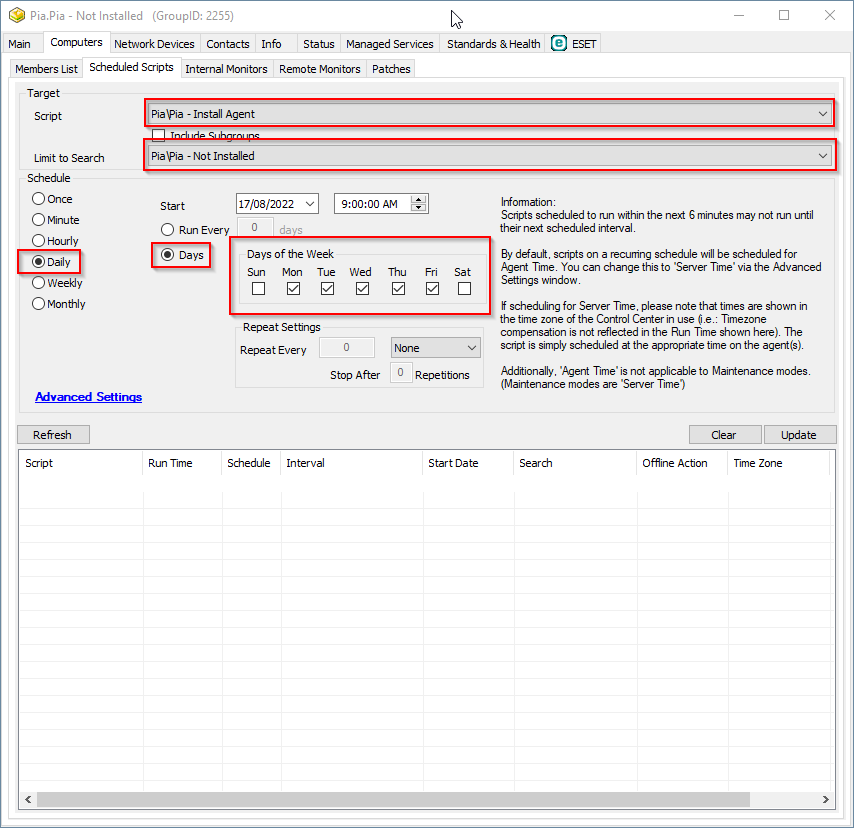
Click "Save" once completed.
Monitor your endpoints to confirm the Pia agent is being deployed and machines are moving from the "Pia - Not Installed" group into the "Pia - Installed" group.
Agent Activation
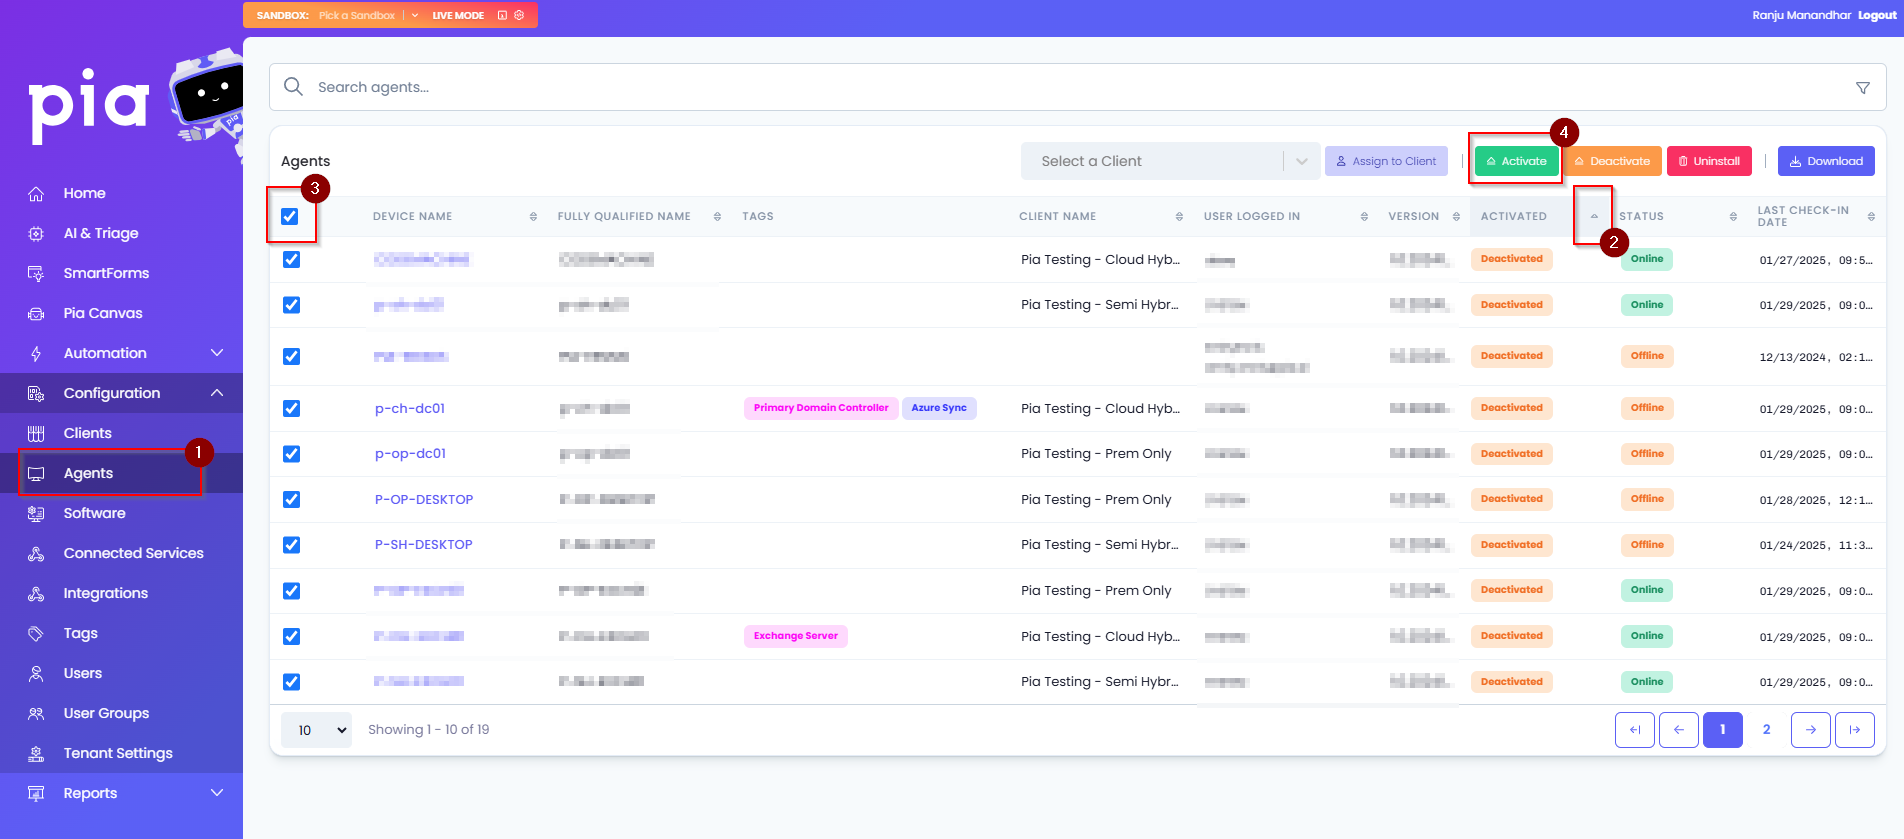
In the Pia Portal, the Installed Agents must be manually activated before it can start communicating with Pia. Follow the steps below to learn how you can activate Pia Agents in the Pia Portal:
Go to Configuration in the left hand menu and navigate to the Agents option.
Click on the sort button in the Activated column so that you can see ALL the Agents that are installed but de-activated. You can also search for the Agent using the Search bar.
Select the Agents you wish to activate. You can also use the top-left checkbox to select All.
Click on 'Activate' button. This will activate the Agents.
Alternatively, you can follow the steps below to activate a single agent:
Click on the Device Name. This will open up additional options for the device
The Activated drop-down will have two options. Select "Activated" option
Click on "Save Details" button

Uninstalling and Reinstalling
Uninstall and reinstall scripts have been provided. With these, there are two options, a standard uninstall and reinstall script respectively and another which also clears the certificate. Unless advised by Pia Support, we recommend using the script which doesn't clear the certificate. These can simply be run on an endpoint inside Automate, same as any standard script.
1. Log into Datto RMM.
2. Expand the "Automation" section and select "ComStore".
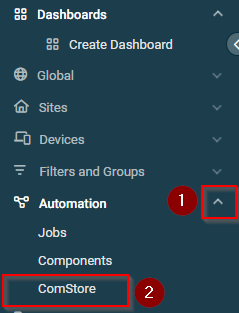
- From the ComStore list, search for "Pia Agent [WIN]" Component and once found, select the "Add" button.

If the pop-up message states that the Component was successfully added, continue to the next steps.
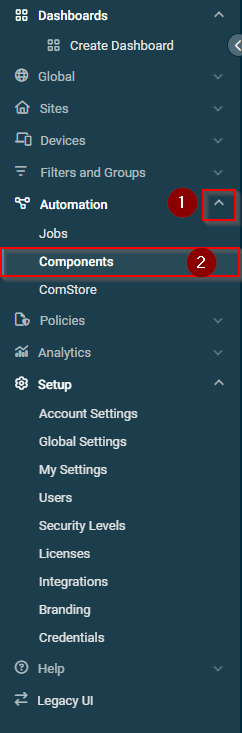
From the left hand menu, expand "Automation" and select "Components".
 6. The Pia Agent should now show in your list of Components as shown below.

- if you want to change the download location from this storage blob from Australia to the US (highlighted below), then use the link provided in the note below the screenshot.
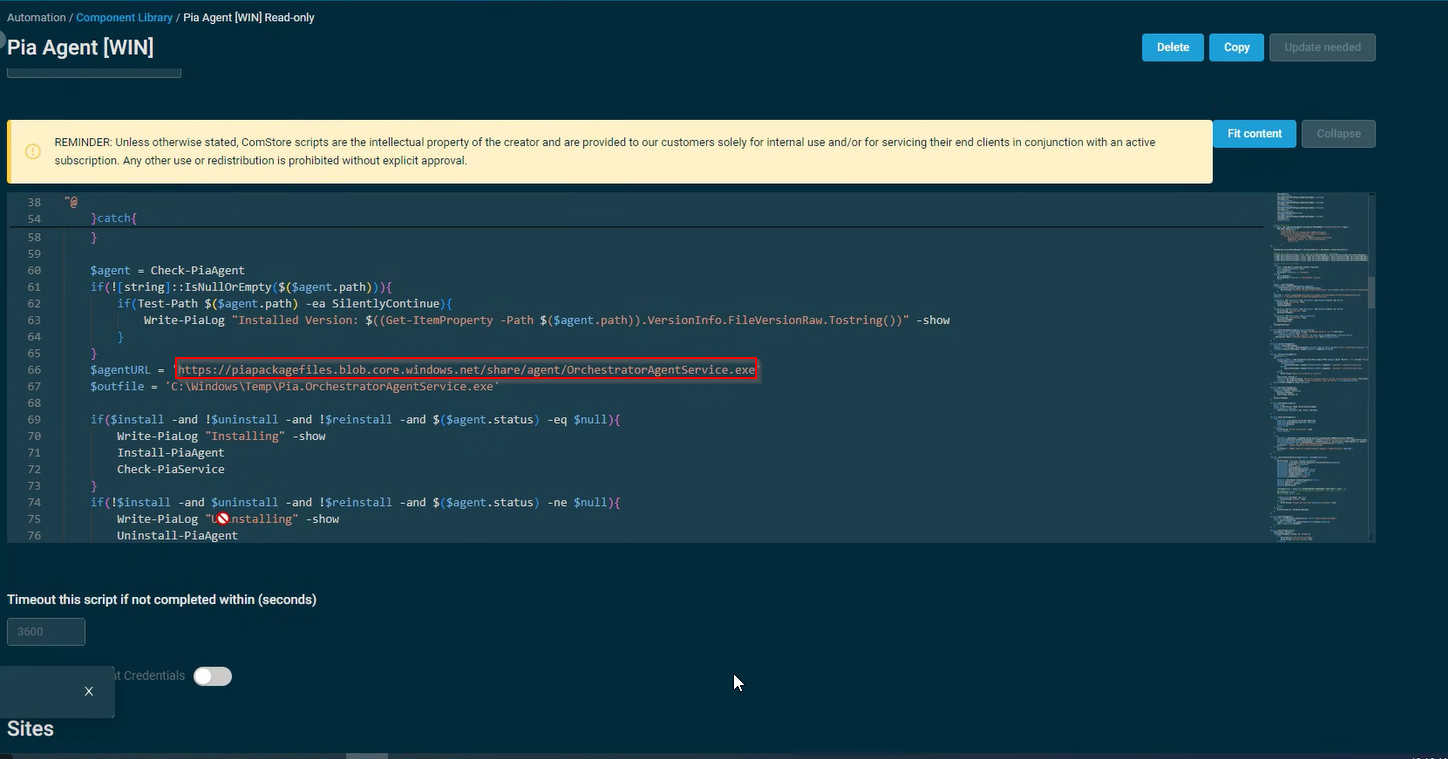
In the above screenshot, the link displayed in Statement 7 is to an Azure Blob Storage located in Australia. If you have geo-filtering enabled and are in the United States, we have the following US Azure Storage Blob which is hosted locally that you can utilise:
https://piatenantadminprodus.blob.core.windows.net/piareleases/Pia.OrchestratorAgentService.exe
Replace the link in Statement 7 of the screenshot with the above link if you are in United States.
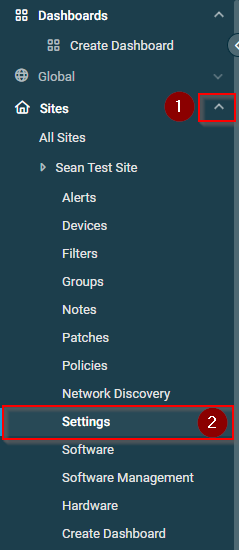
- From the left hand menu, expand "Sites" and then under each site you intend to deploy the Pia Agent to, click on "Settings".
- In the main section of the page, navigate down to the "Variables" section.
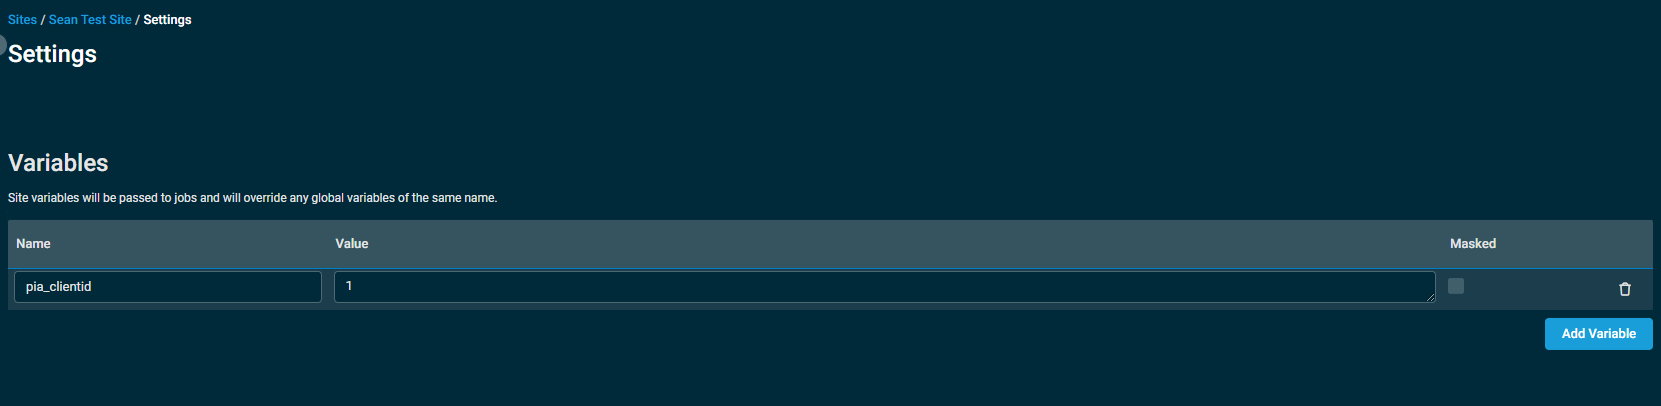
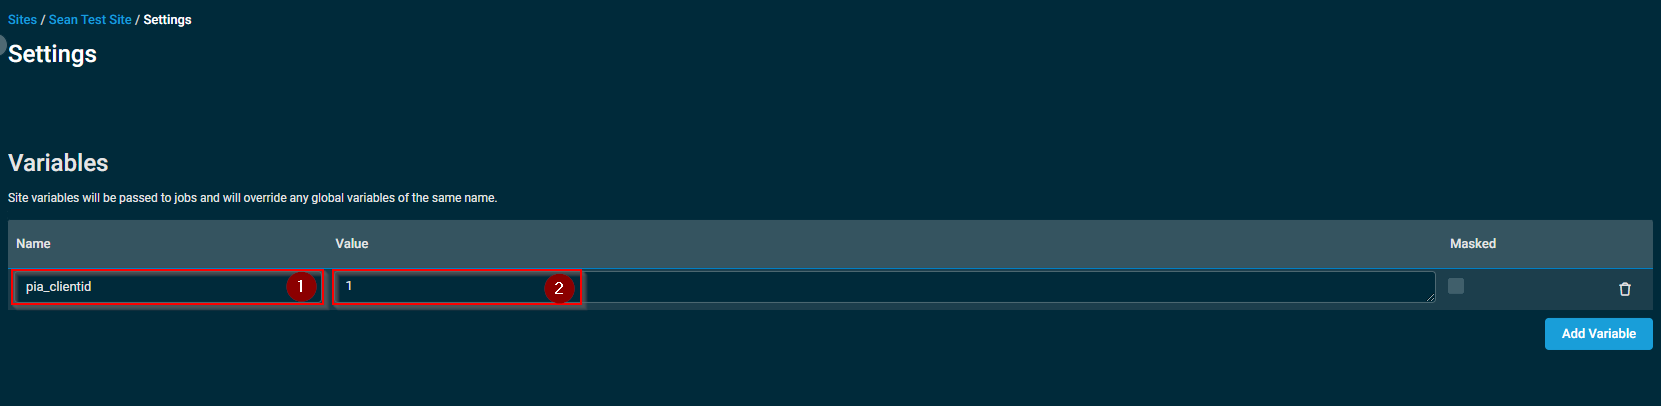
- Create a new Variable called "pia_clientid" and the Value will be the Client's Pia Client ID from the Pia Portal.
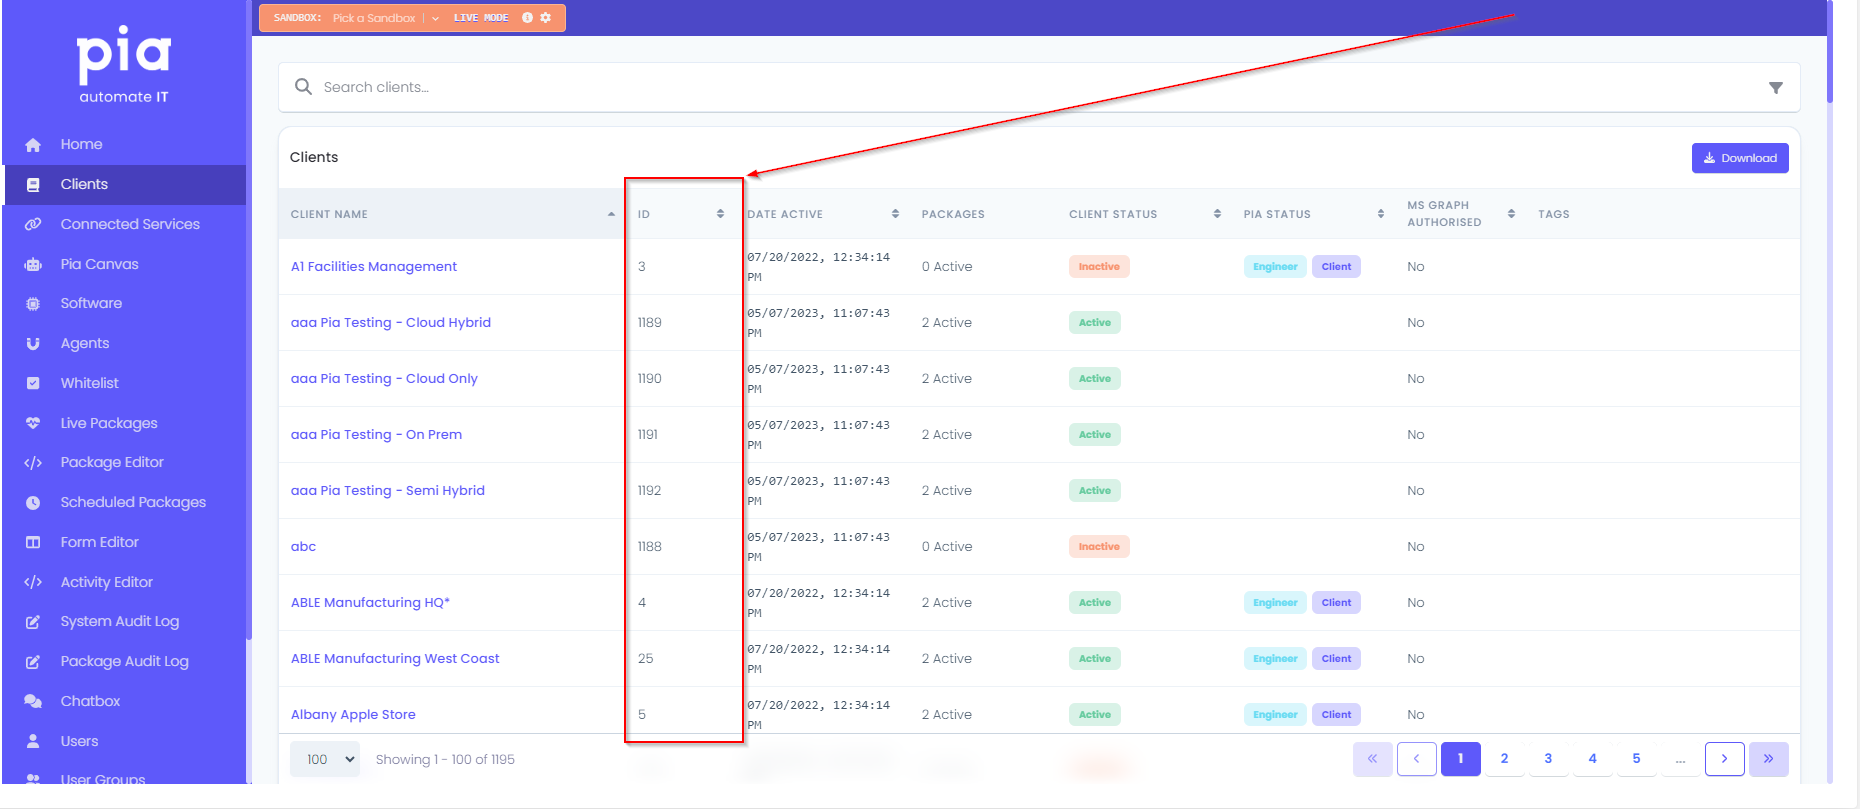
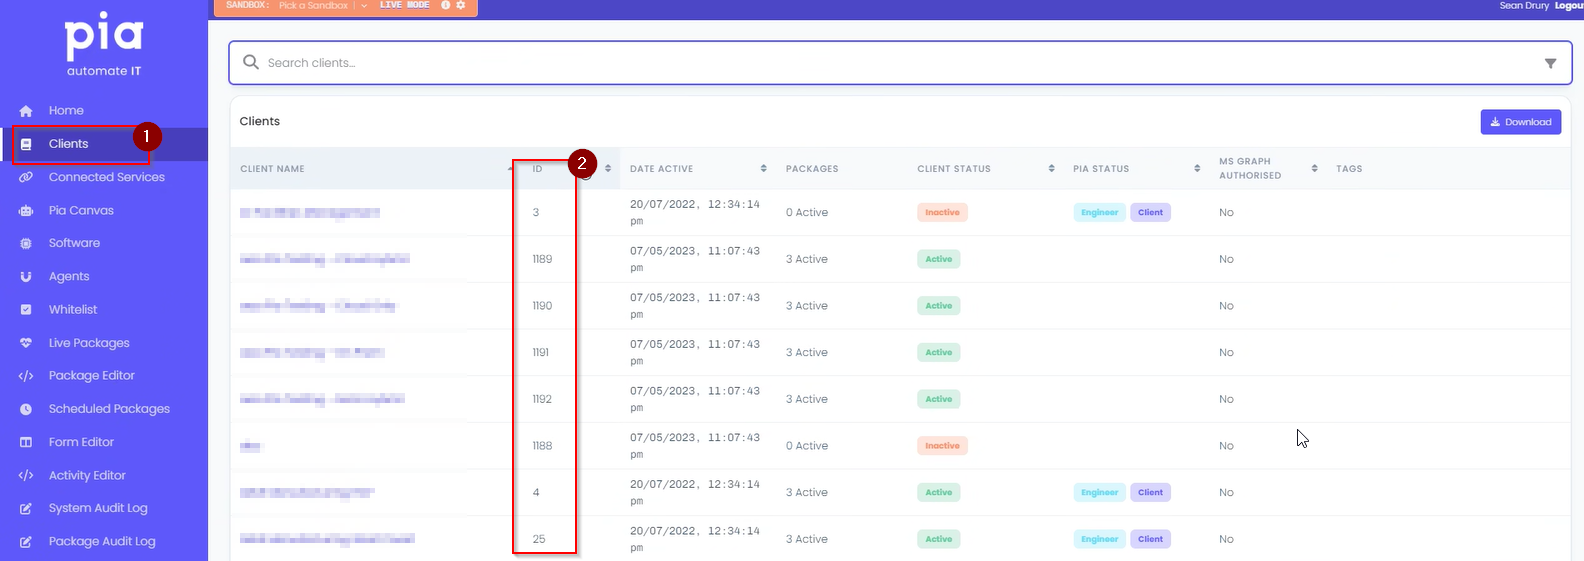
To find your list of Pia Client IDs, log into the Pia Portal, click on "Agents" and review the "ID" column. Example below:
- Click "Save Site" at the bottom of the Settings screen to save the Variable.

Repeat Steps 7 through 10 until the Pia Client ID Variable has been defined for all Sites/Clients you intend to deploy the Pia Agent to.
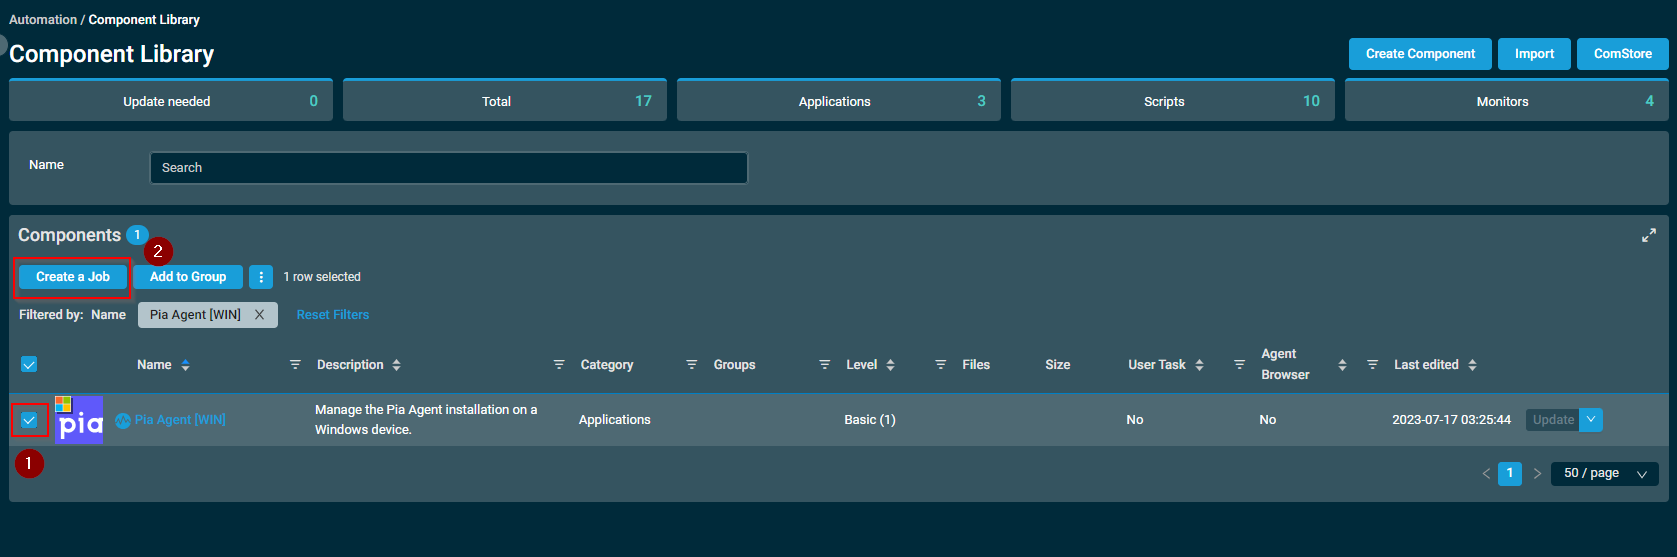
From the left hand menu, expand "Automation" and select "Components".

- Tick the checkbox next to the "Pia Agent [WIN]" Component and then click on "Create a Job".
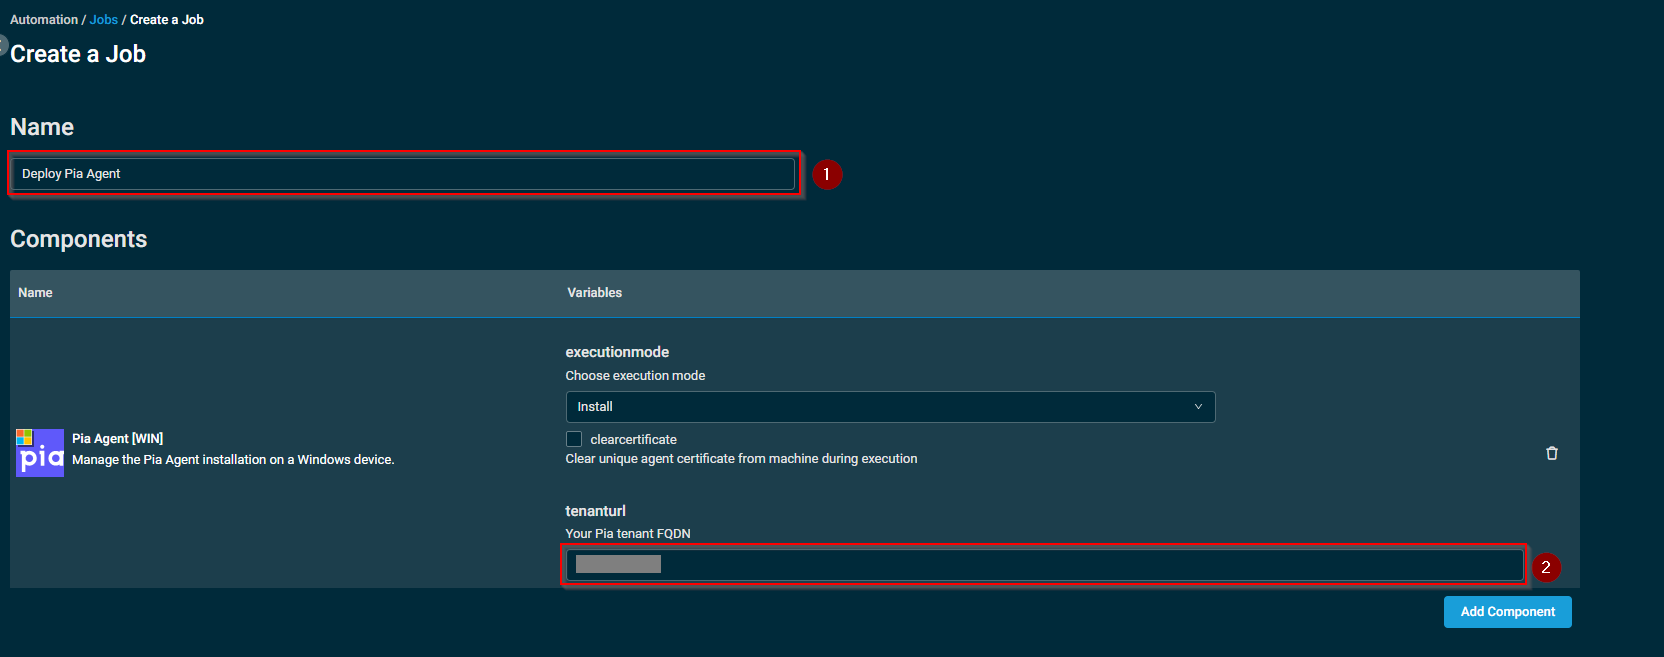
- Enter a Name for the job and Your Pia Tenant FQDN into the tenanturl Variable field.
- Click on "Add Target" under the Targets section.
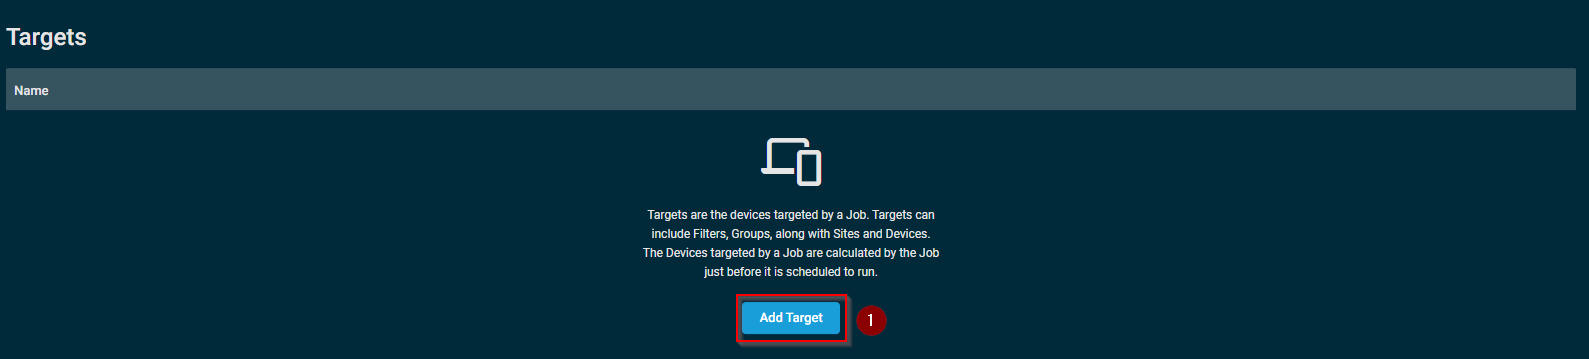
- From the dropdown, select if you wish to deploy using Device Filters, Device Groups, Site Groups, Sites or Devices and then click on "Add" next to the applicable items.

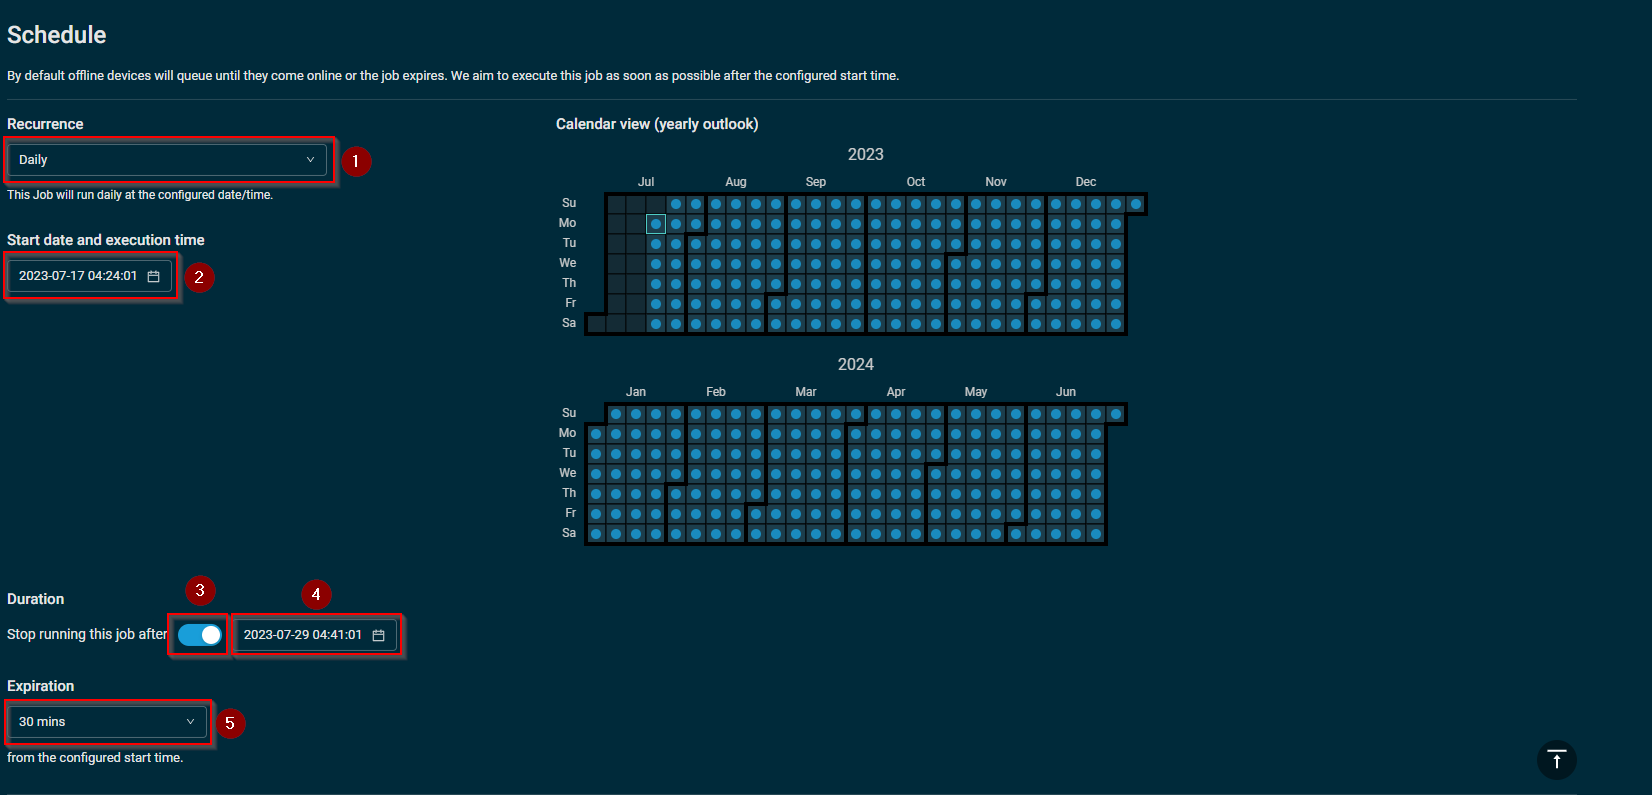
- Set the Recurrence to "Daily". Set the date you want the job to Start, and the execution time you wish for it to run at each occurrence. Duration should be set to stop running approximately 2 weeks from the Start date (2 weeks should be adequate to catch devices as they check in) and, finally an expiration of 30 mins for the execution.
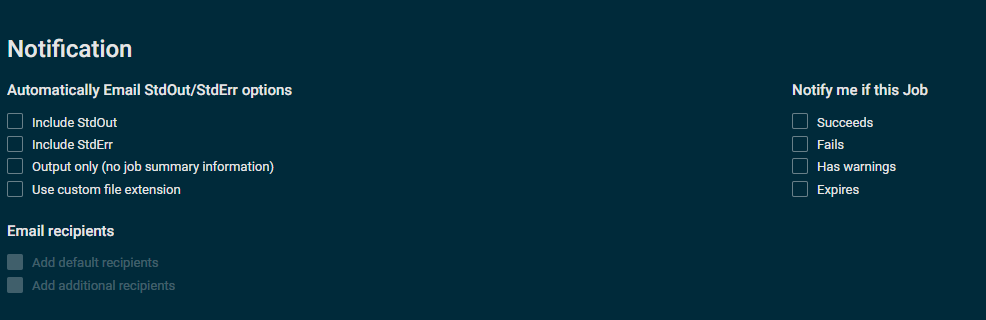
- For Notifications, these are optional, we recommend enabling notifications for "Fails" with the "Include StdErr" output.
- Leave the Execution as the system account and click "Create Job".

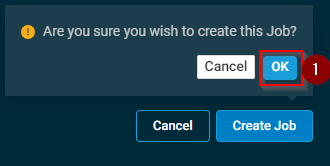
- Click OK to confirm the job.
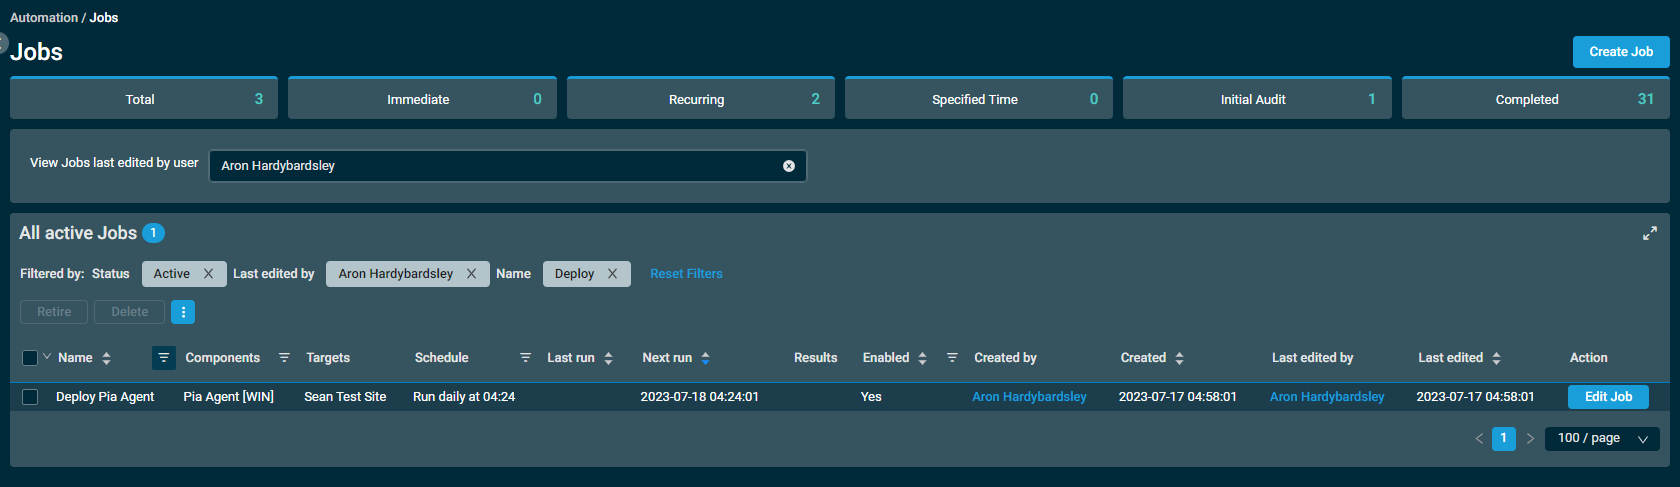
 22. Underneath the Jobs section, you will find the newly created job.
 23. Wait for the job to run on schedule and review the results. If working as expected, the endpoints should appear in the Agents page in the Pia Portal.
You can download the script package from here:
https://piavideos.blob.core.windows.net/videos/Kaseya%20Procedures%20-%20Pia.zip
To accompany the script package, we have the instructional video below:
- After downloading the zip file, unzip the contents.
- Open the install and both reinstall scripts(3 scripts in total) and update the -tenantname variable. The "tenantname" variable must be replaced with the FQDN of your Pia Portal, see the screenshot below.
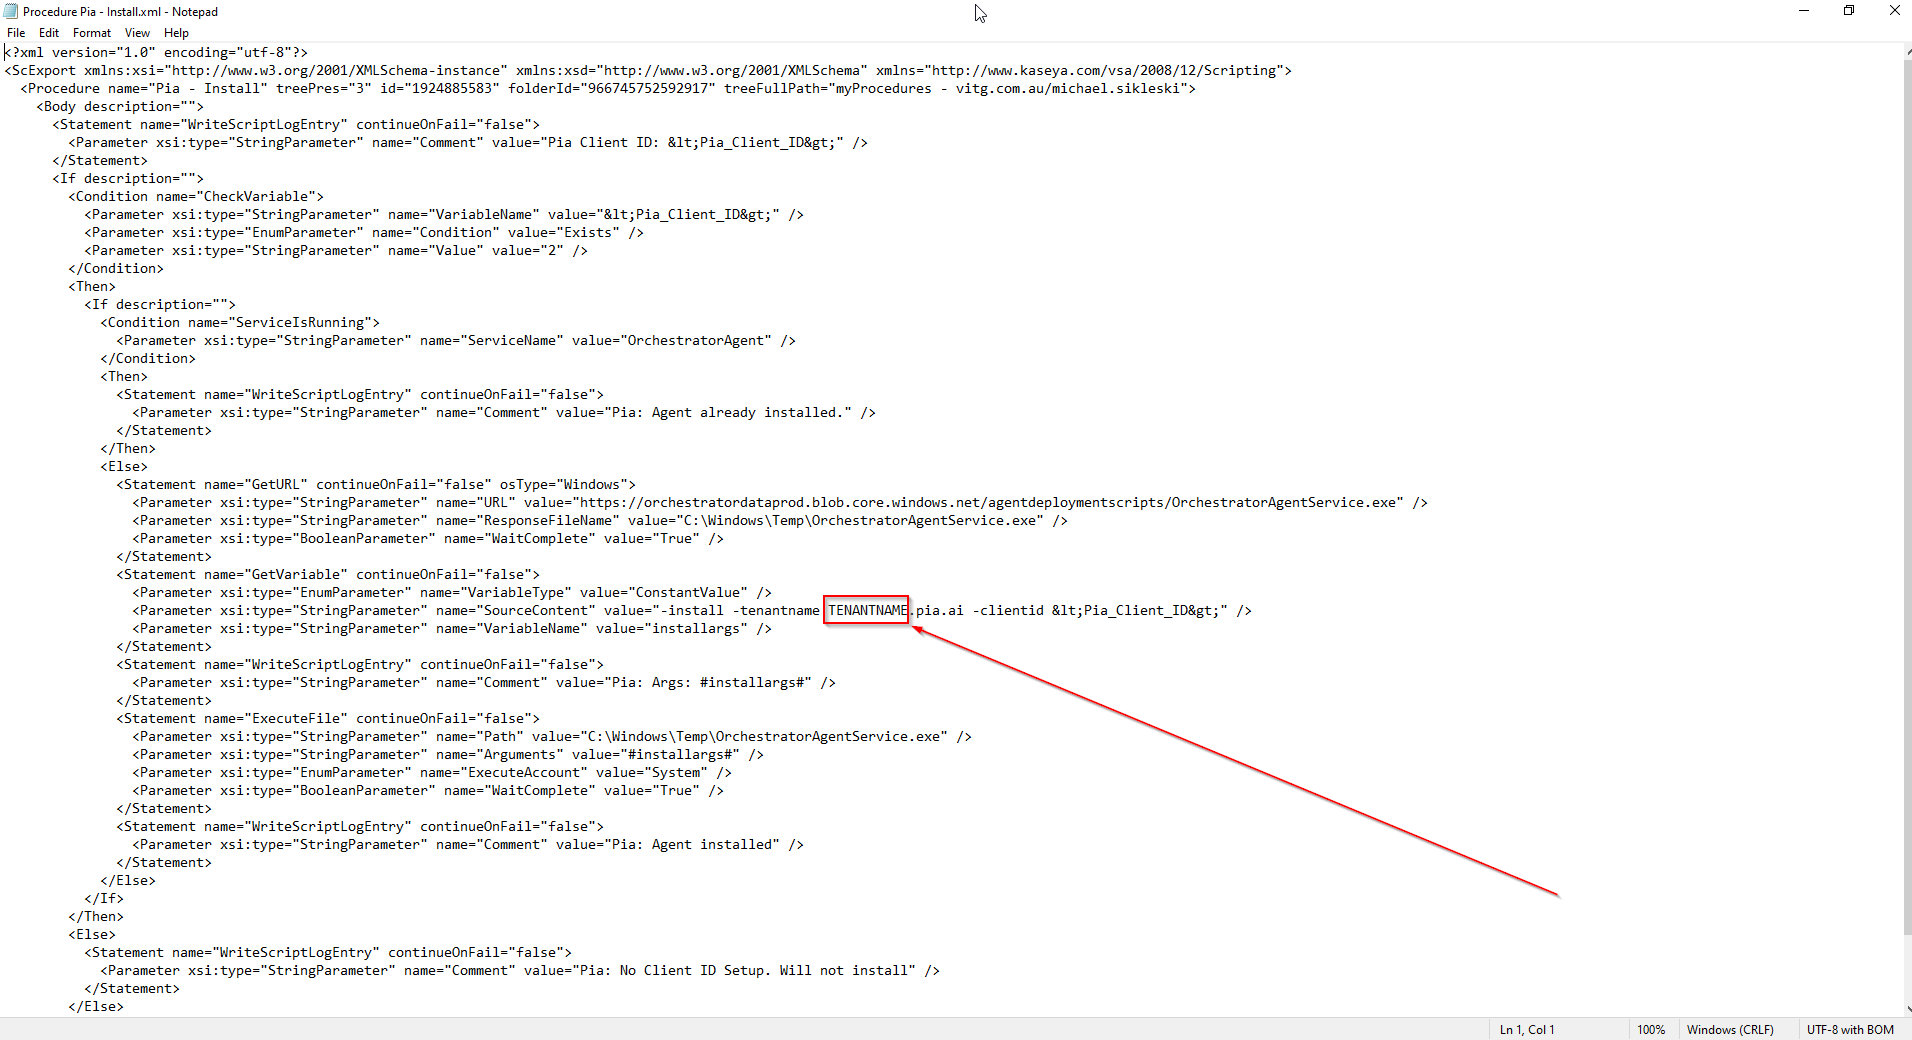
In the above screenshot, the link displayed is to an Azure Blob Storage located in Australia on the following line in the script.
<Parameter xsi:type="StringParameter" name="URL" value="
https://piapackagefiles.blob.core.windows.net/share/agent/OrchestratorAgentService.exe
"/>
If you have geo-filtering enabled and are in the United States, we have the following US Azure Storage Blob which is hosted locally that you can utilise: https://piatenantadminprodus.blob.core.windows.net/piareleases/Pia.OrchestratorAgentService.exe
Replace the link in the screenshot with the above link if you are in United States.
<Parameter xsi:type="StringParameter" name="URL" value="
https://piatenantadminprodus.blob.core.windows.net/piareleases/Pia.OrchestratorAgentService.exe
"/>
- Save all 3 scripts and import them into your Kaseya VSA.
- Follow the instructions in the video to create the Client ID variable for Pia and then mark against your Clients their Client ID.
- Schedule the install script to run against your Clients' Endpoints in Kaseya.
- After the agents have been deployed and installed, complete the following steps to activate the agents.
Agent Activation
In the Pia Portal, the Installed Agents must be manually activated before it can start communicating with Pia. Follow the steps below to learn how you can activate Pia Agents in the Pia Portal:
Go to Configuration in the left hand menu and navigate to the Agents option.
Click on the sort button in the Activated column so that you can see ALL the Agents that are installed but de-activated. You can also search for the Agent using the Search bar.
Select the Agents you wish to activate. You can also use the top-left checkbox to select All.
Click on 'Activate' button. This will activate the Agents.
Alternatively, you can follow the steps below to activate a single agent:
Click on the Device Name. This will open up additional options for the device
The Activated drop-down will have two options. Select "Activated" option
Click on "Save Details" button
Uninstalling and Reinstalling
Uninstall and reinstall scripts have been provided. For the reinstall script, there are two options, a standard reinstall script and another which also clears the certificate. Unless advised by Pia Support, we recommend using the script which doesn't clear the certificate. These can simply be run on an endpoint inside Kaseya, same as any standard script.
Follow the steps below to create an automation policy for agent deployment via N-Central.
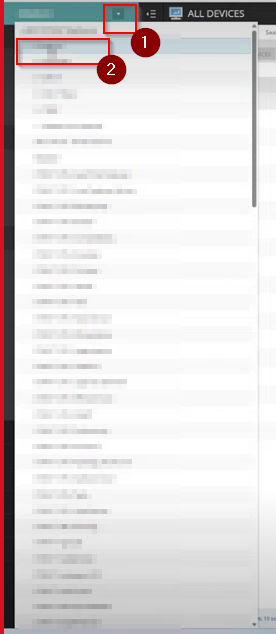
Step 1: Log into N-Central RMM and Click on the drop-down menu in the left hand panel to choose your service organisation from the list.
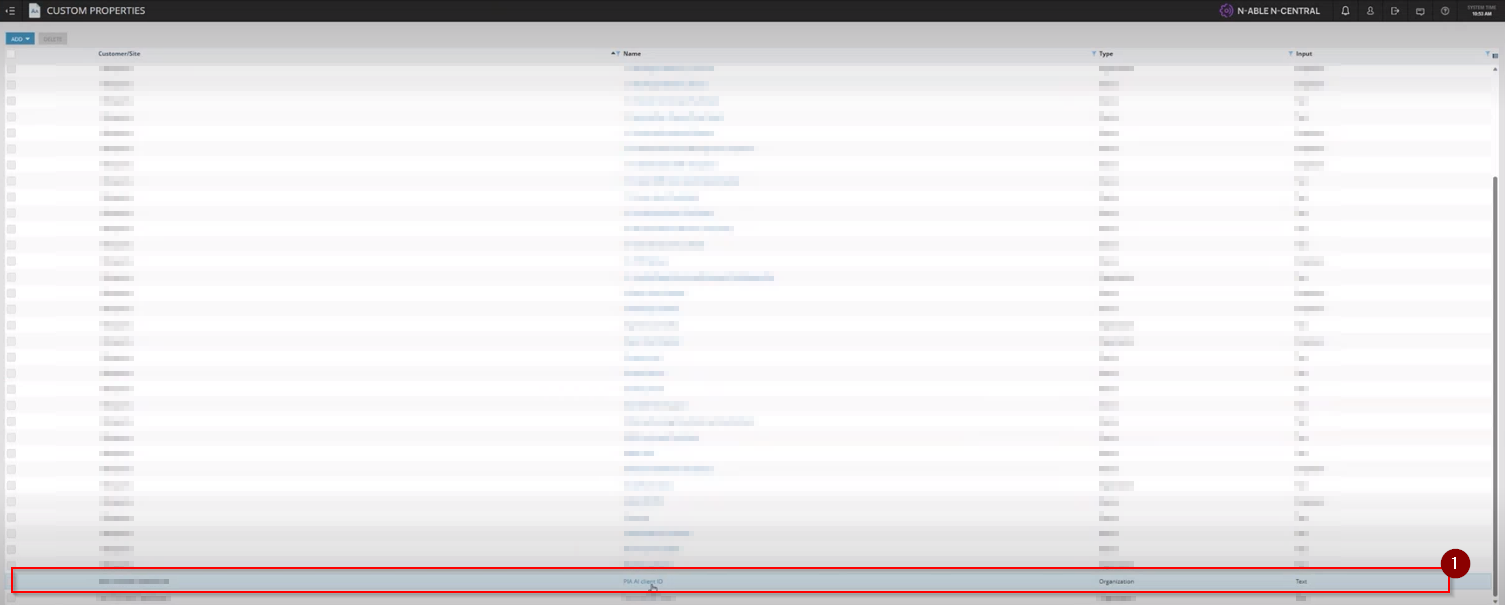
Step 2 : Once the orgnaisation is selected, choose 'custom properties' from under the Administration section on the left hand menu.
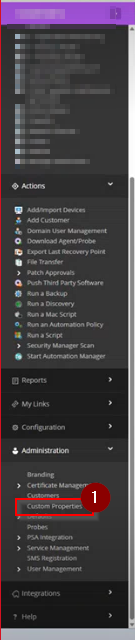
This will open the custom properties screen for the organisation you have selected.
Step 3: On this page, click on 'Add' drop-down and select 'By Customer'.
You will get five options, select 'Text Type'.

This will take you to another page where you can set Property Detail Type.
Step 4: In this screen, make the following changes:
- Set the Property Name as 'PiaID'
- For the propagation dropdown for customers, select 'Propagate to all new Service Organisations/Customers/Sites'
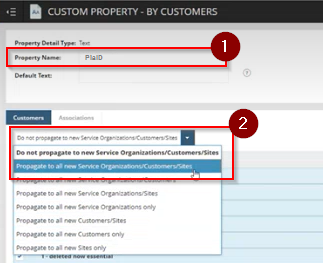
Click on the 'Save' button at the bottom of the page once you have made the changes.
Step 5: Once done, Click on the drop-down menu in the left hand panel to choose your client to define their Pia Id.
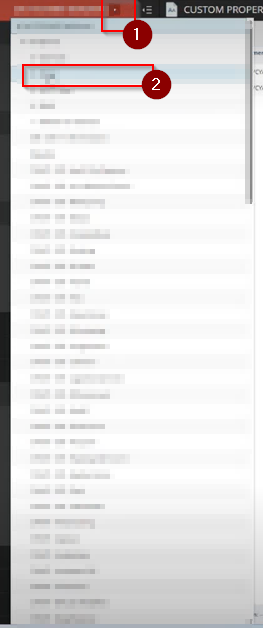
Step 6: Select Custom Properties for the client from under the Administration section on the left hand menu.
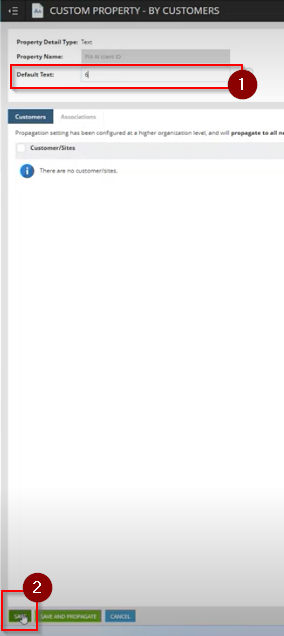
Step 7: From the list of custom properties, click on the 'PiaID' custom property.
Step 8: Next, log into your Pia Tenant Portal and find the Client Id of the selected client in the Clients screen.
Step 9: Back to the custom property screen, update the value for the 'Default Text' field to be the Pia Client Id.
Click on the 'Save' button.
Step 10: Repeat Step 5 through Step 9 to make changes for all the clients you want to deploy the Pia Agent to.
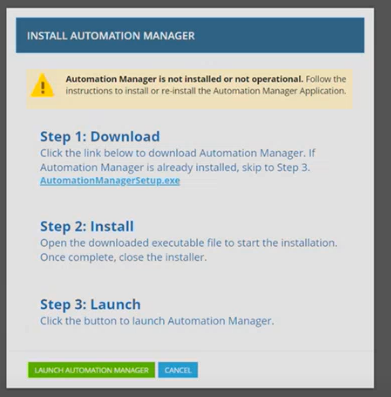
Step 11: Once done, click on the 'Start Automation Manager' option from the left hand menu under the 'Actions' section.
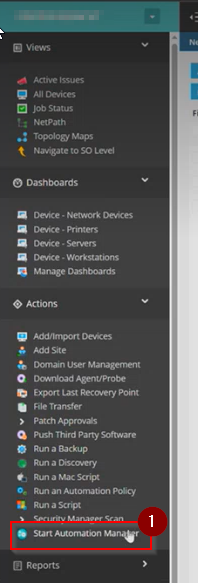
If you do not have the Automation Manager installed , follow the steps in the pop-up message. If you do have the Automation Manager installed, simply click on the 'Launch Automation Manager' button.
Step 12: Once the Automation Manager has started, click on the 'New Policy' button in the Automation Manager.
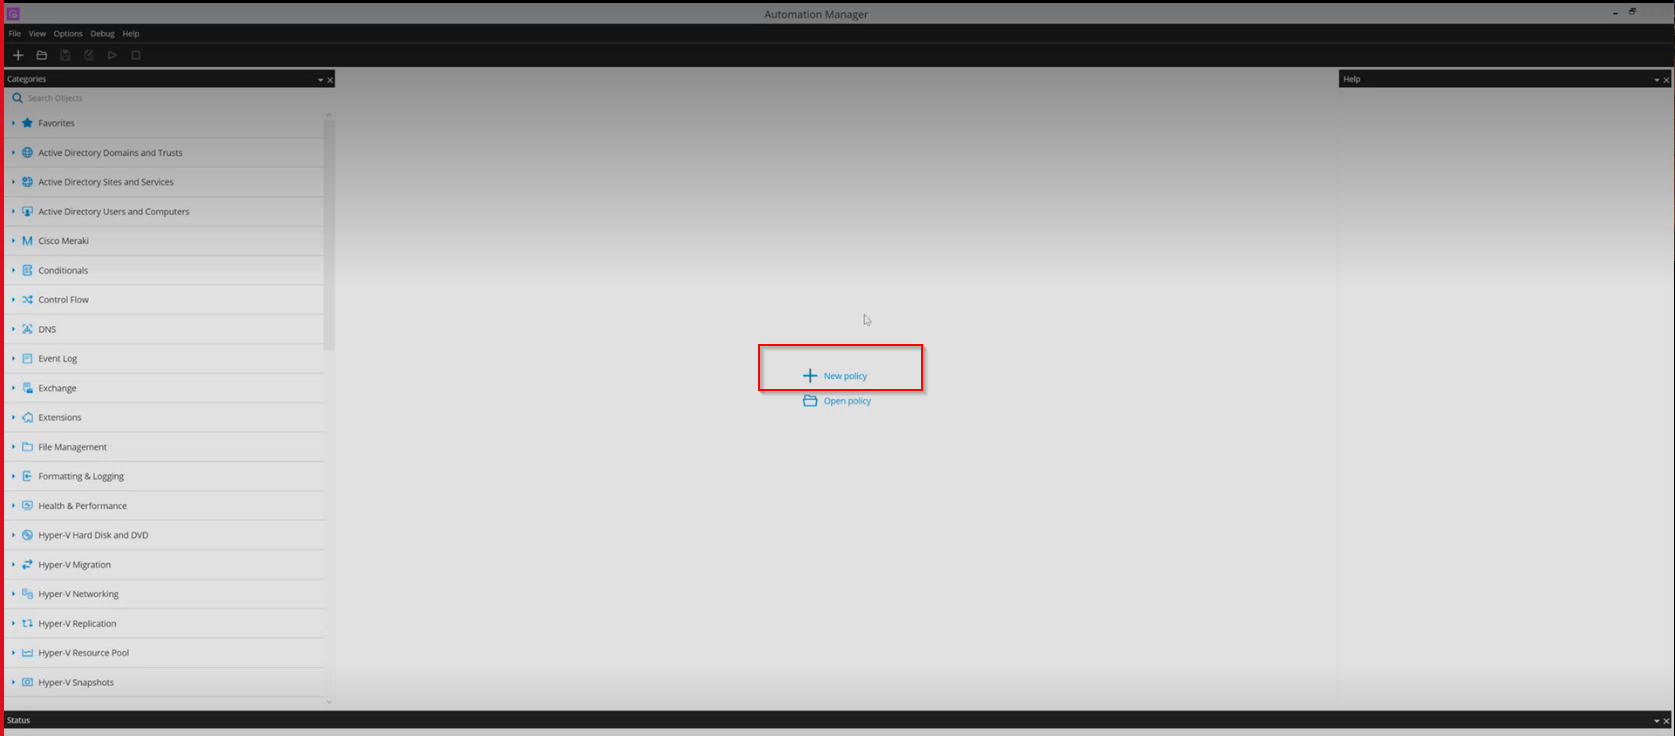
A pop-up will be displayed.
Step 13: Add the 'Name'and 'Description' for the new policy and click on the 'OK' button.
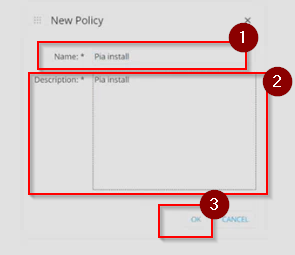
This will open up the Policy Builder.
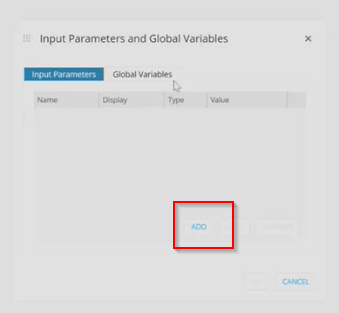
Step 14: In the Policy Builder, click on the 'INPUT' button.

This will open a pop-up to set Input Parameters and Global Variables, click on the 'Add' button
Step 15: In the New Input Parameter section, add the following details:
- Name: PiaID
- Display: PiaID
- Type: String
- Value: This can be left blank.
Click on the 'OK' button

Step 16: Navigate to the 'Search Objects' section in the left menu and search for 'If' Statement.
Drag the 'If' statement into the policy builder in between the 'Input' and 'Output' buttons.
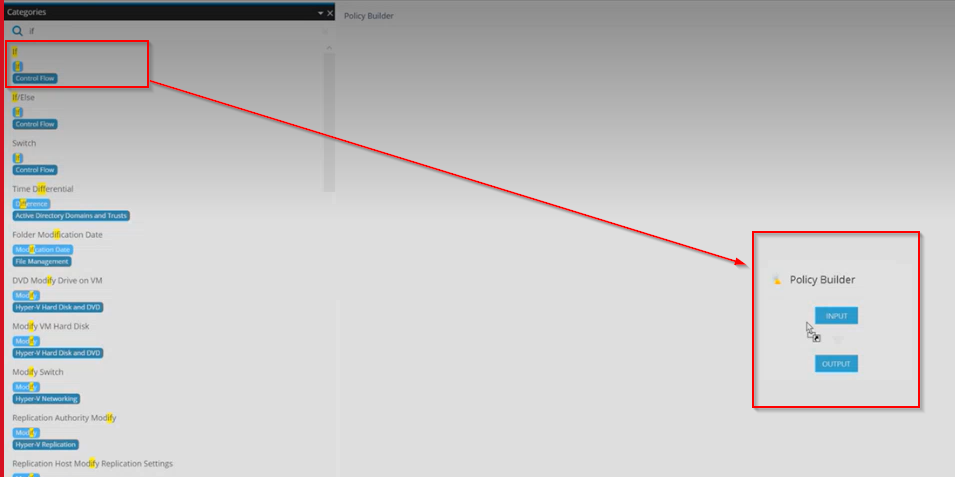
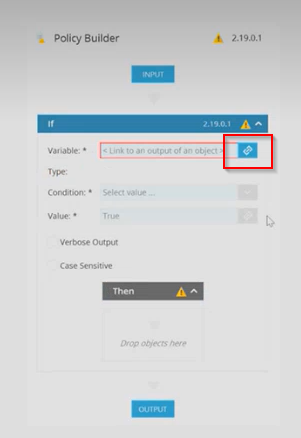
This will open a window to set parameters for the If statement.
Step 17: In the 'Variable' field, click on the link icon.
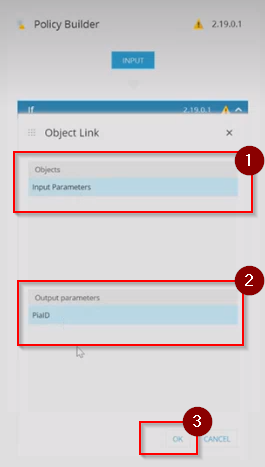
Step 18: In the object link window, click on the 'Input Parameters' in the object section and 'PiaID' in the Output Parameters and then Click 'OK'
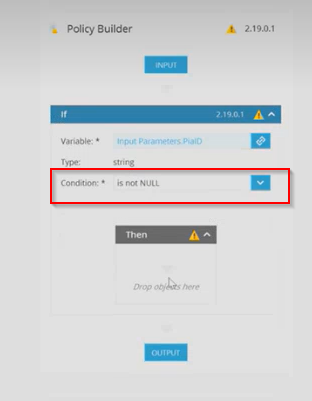
Step 19: Back to the Policy Builder, set the condition to 'is not NULL'.
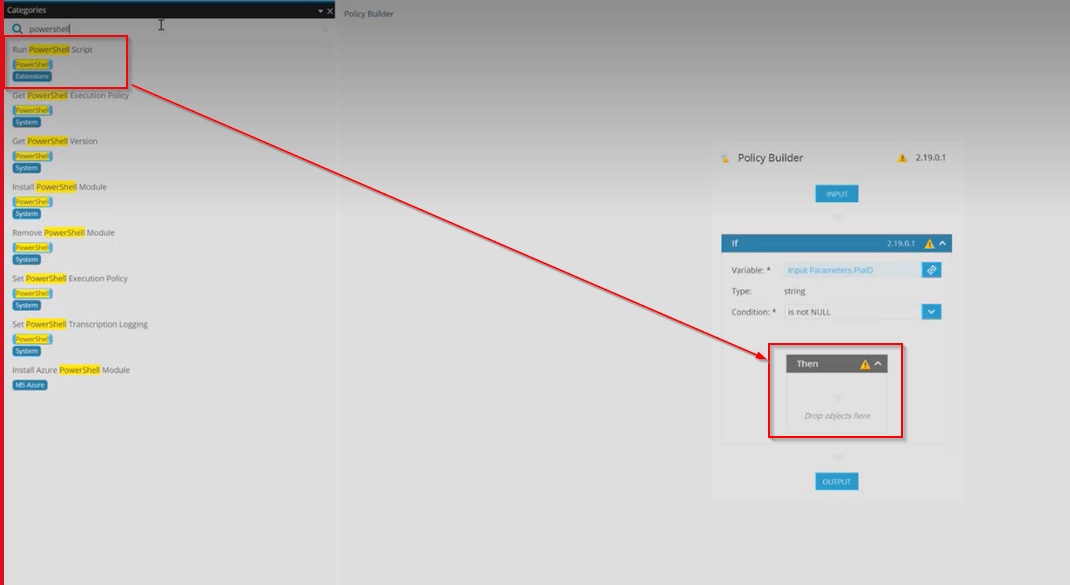
Step 20: Go to the 'Search Objects' section in the left menu again and search for 'PowerShell'.
Drag and drop the 'Run Powershell' script extension into the 'Then' section.
' '
'
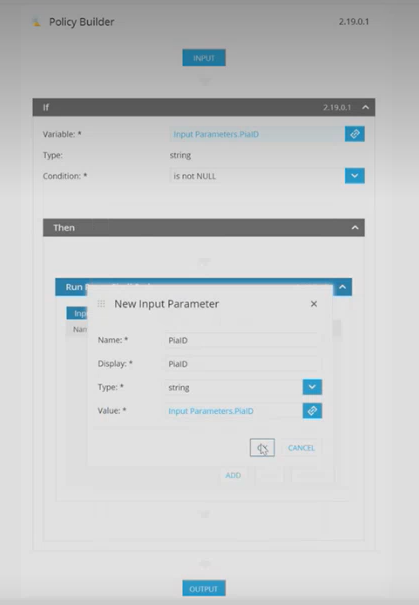
Step 21: Once done, click on the 'Add' button underneath the Input Parameters Tab for the 'Run PowerShell' object.
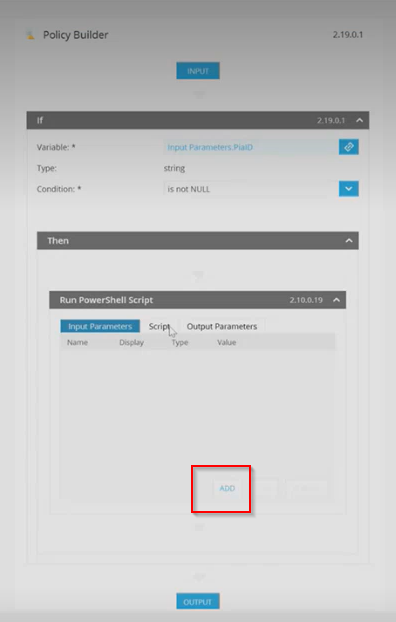
This will open a window to ser New Input Parameter.
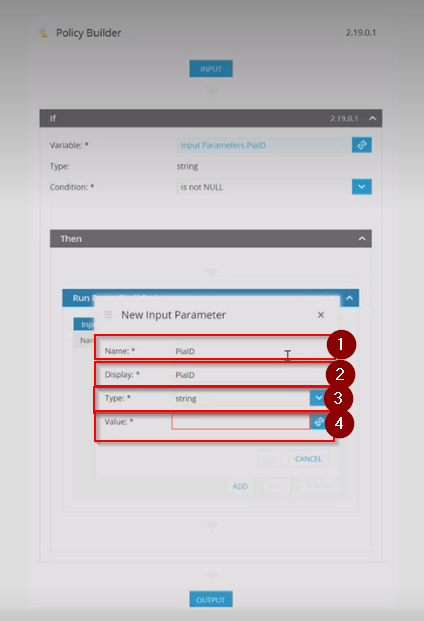
Step 22: In this window, make the following changes:
- Name: PiaID
- Display: PiaID
- Leave the Type as 'String'
- For Value, click on the link icon available in the field.
Step 23: In the Object Link window, click on 'Input Parameters' in the object section and 'PiaID' in the Output Parameters and then, Click 'OK'.
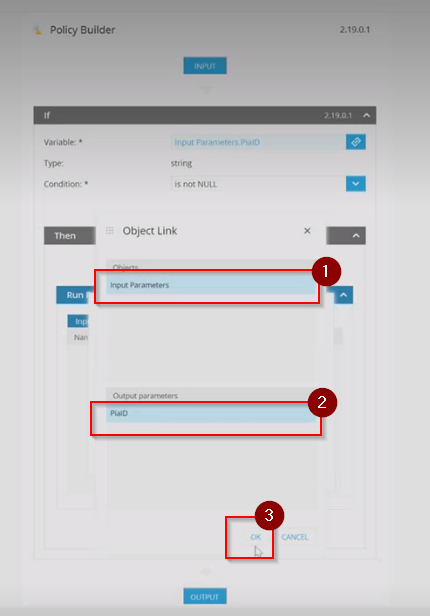
Step 24: Once done, click 'OK' in the New input Parameter window to save the changes.
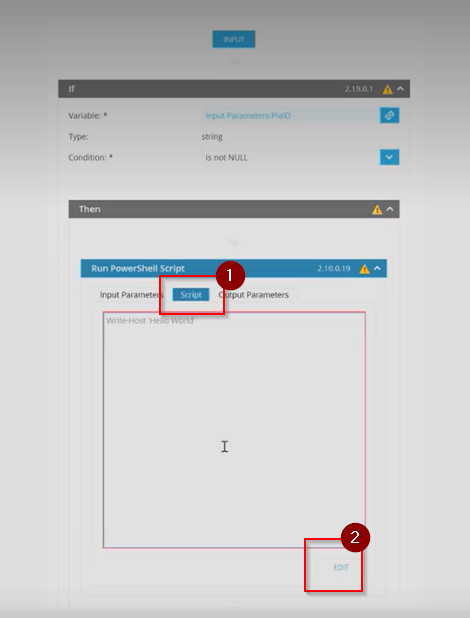
Step 25: Click on the 'Script' Tab and click the 'Edit' button
Step 26: Get a copy of the following script and paste it into the automation policy.
See more...
Function PiaAgent(){
Param(
    [Parameter(ValueFromPipelineByPropertyName = $False)]
    [AllowNull()]
    [switch]$install,
    [Parameter(ValueFromPipelineByPropertyName = $False)]
    [AllowNull()]
    [switch]$reinstall,
    [Parameter(ValueFromPipelineByPropertyName = $False)]
    [AllowNull()]
    [switch]$uninstall,
    [Parameter(ValueFromPipelineByPropertyName = $False)]
    [AllowNull()]
    [switch]$clearcert,
    [Parameter(Mandatory=$true)]
    [string]$tenanturl,
    [Parameter(ValueFromPipelineByPropertyName = $True)]
    [AllowNull()]
    [int]$clientid
)

#Ignore SSL errors
If ($Null -eq ([System.Management.Automation.PSTypeName]'TrustAllCertsPolicy').Type) {
    Add-Type -Debug:$False @"
        using System.Net;
        using System.Security.Cryptography.X509Certificates;
        public class TrustAllCertsPolicy : ICertificatePolicy {
            public bool CheckValidationResult(
                ServicePoint srvPoint, X509Certificate certificate,
                WebRequest request, int certificateProblem) {
                return true;
            }
        }
"@
}
[System.Net.ServicePointManager]::CertificatePolicy = New-Object TrustAllCertsPolicy
#Enable TLS, TLS1.1, TLS1.2, TLS1.3 in this session if they are available
IF([Net.SecurityProtocolType]::Tls) {[Net.ServicePointManager]::SecurityProtocol=[Net.ServicePointManager]::SecurityProtocol -bor [Net.SecurityProtocolType]::Tls}
IF([Net.SecurityProtocolType]::Tls11) {[Net.ServicePointManager]::SecurityProtocol=[Net.ServicePointManager]::SecurityProtocol -bor [Net.SecurityProtocolType]::Tls11}
IF([Net.SecurityProtocolType]::Tls12) {[Net.ServicePointManager]::SecurityProtocol=[Net.ServicePointManager]::SecurityProtocol -bor [Net.SecurityProtocolType]::Tls12}
IF([Net.SecurityProtocolType]::Tls13) {[Net.ServicePointManager]::SecurityProtocol=[Net.ServicePointManager]::SecurityProtocol -bor [Net.SecurityProtocolType]::Tls13}

    ## Test Connection to Tenant
    try{
        $test = New-Object System.Net.Sockets.TcpClient;
        $test.Connect($tenanturl, 443);
        $test.Dispose();
        Write-Host "$tenanturl is reachable"
    }catch{
        $test.Dispose()
        Write-Warning "$tenanturl is unreachable. Exiting."
        exit;
    }

    $agent = Check-PiaAgent
    if(![string]::IsNullOrEmpty($($agent.path))){
        if(Test-Path $($agent.path) -ea SilentlyContinue){
            Write-PiaLog "Installed Version: $((Get-ItemProperty -Path $($agent.path)).VersionInfo.FileVersionRaw.Tostring())" -show
        }
    }
    $agentURL = 'https://piapackagefiles.blob.core.windows.net/share/agent/OrchestratorAgentService.exe'
    $outfile = 'C:\Windows\Temp\Pia.OrchestratorAgentService.exe'

    if($install -and !$uninstall -and !$reinstall -and $($agent.status) -eq $null){
        Write-PiaLog "Installing" -show
        Install-PiaAgent
        Check-PiaService
    }
    if(!$install -and $uninstall -and !$reinstall -and $($agent.status) -ne $null){
        Write-PiaLog "Uninstalling" -show
        Uninstall-PiaAgent
    }
    if(!$install -and !$uninstall -and $reinstall){
        Write-PiaLog "Reinstalling" -show
        Reinstall-PiaAgent
        Check-PiaService
    }
    CleanUp-PiaInstall
}

Function Write-PiaLog([string]$log,[switch]$show){
    [string]$logtime = $((Get-Date -Format "[dd/MM/yyyy HH:mm:ss zz] |").ToString())
    foreach($line in $($log -split "`n")){
        if($VerbosePreference -eq 'Continue' -or $show -eq $true){Write-Host "$logtime $line"}
        Add-Content -Path "C:\Windows\Temp\pia_agent.log" -Value "$logtime $line"
    }
}

Function Install-PiaAgent(){
    $result = Download-PiaAgent
    $exeArgs = if(![string]::IsNullOrEmpty($clientid) -and $clientid -ne 0){"-install -tenantname $tenanturl -clientid $clientid"}else{"-install -tenantname $tenanturl"}
    if($result){Launch-Executable -exepath $outfile -arguments $exeArgs}
}

Function Uninstall-PiaAgent(){
    [int]$retry = 0
    do{
        $agent.path = $agent.path.replace("`"","")
        $PiaServicePath = (Get-ChildItem $(Join-Path $(Split-Path $($agent.path) -Parent) "\*") -Include "*Orchestrator.AgentServiceInstaller.exe").FullName
        if(Test-Path $PiaServicePath){
            if($clearcert){
                Launch-Executable -exepath $PiaServicePath -arguments '-uninstall -clearcertificate true'
            }else{
                Launch-Executable -exepath $PiaServicePath -arguments '-uninstall -clearcertificate false'
            }
        }else{
            Write-PiaLog "Agent not installed to uninstall"
        }
        Start-Sleep -Seconds 5
        if($retry -eq 3){Write-PiaLog "Failed to uninstall after 3 retries. Force Closing the Agent.";End-PiaServiceExe;}
        if($retry -eq 10){Write-PiaLog "Failed to uninstall after 10 retries"; break;}else{$retry++}
    }while((Check-PiaAgent).status -ne $null)
}

Function Reinstall-PiaAgent(){
    $result = Download-PiaAgent
    if($($agent.status) -ne $null){
        Uninstall-PiaAgent
        Start-Sleep -Seconds 15
    }
    Install-PiaAgent
}

Function End-PiaServiceExe(){
    $procs = @()
    $procs += Get-Process -Name Pia.OrchestratorAgent
    foreach($proc in $procs){
        Stop-Process -Id $($proc.Id) -Force | Out-Null
    }
}

Function Download-PiaAgent(){
    try{
        $webclient = New-Object System.Net.WebClient
        $webclient.DownloadFile($agentURL, $outfile)
        $webclient.Dispose()
        return $true;
    } catch {
        Write-PiaLog "Failed to download." -show
        return $false;
    }
}

Function Launch-Executable([string]$exepath, [string]$arguments){
    try{
        Write-PiaLog "Launching: $exepath $arguments"
        $processInfo = new-Object System.Diagnostics.ProcessStartInfo($exepath);
        $processInfo.Arguments = $arguments;
        $processInfo.Verb = 'RunAs'
        $processInfo.CreateNoWindow = $true;
        $processInfo.RedirectStandardOutput = $true;
        $processInfo.RedirectStandardError = $true;
        $processInfo.UseShellExecute = $false;
        $processInfo.LoadUserProfile = $false;
        $processInfo.WindowStyle = 'Hidden';

        $process = New-Object System.Diagnostics.Process
        $process.StartInfo = $processInfo
        $process.Start() | Out-Null
        $process.WaitForExit()

        [string]$output = $($process.StandardOutput.ReadToEnd().ToString()) -split "`n"
        #[string]$error = $($process.StandardError.ReadToEnd().ToString()) -split "`n"
        Write-PiaLog $output
        #Write-PiaLog $error -show

        if($($process.ExitCode) -eq '0'){
            Write-PiaLog "Success" -show
        } else {
            Write-PiaLog "Failed with Exit Code $($process.ExitCode)" -show
        }
        return;
    } catch {
        Write-PiaLog $($_.Exception.Message)
    }
}

Function Check-PiaAgent(){
    $Service = Get-WmiObject Win32_Service -Filter "Name='OrchestratorAgent'"
    return [pscustomobject]@{
        status = if($($Service.State)){$($Service.State)}else{$null}
        path = $($Service.PathName)
    }
}

Function Check-PiaService(){
    Start-Sleep -Seconds 3
    if((Check-PiaAgent).status -eq 'Stopped'){
        try{
            Start-Service 'OrchestratorAgent'
            Write-PiaLog "Service started" -show
        } catch {
            Write-PiaLog "Failed to start service" -show
        }
    }
}

Function CleanUp-PiaInstall(){
    if(Test-Path $outfile){
        Remove-Item $outfile -Force
    }
}


PiaAgent -install -clientid <clientid> -clearcert -tenanturl '<partnername>.pia.ai' -Verbose
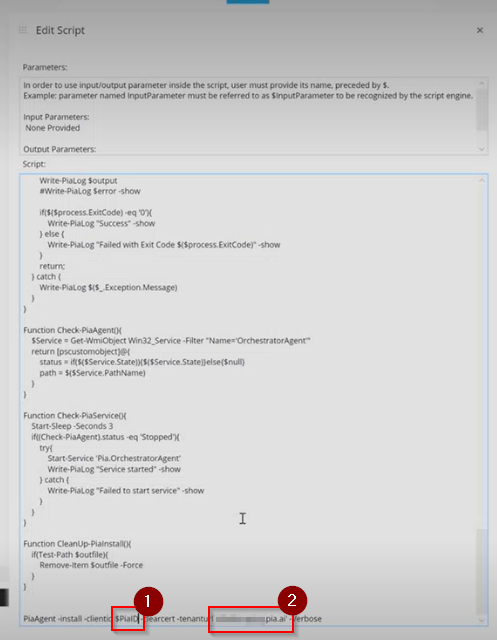
Step 27: Go to the bottom line of the script and modify the following:
- Set the variable for the ClientId to be the same as your input parameter ($PiaID is used in the tutorial screenshots as an example)
- Add your Pia Tenant FQDN into the tenant url field and leave the single quotations around the FQDN (example 'microsoft.pia.ai')
In the script, the URL displayed is to an Azure Blob Storage located in Australia. If you have geo-filtering enabled and are in the United States, we have the following US Azure Storage Blob which is hosted locally that you can utilise:
https://piatenantadminprodus.blob.core.windows.net/piareleases/Pia.OrchestratorAgentService.exe
Replace the $agentURL in the script with the above URL if you are in the United States.
Click 'OK' once you are done.
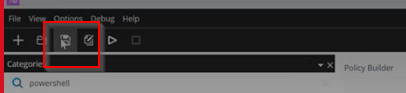
Step 28: Click on the 'Save' button at the top left to save the automation policy to your machine.
Step 29: Select the 'Script/Software Repository' option available under the Configuration section in the left hand menu.
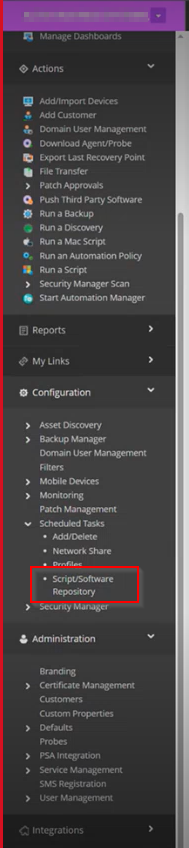
This will open up the Script/Software Repository screen.
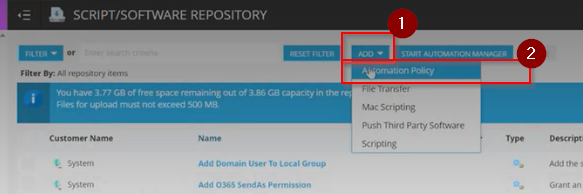
Step 30: In the Script/Software Repository screen, click on the Add Drop-down and select 'Automation Policy'.
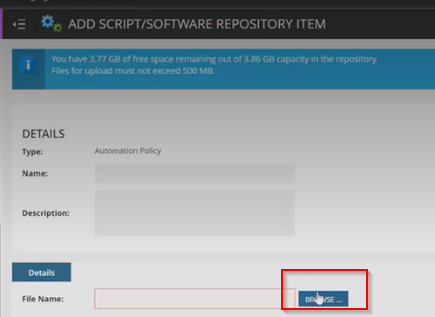
Step 31: Under the Details section, click on the 'Browse' button available in the File Name field to search for the Automation Policy saved in your machine.
This will open up the file explorer where you can Search for the required file and select it.
Step 32: Once the file has been selected, Click on 'Save' to save your changes.
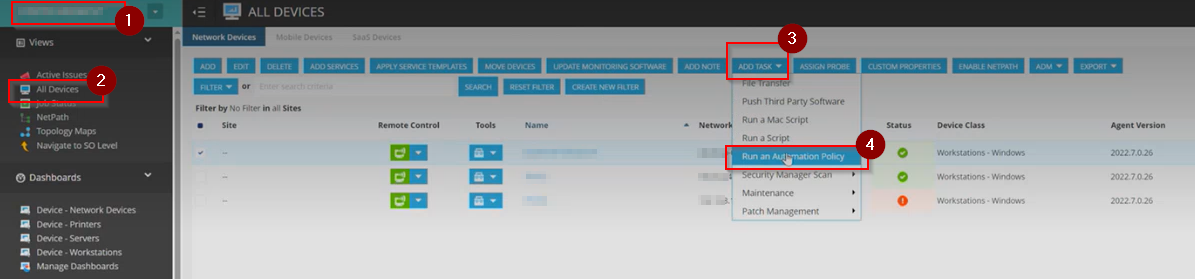
Step 33: Navigate to the client you want to deploy the Agent to by clicking on the drop-down at the top left corner and select 'All Devices' option from the menu.
In the device list, select the ones you wish to have the Pia Agent deployed to and select the Add Task > Run an Automation Policy option from the menu.
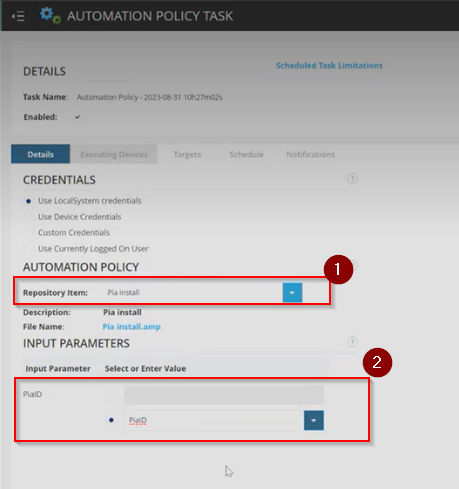
Step 34: In the Automation Policy Task screen, go to the 'Details' Tab.
In this Tab, make the following changes:
- Automation Policy Section: In the Repository Item dropdown, select 'Pia Install'
- Input Parameter Section: Click on the 'Select a Property' radio button which will open up a drop-down.
- From the drop-down, select PiaID property under the Organisation section.
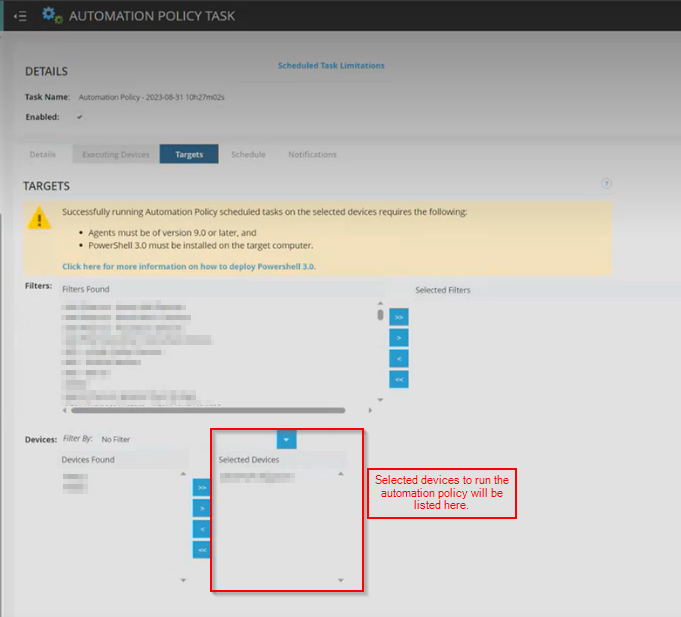
Step 35: Go to the Targets Tab.
Here, the devices you selected in the previous step should already be shown in the list.
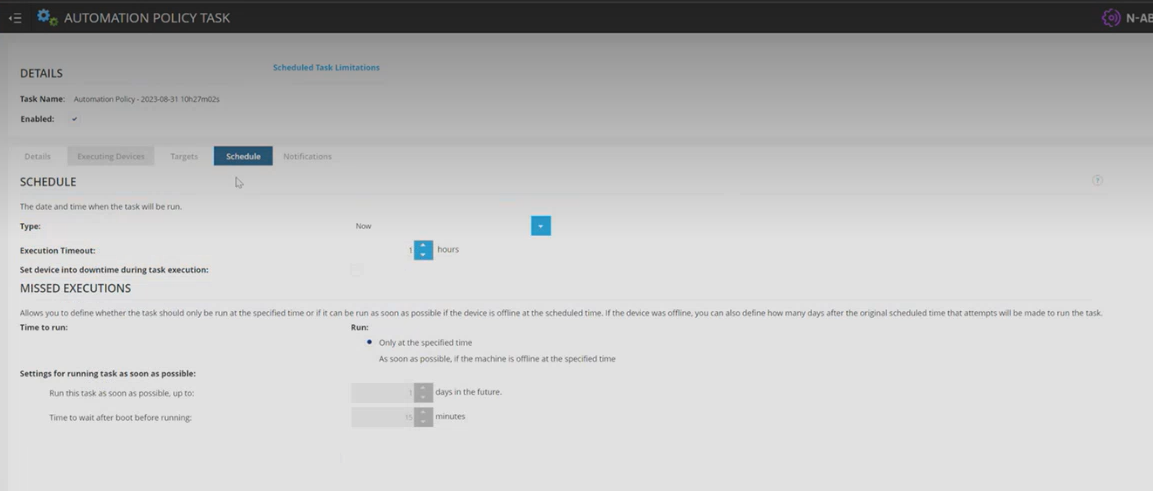
Step 36: At this point, No changes is required on the Schedule Tab as it will be set to 'Now'.
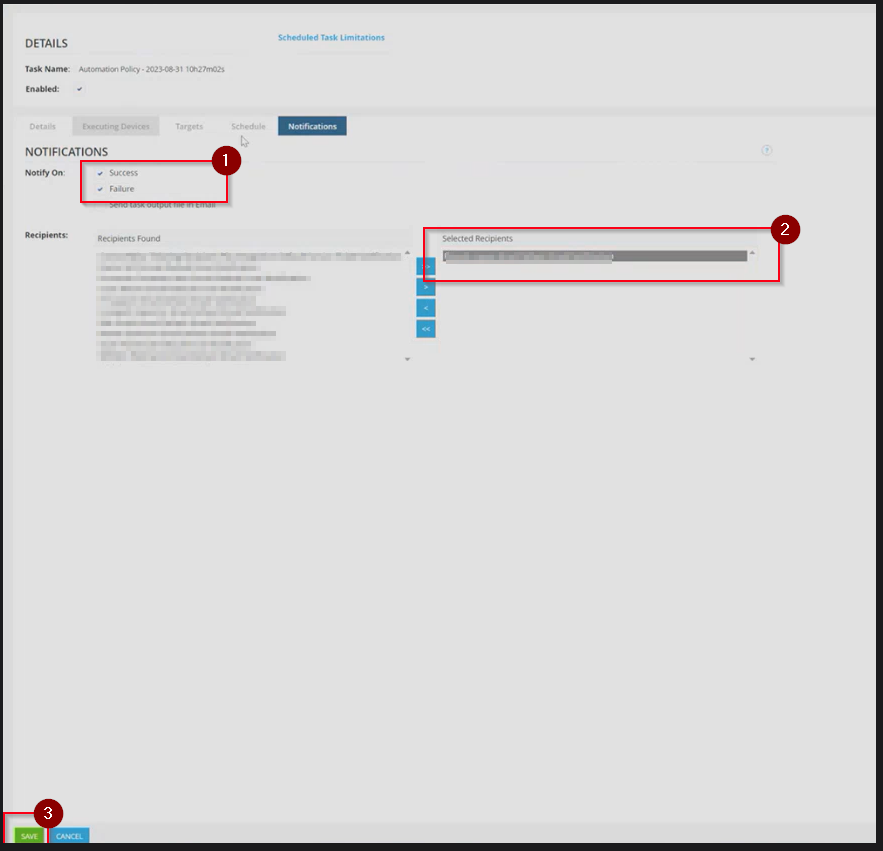
Step 37: In the Notifications Tab, make the following changes:
- Select Notify ON: Failure
We recommend turning notification on Failure but you may also want to select Notify on 'Success' as well if this is your first test of the Automation Policy and you're only deploying on few machines.
From the Recipient list, select the recipients who you'd like to be emailed with the notification.
Click 'Save' once you're done.
Step 38: Review the output of the Automation Policy and the Agents list in your Pia tenant portal to confirm that the Agent has been deployed successfully.
- To obtain the latest copy of your Pia Tenant's installer, you can download it from https://piapackagefiles.blob.core.windows.net/share/agent/OrchestratorAgentService.exe.
This download link is anonymous.
The above link is to an Azure Blob Storage located in Australia. If you have geo-filtering enabled and are in the United States, we have the following US Azure Storage Blob which is hosted locally that you can utilise:
https://piatenantadminprodus.blob.core.windows.net/piareleases/Pia.OrchestratorAgentService.exe
- The Pia Agent can be installed using the command line below
OrchestratorAgentService.exe -tenantname <tenantname> -clientId <clientid> -install
The "tenantname" variable must be replaced with the FQDN of your Pia Portal.
The "clientid" variable must be replaced with the ID Number for the Client you are configuring this installation for.
If you are attempting to create this as a script/automation package to push out to all your Clients via another RMM, you should be able to stamp a variable or custom value in most RMMs which can be pulled to ensure the agent installs against the correct Client in the Pia Portal.
- Activating the Pia Agent in the Pia Portal is the same as shown in the ConnectWise Automate steps 20-22 above.
We also have the Powershell script below which can be used for install/re-install/uninstall of the Pia Agent. The only modifications required is in the final line of the code for the following
- Which mode(install/uninstall/reinstall) you want the script to run in
- TenantURL should be set to your Pia Tenant URL(including quotations)
- Client ID should be set to the Pia Client ID of the Client you are deploying to
In the script below, the URL displayed is to an Azure Blob Storage located in Australia. If you have geo-filtering enabled and are in the United States, we have the following US Azure Storage Blob which is hosted locally that you can utilise:
https://piatenantadminprodus.blob.core.windows.net/piareleases/Pia.OrchestratorAgentService.exe
Replace the $agentURL in the script below with the above URL if you are in the United States.
Function PiaAgent(){
Param(
    [Parameter(ValueFromPipelineByPropertyName = $False)]
    [AllowNull()]
    [switch]$install,
    [Parameter(ValueFromPipelineByPropertyName = $False)]
    [AllowNull()]
    [switch]$reinstall,
    [Parameter(ValueFromPipelineByPropertyName = $False)]
    [AllowNull()]
    [switch]$uninstall,
    [Parameter(ValueFromPipelineByPropertyName = $False)]
    [AllowNull()]
    [switch]$clearcert,
    [Parameter(Mandatory=$true)]
    [string]$tenanturl,
    [Parameter(ValueFromPipelineByPropertyName = $True)]
    [AllowNull()]
    [int]$clientid
)

#Ignore SSL errors
If ($Null -eq ([System.Management.Automation.PSTypeName]'TrustAllCertsPolicy').Type) {
    Add-Type -Debug:$False @"
        using System.Net;
        using System.Security.Cryptography.X509Certificates;
        public class TrustAllCertsPolicy : ICertificatePolicy {
            public bool CheckValidationResult(
                ServicePoint srvPoint, X509Certificate certificate,
                WebRequest request, int certificateProblem) {
                return true;
            }
        }
"@
}
[System.Net.ServicePointManager]::CertificatePolicy = New-Object TrustAllCertsPolicy
#Enable TLS, TLS1.1, TLS1.2, TLS1.3 in this session if they are available
IF([Net.SecurityProtocolType]::Tls) {[Net.ServicePointManager]::SecurityProtocol=[Net.ServicePointManager]::SecurityProtocol -bor [Net.SecurityProtocolType]::Tls}
IF([Net.SecurityProtocolType]::Tls11) {[Net.ServicePointManager]::SecurityProtocol=[Net.ServicePointManager]::SecurityProtocol -bor [Net.SecurityProtocolType]::Tls11}
IF([Net.SecurityProtocolType]::Tls12) {[Net.ServicePointManager]::SecurityProtocol=[Net.ServicePointManager]::SecurityProtocol -bor [Net.SecurityProtocolType]::Tls12}
IF([Net.SecurityProtocolType]::Tls13) {[Net.ServicePointManager]::SecurityProtocol=[Net.ServicePointManager]::SecurityProtocol -bor [Net.SecurityProtocolType]::Tls13}

    ## Test Connection to Tenant
    try{
        $test = New-Object System.Net.Sockets.TcpClient;
        $test.Connect($tenanturl, 443);
        $test.Dispose();
        Write-Host "$tenanturl is reachable"
    }catch{
        $test.Dispose()
        Write-Warning "$tenanturl is unreachable. Exiting."
        exit;
    }

    $agent = Check-PiaAgent
    if(![string]::IsNullOrEmpty($($agent.path))){
        if(Test-Path $($agent.path) -ea SilentlyContinue){
            Write-PiaLog "Installed Version: $((Get-ItemProperty -Path $($agent.path)).VersionInfo.FileVersionRaw.Tostring())" -show
        }
    }
    $agentURL = 'https://piapackagefiles.blob.core.windows.net/share/agent/OrchestratorAgentService.exe'
    $outfile = 'C:\Windows\Temp\Pia.OrchestratorAgentService.exe'

    if($install -and !$uninstall -and !$reinstall -and $($agent.status) -eq $null){
        Write-PiaLog "Installing" -show
        Install-PiaAgent
        Check-PiaService
    }
    if(!$install -and $uninstall -and !$reinstall -and $($agent.status) -ne $null){
        Write-PiaLog "Uninstalling" -show
        Uninstall-PiaAgent
    }
    if(!$install -and !$uninstall -and $reinstall){
        Write-PiaLog "Reinstalling" -show
        Reinstall-PiaAgent
        Check-PiaService
    }
    CleanUp-PiaInstall
}

Function Write-PiaLog([string]$log,[switch]$show){
    [string]$logtime = $((Get-Date -Format "[dd/MM/yyyy HH:mm:ss zz] |").ToString())
    foreach($line in $($log -split "`n")){
        if($VerbosePreference -eq 'Continue' -or $show -eq $true){Write-Host "$logtime $line"}
        Add-Content -Path "C:\Windows\Temp\pia_agent.log" -Value "$logtime $line"
    }
}

Function Install-PiaAgent(){
    $result = Download-PiaAgent
    $exeArgs = if(![string]::IsNullOrEmpty($clientid) -and $clientid -ne 0){"-install -tenantname $tenanturl -clientid $clientid"}else{"-install -tenantname $tenanturl"}
    if($result){Launch-Executable -exepath $outfile -arguments $exeArgs}
}

Function Uninstall-PiaAgent(){
    [int]$retry = 0
    do{
        $agent.path = $agent.path.replace("`"","")
        $PiaServicePath = (Get-ChildItem $(Join-Path $(Split-Path $($agent.path) -Parent) "\*") -Include "*Orchestrator.AgentServiceInstaller.exe").FullName
        if(Test-Path $PiaServicePath){
            if($clearcert){
                Launch-Executable -exepath $PiaServicePath -arguments '-uninstall -clearcertificate true'
            }else{
                Launch-Executable -exepath $PiaServicePath -arguments '-uninstall -clearcertificate false'
            }
        }else{
            Write-PiaLog "Agent not installed to uninstall"
        }
        Start-Sleep -Seconds 5
        if($retry -eq 3){Write-PiaLog "Failed to uninstall after 3 retries. Force Closing the Agent.";End-PiaServiceExe;}
        if($retry -eq 10){Write-PiaLog "Failed to uninstall after 10 retries"; break;}else{$retry++}
    }while((Check-PiaAgent).status -ne $null)
}

Function Reinstall-PiaAgent(){
    $result = Download-PiaAgent
    if($($agent.status) -ne $null){
        Uninstall-PiaAgent
        Start-Sleep -Seconds 15
    }
    Install-PiaAgent
}

Function End-PiaServiceExe(){
    $procs = @()
    $procs += Get-Process -Name OrchestratorAgent
    foreach($proc in $procs){
        Stop-Process -Id $($proc.Id) -Force | Out-Null
    }
}

Function Download-PiaAgent(){
    try{
        $webclient = New-Object System.Net.WebClient
        $webclient.DownloadFile($agentURL, $outfile)
        $webclient.Dispose()
        return $true;
    } catch {
        Write-PiaLog "Failed to download." -show
        return $false;
    }
}

Function Launch-Executable([string]$exepath, [string]$arguments){
    try{
        Write-PiaLog "Launching: $exepath $arguments"
        $processInfo = new-Object System.Diagnostics.ProcessStartInfo($exepath);
        $processInfo.Arguments = $arguments;
        $processInfo.Verb = 'RunAs'
        $processInfo.CreateNoWindow = $true;
        $processInfo.RedirectStandardOutput = $true;
        $processInfo.RedirectStandardError = $true;
        $processInfo.UseShellExecute = $false;
        $processInfo.LoadUserProfile = $false;
        $processInfo.WindowStyle = 'Hidden';

        $process = New-Object System.Diagnostics.Process
        $process.StartInfo = $processInfo
        $process.Start() | Out-Null
        $process.WaitForExit()

        [string]$output = $($process.StandardOutput.ReadToEnd().ToString()) -split "`n"
        #[string]$error = $($process.StandardError.ReadToEnd().ToString()) -split "`n"
        Write-PiaLog $output
        #Write-PiaLog $error -show

        if($($process.ExitCode) -eq '0'){
            Write-PiaLog "Success" -show
        } else {
            Write-PiaLog "Failed with Exit Code $($process.ExitCode)" -show
        }
        return;
    } catch {
        Write-PiaLog $($_.Exception.Message)
    }
}

Function Check-PiaAgent(){
    $Service = Get-WmiObject Win32_Service -Filter "Name='OrchestratorAgent'"
    return [pscustomobject]@{
        status = if($($Service.State)){$($Service.State)}else{$null}
        path = $($Service.PathName)
    }
}

Function Check-PiaService(){
    Start-Sleep -Seconds 3
    if((Check-PiaAgent).status -eq 'Stopped'){
        try{
            Start-Service 'OrchestratorAgent'
            Write-PiaLog "Service started" -show
        } catch {
            Write-PiaLog "Failed to start service" -show
        }
    }
}

Function CleanUp-PiaInstall(){
    if(Test-Path $outfile){
        Remove-Item $outfile -Force
    }
}


PiaAgent -install -clientid <clientid> -clearcert -tenanturl '<partnername>.pia.ai' -Verbose
Uninstalling and Reinstalling
Please see the command line arguments below to uninstall and reinstall the Pia Agent. With these, there are two options, a standard uninstall and reinstall command respectively and another which also clears the certificate. Unless advised by Pia Support, we recommend using the command which doesn't clear the certificate.
Powershell Script
If you are using the Powershell script above for agent installation, it can be changed to uninstall or reinstall the script via changing the "-install" argument on the last line to "uninstall" and "reinstall" respectively.
Uninstall Agent
"C:\Program Files (x86)\OrchestratorAgent\Pia.Orchestrator.AgentServiceInstaller.exe" -uninstall
Uninstall Agent(clear certificate)
"C:\Program Files (x86)\OrchestratorAgent\Pia.Orchestrator.AgentServiceInstaller.exe" -uninstall -clearcertificate true
For reinstalling, you would need to combine the un-install and install commands into a single script/automation procedure in your RMM/Deployment Method.