Making use of a Custom Integration
Once you have set up your Custom Integration, you can create an Automation with a Custom Integration.
We have a vibrant community of automation engineers (both Pia staff and other MSPs) solving the same problems as you! For examples of how to use the new Custom Integration feature, the new integration experience or to ask questions, jump on our Discord here: Discord Community.
For those of you who prefer a video guide, here we go!
Creating a Custom Automation
In the Pia Portal, in the left hand menu, select Automation > Package Editor
Following the same steps in Your First Automation. We can begin our custom automation inside our development sandbox. First starting with our example custom YAML:
# Pia Automation Package
conditions:
- name: 'client_filter'
optMode: 'OptOut'
category: 'Chat GPT'
- name: 'chat'
option_button: 'Chat GPT Completions'
option_text: 'Create an auto completion from Chat GPT'
option_category: 'Chat GPT'
steps:
- task: chat_interaction
inputs:
text: 'Enter your completion from Chat GPT'
form_name: 'chat_gpt'
form_display_mode: 'Embed'
- task: inline_powershell
inputs:
apiUrl: $i_chatgpt_api_base_url_1
apiKey: $i_chatgpt_api_key_1
message: =chat_interaction.form.prompt
script: |
$headers = @{
"Authorization" = "Bearer $apiKey"
"Content-Type" = "application/json"
}
$body = @{
model = "gpt-4o-mini"
temperature = 0.7
messages = @(
@{
role = "user"
content = $message
}
)
}
$response = Invoke-WebRequest -Uri "$apiUrl/completions" -Method POST -Headers $headers -Body $(ConvertTo-Json $body -Depth 5) -UseBasicParsing
$responseData = Convertfrom-Json $response
return @{
completion = $responseData.choices.message.content
}
- task: chat_interaction
inputs:
text: =inline_powershell.completion
The above example utilizes our new integration experience to collect stored variables and access the OpenAI API to retrieve an AI completion.
Making use of your Custom Integration Keys
If you notice within our inline_powershell task in our above example, we are referring to the following 2 variables:
- $i_chatgpt_api_base_url_1
- $i_chatgpt_api_key_1
These are 2 unique global variables that have been created within our custom integration, utilizing the API key and API base URL, as seen below:
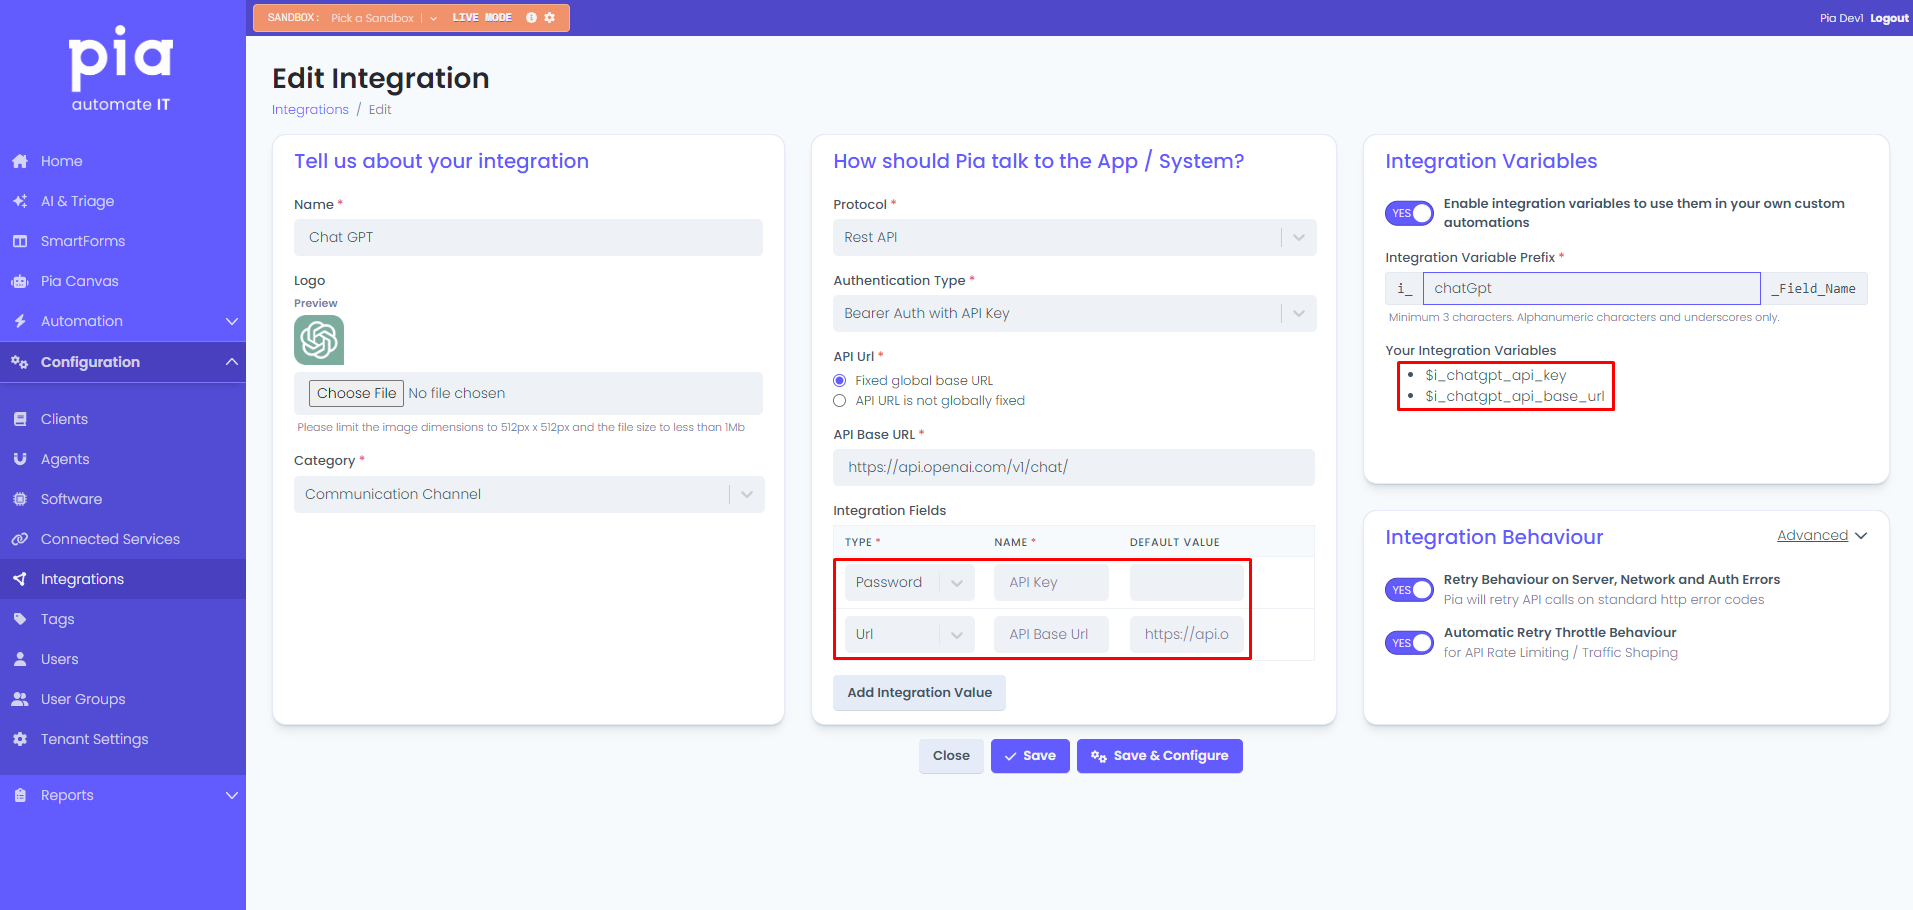
Keep in mind, you can create additional custom values that are able to be specified when configuring the integration later.
These variables will then be suffixed with our postfix variable as configured when setting up the configuration of the integration:
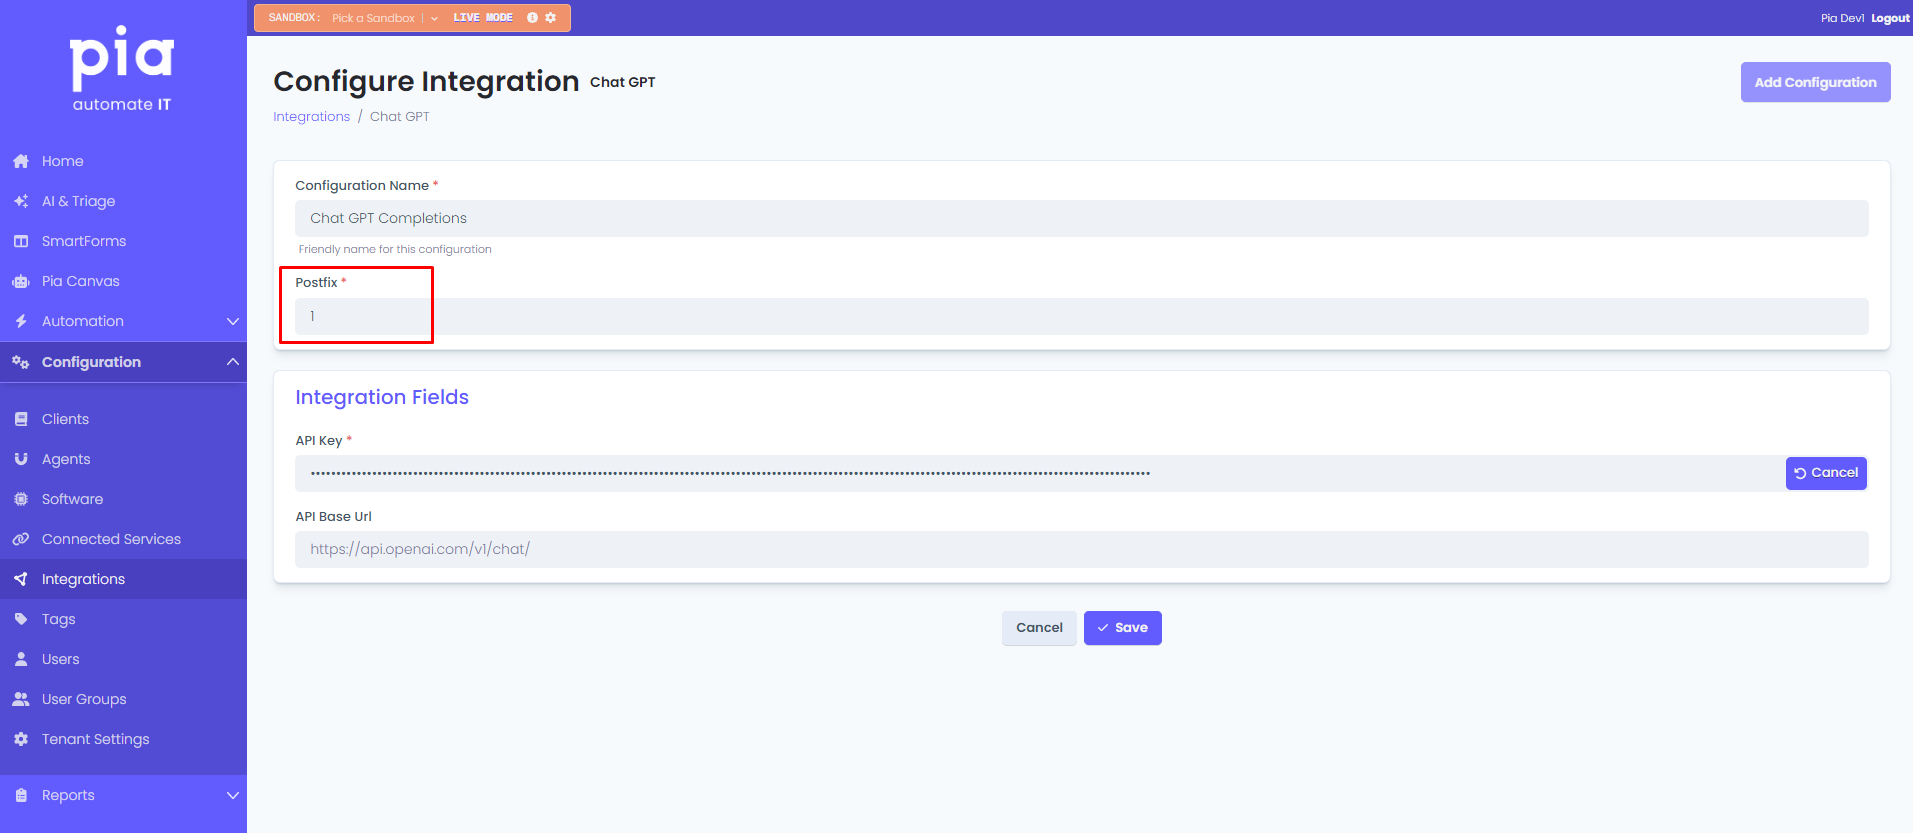
After entering the API Key and selecting what your desired postfix value will be, you have now setup the configuration profile for your integration!
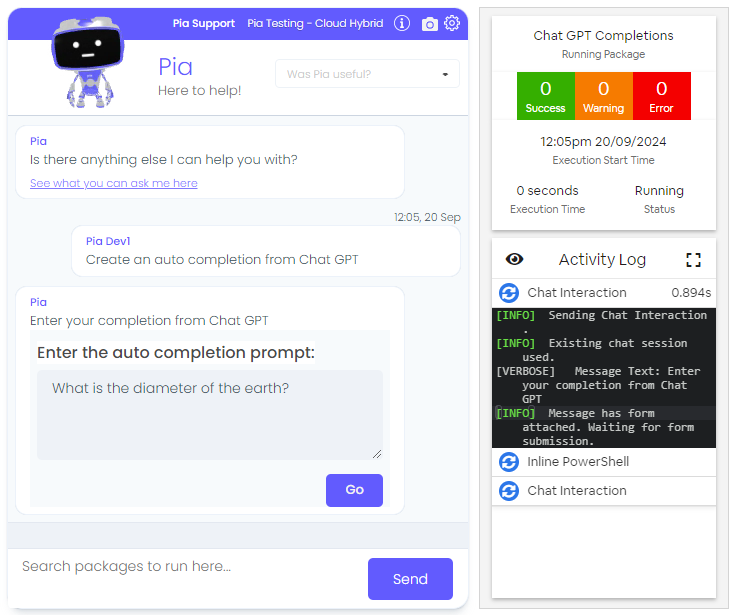
Running your Automation
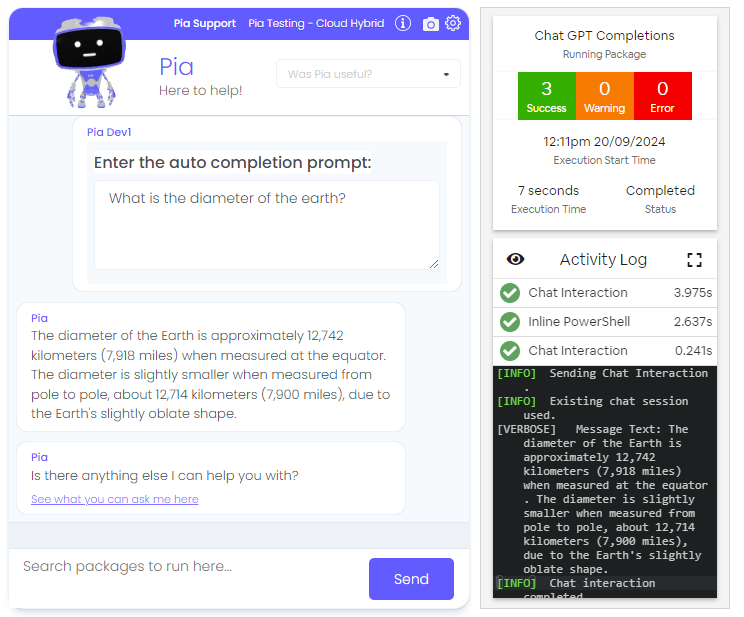
Now you can run your automation. From our example above you will be presented with a form field which asks for your input, as seen below:
Once you have entered your prompt, Pia will collect the API keys and API base URL as a one-time use token for your execution. As seen in the screenshot below, the API key and API base URL may not be what you were expecting. This is to enhance security and prevent the leaking of secret keys within the automations by making use of our Pia Proxy, once requesting https://tenantName.pia.ai/proxy/completions, we will then redirect your request to the 3rd party service you wish to integrate with:
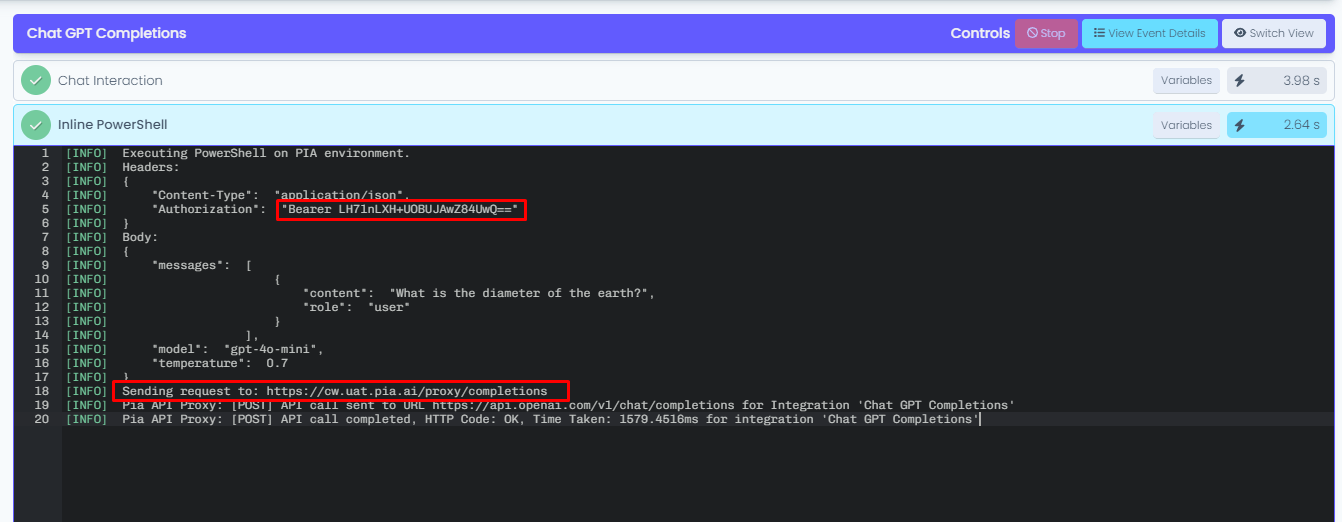
Which then returns the API response in order for you to make use within your custom automation (for our example, we add the OpenAI completion to a chat interaction and display to the chatbox user):
Setting up Multiple Integration Configurations
There may be cases when you want to make use of the same integration, for different clients, using different API keys / variables, this is something that can be completed by creating multiple integration configurations.
Integration configurations allow you to postfix (suffix) the global integration variables which can allow you to call in different API keys depending on the conditions of your automation.
To get this started you can head over to the configure panel (similar to previous steps) and configure the configurations:
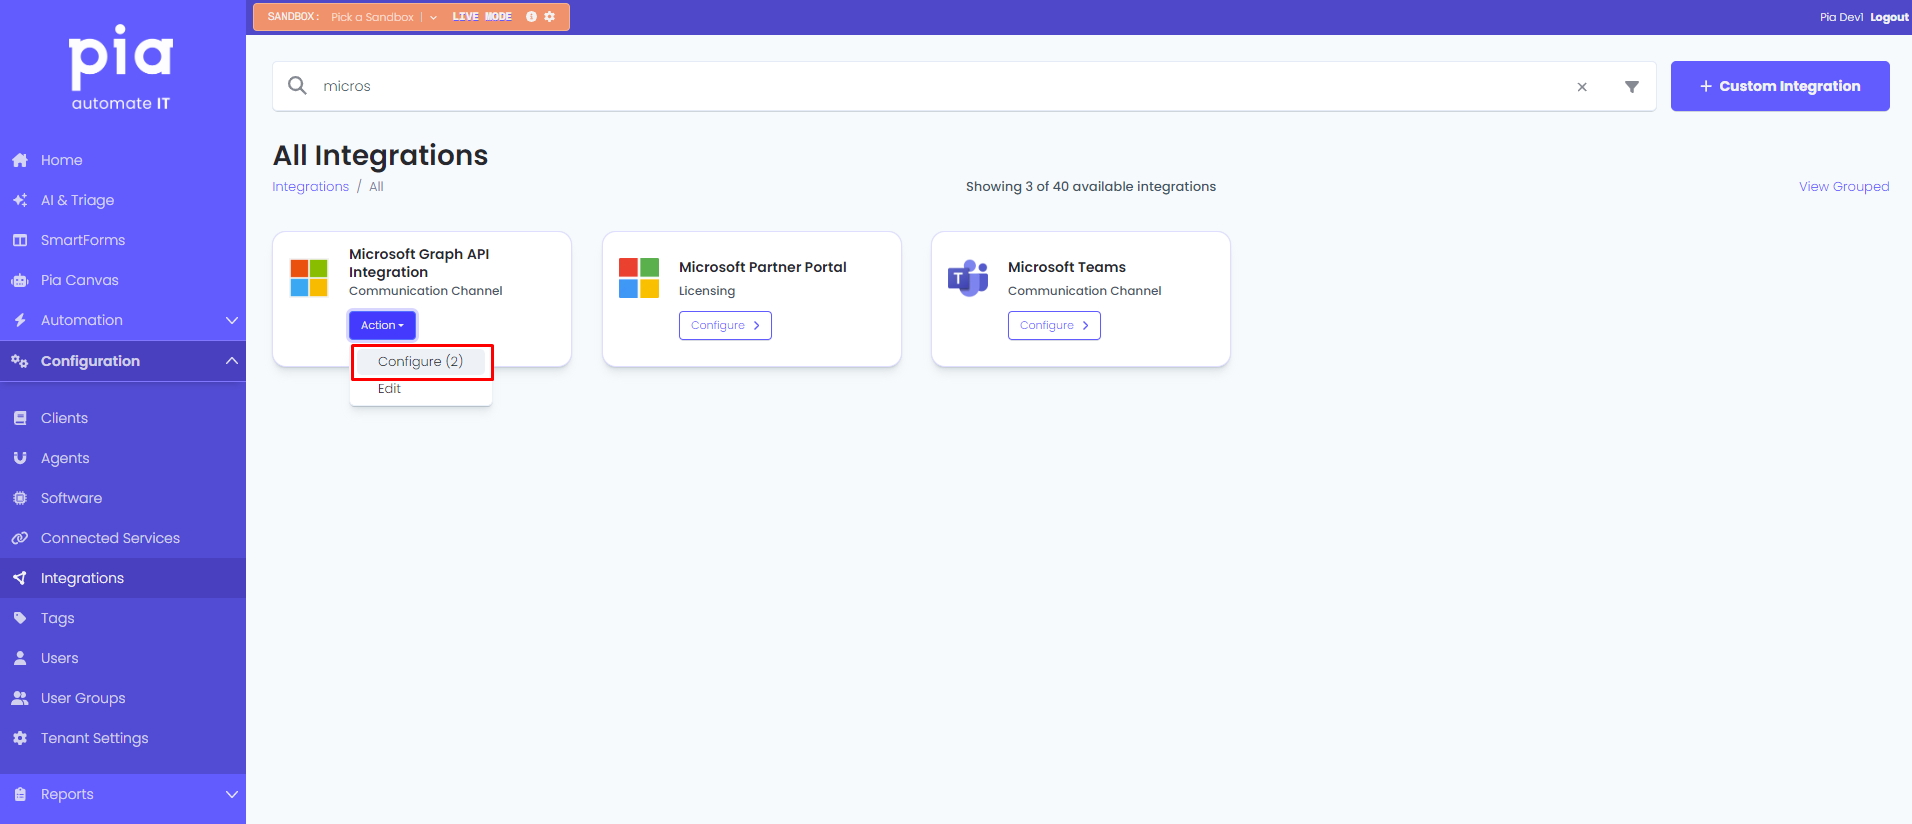
In our example we are going to interact with the Microsoft Graph API to collect a list of domains for a couple of clients. To do this, we will be storing a Delegated token within the API Key space, which can then be stored and suffixed to the specific client.
# Pia Automation Package
conditions:
- name: 'client_filter'
optMode: 'OptOut'
category: 'Microsoft Graph'
- name: 'chat'
option_button: 'Multiple Integration Variables'
option_text: 'Multiple Integration Variables'
option_category: 'Custom Integrations'
steps:
- task: inline_powershell
inputs:
cloudHybridToken: $i_microsoft_graph_api_key_cloudhybrid
cloudOnlyToken: $i_microsoft_graph_api_key_cloudonly
cloudHybridUrl: $i_microsoft_graph_api_base_url_cloudhybrid
cloudOnlyUrl: $i_microsoft_graph_api_base_url_cloudonly
script: |
$keys = @(
$cloudHybridToken
$cloudOnlyToken
)
$data = @()
foreach($token in $keys) {
$headers = @{
"Authorization" = "Bearer $token"
"Content-Type" = "application/json;odata.metadata=minimal"
}
$domainData = $(Invoke-WebRequest -Uri "$cloudOnlyUrl/domains" -Method GET -Headers $headers -UseBasicParsing).content
$domainData = ConvertFrom-Json $domainData
$data += $domainData.value.id
}
$message = New-Object -TypeName System.Text.StringBuilder
[void]$message.AppendLine("Domains for Cloud Hybrid and Cloud only clients:")
foreach($domain in $data) {
[void]$message.AppendLine(" - $domain")
}
return @{
message = $message.ToString()
}
- task: chat_interaction
inputs:
text: =inline_powershell.message
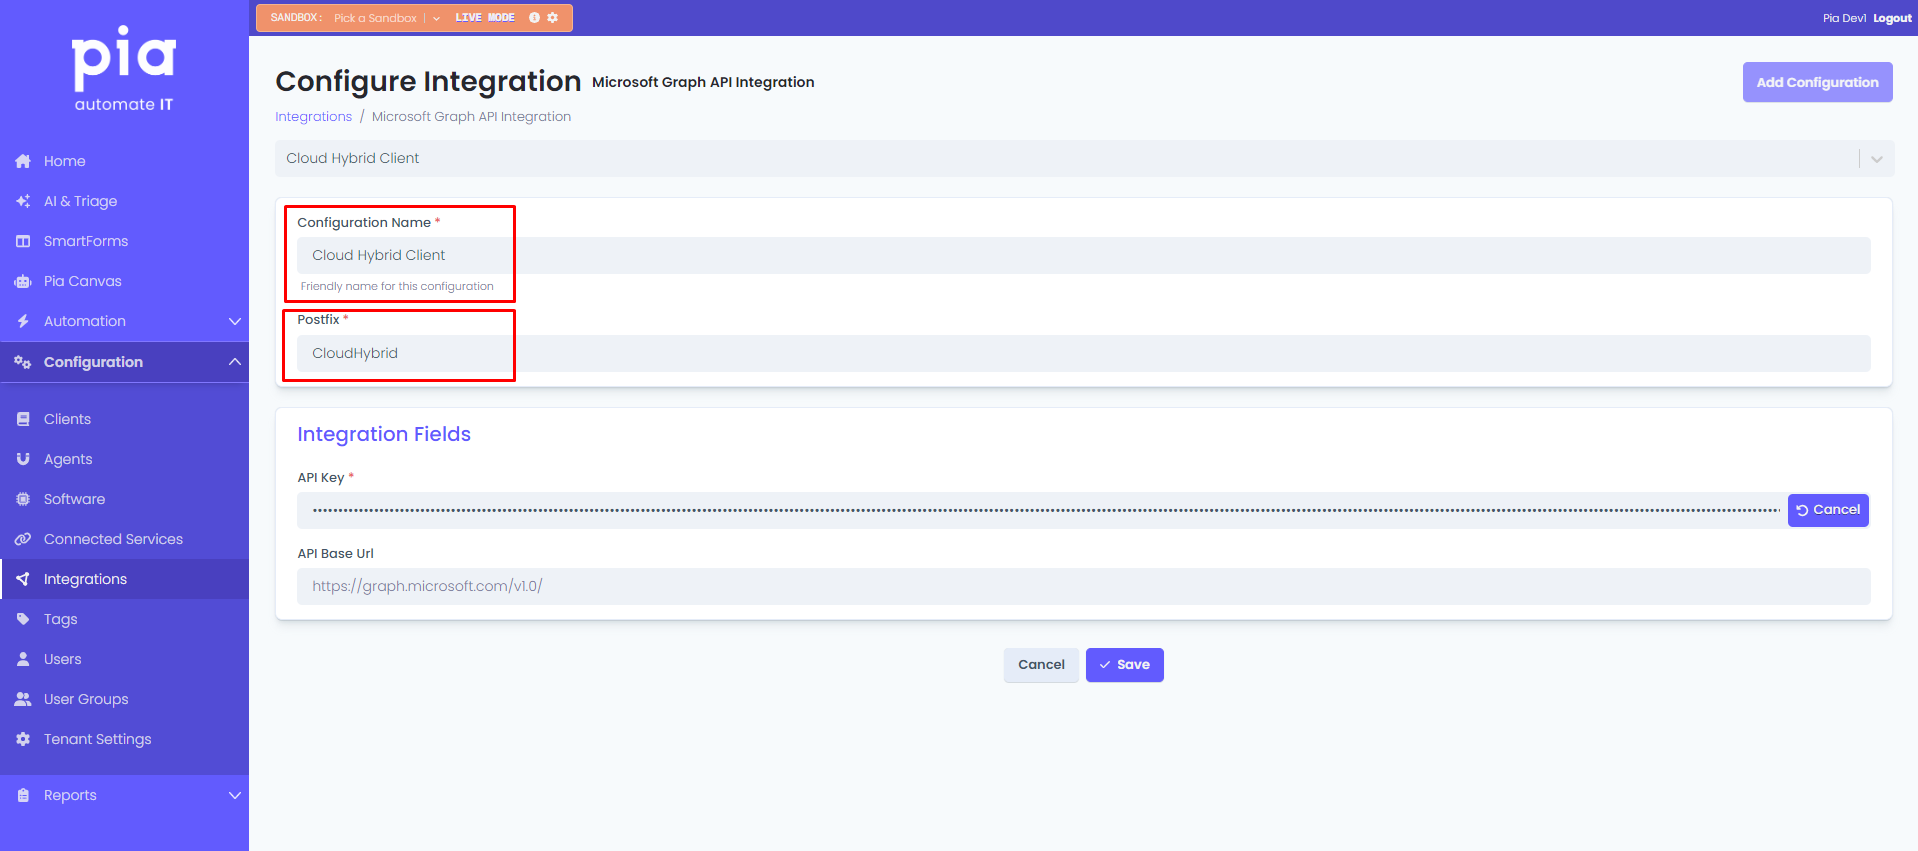
Below is an example of how the PostFix works:
First step: Setup the first configuration profile
Second step: Setup the second configuration profile (and so on)
To complete a second profile you will select "Add Configuration" in the top right
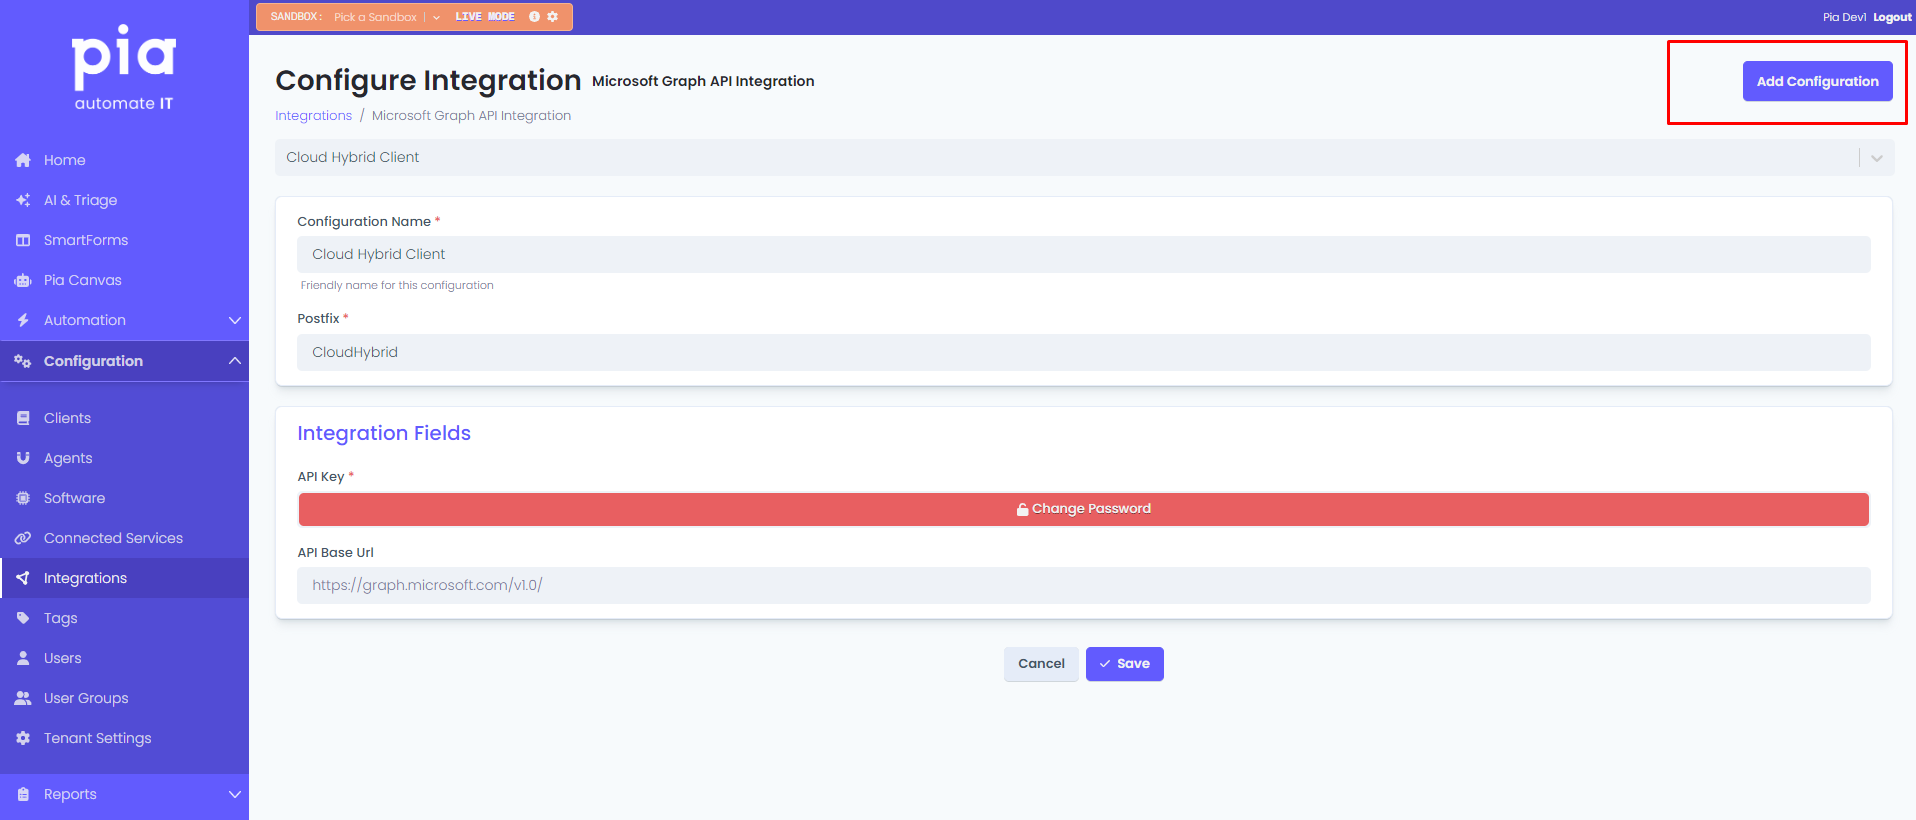
Which will present you with the same setup screen as Step 1:
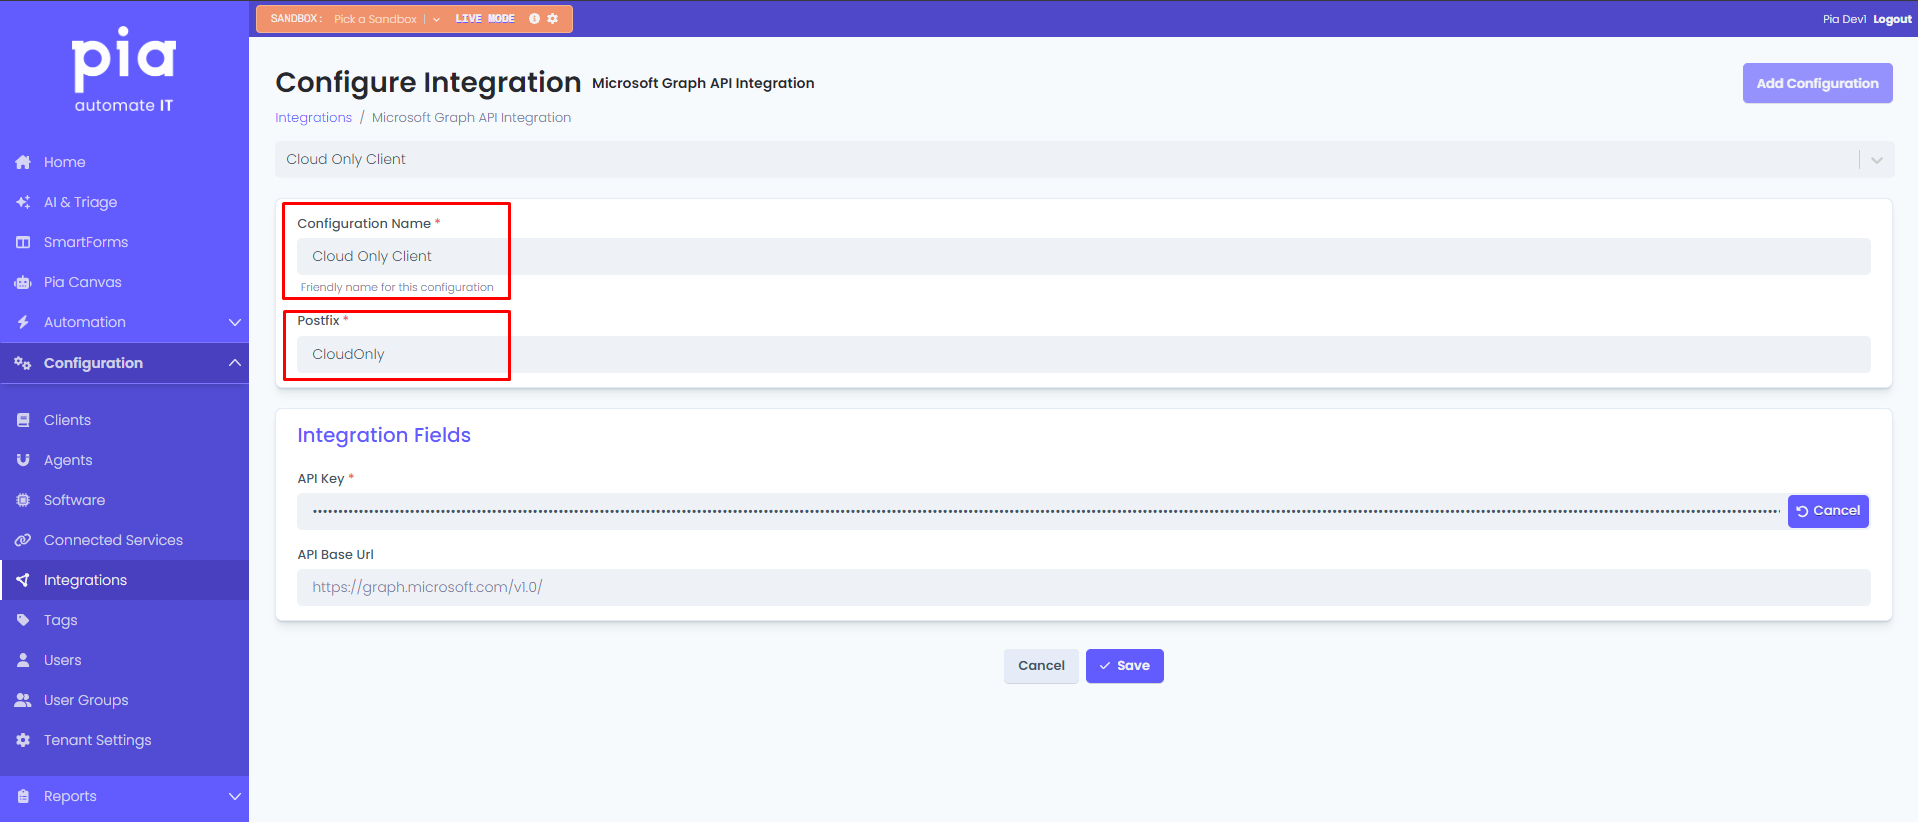
Variables will then have the format of <integration-variable-name>_<PostFix> (for our example we will see $i_microsoft_graph_api_key_cloudhybrid and $i_microsoft_graph_api_key_cloudonly, the same concept applying to the API URL).
Now when executing our custom automation to collect domains of Microsoft tenants, we will be able to access multiple clients!