Package Editor
Overview
The package editor allows you to create and modify automations on the Pia platform.
You can create a new package by:
- Create a new sandbox or select an existing one
- Fill out the name and description for your new package
- Click save
Your new package will be created from the package template - giving you a basic structure to work from. Package definitions are written in YAML and must be formatted into a specific structure for Pia to understand.
The basic format consists of 2 main elements:
- Conditions: Determine when and how a package will run
- Activities: Determine what steps or actions a package will take
This article will focus primarily on the features of the package editor which help you write automations. For a practical deep dive about how to create automation packages (writing YAML and PowerShell), watch the Automation Development Video Series.
Package Definition YAML
YAML (Yet Another Markup Language) is the language used to define a package (package definition). Here is an example of the basic package YAML structure you get when creating a package:
# Pia Automation Package
conditions:
- name: 'client_filter'
  optMode: 'OptOut'
  category: 'Hello World'

- name: 'chat'
  option_button: 'The name of the button in Pia'
  option_text: 'Text which is displayed in the Pia Chatbot'
  option_category: 'Pia Chatbot Category'

steps:
- task: chat_interaction
  inputs:
    text: 'Hello World!'
Versions and Publishing
What is a Package Version? Package versions are a way to track changes to a package over time. Package versions only exist/apply to live mode, they do not exist in sandbox mode.
When a package is executed, the package execution is linked to the version from the point of time that it was executed. So if you go back to an old version of a package in the live packages view, and look at previous execution, it will show you the activities that were executed at that point of time, even if you changed the package since the package was executed.
If you attempt to modify a published package or draft package version which has already been used in a package execution, a new version will be automatically created. The versions is a tab located in the Package Editor, which is available in both live mode and sandbox mode.
You may also delete, publish and unpublish package versions (not available in sandbox mode).
What does Publishing a Package do? Publishing a package will "activate" the package, this means different things depending on the conditions configured in the package:
- If the package has a schedule condition, the schedule will be activated (Note: schedules do not work in sandbox mode - this is by design).
- If the package has Client Filter and Chat conditions, it will be useable via the Pia chatbot.
- If the package has the ticketing system event condition, it will begin processing external events from the relevant ticketing system (Note: ticketing system events will not start your automation in sandbox mode - this is by design).
Another way to publish a package is by promoting a sandbox package to live mode (refer to heading below).
Promote a Package to Live
When you have completed the development of a package in Sandbox mode, you may want to promote the package into live mode. Before you do this, you should make sure you fully test and double check the package conditions to remove any test code.
After clicking the Promote To Live button, you will be prompted to select which activities and forms to copy or to overwrite from your sandbox into live mode. If an older version of the package already exists in live mode (you may have copied this originally into the sandbox), you could choose to overwrite or create a new package entirely.
When you promote the package, a new version of the package will be added to the existing package in live mode. If the package does not exist in live mode, it will be created. During this process, the package in live mode will also automatically be published - this means your package is "activated" and can be used by Pia to execute automations.
After the package has been promoted to live mode, it will automatically remove the package from the sandbox. If you need to further modify the package, you can copy a package back to the sandbox using the Copy to Sandbox feature.
Copy a Package to Sandbox
When you are in live mode and want to make changes to a package, you should copy the package to a sandbox so you can develop/test in isolation without affecting people who may be using the package. To do this, you can use the copy to sandbox feature.
First, select the Copy to Sandbox button in the toolbar. You will be prompted to select the sandbox you wish to copy to. In the next step, you will be asked to confirm which associated forms and activities you wish to copy or override into the target sandbox.
Once you hit copy, the package copy process will be completed and you will be redirected to the sandbox which your package has been cloned into.
You can also use the Copy to Sandbox feature if you wish to copy a package from one sandbox to another.
Annotations
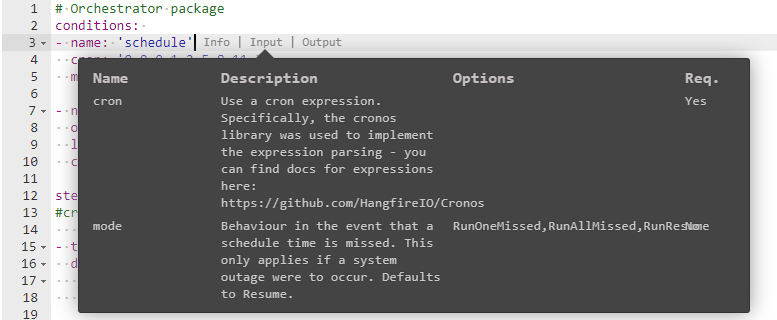
The annotation feature is a useful way to view Inputs and Outputs for an activity or a condition while viewing the YAML code/definition of a package. To view this, hover over the name of a condition or activity in the package editor and you'll see options appear in the format of "Info | Input | Output".
The screenshot below shows what the input annotations look like for the "Schedule" condition.
Package Variables
You may use package variables to inject information at the run time of an automation. This information is typically provided to you by the Pia platform and may be a static value (such as Base URL) or a dynamic value (such as Context: Client Id). You can however, create your own Package Variables which you may reuse across multiple packages.
Most integrations offered in the Pia platform will provide Package Variables for you to use for your own automations. To view which Package Variables are available for the integration you need, go to Connected Services.
Package Variables are listed on the bottom right section of the Package Editor Screen and you can use the settings icon on the right of the Filter bar to create your own.
Here are the Package Variables which are always available (regardless of connected services configuration):
Note: The table below is in the process of being updated. Refer to the specific integration you are interested in to see its variables.
| Variable Name | Variable in Package Editor |
|---|---|
| Azure Api Token (PIA) | $AZURE_Api_Token_PIA |
| Base Url | $Base_Url |
| Context: Client Id | $Ctx_Client_Id |
| Context: Ticket Id | $Ctx_CW_Ticket_Id |
| CW API Client Id | $CW_Api_Client_Id |
| CW API Token | $CW_Api_Token |
| CW API Url | $CW_Api_Url |
| Exchange Online Api Token (Client) | $EXO_Api_Token_Client |
| Exchange Online Api Token (PIA) | $EXO_Api_Token_PIA |
| IT Glue API Token | $Glue_Api_Token |
| IT Glue API URL | $Glue_Api_Url |
| Kaseya API Token | $Kaseya_Api_Token |
| Kaseya API URL | $Kaseya_Api_Url |
| MS Graph Api Token (Client) | $MSGRAPH_Api_Token_Client |
| MS Graph Api Token (PIA) | $MSGRAPH_Api_Token_PIA |
| MS Graph Tenant Id | $Ctx_Client_MSTenant_Id |
| RC API Url | $RC_Api_Url |
| RC Prod API Token | $RC_Api_Token |
| RC Prod Bot Token | $RC_Bot_Token |
| RC Sandbox API Token | $RC_Api_Sandbox_Token |
| RC Sandbox API Url | $RC_Api_Sandbox_Url |
| RC Sandbox Bot Token | $RC_Bot_Sandbox_Token |
| PIA SharePoint URL | $SP_Url |
| Xero Api Token | $Xero_Api_Token |
| Winget Unique Token | $Winget_Unique_Token |
YAML
YAML is similar to XML, it is a human-readable language which is commonly used in automation software (e.g. CHEF, Ansible automation platform, Docker etc). YAML's full name is Yet Another Markup Language. YAML is sensitive to syntax and formatting errors, especially when it comes to the white spaces for different levels of indentation. In the examples below, we use 2 spaces to denote each level of indentation.
Extra Notes:
- To add comments in YAML, you can use '#' in the front of the code, or simply put '#' in the middle of statements you want to comment out (examples below).
- To validate your YAML, save your package (CTRL+S shortcut to save). If there is an error in your YAML syntax, Pia will display the error at the bottom of the package editor
YAML - Packages
The structure of a package is split into two parts, Conditions and Steps (Activities).
This is the most basic package YAML structure:
 conditions:
  - name: 'client_filter'
    optMode: 'OptIn'
    category: 'Testing'

  - name: 'chat'
     option_button: 'TestGridViewPackage'
     option_text: 'TestGridViewPackage'
     option_category: 'testing'
     beta_mode: 'Enabled'

 steps:
  - task: inline_powershell
    inputs:
    script: |
            help Get-Command -Full | Out-GridView

  - task: chat_interaction
     inputs:
       text: 'Hello World!'
YAML - Conditions
Each condition is defined as:
- name: 'condition_name'
  property_name: 'property_value'
YAML - Activities/Steps
Each step (or activity) is defined as:
- task: 'activity_name'
  property name: 'property value'
  inputs:
    input_name: 'input_value'
activity_name
The static name of the activity - you can select this in the editor or type it in manually.
You can use any of the system provided "Built-In" Activities or PowerShell Activities you create (to create your own activities, refer to the Activity Editor).
property_name and property_value
These are additional properties which can alter the execution behavior of the activity. The available property_name's are:
- executionEnvironment: Value can be one of 'PIA', 'System', 'AsUser' or 'AsUserElevated'
- executionEnvironmentKey: The qualified name of the Pia agent (e.g. 'DC01')
- executionClientId: The Id of the client in which the activity will run. By default, this will be the current client for which the package is executing.
- alias: An alias for the activity - must be unique for the package
- skip: 'true' to skip the activity during execution - any other value will not skip
- document: This value will show in the procedure documentation for the package on the client dashboard, it can be multiple lines
input_name and input_value
These are inputs to the activity itself - the inputs are different for every activity. For PowerShell Activities, you define these inputs yourself. You can also use the package annotation feature to view the inputs or view them with the "Add Activity" feature of the package editor.
YAML - Input Resolution
All activities and conditions in a package have both inputs and output properties. Often while you are creating your automation, you will want to pass the output of a condition or activity into the input of an activity further in your automation execution.
To facilitate this, you may use an input expression in your package to obtain the output of a previously executed condition or activity.
The example below demonstrates the use of an expression. Observe that there are 2 steps in the automation. The Inline PowerShell step has an input property called "details" which is set to an expression =azure_get_user.details. This expression is evaluated at run time during execution of the automation. When the automation reaches that particular step/activity, it will evaluate the expression and replace the expression with the value of the expression (in this case, the value will be that of the "details" output property of the azure_get_user activity).
- task: azure_get_user

- task: inline_powershell
  inputs:
    details: =azure_get_user.details
    script: |
            Write-Host $("The user's name is: " + $details.FirstName)
Acceptable formats of an input expression are as follows:
=conditionname.outputpropertyname=conditionname.outputpropertyname.\[nestedproperty\]=activityname.outputpropertyname=activityname.outputpropertyname.\[nestedproperty\]$variablename
Keep in mind, if an activity has an alias, you could also reference the activity by using alias instead of using Activity Name.
- task: azure_get_user
  alias: existing_user

- task: inline_powershell
  inputs:
    details: =existing_user.details
    script: |
            Write-Host $("The user's name is: " + $details.FirstName)
You can also use input resolution inside your string/text expression by wrapping your input expression in curly braces ({}). Refer to the example below:
- task: azure_get_user

- task: chat_interaction
  inputs:
    text: 'The first name is: {=azure_get_user.details.firstName}'