Chat Interaction Activity
Overview
The Chat Interaction (chat_interaction) Activity is a powerful feature for use in your automation packages. With the Chat Interaction Activity, you can interface with the users of your automation and control the flow of execution of your package. Specifically, you can send text messages to your user and request input (using a form) via the Pia Chatbot.
Lets compare building an automation in Pia with how you would build a simple PowerShell script on your PC. In your PowerShell script, you may need to ask your user for information and also display information back to them. You may use Write-Host and Read-Host for this, or for a more advanced UI, you may even create a window popup or web page to request information from your user.
With the Pia chatbot, the Chat Interaction activity speeds up your development by reducing one of the concerns that you would otherwise need to spend time developing - the user interface.
The Chat Interaction activity can be located by searching for "Chat Interaction" in the list of activities in the package editor:

Here is a working sample of the activity in a basic package:
# Orchestrator package
conditions:
- name: 'client_filter'
  optMode: 'OptOut'
  category: 'Test Package'

- name: 'chat'
  option_button: 'Test'
  option_text: 'This is a test package'
  option_category: 'Test Category'

steps:
- task: chat_interaction
  inputs:
    text: 'Hello World!'
Activity Behaviour
The primary behaviour of the Chat Interaction activity is to send messages to the user via the Pia Chatbot. When your package is executed, Pia will output the message you specify and move on to the next activity in your package for execution.
One exception to this behaviour is where you send a message via Chat Interaction activity with a form attached. In this scenario, the package execution will wait until the user submits a response to the form before continuing on to the next activity in your package (Note: This doesn't apply for forms where you have turned off the setting for "Enable Go Button" - forms used in this scenario are typically read only and used to better present large amounts of information which do not fit into a text message).
The Chat Interaction Activity can only be used in package executions which have been initiated via the Pia Chatbot (i.e. this activity will not work in cases where the package was initiated via Schedule or Ticketing System Event).
Features of the Chat Interaction Activity
The Chat Interaction activity primarily used to send text to the chatbot, but there are also some additional features which make a couple of common scenarios easier:
- You can send forms to the chatbot to request information from the user
- You can send text with newlines and even HTML formatting in the text of the chat message
- If you want to send a user a date but want it to be converted to the local timezone of the user, you can format the date in ISO UTC format and it will be automatically converted when it is displayed in the chatbot
An example of each feature above is available at the bottom of this article.
Input Properties
Use properties to modify the behaviour of the activity.
Property Name: ticket_id
Default Value: $Ctx_CW_Ticket_Id
Property Required: Yes
Property Description: The ticket id of the ticket to send the chat message to. This defaults to the ticket id for the current chat session and does not need to be set unless you want to override this behaviour.
Property Name: text
Property Required: Yes
Property Description: The text message to send the user.
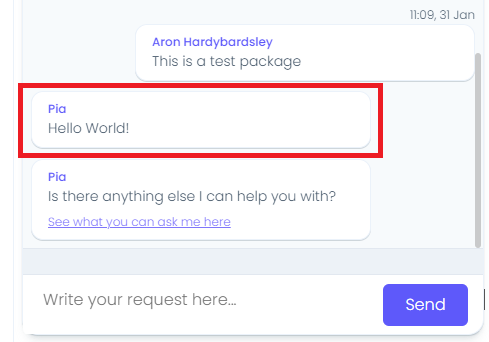
Here's an example using the text "Hello World!":
Property Name: form_name
Property Required: Yes
Property Description: The static name of a form for the user to fill out.

Property Name: form_display_mode
Property Options: 'Popout' or 'Embed'
Default Value: Popout
Property Required: Yes
Property Description: This determines how the form is displayed in the chat.
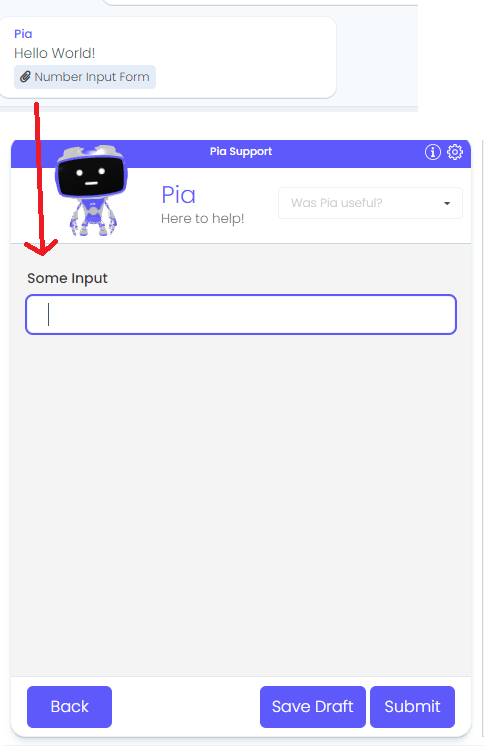
The screenshot below shows the "Popout" form experience. This is useful for larger forms:
The screenshot below shows the "Embed" form experience. This is useful for smaller forms:

Property Name: form_def
Property Required: No
Property Description: A JSON string which defines default values for the form which the user will fill out.
Refer to this article for more: Chat Interaction - Form Def Property
Property Name: audience
Property Options: 'Engineer' or 'Client'
Default Value: Engineer
Property Required: Yes
Property Description: Set target audience for this chat message. Multiple values can be added to this input property using a comma separated format (e.g. Engineer,Client). Note: The audience property/feature is not yet fully supported as Pia does not currently expose the chatbot to the end client. Please do not use this for now.
Output Properties
There is a single property which the Chat Interaction activity makes available:
Property Name: form
Property Description: This will return a JSON string containing the result of the filled form for which the user submitted. This will always have a value if your Chat Interaction Activity had a form_name set. Typically, you would access the fields directly in your form by using the syntax "=chat_interaction.form.FIELD_REFERENCE_NAME" - where FIELD_REFERENCE_NAME is the reference name of the field you set in your form as per the screenshot below:

Refer to the Pia Form Editor for more information on how you can create forms.
Examples
Form Example
Here is an example of a chat interaction activity which displays a form to the user, complete with form def and form output:
# Orchestrator package
conditions:
- name: 'client_filter'
  optMode: 'OptOut'
  category: 'Test Package'

- name: 'chat'
  option_button: 'Test'
  option_text: 'This is a test package'
  option_category: 'Test Category'

steps:
- task: chat_interaction
  inputs:
    form_def: '{ "num": 10 }' # Dynamically set the default value of the number input field to 10
    form_name: 'prompt_number_input'
    form_display_mode: 'Embed'
    text: "Hello World!"

- task: chat_interaction
  inputs:
     # Use the output of the form as submitted by the user
    text: "The value was: {=chat_interaction.form.num}"
In the above example, a form will be displayed with the "num" field displaying a default value of '10':

The screenshot below shows that the form has been submitted with the "num" field having the value of '20':

HTML Formatting Example
You can use HTML in the text property of the chat interaction:
conditions:
- name: 'client_filter'
  optMode: 'OptOut'
  category: 'Testing'

- name: 'chat'
  option_button: 'Hello World'
  option_text: 'Say Hello World!'
  option_category: 'Test'

steps:
- task: chat_interaction
  inputs:
    text: '<b>Calculator</b>: This is <span style="color: green;text-decoration: underline;">HTML</span>'
This will produce a message with formatted output as follows:

Date Formatting Example
When working with dates in a chat interaction, always output into ISO date format as UTC time. The chatbot will automatically convert this date into the local time format of the user's browser.
This has the added benefit of converting into the date format for the localised region of the browser (e.g. DD/MM/YYYY vs. MM/DD/YYYY).
Here is the example:
conditions:
- name: 'client_filter'
  optMode: 'OptOut'
  category: 'Testing'

- name: 'chat'
  option_button: 'iso8601_date_time'
  option_text: 'iso8601_date_time'
  option_category: 'Testing'

steps:
- task: inline_powershell
  inputs:
    script: |
            $res = (Get-Date).ToUniversalTime().ToString("o");

            # Note: Make sure you return a string containing text + a date, not just the date
            # At this point in time, if you return only the date, it will be automatically converted to the server time and give you an undesired output.
            # So you must return a "message which contains a date" instead.

            return @{ result = $("Date: " + $res) }

- task: chat_interaction
  inputs:
    text: ' {=inline_powershell.result}'
This will look like the following in the chat:
