Pre-executing extension automations
Pia is always looking to help you out with your Automation Journey. If you would like to add more Extension Points to any of the Pia Automations, Please contact Pia Partner Support.
Things to Provide:
- Where do you want the Extension Point (i.e. Before and After which Activity)
- Data Schema
- Data Type
This continues on from part 1: logging to the ticketing system:
- Either go back and do that first (recommended) or;
👩💻 here is the code
Create a form with the following details
Name: Pre Flight Checks
Static name: pre_flight_checks_formAdd a set of checkboxes to your form
- Still in your form, drag on the checkboxes element from the toolbox on the right
- Give it a label of
Manual checks prior to new user creation - And a Reference Name of
pre_run_checks
- Create a new automation package with the below content:
## Conditions are the first thing we define in our automation definition
conditions:
# 📝 Wherever you use a chat condition, you MUST have a client_filter condition.
- name: 'client_filter'
  optMode: 'OptOut'
  category: 'Testing'
# 💬 This is where we've defined a chat condition
- name: 'chat'
  option_button: 'Checks and auditing'
  option_text: 'Preflight checks and logging the results'
  option_category: 'Tutorial'

## Steps are the things that run when the conditions are met
steps:
## Setup the data using powershell inline
- task: inline_powershell
  alias: checklist_data
  inputs:
    script: |
        # ① Define a list of checks that must be met before a user is created
        $checks = @("Identity Verified","Reviewed Policies",
                    "Secure Information Transferred","Training Confirmed")

        # ② Convert the list of items into the format required by our form field definition
        $checklist = $checks | ForEach-Object { @{ text = $_; value = $_ } }

        # ③.Return both the array of possible options and the form definition
        return @{
            CheckboxOptions = $checks
            FormDef = @{ pre_run_checks = $checklist }
        }

- task: chat_interaction
  alias: pre_flight_checks_form
  inputs:
    text: 'Preflight checks'
    form_name: 'pre_flight_checks_form'
    form_display_mode: 'Embed'
    form_def: =checklist_data.FormDef

- task: inline_powershell
  alias: checklist_results
  inputs:
    cbSelectedItems: =pre_flight_checks_form.form.pre_run_checks
    cbOptions: =checklist_data.CheckboxOptions
    script: |

        # Convert the cbOptions JSON string to a PowerShell object
        $cbOptions = $cbOptions  | ConvertFrom-Json
        # Split the cbSelectedItems string into an array at each comma
        $cbSelectedItems = $cbSelectedItems.Split(',')

        # Create selectedItems & not selected by filtering the cbOptions in cbSelectedItems
        $selected = $cbOptions | Where-Object { $_ -in $cbSelectedItems }
        $notSelected = $cbOptions | Where-Object { $_ -notin $cbSelectedItems }

        # Prefix each checked item with '✅' or set to '(😭 none)'
        $completedChecks = if($selected) {
            $selected -replace '^', '   ✅ ' -join "`n"
        } else {
            "   (😭 none)"
        }

        # Prefix each non-checked item with '❌' or set to '(🎉 none)'
        $skippedChecks = if($notSelected) {
            $notSelected -replace '^', '   ❌ ' -join "`n"
        } else {
            "   (🎉 none)"
        }

        # Combine the strings into the final output
        $output = ("Completed pre-checks:`n{0}`n`n" `
                    + "Skipped checks:`n{1}") -f $completedChecks, $skippedChecks

        # We will reference it as AuditMessage
        @{ AuditMessage  = $output}


# 🎫 add an audit log message to the ticket associated with this automation
- task: system_audit_note
  inputs:
    Content: |
       {=checklist_results.AuditMessage}
- But seriously, bo back and do part 1 and the basic concepts tutorials first.
The out of the box automations are pretty good, but sometimes you just need to do more!
There is only a single line of code in this part of the tutorial 🛌! That's because the nuance is all about how to configure and run them.
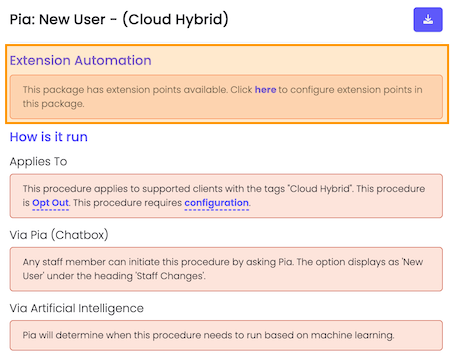
There are a couple of things you can't do with an extension automation, such as nesting and scheduling. And data you might have available in an extension automation that you won't in a stand-alone automation. But at its essence an extension automation is just another automation that has the
What you'll learn
- Adding an extension automation condition to mark your automation as an extension
- Promoting your extension to live mode
- How to run extensions for a specific client and package
Part 1 : Add the Extension Automation condition
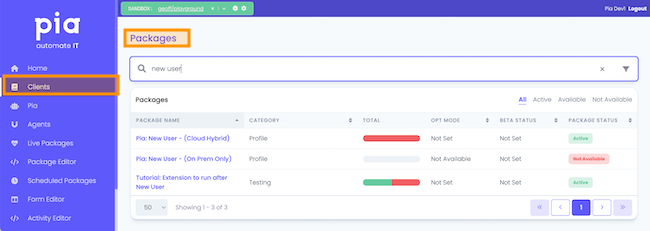
- Open the automation package definition from the previous tutorial section. It's probably named,
Tutorial: Audit Logging - We're going to add in the condition. Place your cursor at the bottom of the conditions section of the yaml file and bring in the Extension Automation condition from the toolbox:
🤣 Yes, thats it! That is the only change we're making to the automation.
Part 2: Promote to live
Often you can't link an extension to an automation without promoting in from your
So, it is especially important to be really disciplined with how you test your extension as the first time it runs end to end could be in the live environment.
- Are you ready for this 😓? From the top actions bar in the automation package editor, click "Promote to Live"
- You will be presented with a list of changes, a list of activities and forms that will be promoted from your sandbox into the live environment
- Review the list carefully and press
Continue
Part 3 : Link the extension to the package
Open the client configuration for the client you'll be testing against
🧖♀️You can can test without creating a userAs the extension runs before the main automation, you can test that this is working as expected and cancel the main automation before there is anything created in the client environment
In the package configuration, open the extension automation configuration
Only for configured automationsThis section won't be here for automations that don't have extension points configured.
From the Extension Points dialog, select your automation package from the
Beginning of Package Executiondrop down.
That's it, now whenever the New User automation is run for that client, your extension will run first - presenting your engineer a checklist to complete and logging the result to the ticketing system
Part 4 : Run the New User package
OK, lets finish this off and run it and see the magic 🪄 happen.
- Open your test ticket (for the client you have just configured) in the ChatBox or ticketing system
- Trigger the New User automation. I'll just repeat that 😉, the New User automation.
- And you should see output similar to the below:
- You can see once your extension is complete the standard New User automation seamlessly continues, without it feeling like disparate automations to your service desk engineer.
🧨 Congratulations 🧨. You can now plugin your own custom logic to existing Pia provided automations. The possibilities are endless... In the next part of the tutorial we are going to look at how you can access data from the parent automation and use it to power your custom automation.
🖥️ full code example
## Conditions are the first thing we define in our automation definition
conditions:
# 📝 Wherever you use a chat condition, you MUST have a client_filter condition.
- name: 'client_filter'
  optMode: 'OptOut'
  category: 'Testing'
# 💬 This is where we've defined a chat condition
- name: 'chat'
  option_button: 'Checks and auditing'
  option_text: 'Preflight checks and logging the results'
  option_category: 'Tutorial'

# 🔌 This is where we've defined an extension automation. You won't be able to
# 🔌  connect to a parent automation without this
- name: 'extension_automation'

## Steps are the things that run when the conditions are met
steps:
## Setup the data using powershell inline
- task: inline_powershell
  alias: checklist_data
  inputs:
    script: |
        # ① Define a list of checks that must be met before a user is created
        $checks = @("Identity Verified","Reviewed Policies",
                    "Secure Information Transferred","Training Confirmed")

        # ② Convert the list of items into the format required by our form field definition
        $checklist = $checks | ForEach-Object { @{ text = $_; value = $_ } }

        # ③.Return both the array of possible options and the form definition
        return @{
            CheckboxOptions = $checks
            FormDef = @{ pre_run_checks = $checklist }
        }

# 📋 form to display the checklists
- task: chat_interaction
  alias: pre_flight_checks_form
  inputs:
    text: 'Preflight checks'
    form_name: 'pre_flight_checks_form'
    form_display_mode: 'Embed'
    form_def: =checklist_data.FormDef

- task: inline_powershell
  alias: checklist_results
  inputs:
    cbSelectedItems: =pre_flight_checks_form.form.pre_run_checks
    cbOptions: =checklist_data.CheckboxOptions
    script: |

        # Convert the cbOptions JSON string to a PowerShell object
        $cbOptions = $cbOptions  | ConvertFrom-Json
        # Split the cbSelectedItems string into an array at each comma
        $cbSelectedItems = $cbSelectedItems.Split(',')

        # Create selectedItems & not selected by filtering the cbOptions in cbSelectedItems
        $selected = $cbOptions | Where-Object { $_ -in $cbSelectedItems }
        $notSelected = $cbOptions | Where-Object { $_ -notin $cbSelectedItems }

        # Prefix each checked item with '✅' or set to '(😭 none)'
        $completedChecks = if($selected) {
            $selected -replace '^', '   ✅ ' -join "`n"
        } else {
            "   (😭 none)"
        }

        # Prefix each non-checked item with '❌' or set to '(🎉 none)'
        $skippedChecks = if($notSelected) {
            $notSelected -replace '^', '   ❌ ' -join "`n"
        } else {
            "   (🎉 none)"
        }

        # Combine the strings into the final output
        $output = ("Completed pre-checks:`n{0}`n`n" `
                    + "Skipped checks:`n{1}") -f $completedChecks, $skippedChecks

        # We will reference it as AuditMessage
        @{ AuditMessage  = $output}


# 🎫 add an audit log message to the ticket associated with this automation
- task: system_audit_note
  inputs:
    Content: |
      {=checklist_results.AuditMessage}