Extension automations with parent data
What you'll learn
- Getting the data schema for an automation you'd like to extend
- Accessing data from the parent automation in your custom extension
- Setting up mock data to test in isolation
- Using html formatted The fallback content to display on prerendering
- Testing in the chat mode
Pia is always looking to help you out with your Automation Journey. If you would like to add more Extension Points to any of the Pia Automations, Please contact Pia Partner Support
Things to Provide:
- Where do you want the Extension Point (i.e. Before and After which Activity)
- Data Schema
- Data Type
Step 1: Get setup with a basic package
This continues on from part1: logging to the ticket and part2: start of automation extension. You'll need to go back and do that first as it builds upon that knowledge.
It really depends on the knowledge in the automation basics tutorial too. We strongly recommend that you spend the time to go through this before you jump into extensions.
Create a
The fallback content to display on prerenderingto work in if you don't have one🤔 How to create a sandbox
- In the top bar of the portal, select view all sandboxes
- '+ New Sandbox' to create your sandbox
- Give it a simple, easy to remember name
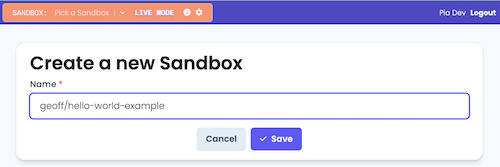
Choose a good nameprefixing your sandboxes with your name can make them easy to find
Create a new
The fallback content to display on prerenderingcalledTutorial: Audit Logging🎗️ Refresher on how to create an automation package definition
- Open the "Package Editor" from the left-hand menu
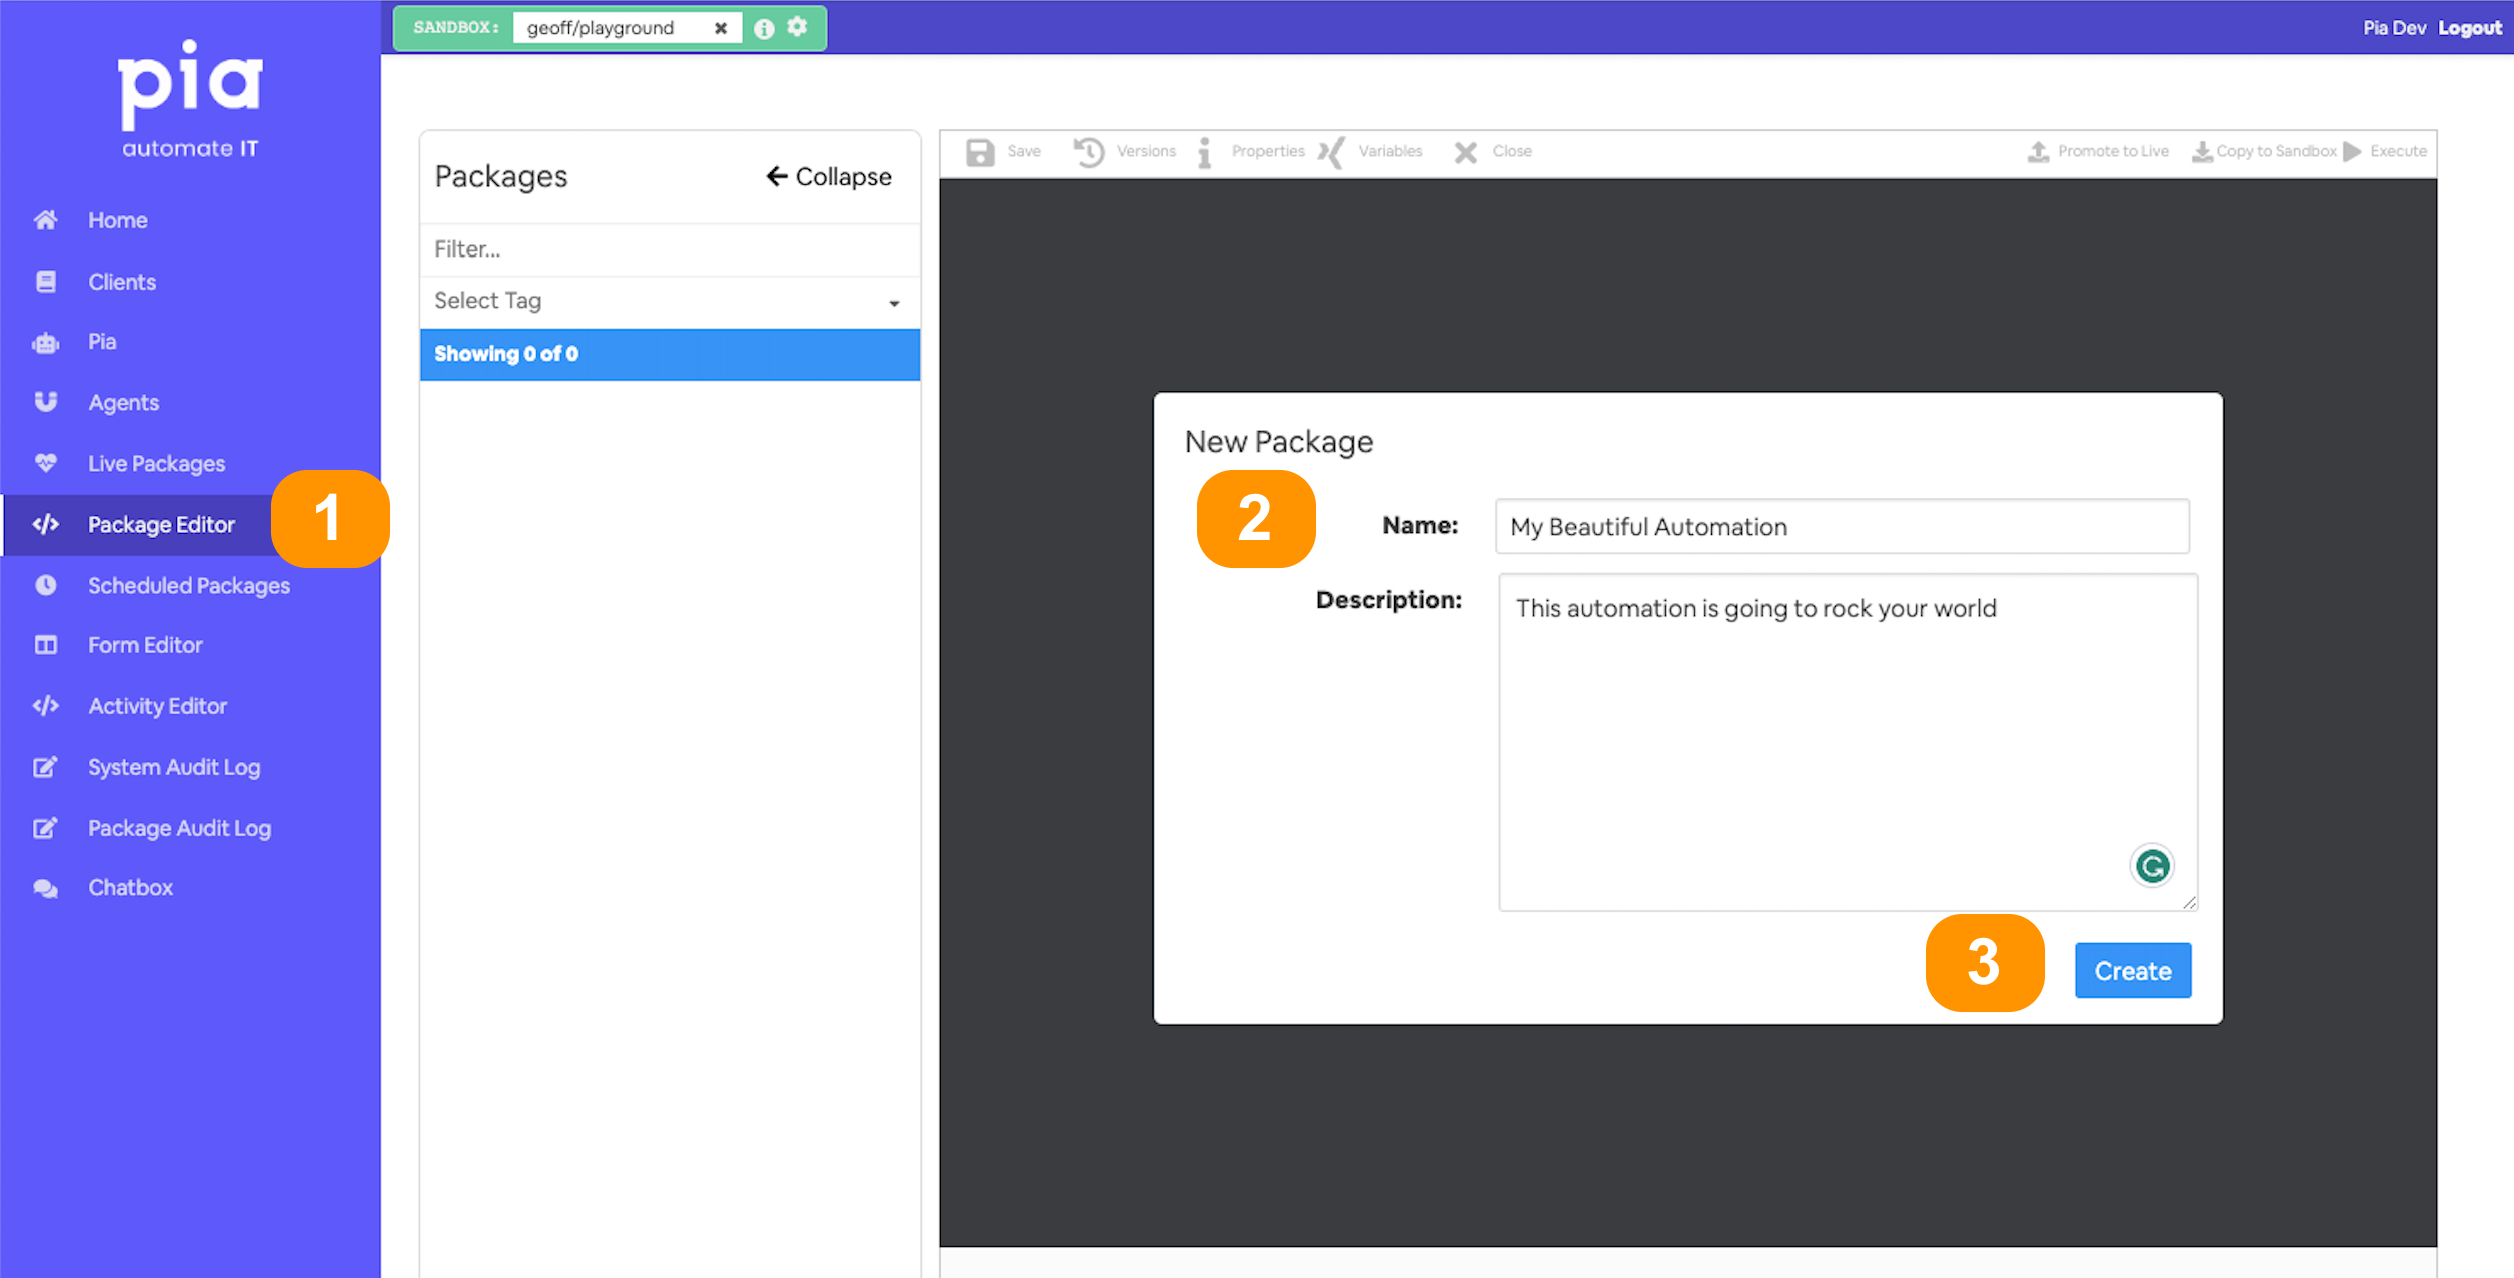
- Give your automation a memorable name;
- and a description (optional)
- You'll land in the automation definition editor
Set it up with a
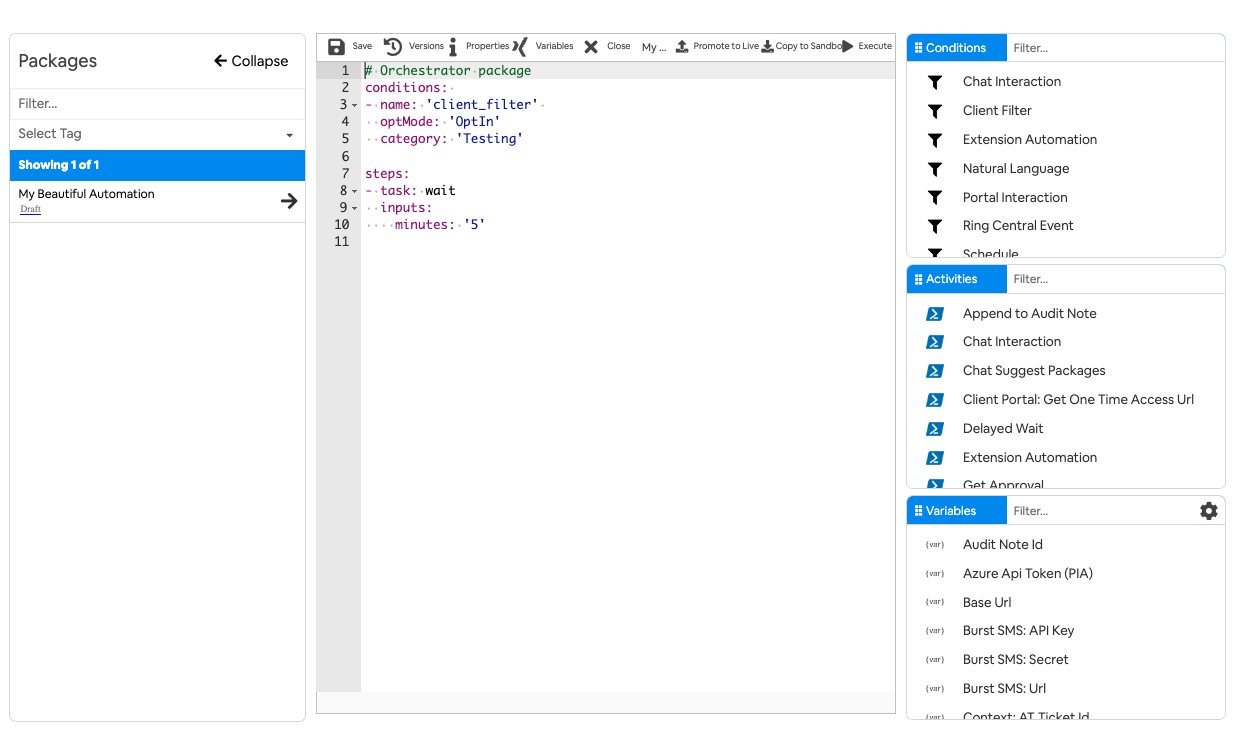
The fallback content to display on prerenderingso we can test it from the chatbox. It should end up looking similar to the below:
# 🎯 This file will control how the extension flows.

## Conditions are the first thing we define in our automation definition
conditions:
# 📝 Wherever you use a chat condition, you MUST have a client_filter condition.
- name: 'client_filter'
  optMode: 'OptOut'
  category: 'Testing'
# 💬 This is where we've defined a chat condition
- name: 'chat'
  option_button: 'End of New User Extension'
  option_text: 'I want to run an extension at the end of New User'
  option_category: 'Tutorial'

## Steps are the things that run when the conditions are met
## We haven't got to that yet, so keep the default
steps:
- task: wait
  inputs:
    minutes: '5'
If you want to check everything is working, you can run it from the chat box - but it won't look very exciting. It will just show
Waiting...for 5 minutes :-)
Add in the extension condition, in the same way as you did in the previous part of this series
Step 2: Setup mock data for testing
This extension is going to run after the new user package that takes a few minutes to run. We don't want to have to run the whole package every time we make a small change 🥱, so we set it up in a way that our package gets the same set of data to work with as if it was run after the New User automation when we're testing and debugging using the chatbox interface.
add a step to create mock data
Who's got time to wait, eh? Remove the wait activity form the automation package definition.
Replace it with an
The fallback content to display on prerenderingactivity into your automation package definitionGive it an alias -
alias: parent🎗️ remember you always need an aliasa Powershell, or any activity that you want to refer to later in your automation should always have a well named alias.
This is a bit of a special case, as we are using the name
parentto have a nice name to override the variable=extension_automation.parent_datathat is always provided when you are running in the context of an extension. But not, when you're not. So, we're going to use this replacement variable in our automation and will populate it with mock data if we're not running as an extension.And lets bring in that extension data into a variable called
$ea_data. So add the below input variable mapping:
ea_data: =extension_automation.parent_dataAnd lets start our script off with just the return statement to return the extension data
use this patternThis pattern of setting up mock data and populating in works well for all extensions. Of course with different mock data
$result = $ea_data
## if $ea_data is empty this isn't an extension - use the mock data
if([string]::IsNullOrEmpty($result)){
    $mockData = '{
        ## We will populate this with mock data ##
    }'
    $result = ConvertFrom-Json $mockData
} else {
  $result = ConvertFrom-Json $result
  $result = $result[0]
}
return @{data = $result}
use this reference throughoutwe will be accessing the data throughout the rest of the automation as
parent.data. Withparentbeing the alias for this script. Anddatabeing the variable we are using to return all the user properties.So, our automation will always work even if we rely on data from the extension
🖥️ Keeping up? Here's what your full automation package definition should look like so far
# 🎯 This file will control how the extension flows.

## Conditions are the first thing we define in our automation definition
conditions:
# 📝 Wherever you use a chat condition, you MUST have a client_filter condition.
- name: 'client_filter'
  optMode: 'OptOut'
  category: 'Testing'
# 💬 This is where we've defined a chat condition
- name: 'chat'
  option_button: 'End of New User Extension'
  option_text: 'I want to run an extension at the end of New User'
  option_category: 'Tutorial'

# 🔌 This is where we've defined an extension automation. You won't be able to
# 🔌  connect to a parent automation without this
- name: 'extension_automation'

## Steps are what execute when the conditions are met
steps:

# 💡 Time to grab that extension automation data! And hey,
# if we can't find it, we'll just use some mock data instead. 😉
- task: inline_powershell
  alias: parent
  inputs:
    ea_data: =extension_automation.parent_data
    script: |
        if([string]::IsNullOrEmpty($result)){
            ## We will populate this with mock data in next step! ##
            $mockData = '{}'
            $result = ConvertFrom-Json $mockData
        }
        return @{data = $result}
Populate the mock data
For your convenience, Pia provides example data for all of our extensions.
Open the automation package configuration for the client you'll be testing against
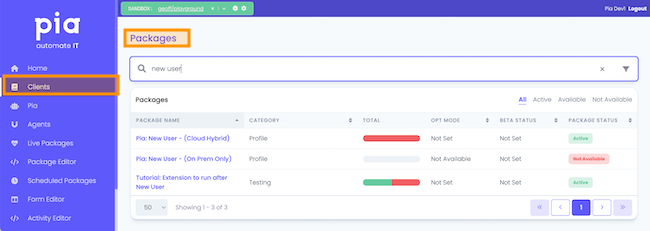
In the package configuration, open the extension automation configuration
Only for configured automationsThis section won't be here for automations that don't have extension points configured.
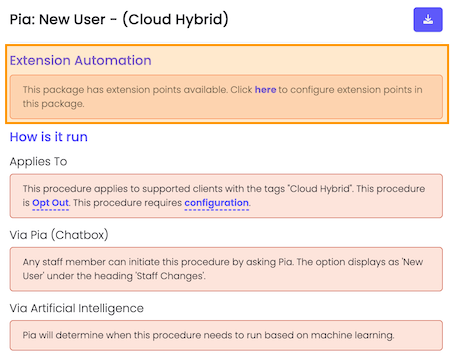
- Select the
Data Schemabutton and copy the contents so we can use it as the mock data in our script
- Go back to the automation package editor, in your inline powershell select the
{}'s within the$mockData = '{}'line. Paste the mock data from your clipboard. Almost too easy 🌴.
- Just to labour the point, add a The fallback content to display on prerenderingand print out one of the variables. Remember how to get the returned data from an inline powershell activity?
- For example, to print out the display name, the below should do the trick.
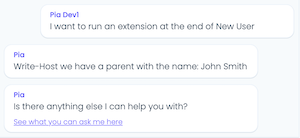
# 💬 Output to the engineer in the chat
- task: chat_interaction
  inputs:
    text: "We have a parent with the name: {=parent.data.displayName}"
- Go ahead and run your automation and you'll see that you have accessed the mock data.
If this had been triggered as an extension rather than as a chat interaction you would have got the name from the parent.
Step 3: Display the results with a bit of style
If you read the detailed docs - highly recommended :-) - for the
The fallback content to display on prerenderingyou will learn that in is more powerful that just displaying text and forms. We are going to create a nice HTML table like structure to print out all ourparent.dataattributes and values. 😎.
- Near the end of your automation package, but before the chat interaction you just created create another powershell activity
We could have just added logic at the end of our existing Inline Powershell. Why didn't we 🤔?
Inline powershell can get complicated quickly. If you follow the single responsibility principle and keep each script, short and focused. So, use multiple scripts to achieve a complex outcome it is soooo much easier to spot issues and debug. You'll thank me later ☺️.
- Set it up so it looks similar to this
#🤩 Create a nicely formatted HTML string to add to the Chat
- task: inline_powershell
  alias: formatted_message
  inputs:
    data: =parent.data
    script: |
And now lets implement the logic to iterate through the
data(notice this is the variable that we've mapped fromparent.datathat we use whenever we want to get data passed into our extension from a parent).So lets work through this:
- Deal with the data conversion at the start of your script
- Iterate through each item in the collection; and
- For each one put together a string of text, using the ```<strong>``` html tag to make the names standout and the ```<br />``` to go onto a new line.
Keep it SimplePia aiDesk works best if you keep chat messages short and sweet. You can usually achieve most of what you need to lay out content in an easy to read manner with these 2 simple html tags.
Your powershell script might end up looking something like this
#Start by converting into a powershell object
$data = $data | ConvertFrom-Json
#Initialise output, which we'll use to concatenate a nice looking message together
$output = ""
foreach ($property in $data.PSObject.Properties) {
    $output +=  '<strong>' + $property.Name + ':</strong>' + $property.Value + '</div><br />'
}
return @{asDisplayString = $output}
now lets use the variable
formatted_message.asDisplayStringto output your message to chat. 🎗️ remember:formatted_messagewas the alias you gave this activity.So, go ahead and update that chat so that it looks similar to:
- task: chat_interaction
  inputs:
    text: |
        {=formatted_message.asDisplayString}
- Go ahead and run it through the chatbox and you should get output like:
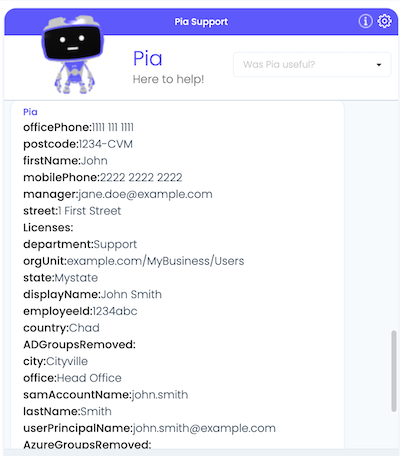
🐣 well - it displayed everything, thats pretty cool. But we can do a little better methinks...
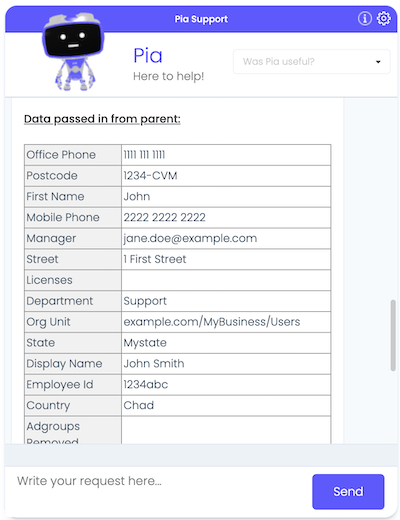
Step 4: Display the results in a grid
OK, We're going to just update the powershell script from the previous step and add a little spit and polish. We're going to make 2 changes to the script:
- Take the camel case variable names and turn them into title case
- Make the HTML a little more complex so it displays in a grid.
- Replace the script you have for
formatted_messagewith the following:
$data = $data | ConvertFrom-Json
$output = "`n<u><strong>Data passed in from parent:</strong></u><br />`n"
$output += "<div style='display: table;border-collapse: collapse;'>"

# Loop over each property in the object
foreach ($property in $data.PSObject.Properties) {
    # Convert property name from camelCase to Title Case for display
    $displayName = (Get-Culture).TextInfo.ToTitleCase(($property.Name -replace "(?<=\p{Ll})(?=\p{Lu})", " ").ToLower())

    # Create a div for each 'row', containing two more divs for 'cells'
    $output += '<div style="display: table-row;">
                    <div style="display: table-cell; padding: 2px;border: 1px solid #999;vertical-align: middle;background: #f1f1f1">' + $displayName + '</div>
                    <div style="display: table-cell; padding: 2px;border: 1px solid #999;vertical-align: middle">' + $property.Value + '</div>
                </div>'
}

# Close the container div
$output += "</div>"
return @{asDisplayString = $output}
🤔 Theres a couple of fiddly bits in there, but the logic is just the same as what you did previously
Run it again, and you should get the below:
Step 5: Configure it to run at the end of New User
So, we've taken a windy 🚏 path to get here, but now for the moment of truth. Let's plug this into your New User automation And see some real data come through...
- Without New User in your The fallback content to display on prerenderingyou'll need to promote to live before you can configure it
🎗️ Quick reminder of how to do that
:::caution test, test and test again Often you can't link an extension to an automation without promoting in from your
So, it is especially important to be really disciplined with how you test your extension as the first time it runs end to end could be in the live environment. :::
- Are you ready for this 😓? From the top actions bar in the automation package editor, click "Promote to Live"
- You will be presented with a list of changes, a list of activities and forms that will be promoted from your sandbox into the live environment
- Review the list carefully and press
Continue
Open the client configuration for the client you'll be testing against
this will create a userThis will go ahead and create a user, so make sure you tidy up after yourself :-)
In the package configuration, open the extension automation configuration
Only for configured automationsThis section won't be here for automations that don't have extension points configured.
From the Extension Points dialog, select your automation package from the
End of Package Executiondrop down.
Step 6: Run it and see the results
- Trigger the New User automation.
- After the New User automation has gone through it's standard steps, you should see the actual data of the user you've just created in
the chat output.
🧨 Congratulations 🧨. You now can access data from the parent automation and use it to power your custom automation. This can be really powerful as you can use this data to integrate with other systems and processes on a per-client basis without having to question the service desk engineer to get that information.