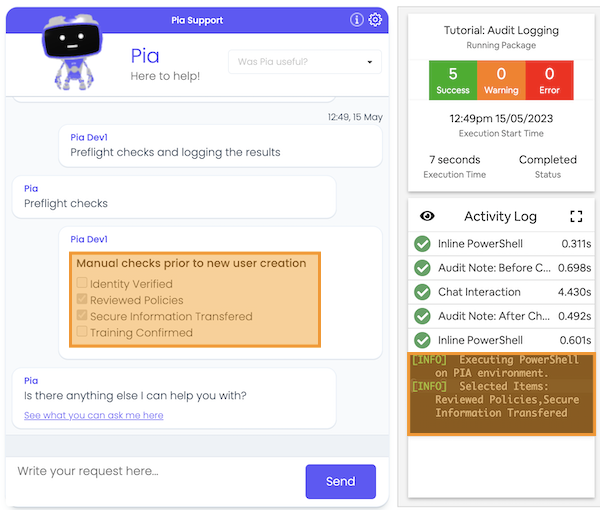
Writing to the ticketing system
The ticket is the source of truth. In this tutorial we explore writing to the audit log in the ticketing system and key points in your automation
What you'll learn
- Using checkboxes in forms and using the results
- Using the values from the checkboxes to drive the behaviour of your automation
- Adding an audit log message to the ticket
Step 1: Get setup
Create a
The fallback content to display on prerenderingto work in if you don't have one🤔 How to create a sandbox
- In the top bar of the portal, select view all sandboxes
- '+ New Sandbox' to create your sandbox
- Give it a simple, easy to remember name
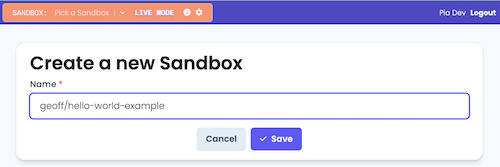
Choose a good nameprefixing your sandboxes with your name can make them easy to find
Create a new
The fallback content to display on prerenderingcalledTutorial: Audit Logging🎗️ Refresher on how to create an automation package definition
- Open the "Package Editor" from the left-hand menu
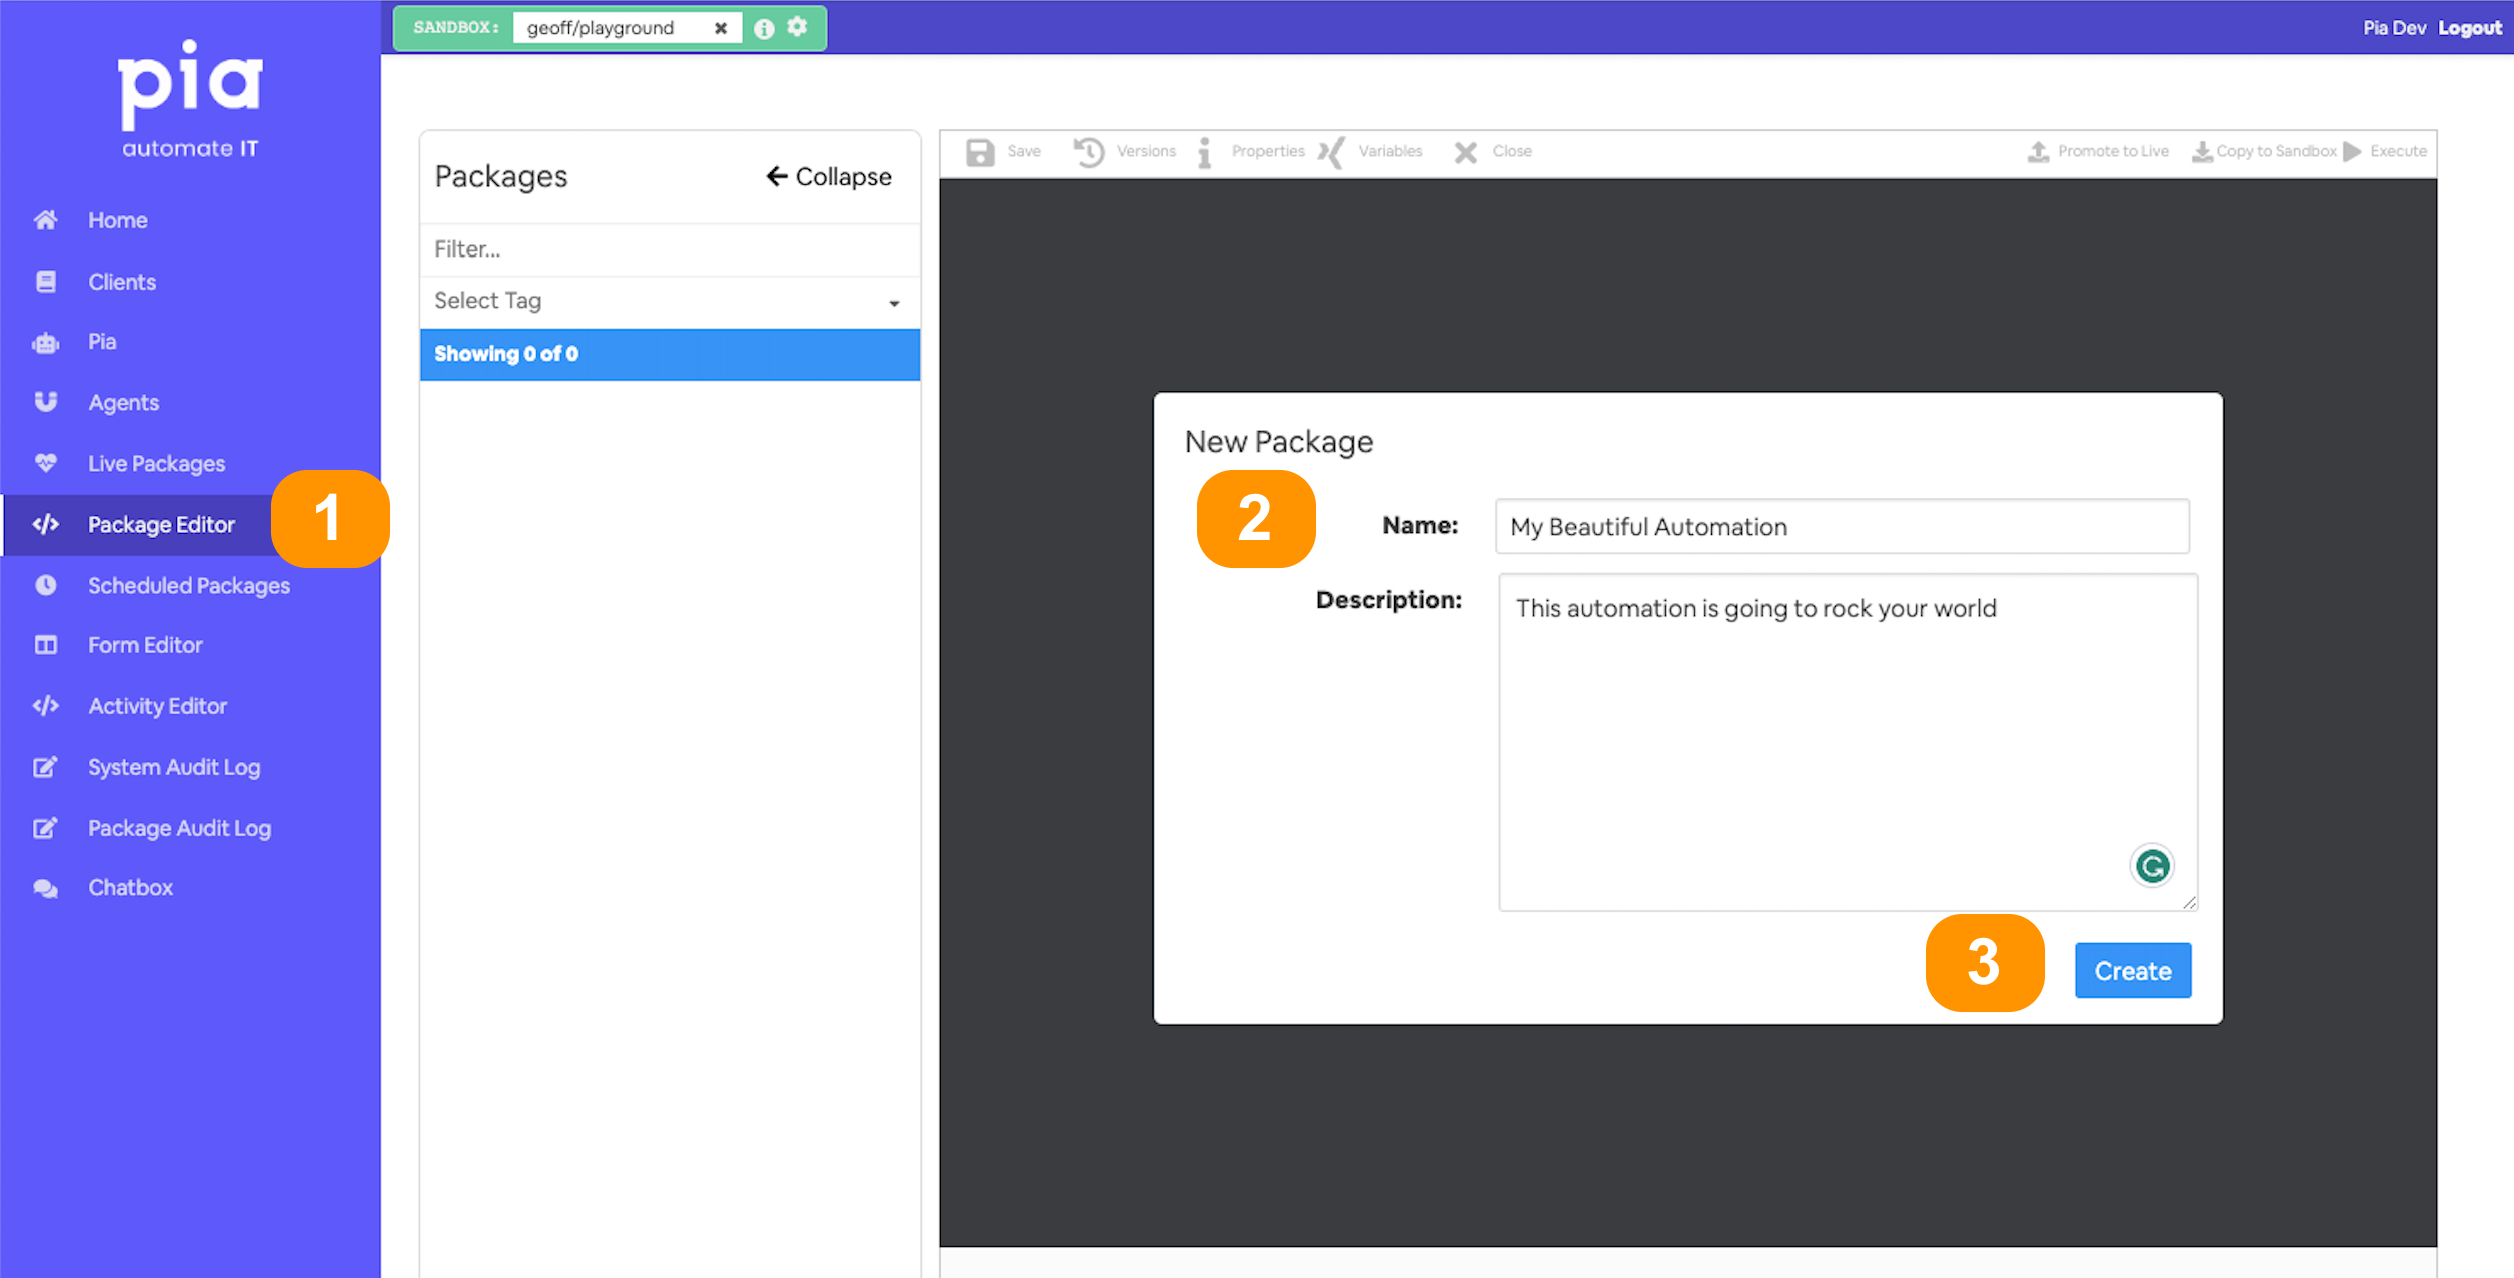
- Give your automation a memorable name;
- and a description (optional)
- You'll land in the automation definition editor
Set it up with a
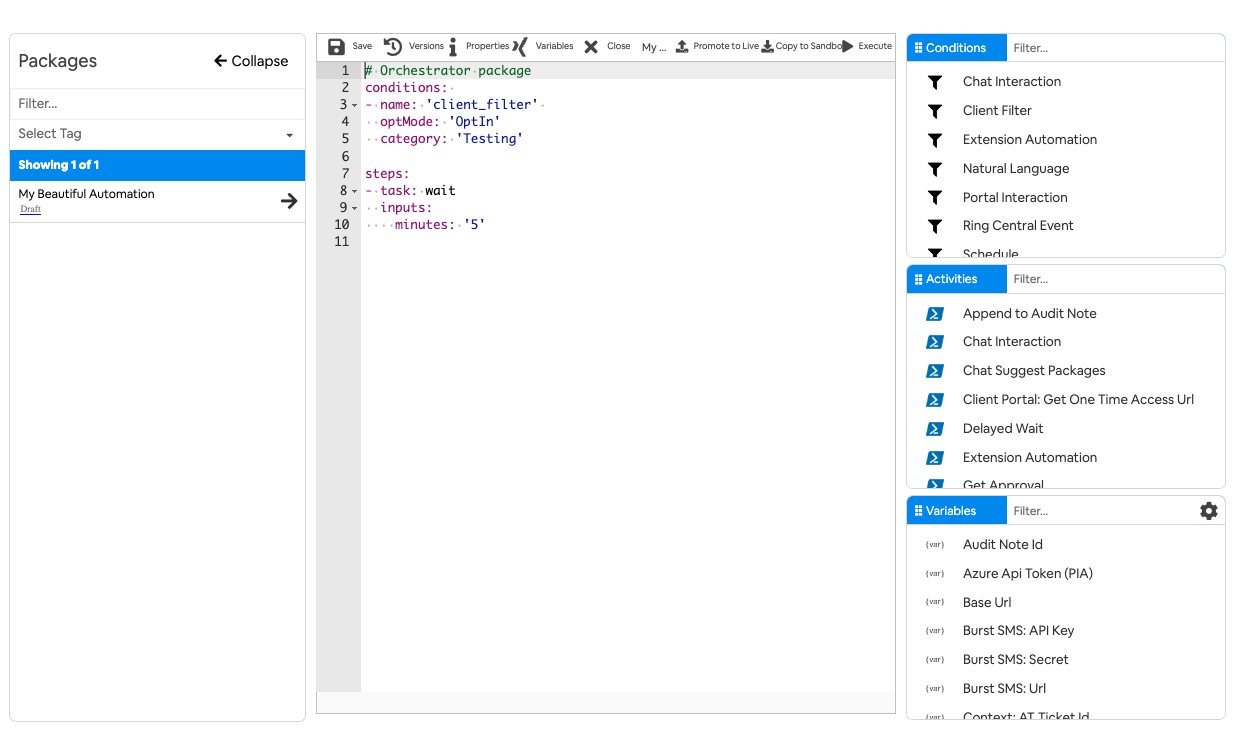
The fallback content to display on prerenderingso we can test it from the chatbox. It should end up looking similar to the below:
## Conditions are the first thing we define in our automation definition
conditions:
# 📝 Wherever you use a chat condition, you MUST have a client_filter condition.
- name: 'client_filter'
optMode: 'OptOut'
category: 'Testing'
# 💬 This is where we've defined a chat condition
- name: 'chat'
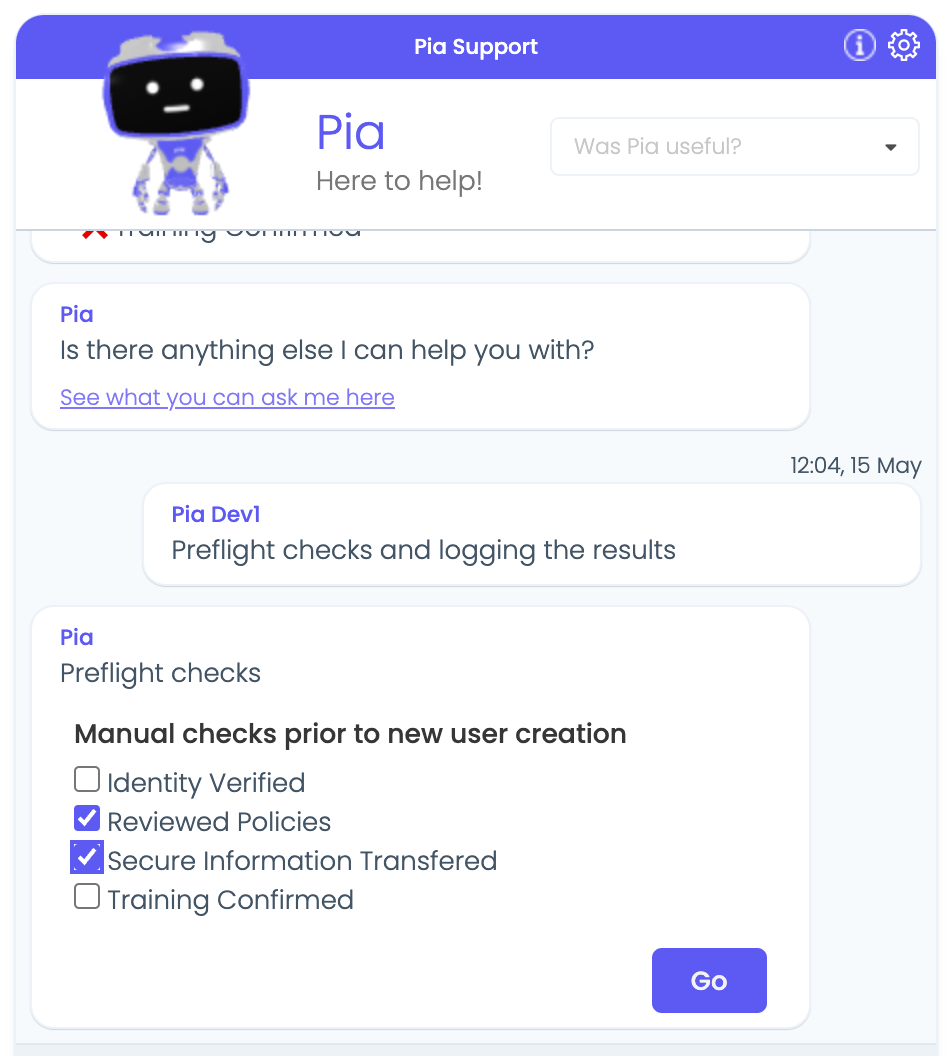
option_button: 'Checks and auditing'
option_text: 'Preflight checks and logging the results'
option_category: 'Tutorial'
## Steps are the things that run when the conditions are met
## We haven't got to that yet, so keep the default
steps:
- task: wait
inputs:
minutes: '5'
If you want to check everything is working, you can run it from the chat box - but it won't look very exciting. It will just show
Waiting...for 5 minutes :-)
Step 2: Create your form
- Go to form editor in your sandbox where you will see "New Form" section.
- Fill in the name and static name of the form you want to create. You can make changes to the other option as per your requirement:
- Once you click on the 'Create' button, you will be taken to the Form Editor screen where you can start editing your form.
- Give it the following details:
Name: Pre Flight Checks
Static name: pre_flight_checks_form
Step 3: Add a set of checkboxes to your form
- Still in your form, drag on the checkboxes element from the toolbox on the right
- Give it a label of
Manual checks prior to new user creation - And a Reference Name of
pre_run_checks
- Don't worry 🧘 about anything else, we are going to set the values using a The fallback content to display on prerenderingscript. Save your form and go back to your automation package definition.
Step 4: Configure your form in the automation definition
Create a script to define the data
- Replace the wait activity with an The fallback content to display on prerenderingactivity
- Give it an
aliaslike:alias: checklist_data
Aliases allow you to refer to the return values from inline powershell from anywhere in your automation definition.
Create a little powershell script to provide the data required to populate our form. It should return 2 properties we will use later:
CheckboxOptions: a list of strings, that relate to the checks to performFormDef: the form definition to configure the form we just created in the previous step. Read the documentation onThe fallback content to display on prerenderingif you need more information.
Here is one possible implementation:
# Define a list of checks that must be met before a user is created
$checks = @("Identity Verified","Reviewed Policies",
            "Secure Information Transferred","Training Confirmed")

# Convert the list of items into the format required by our form field definition
$checklist = $checks | ForEach-Object { @{ text = $_; value = $_ } }

# Return both the array of possible options and the form definition
return @{
    CheckboxOptions = $checks
    FormDef = @{ pre_run_checks = $checklist }
}
Add in the chat interaction for the form
Go ahead and add a
The fallback content to display on prerenderingbelow the inline powershell🤔 need a reminder?
From within the automation package editor
- Put your cursor into the activities section of the yaml file
- Select the activity you want from the activities section of the editor
- The available fields can be filled in using the form. Or, you can enter them into the yaml later
- Click 'Add' to populate your definition with this activity
We are going to include the following form properties
text: 'Preflight check'
form_name: 'pre_flight_checks_form'
form_display_mode: 'Embed'
form_def: =checklist_data.FormDefIt should end up similar to:
## Run our form embedded in the chat experience passing in the form def
- task: chat_interaction
alias: pre_flight_checks_form
inputs:
    text: 'Preflight checks'
    form_name: 'pre_flight_checks_form'
    form_display_mode: 'Embed'
    form_def: =checklist_data.FormDef
Let's go ahead and run that from the chatbox
👀 Complete automation package definition
## Conditions are the first thing we define in our automation definition
conditions:
# 📝 Wherever you use a chat condition, you MUST have a client_filter condition.
- name: 'client_filter'
  optMode: 'OptOut'
  category: 'Testing'
# 💬 This is where we've defined a chat condition
- name: 'chat'
  option_button: 'Checks and auditing'
  option_text: 'Preflight checks and logging the results'
  option_category: 'Tutorial'

## Steps are the things that run when the conditions are met
steps:
## Setup the data using powershell inline
- task: inline_powershell
  alias: checklist_data
  inputs:
    script: |
        # ① Define a list of checks that must be met before a user is created
        $checks = @("Identity Verified","Reviewed Policies",
                    "Secure Information Transferred","Training Confirmed")

        # ② Convert the list of items into the format required by our form field definition
        $checklist = $checks | ForEach-Object { @{ text = $_; value = $_ } }

        # ③.Return both the array of possible options and the form definition
        return @{
            CheckboxOptions = $checks
            FormDef = @{ pre_run_checks = $checklist }
        }

## Run our form embedded in the chat experience passing in the form def
- task: chat_interaction
  alias: pre_flight_checks_form
  inputs:
    text: 'Preflight checks'
    form_name: 'pre_flight_checks_form'
    form_display_mode: 'Embed'
    form_def: =checklist_data.FormDef
Step 5: Parse the output and convert into message format
We will use another
Go ahead and add the
The fallback content to display on prerenderingactivity at the bottom of the package definition.Populate it with the following properties
- task: inline_powershell
  alias: checklist_results
  inputs:
    cbSelectedItems: =pre_flight_checks_form.form.pre_run_checks
    cbOptions: =checklist_data.CheckboxOptions
    script: |
        Write-Host Selected Items: $cbSelectedItems
🫸 Lets pause and take note of a few things here 🫷
alias: checklist_results: as always our inline powershell needs an alias so we can reference the values later.under
inputs:we have mapped 2 variables so that we can use them in our scriptcbSelectedItems: is mapped to the reference name we gave to our checkbox list when we created the form early in this tutorialcbOptions: is mapped to the full list of the names of the checks
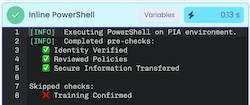
Now run the automation again, and check 2 checkbox items and see what you get printed from your script
 Checkboxes produce comma separated string
Did you notice that, that has produced a comma separated string? We are going to have to transform it before we can do anything useful
Lets finish our script
We are going to do a few things in our script.
- Transform the input properties into 2 arrays of selected vs complete list of checks.
- Create 2 arrays of checked and non-checked items
- Format the results into a user friendly message
Start by adding the logic to create 2 lists of strings for selected and non-selected checkbox items.
```powershell
# Convert the cbOptions JSON string to a PowerShell object
$cbOptions = $cbOptions  | ConvertFrom-Json
# Split the cbSelectedItems string into an array at each comma
$cbSelectedItems = $cbSelectedItems.Split(',')

# Create selectedItems list by filtering the cbOptions for values that exist in cbSelectedItems
$selected = $cbOptions | Where-Object { $_ -in $cbSelectedItems }

# Create a not selected list by filtering the cbOptions for values that exist in cbSelectedItems
$notSelected = $cbOptions | Where-Object { $_ -notin $cbSelectedItems }
```
We want to create output similar to the below:
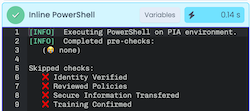
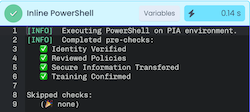
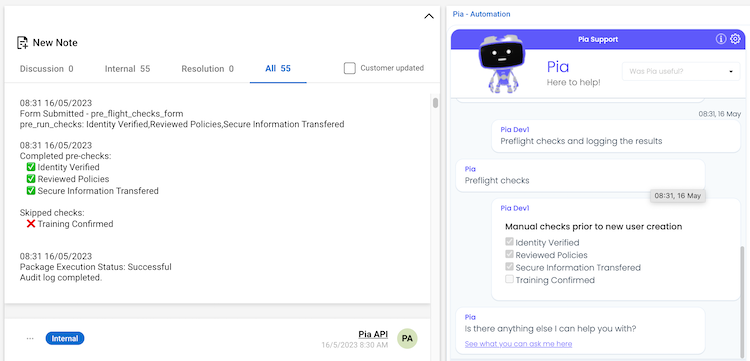
Completed pre-checks:
   ✅ Reviewed Policies
   ✅ Secure Information Transferred
Skipped checks:
   ❌ Identity Verified
   ❌ Training Confirmed
Lets start by adding the logic to print the selected checks in a pretty format
    # Prefix each checked item with '✅' or set to '(😭 none)'
    $completedChecks = if($selected) {
        $selected -replace '^', '   ✅ ' -join "`n"
    } else {
        "   (😭 none)"
    }

    # Prefix each non-checked item with '❌' or set to '(🎉 none)'
    $skippedChecks = if($notSelected) {
        $notSelected -replace '^', '   ❌ ' -join "`n"
    } else {
        "   (🎉 none)"
    }

    # Combine the strings into the final output
    $output = ("`nCompleted pre-checks:`n{0}`n`n" `
                + "Skipped checks:`n{1}") -f $completedChecks, $skippedChecks

    # And lets just print that to the console for now
    Write-Host $output
Now if you run the different scenarios you should get output similar to:
Step 6: Add the message to the ticketing system
Whether Connectwise, Autotask, ServiceNow or another supported PSA it is often valuable to record information in the ticket for when you want to look back and see the history of a request. Let's go ahead and write this message to the ticket notes. This bit is nice and simple.
- First, instead of logging the message lets get the The fallback content to display on prerenderingto return the message as a variable. Replace that line with something similar to:
# Return the message with the name AuditMessage
@{ AuditMessage  = $output}
- Now, bring in the The fallback content to display on prerenderingactivity from the toolbox on the right. You can remove the
TicketNoteIdproperty as we're using the one in the current context. - Set the content to the variable we are returning from the inline powershell
- This time, lets run it from the ticketing system so that we can see it in all its glory! Below is an example from ConnectWise:
🧨 Congratulations 🧨, that is pretty amazing. You can now interact with the ticketing system and might have even learnt a new form component. In the next part of the tutorial we are going to continue this example and make it an extension of the New user package - aka
🎪 full code example
## Conditions are the first thing we define in our automation definition
conditions:
# 📝 Wherever you use a chat condition, you MUST have a client_filter condition.
- name: 'client_filter'
  optMode: 'OptOut'
  category: 'Testing'
# 💬 This is where we've defined a chat condition
- name: 'chat'
  option_button: 'Checks and auditing'
  option_text: 'Preflight checks and logging the results'
  option_category: 'Tutorial'

## Steps are the things that run when the conditions are met
steps:
## Setup the data using powershell inline
- task: inline_powershell
  alias: checklist_data
  inputs:
    script: |
        # ① Define a list of checks that must be met before a user is created
        $checks = @("Identity Verified","Reviewed Policies",
                    "Secure Information Transferred","Training Confirmed")

        # ② Convert the list of items into the format required by our form field definition
        $checklist = $checks | ForEach-Object { @{ text = $_; value = $_ } }

        # ③.Return both the array of possible options and the form definition
        return @{
            CheckboxOptions = $checks
            FormDef = @{ pre_run_checks = $checklist }
        }

- task: chat_interaction
  alias: pre_flight_checks_form
  inputs:
    text: 'Preflight checks'
    form_name: 'pre_flight_checks_form'
    form_display_mode: 'Embed'
    form_def: =checklist_data.FormDef

- task: inline_powershell
  alias: checklist_results
  inputs:
    cbSelectedItems: =pre_flight_checks_form.form.pre_run_checks
    cbOptions: =checklist_data.CheckboxOptions
    script: |

        # Convert the cbOptions JSON string to a PowerShell object
        $cbOptions = $cbOptions  | ConvertFrom-Json
        # Split the cbSelectedItems string into an array at each comma
        $cbSelectedItems = $cbSelectedItems.Split(',')

        # Create selectedItems & not selected by filtering the cbOptions in cbSelectedItems
        $selected = $cbOptions | Where-Object { $_ -in $cbSelectedItems }
        $notSelected = $cbOptions | Where-Object { $_ -notin $cbSelectedItems }

        # Prefix each checked item with '✅' or set to '(😭 none)'
        $completedChecks = if($selected) {
            $selected -replace '^', '   ✅ ' -join "`n"
        } else {
            "   (😭 none)"
        }

        # Prefix each non-checked item with '❌' or set to '(🎉 none)'
        $skippedChecks = if($notSelected) {
            $notSelected -replace '^', '   ❌ ' -join "`n"
        } else {
            "   (🎉 none)"
        }

        # Combine the strings into the final output
        $output = ("Completed pre-checks:`n{0}`n`n" `
                    + "Skipped checks:`n{1}") -f $completedChecks, $skippedChecks

        # We will reference it as AuditMessage
        @{ AuditMessage  = $output}


# 🎫 add an audit log message to the ticket associated with this automation
- task: system_audit_note
  inputs:
    Content: |
       {=checklist_results.AuditMessage}