Configuring Extensions
🤖 What is an extension?
As a part of Pia AI Desk, Pia provides you with a set of 50-60 automation automations. These automations let you perform various tasks with Pia such as Staff Onboarding and Offboarding.
Pia's automations support a range of scenarios. Right now, with advanced automations (such as Staff Onboarding and Offboarding) you can use manual tasks to achieve the gap between what Pia does and the processes for your clients.
Using Extension Automations in Pia you can create your own extensions for your favorite Pia automations.
Examples:
- At the start of Staff Onboarding automation for client "ABC Company", prompt a message to the Service Desk engineer to remind them to do something
- At the end of the Staff Onboarding automation, send an email to HR to let them know that a new user has been created
- At the end of the terminate user automation, revoke a license in backup radar via a third party API
- After submitting the Staff Onboarding Form, send an email to HR with the New User Request details
First, see it in action
Demo of running an extension after Staff Onboarding creation

How we built it

Quick Start
The best way to become an Extension Automation guru is OUR TUTORIAL SERIES. 🎉📺.
Once you have decided what you want your extension automation to do, follow the steps below:
- Create a new automation
- Add the
extension_automationcondition to let Pia know that your automation is an extension automation - Use data from the parent automation in your extension
- Promote your automation to 'live'
- Link your extension automation to a Pia automation
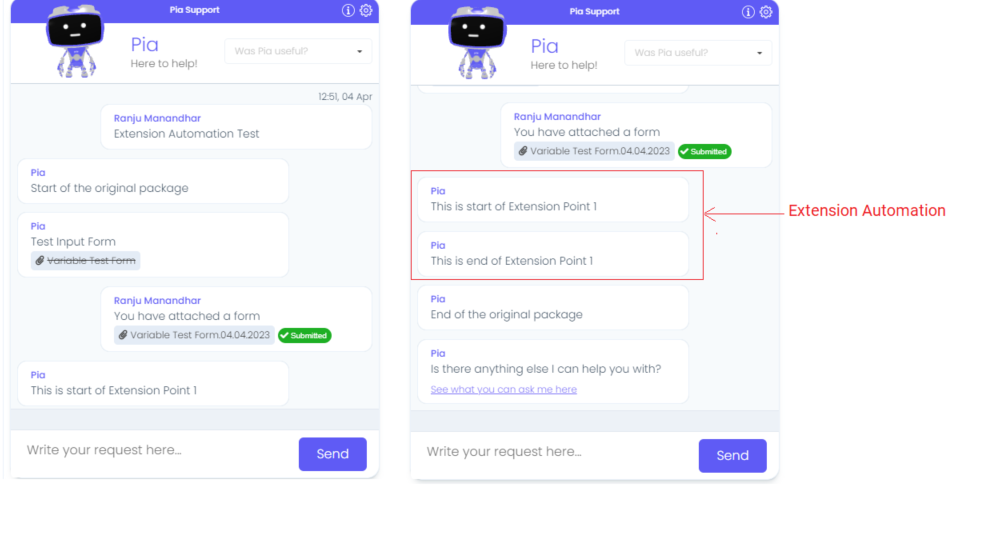
Here is an example of a automation running in Pia chatbot with an extension automation linked to it:
Deciding on Extension Automation Properties
The first step is to find the gap between a Pia automation and the business process you want to automate. This will help you understand what you want your extension automation to do.
Once you have decided on your required extension automation and the automation you wish to extend, the next step is to define at what point of the automation your extension automation will run. Pia currently provides extension points for the Staff Onboarding and Staff Offboarding automation in the following areas:
| Automation Type | Automation Name | Extension Points |
|---|---|---|
| Tech Assist and SmartForms | Pia: Staff Onboarding | Start of the automation, Middle of the automation (Prior to Staff Onboarding), Prior to Scheduling, End of the automation |
| Tech Assist and SmartForms | Pia: Staff Offboarding | Start of the automation, Middle of the automation (Prior to Staff Offboarding), Prior to Scheduling, End of the automation |
| Tech Assist and SmartForms | Pia: Reset Network Password | Start of the automation, Middle of the automation, and End of the automation (After the user is selected) |
| Tech Assist and SmartForms | Pia: Account Locked Out | Start of the automation, Middle of the automation (Prior to unlocking user account), End of the automation |
| Tech Assist | Pia: Re-enable Offboarded Account | Start of the automation, Middle of the automation (Prior to re-enabling user account), End of the automation |
| Tech Assist | Pia: Re-allocate User License | Start of the automation, Middle of the automation (Prior to re-allocating user license) , End of the automation |
| Tech Assist | Pia: Manage User Licenses | Start of the automation, Middle of the automation (Prior to adding or removing license for a user) , End of the automation |
| Tech Assist and SmartForms | Pia: Create or Remove Mail Forwarding Rule | Start of the automation, Middle of the automation (Prior to creating/removing the mail forwarding rule), Prior to Scheduling and End of the automation |
| Tech Assist | Pia: Add or Remove User From Groups | Start of the automation, Middle of the automation (Prior to updating group access), Prior to Scheduling and End of the automation |
| Tech Assist and SmartForms | Pia: Update User Details | Start of the automation, Middle of the automation (Prior to updating user details), Prior to Scheduling (Tech Assist Only) and End of the automation |
| Tech Assist and SmartForms | Pia: Add or Remove Users from Allow List | Start of the automation, Middle of the automation (Prior to adding or removing users from Allow List) and End of the automation |
| Tech Assist and SmartForms | Pia: Add or Remove Users from Block List | Start of the automation, Middle of the automation (Prior to adding or removing users from Block List), End of the automation |
| Tech Assist and SmartForms | Pia: Change Calendar Permissions | Start of the automation, Middle of the automation (Prior to updating user calendar permissions), End of the automation |
| Tech Assist and SmartForms | Pia: Setup or Remove Out of Office | Start of the automation, Middle of the automation (Prior to updating out of office), End of the automation |
| Tech Assist and SmartForms | Pia: Grant or Revoke Mailbox Access | Start of the automation, Middle of the automation (Prior to making mailbox changes), End of the automation |
Use data from the parent automation in your extension
Pia gives you the ability to use the data from the parent automation in your extension automation. The data will be available as a json object in the format as required by the automation.
You can use the data from the parent automation using an inline PowerShell activity in your extension automation where you can set the input property as:
- task: inline_powershell
  inputs:
    data: =extension_automation.parent_data
    script: |
        $obj = $(ConvertFrom-Json $data)
        write-host $data
Data available from Staff Onboarding automation
Extension Point 1 (Start of the automation) There is no data available for this extension point.
Extension Point 2 (Middle of the automation)
{
    "additionalAttributes": "",
    "additionalProxyAddresses": "",
    "alAdditionalAttributes": "",
    "changeAtLogon": true,
    "city": "",
    "company": "",
    "countryCode": "",
    "department": "",
    "description": "",
    "displayName": "",
    "email": "",
    "employeeId": "",
    "expiration": "",
    "firstName": "",
    "groups": "",
    "jobTitle": "",
    "lastName": "",
    "managerUpn": "",
    "middleName": "",
    "mobilePhone": "",
    "office": "",
    "officePhone": "",
    "ou": "",
    "password": "",
    "postalCode": "",
    "skipMailNickname": true,
    "state": "",
    "street": "",
    "userName": "",
    "userPrincipalName": ""
}
Extension Point 3 (End of the automation)
{
    "adGroupsAssigned": [],
    "additionalAttributes": "",
    "additionalProxyAddresses": "",
    "alAdditionalAttributes": "",
    "azureGroupsAssigned": [],
    "changeAtLogon": true,
    "city": "",
    "company": "",
    "country": "",
    "department": "",
    "description": ""
    "displayName": "",
    "emailAddress": "",
    "employeeId": "",
    "expiration": "",
    "firstName": "",
    "groups": "",
    "jobTitle": "",
    "lastName": "",
    "licenses": [],
    "manager": "",
    "middleName": "",
    "mobilePhone": "",
    "office": "",
    "officePhone": "",
    "orgUnit": "",
    "ou": "",
    "password": "",
    "postcode": "",
    "samAccountName": "",
    "skipMailNickname": true,
    "state": "",
    "street": "",
    "userPrincipalName": ""

}
Data available from Staff Offboarding automation
Extension Point 1 (Start of the automation) There is no data available for this extension point.
Extension Point 2 (Middle of the automation)
{
    "additionalAttributes": "",
    "clientId": 123,
    "immutableId": "",
    "samAccountName": "",
    "scheduleDate": "",
    "scheduleForLater": true,
    "userPrincipalName": ""
}
Extension Point 3 (End of the automation)
{
    "adGroupsRemoved": [],
    "additionalAttributes": "",
    "azureGroupsRemoved": [],
    "clientId": 123,
    "displayName": "",
    "emailAddress": "",
    "emailAddresses": [],
    "firstName": "",
    "licenses": [],
    "orgUnit": "",
    "samAccountName": "",
    "scheduleDate": "",
    "scheduleForLater": true,
    "surname": "",
    "userPrincipalName": ""
}
Data available from Reset Network Password automation
Extension Point 1 (Middle of the automation)
{
    "userPrincipalName": "",
    "password": "!",
    "changeAtNextLogon": true,
    "clientId": 123
}
Linking Extensions to a Client
See the instructions for adding an Extension to a Client
Linking your extension automation to a Pia automation
Follow the steps below to link your extension automation to a Pia package:
Step 1: Log into your Pia portal
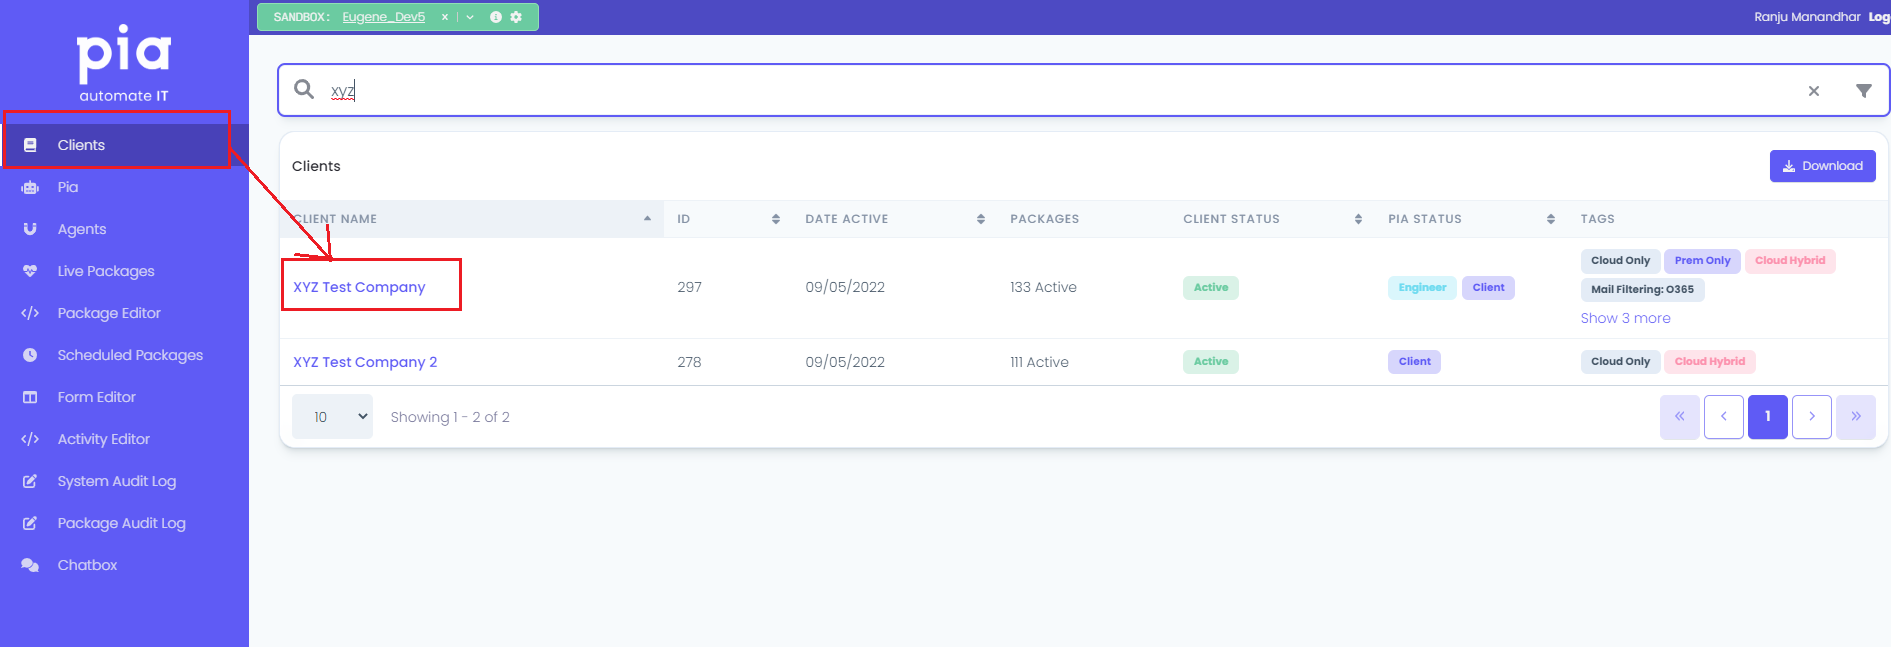
Step 2: Go to the Clients Screen and select a client from the clients list
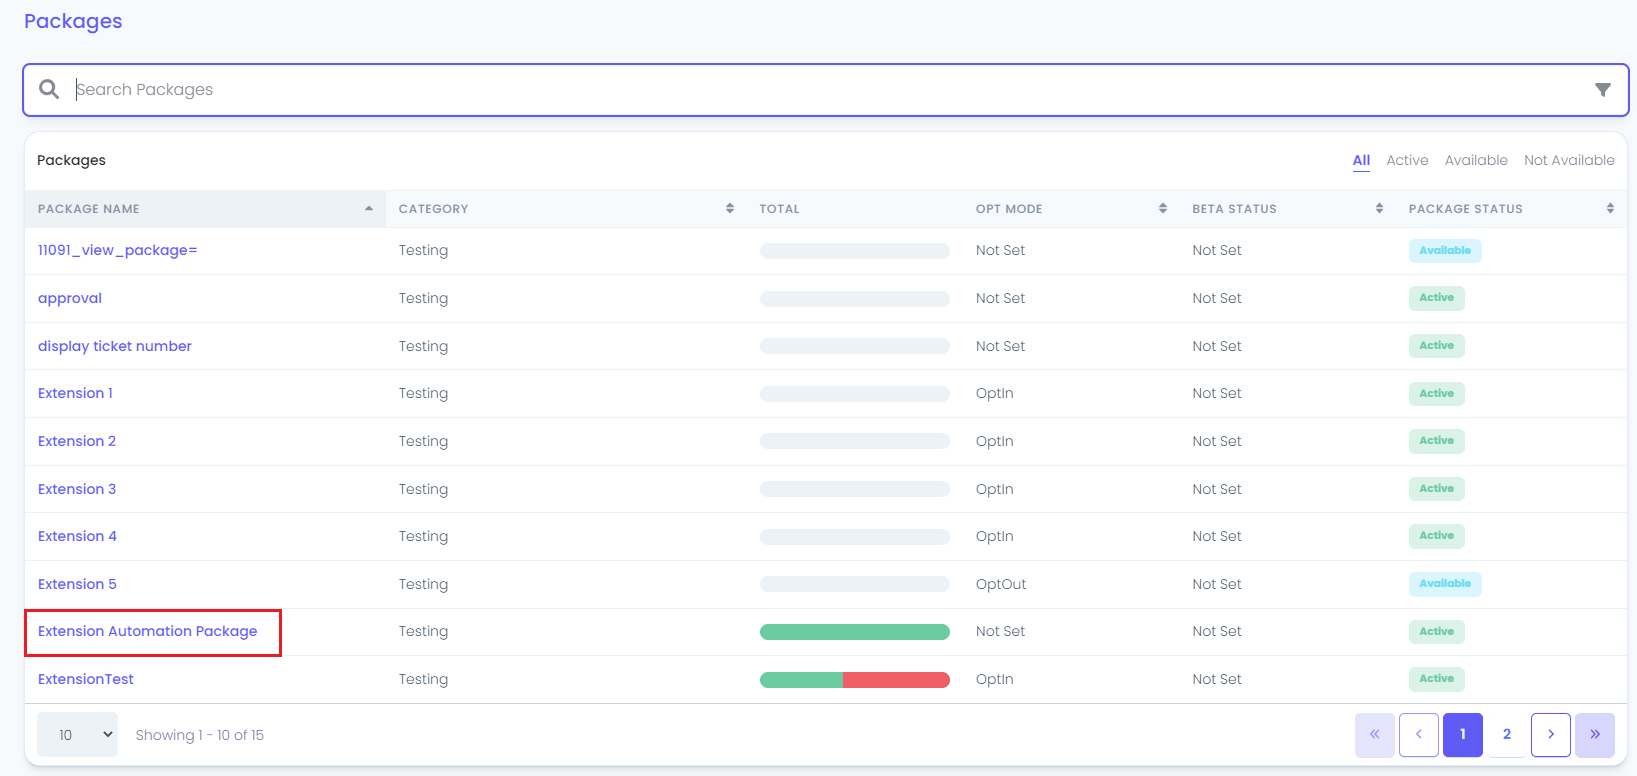
Step 3: Navigate to the list of packages available for the client and select the package which needs an extension automation linked.
For each package, you will see an "Extension Automation" section. If the package has extension points, you will get the below message:
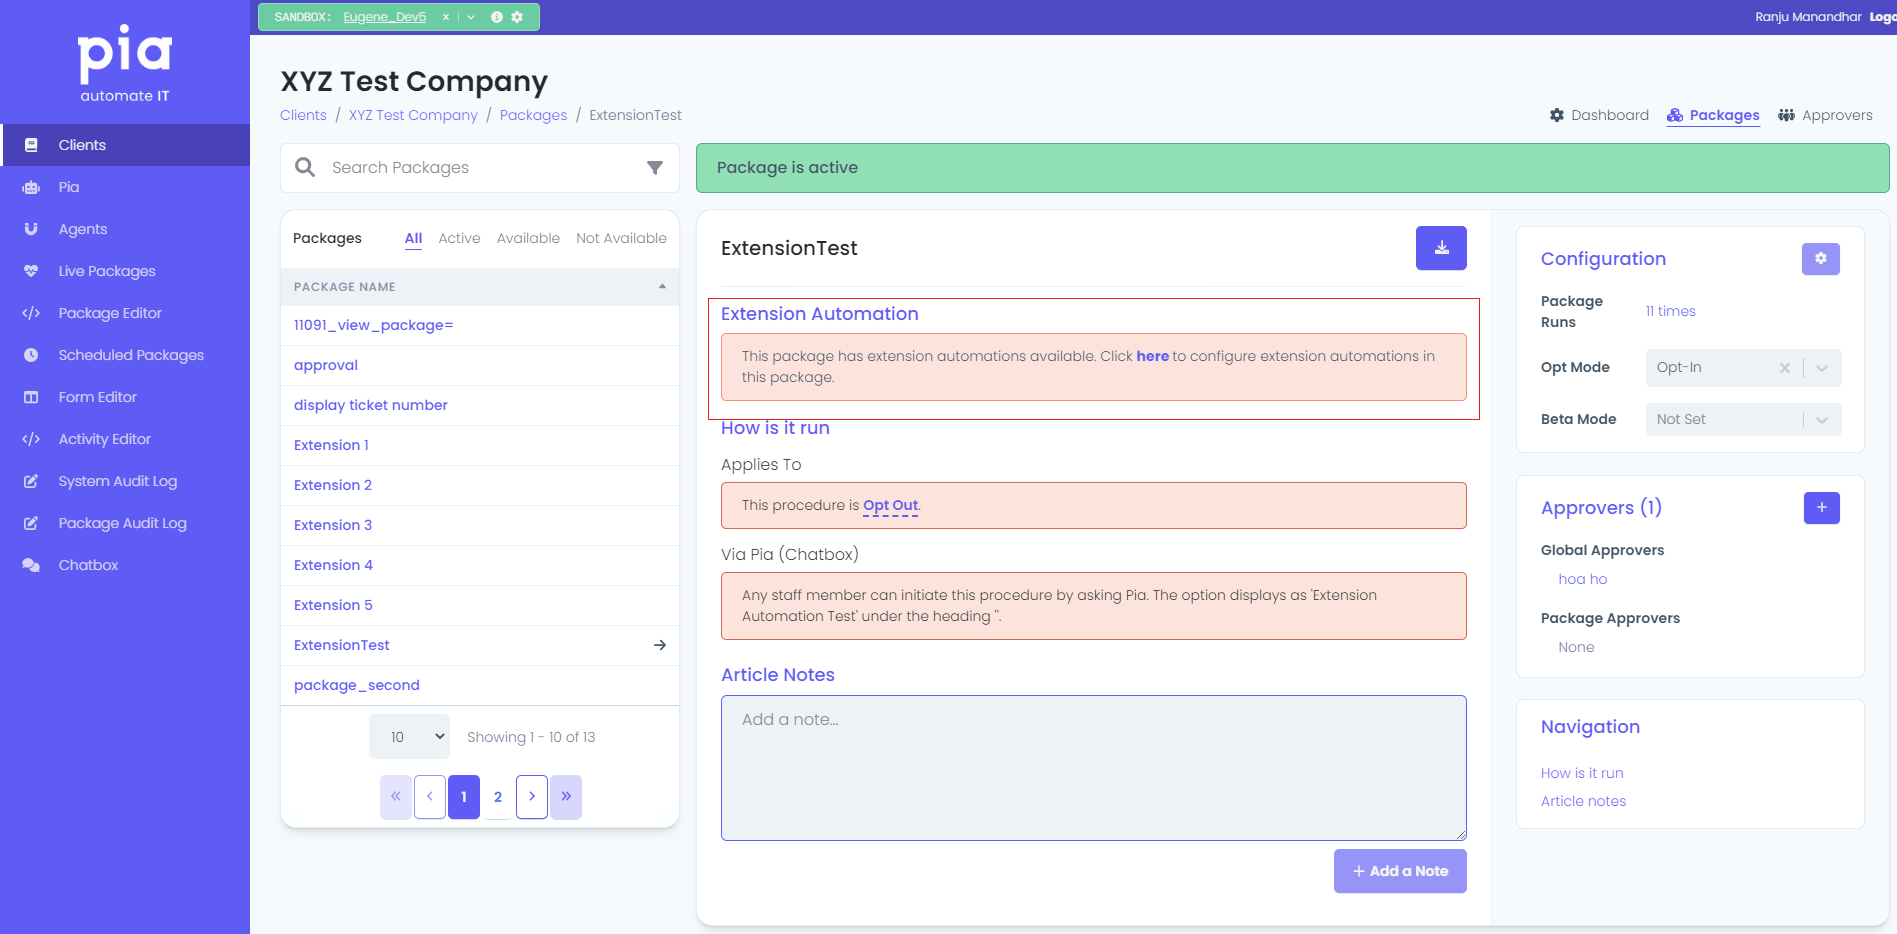
Step 4: For the package that has extension points available, click on the "here" text which will open a pop up that allows you to add extensions to the package. This pop up will have the following:
- For each Extension Point, you can view the Data schema that will be passed to the extension package by clicking the "Data Schema" button.
- You can add, remove or reorder multiple extensions to the same extension point by clicking the plus button, delete button and up/down arrow respectively.
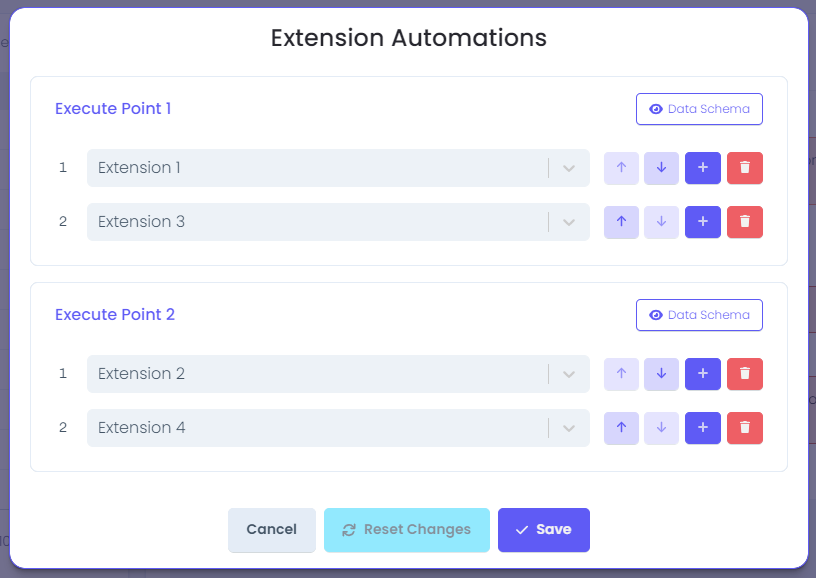
Step 5: Once you have linked your extension packages to the desired package, click the Save button.