Working with Forms
If you want to make your package more interactive to the user, you can use different forms available in the Form Editor screen. Forms are mostly used in Pia package to:
- Receive Inputs from the user required for the automation
- Provide user with an ability to determine the flow of the package
In this tutorial we explore the concept of how to create forms to gather user input and how to use the output as inputs into other components of your automation flow
What you'll learn
- Using the form editor to create a form
- Creating forms with interactive elements
- Adding radio buttons, dropdowns and text to make complex forms
- Adding your form into your The fallback content to display on prerendering
- Providing inputs into your form to populate elements
- The difference between embedded and popout forms
Step 1: Create a Form
- Go to form editor in your sandbox where you will see "New Form" section.
- Fill in the name and static name of the form you want to create. You can make changes to the other option as per your requirement:
- Once you click on the 'Create' button, you will be taken to the Form Editor screen where you can start editing your form.
- Give it the following details:
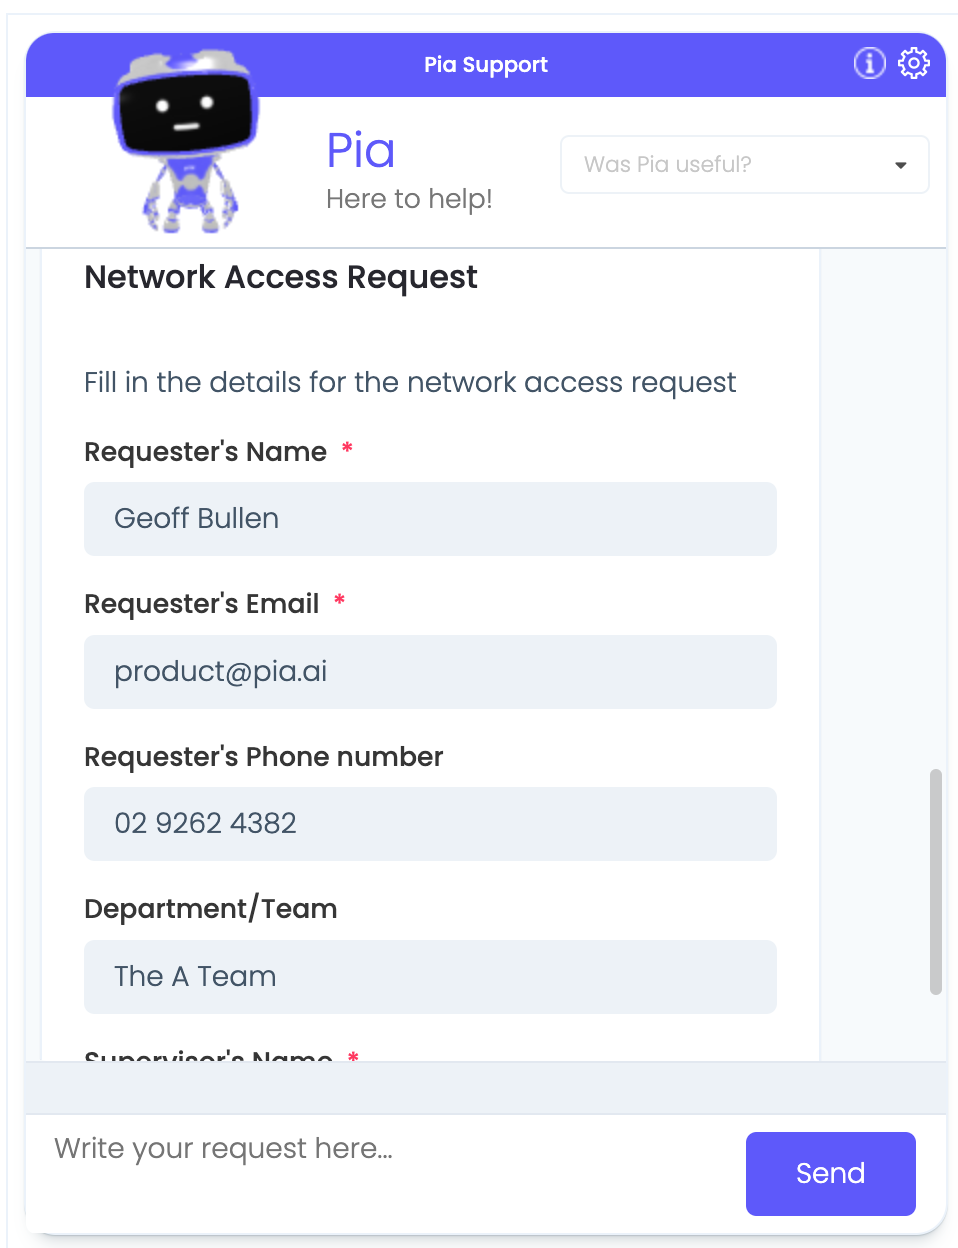
Name: Network Access Request
Static name: network_access_request_form
- Static names cannot be changed. Choose wisely!
- The 'Go' button is required as it is a submittable form. We will cover read-only forms later
Step 2: Add the title and subtitle
- Drag in "Header Text" element from the toolbox sidebar and replace "placeholder text" with
Network Access Request
- Add in your subheading. Drag the paragraph element from the toolbox sidebar
- Give it the text
Fill in the details for the network access request - A li'l style: change the font size to 18pts
- Save your form
Remember to save your form regularly so you don't lose your work if you close your browser by mistake
Step 3: Add some text input fields
Add in input boxes with the following values
Label Reference Name Placeholder Text Required Requester's Name requester_name Enter name true Requester's Email requester_email Enter email true Requester's Phone number requester_phone Enter number false Department/Team requester_team Enter team false Supervisor's Name requester_supervisor_name Enter name true
Step 4: Plugin your Form
Add a
The fallback content to display on prerenderingas we did in the first tutorial🤔 need a reminder?
From within the automation package editor
- Put your cursor into the activities section of the yaml file
- Select the activity you want from the activities section of the editor
- The available fields can be filled in using the form. Or, you can enter them into the yaml later
- Click 'Add' to populate your definition with this activity
This time we are going to include the form properties. Add the following
text: ' '
form_name: 'network_access_request_form'
form_display_mode: 'Embed'You should end up with the yaml below
# 📄 Run your form
- task: chat_interaction
  inputs:
    text: ' '
    form_name: 'network_access_request_form'
    form_display_mode: 'Embed'
Step 5: Run your package with the Form
Go to the chatbox screen and run your automation
🤔 need a reminder?
Create a test ticketTo run in the chatbot, a valid ticket number from your ticketing system is required.
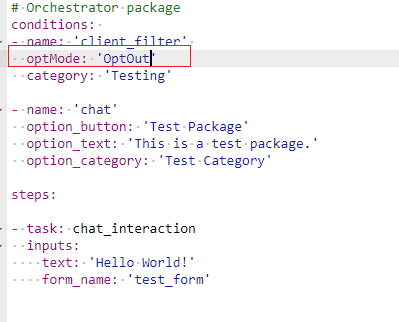
Running in The fallback content to display on prerenderingmodeTo run your package in Pia chatbot (in
The fallback content to display on prerenderingMode), set the 'OptMode' inThe fallback content to display on prerenderingto 'OptOut' so that the package runs in sandbox mode for all the clients in your sandbox regardless of their OptIn/Out status.👀 Check your condition
From within the Chatbox screen of the partner portal
- Enter a service desk ticket
- Select the automation to run
- Validate the output
You should get the following result
Step 6: Converting to a Popup Form
Our form is getting a little big to run in the chat interface.
- Change the highlighted row in the yaml
# 📄 Run your form
- task: chat_interaction
  inputs:
    text: '<strong>Enter request details:</strong>'
    form_name: 'network_access_request_form'
    form_display_mode: 'Popup'
Run it again and take note of the difference
How to pickEmbed mode is great for forms with just a couple of fields as a user doesn't need to leave the chat interface
Step 7: Accessing the Form values
We're going to simply print out the values from the form in a chat message so that we can learn how to reference variable from the form.
- Open up your automation definition from the package editor
- Give your The fallback content to display on prerenderingan alias of
network_access_request_form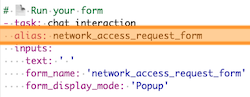
An alias gives us a name that we can use throughout our automation definition whenever we want to access variables.
- Add a new chat interaction activity to print the results.
# 🛠️Use the form variables
- task: chat_interaction
  inputs:
    text: |
     <strong>Network Request details:</strong>
     <strong>Name:</strong> {=network_access_request_form.form.requester_name}
     <strong>Email:</strong> {=network_access_request_form.form.requester_email}
     <strong>Phone:</strong> {=network_access_request_form.form.requester_phone}
     <strong>Team:</strong> {=network_access_request_form.form.requester_team}
     <strong>Supervisor:</strong> {=network_access_request_form.form.requester_supervisor_name}
{=network_access_request_form.form.requester_name}- chat activity alias:
network_access_request_form - output property of chat activity:
form(**all forms are accessed using this) - Reference name
requester_namethe reference name we gave the field in the form editor
🧨 Congratulations 🧨 , you can now gather information from your engineers as the automation progresses!
👍 This is what the complete automation definition looks like
## Conditions are the first thing we define in our automation definition

conditions:
# 🔎 This is where we can set the options to Filter by clients
# 📝 Wherever you use a chat condition, you MUST have a client_filter condition.
- name: 'client_filter'
  optMode: 'OptOut'
  category: 'Testing'

# 💬 This is where we've defined a chat condition
- name: 'chat'
  option_text: 'I want to run my First Chat Interaction'
  option_button: 'First Chat Interaction'
  option_category: 'Tutorial'

# 🏃 Activities, or steps, are the actions we take when a condition has been met
steps:
- task: chat_interaction
  inputs:
    text: 'Hello there! Did you realise, you are now officially a Pia automation engineer?'

# 📄 Run your form
- task: chat_interaction
  alias: network_access_request_form
  inputs:
    text: ' '
    form_name: 'network_access_request_form'
    form_display_mode: 'Popup'

# 🛠️ Use the form variables
- task: chat_interaction
  inputs:
    text: |
     <strong>Network Request details:</strong>

     <strong>Name:</strong> {=network_access_request_form.form.requester_name}
     <strong>Email:</strong> {=network_access_request_form.form.requester_email}
     <strong>Phone:</strong> {=network_access_request_form.form.requester_phone}
     <strong>Team:</strong> {=network_access_request_form.form.requester_team}
     <strong>Supervisor:</strong> {=network_access_request_form.form.requester_supervisor_name}