Querying the Environment
Finally! We're going to write some powershell code 😬. In this part of the tutorial we are going to run powershell on a Pia agent in our environment to get information about users and groups for a client.
What you'll learn
- Running powershell on the pia Orchestrator
- Running on a specific agent
- Controlling the user that executes a command
- Query the environment to get a user
- Query the environment to get a list of groups
Step 1: Create a Powershell Activity
- Create an activityName it wisely
You can't change the activity name after you create it
- in your sandbox select New Activity from the left-hand menu
- You will see "New Activity" section displayed on the right
- Fill in the name and static name of the activity you want to create. You can make changes to the other option as per your requirement:
- Once you click on the 'Create' button, you will be taken to the Activity Editor screen where you can start coding 👨💻!
Your activity comes with two pre-defined functions VerifyActivity and ExecuteActivity. Verify is where you can perform pre-execution checks to decide if you have everything you need to run your automation activity. ExecuteActivity is the meat of your automation.
💡 Learn all about it
You can create PowerShell activities using the Activity Editor. These activities are executed on the Pia Orchestrator platform by default however they can also be executed via a Pia agent. Refer to the [YAML - Activities/Steps] section regarding the executionEnvironment and executionEnvironmentKey properties.
To create a PowerShell activity:
- Ensure you are in Sandbox mode with a sandbox selected.
- Navigate to the Activity Editor where you will be presented with the new activity form.
- Fill out the required fields as such:
- Name: The display name of the activity.
- Static Name: The static name is how the activity will be referenced in the package YAML definition. This property can only be set on creation and cannot be changed once it is set. The typical naming convention for activities consists of words separated by underscores for example
my_test_activity. - Description: This is where you can give a brief description of what the activity does.
PowerShell Activities
When you first create a new activity from the activity editor, you will see the following PowerShell templated code with two pre-defined functions VerifyActivity and ExecuteActivity:
Activity Template:
     Function VerifyActivity()
    {
        # Put code here to verify the command will work given the variables
        return $true;
    }

    Function ExecuteActivity()
    {
        # Do stuff here

        # Set output variables
        $activityOutput.out.Variable1 = "something";
        $activityOutput.out.Variable2 = "something else";

        # Set execution status
        $activityOutput.success = $true;

        return $activityOutput;
    }
Default Functions:
- VerifyActivity - If there are any checks which need to be performed to verify that this activity can be safely executed, you can put these checks inside this function. At the current time, this function is not used so you may safely ignore it.
- ExecuteActivity - This is the business end of the activity, where all the business logic which your activity needs to perform will be invoked.
Note: These functions are called by the Orchestrator platform, if you remove or rename either of these two functions the activity will not work.
You can configure input/output variables in the editor by clicking on the 'Variables' menu item at the top of the code editor. Input variables allow you to pass information into the activity from the calling package. Output variables allow you to return information from an activity to the calling package.
In the code editor you can access the input variables by name for example if you configure a variable called "upn" then you can access this variable by $upn.
The output variables are returned by the activity via the $activityOutput object, you can see an example of this in the above activity template where 'Variable1' and 'Variable2' properties are being set on the $activityOutput.out child object i.e. $activityOutput.out.Variable1 = "something"; and $activityOutput.out.Variable2 = "something else";
There is an additional section of the PowerShell template which is initially hidden from view, you can view this section by clicking on the 'Show Test Code' checkbox in the menu at the top of the editor. This section shows how the input and output variables are initialized in the script.
Hidden Test Code Section:
    #read_only
    ####################################################
    ##########  INPUT
    #####################################################

    $my_input = "";

    ####################################################
    ##########  OUTPUT
    #####################################################

    $variableProps = @{
        my_output = $null;
    }

    $outputProps = @{
        out = $(New-Object psobject - Property $variableProps);
        success = $false;
    }

    $activityOutput = New-Object psobject -Property $outputProps;

     #/read_only
So in the above read only section you can see that the input variables are just a plain old variable in the script, and the output variable are properties in the 'out' object which is a property of the $activityOutput variable.
Calling Activities in Packages
To call a PowerShell activity from a package you need to reference its static name, any input arguments are provided via the inputs element in the YAML task definition, see below example:
Calling an activity:
    #Calling an activity with a static name of my_test_activity
    - task: my_test_activity
      inputs:
        my_input: 'some value'
Retrieving output from an activity:
    #Calling an activity with a static name of my_test_activity
    - task: my_test_activity
      inputs:
        my_input: 'some value'

    #Passing out of previous activity to next activity
    - task: inline_powershell
      inputs:
        my_activities_output: =my_test_activity.my_output
        script: 'Write-Host "This is my output: $my_activities_output"'
The above example of retrieving output from an activity will work for a simple scalar output variable, however you will often need to return lists of objects, and in this case you will need to deserialize the output before you can work with it.
Deserializing activity output:
    #Calling an activity with a static name of my_test_activity
    - task: my_test_activity
      inputs:
        my_input: 'some value'

    #Deserializing the output variable
    - task: inline_powershell
    inputs:
        my_activities_output: =my_test_activity.my_output
        script: |
                $my_activities_output = [Array]$(ConvertFrom-Json $my_activities_output)
                foreach($output in $my_activities_output){
                    Write-Host "Object property value: $($output.my_property)"
                }
Calling the meta property to get activity name or description:
The meta property has the following 2 values:
- name - This is the display name of the activity.
- description - This is where you can give a brief description of what the activity does.
      #Calling the meta property to get activity name or description
      - task: my_test_activity
      document: 'This {=my_test_activity.meta.name} will {=my_test_activity.meta.description}'
      inputs:
      my_input: 'some value'
Best Practices
When developing a PowerShell activity it is recommended to breakup your logic into separate functions rather then writing everything in the ExecuteActivity function, however if the activity is only performing a very simple action for example calling a single function and returning its result then this can just go in the ExecuteActivity function.
It is important that when you call a function or perform any action within the script which returns any output you must assign the output to a variable, if you do not assign the output to a variable it will cause the activity to fail because the Orchestrator platform will not be able to distinguish between the multiple returns.
For example, if we define an activity which makes the following function call Get-ADGroupMember -Identity 'Domain Users' and do not assign the output to a variable the activity will fail. Additionally, the objects you return from your activities must be serialized, and to ensure that the objects you are returning will be serialized properly you should return them as basic powershell objects which you create yourself from the more complex objects you may be working with (i.e. do not simply return the output of Get-ADUser).
Example activity returning a list of users in an AD group:
Function GetGroupMembers()
{
    # a list to collect our basic powershell objects in
    $users = @();

    # assigning the output of function call to a local variable
    $adUsers = Get-ADGroupMember -Identity  $groupName | get-aduser -Properties mail  | Select samaccountname, mail

    # constructing basic powershell objects to be serialized and return in output variable
    foreach($user in $adUsers)
    {
        $users += @{
            accountName = $user.SamAccountName;
            email = $user.mail;
        };
    }

    return $adUsers;
}

Function ExecuteActivity()
{
    try
    {
        # Get users using our function above
        $users = GetGroupMembers

        # Serialise the list and assign it to an output variable
        $activityOutput.out.users = $(ConvertTo-Json -Depth 5 $users);

        # Set execution status
        $activityOutput.success = $true;
    }
    catch
    {
        Write-Error $_.Exception.Message
        # set the success property to false so Pia knows something went wrong
        $activityOutput.success = $false;
    }

    return $activityOutput;
}
In the above example we have put most of the logic in the GetGroupMembers function which is called within the ExecuteActivity function, we are assigning the output of the GetGroupMembers function to a variable which is this serialized and assigned the the $activityOutput.out.users output variable, we are wrapping this in a try catch if an exception is caught then we are setting the $activityOutput.success to false which lets the Orchestrator platform know that something went wrong and it should stop execution of the package.
Step 2: Write our first powershell
We are going to make a gentle start on our journey towards running powershell automations. Let's first get a bit of an understanding of the execution environment by printing out some details of where we're running and as whom.
- Add the 3 lines highlighted below to the "Do Stuff here section of the activity". This is simply going to print out the computer name and the user executing the script.
Function VerifyActivity()
{
    return $true;
}

Function ExecuteActivity()
{
    # Do stuff here
    Write-Host ("Executing Get Users on agent: " + $($env:computername))
    Write-Host ("Running as user: " + (whoami))
    Write-Host ""
    # Set execution status
    $activityOutput.success = $true;

    return $activityOutput;
}
- Create a new automation package definition called "Tutorial: Part 3 - Querying the Environment"
🎗️ Refresher on how to create an automation package definition
- Open the "Package Editor" from the left-hand menu
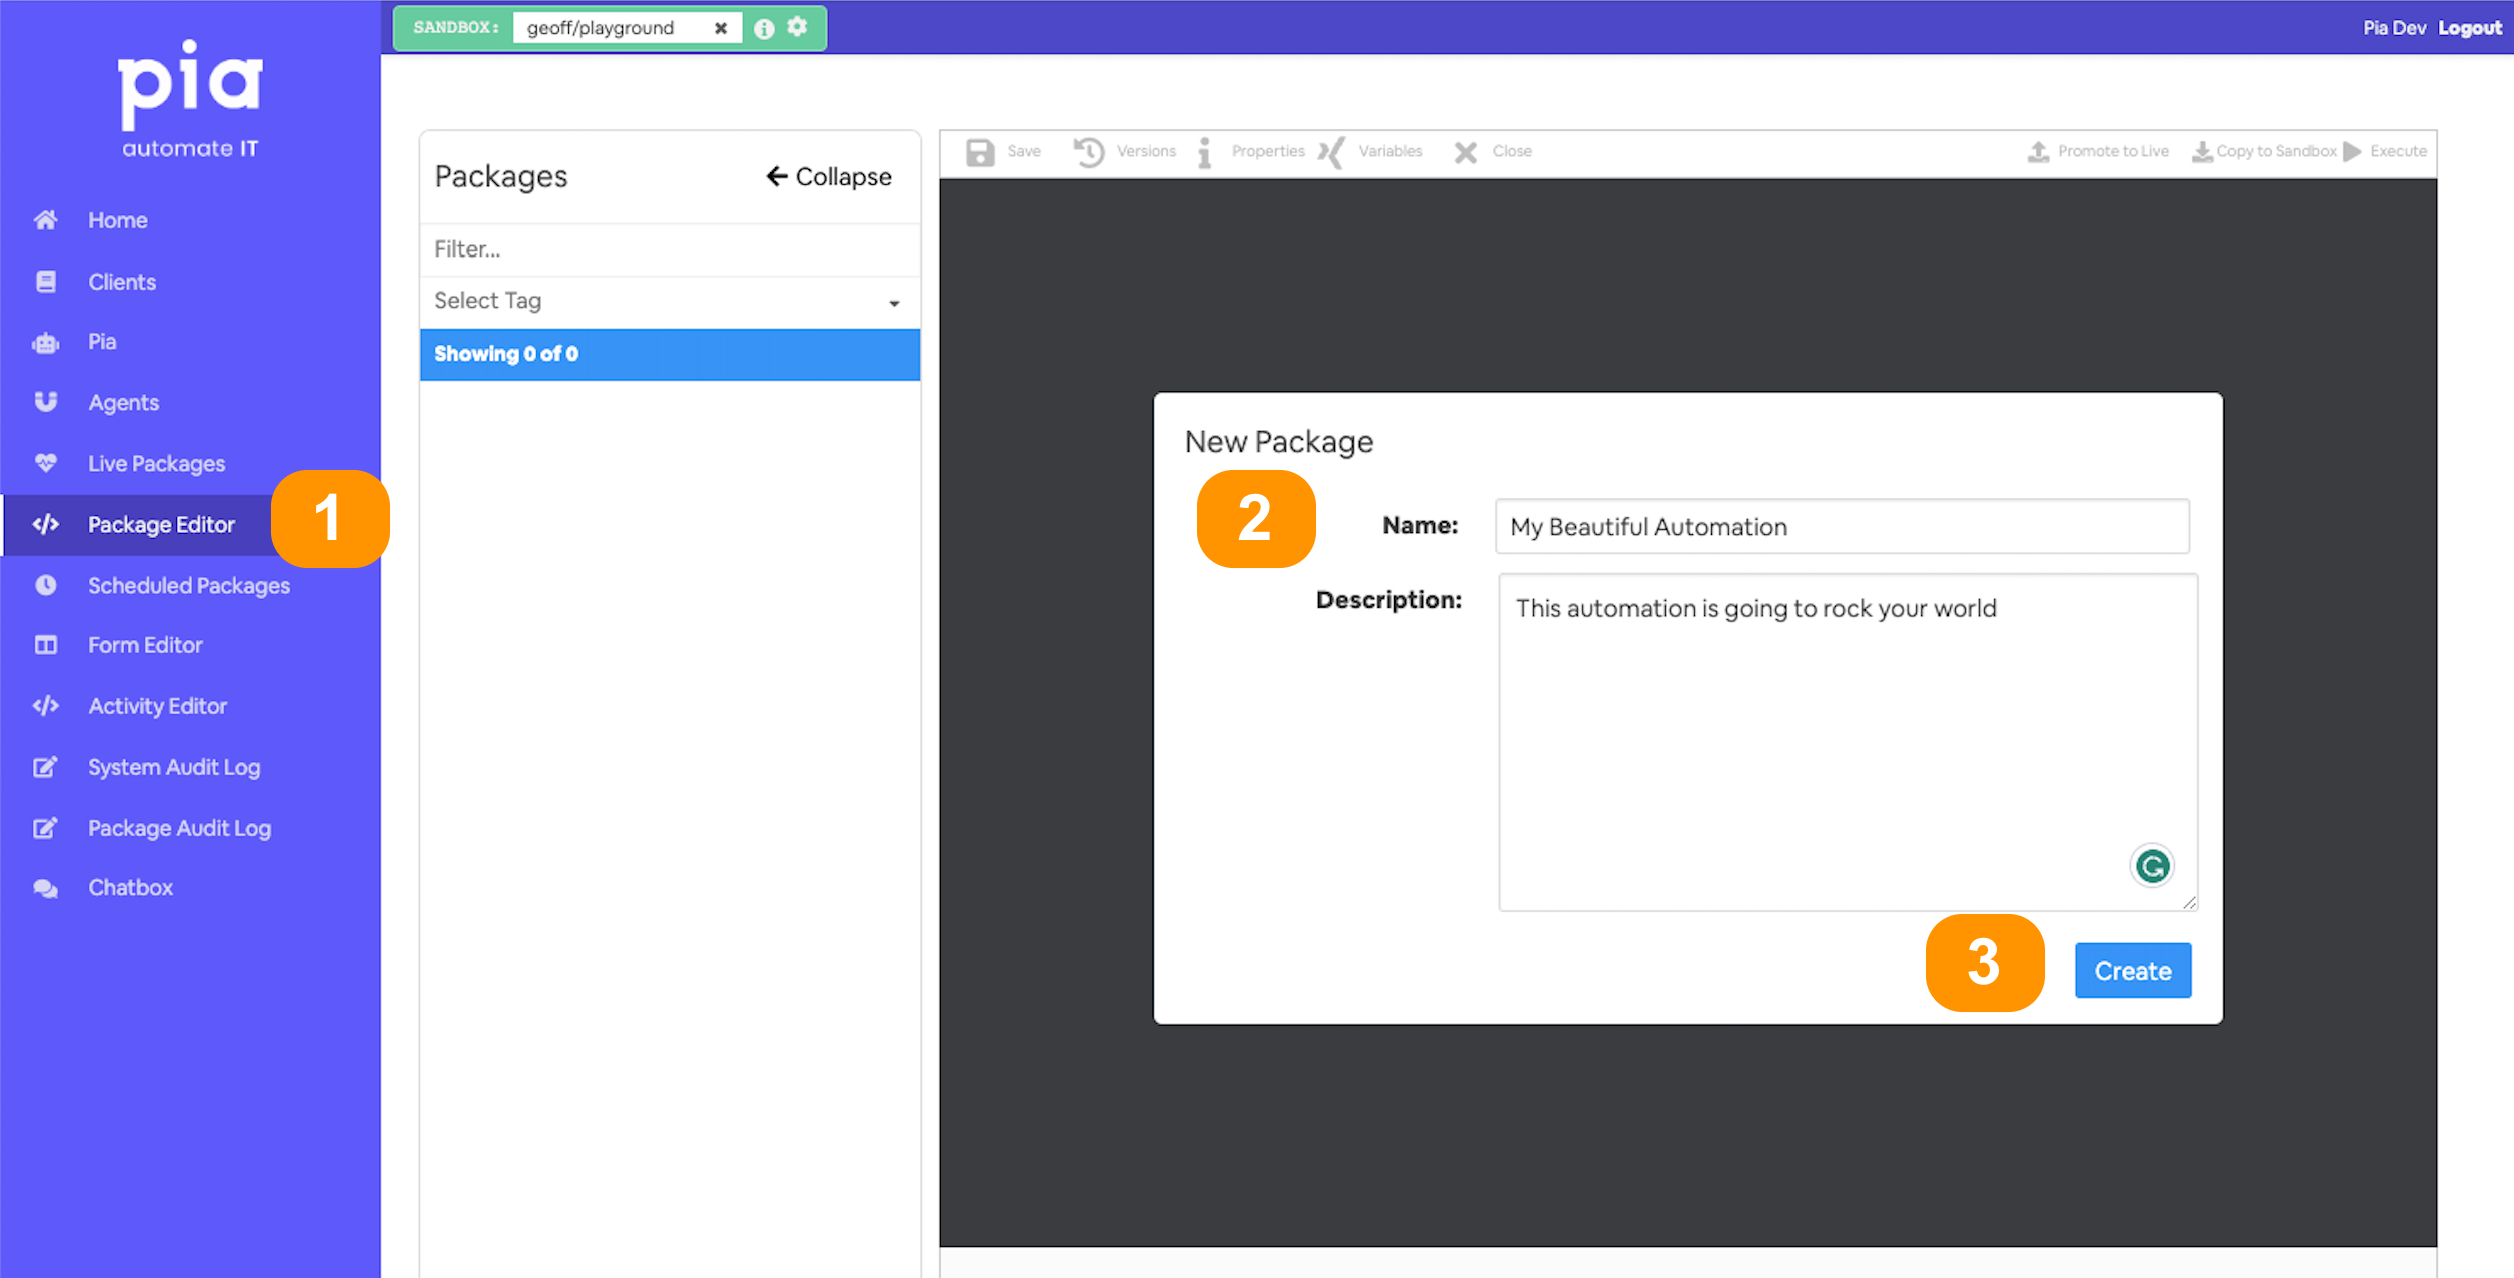
- Give your automation a memorable name;
- and a description (optional)
- You'll land in the automation definition editor
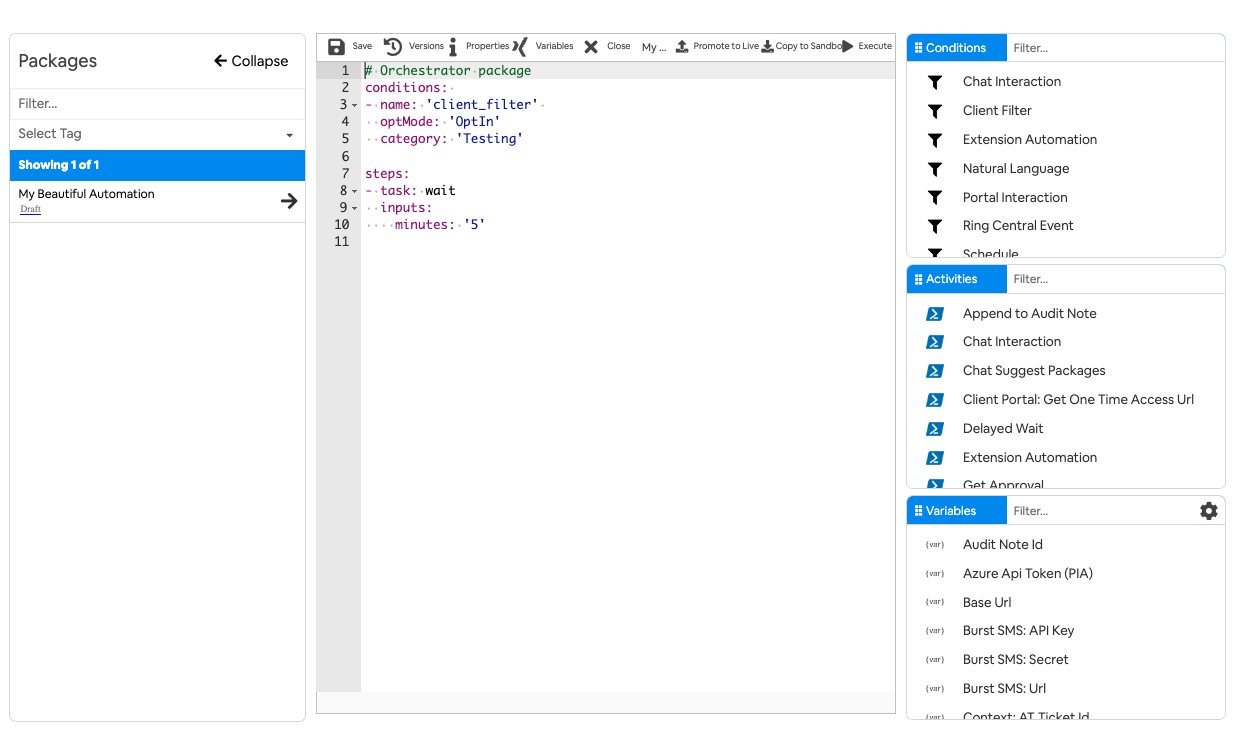
- Add the below conditions and steps.
- A chat condition so we can run it from the ChatBox to test
- optMode of OptOut so that it can be ran against any client in the Sandbox
- And this is the new bit!
- task: get_usersto include our newly created activity
- Here is the complete definition
## Conditions are the first thing we define in our automation definition
conditions:
# 📝 Wherever you use a chat condition, you MUST have a client_filter condition.
- name: 'client_filter'
  optMode: 'OptOut'
  category: 'Testing'
# 💬 This is where we've defined a chat condition
- name: 'chat'
  option_button: 'Part 3: Query Environment'
  option_text: 'Part 3: I want to query the client environment'
  option_category: 'Tutorial'


steps:
# 💻 run get user in the default context. It will run on the Pia Orchestrator
- task: get_users
Step 3: Run the activity and view the output
Execute your automation from the chatbot.
On the right-side you can see detailed output from all the activities.
Expand Get Users List and you should see output similar to the below.
[INFO]  Executing PowerShell on PIA environment.
[INFO]  Executing Get User List on agent: OrchestratorVM
[INFO]  Running as user: nt authority\system
Step 4: Specifying an agent and user
What we're going to now is just run that same activity in a couple of different contexts so that you can get a flavour for the what is available to you.
- Add the below YAML to the bottom of your package definition
# 💻 run get user on a specific Agent
 - task: get_users
  executionEnvironment: 'System'
  executionEnvironmentKey: 'PIA-DC02'
# 💻 run get user on a specific Agent as the logged in user
- task: get_users
  executionEnvironment: 'AsUser'
  executionEnvironmentKey: 'PIA-DC02'
There are three options, System and AsUser
- System: run as the system user
- AsUser: run as the logged in user
- AsUserElevated: run as elevated user
This is the device name as listed on the agents page
So we now have an automation definition that calls the New User List automation 3 times with different options. Let's see what we get.
💻 Complete YAML definition
## Conditions are the first thing we define in our automation definition
conditions:
# 📝 Wherever you use a chat condition, you MUST have a client_filter condition.
- name: 'client_filter'
  optMode: 'OptOut'
  category: 'Testing'
# 💬 This is where we've defined a chat condition
- name: 'chat'
  option_button: 'Part 3: Query Environment'
  option_text: 'Part 3: I want to query the client environment'
  option_category: 'Tutorial'

## Steps are the things that run when the conditions are met
steps:
# 💻 run get user in the default context. It will run on the Pia Orchestrator
- task: get_users
# 💻 run get user on a specific Agent
- task: get_users
  executionEnvironment: 'System'
  executionEnvironmentKey: 'PIA-DC02'
# 💻 run get user on a specific Agent as the logged in user
- task: get_users
  executionEnvironment: 'AsUser'
  executionEnvironmentKey: 'PIA-DC02'
- Save your automation package definition and run it in the chatbot
- If you inspect the activity output you should see something similar to
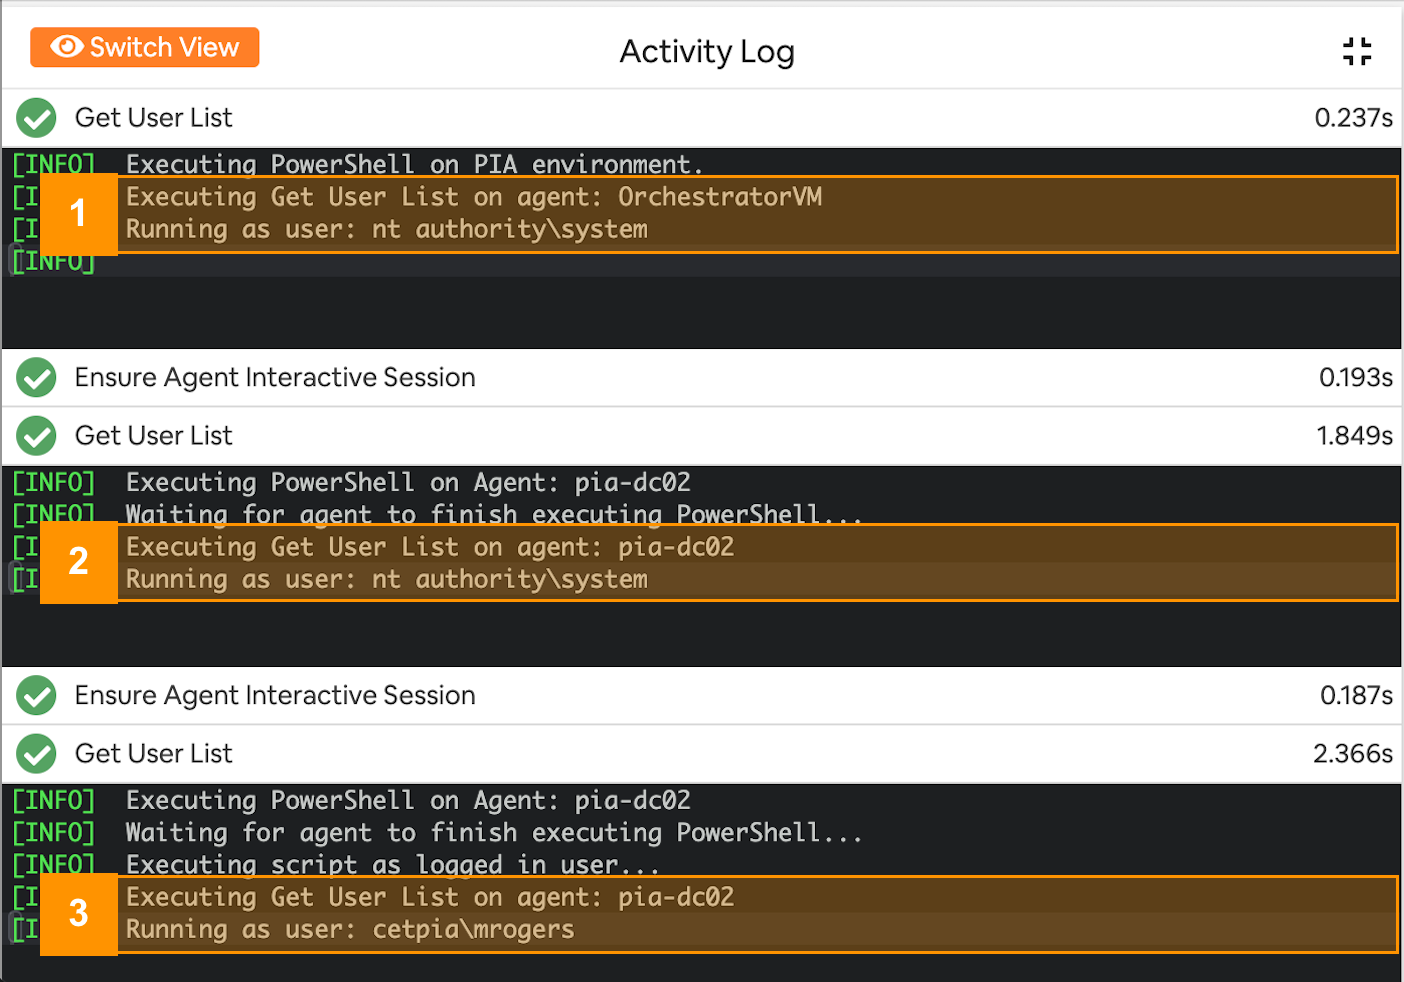
These are the 3 scenarios:
- Running on the Pia Orchestrator machine (📝: this doesn't have access to your environment).
- Running on the specified agent (in our case pia-dc01) as the system user.
- Running on the specified agent as the currently logged in user.
Step 5: Querying Active Directory for list of Groups
What we want to do now is get a list of groups that we can use in the next part of the tutorial to populate the selection in a form. We are going to get the groups sorted in order of popularity, so the one at the top is the most likely to be the one that we want.
- Open the activity
Get User Listthat you created earlier - Create a new function called
GetGroupList - Implement the behavior: the function should have no parameters and returns a sorted list of groups with their member counts.
Here is one possible implementation:
<#
   The GetGroupList function retrieves all Active Directory groups, counts the number of members
   in each group, and returns a sorted list of groups with their member counts.
#>
Function GetGroupList(){
    # Get all groups
    $groups = Get-ADGroup -Filter *

    $groupList = @()
    foreach ($group in $groups) {
        # Get the members of the group and add their count to the object
        $members = Get-ADGroupMember -Identity $group -Recursive
        $groupList += New-Object PSObject -Property @{
            Name = $group.Name
            DistinguishedName = $group.DistinguishedName
            MemberCount = $members.Count
        }
    }

    # Sort and filter to only display groups with more than 9 members
    $groupList = $groupList | Where-Object { $_.MemberCount -gt 9 } | Sort-Object MemberCount -Descending

    return $groupList
}
- And for now we will just call that function and print out the groups and their member count. We will add it to the
ExecuteActivityfunction. Add it just below the code you wrote in the previous steps: - We'll format it as a table so its nice and easy to read.
# GetGroupList
Write-Host "Groups with 10+ members:"
Write-Host "========================"
$groupList = GetGroupList
$groupList | Format-Table Name, MemberCount | Out-Host;
- Update your automation package definition YAML so that it only runs once as System on an Agent. Your YAML should look similar to the below, although the agent identifier in the highlighted line below will of course be different.
 ## Conditions are the first thing we define in our automation definition
conditions:
# 📝 Wherever you use a chat condition, you MUST have a client_filter condition.
- name: 'client_filter'
  optMode: 'OptOut'
  category: 'Testing'
# 💬 This is where we've defined a chat condition
- name: 'chat'
  option_button: 'Part 3: Query Environment'
  option_text: 'Part 3: I want to query the client environment'
  option_category: 'Tutorial'

## Steps are the things that run when the conditions are met
steps:
# 💻 run get user on a specific Agent as System
- task: get_users
  executionEnvironment: 'System'
  executionEnvironmentKey: '[YOUR-AGENT-GOES-HERE]'
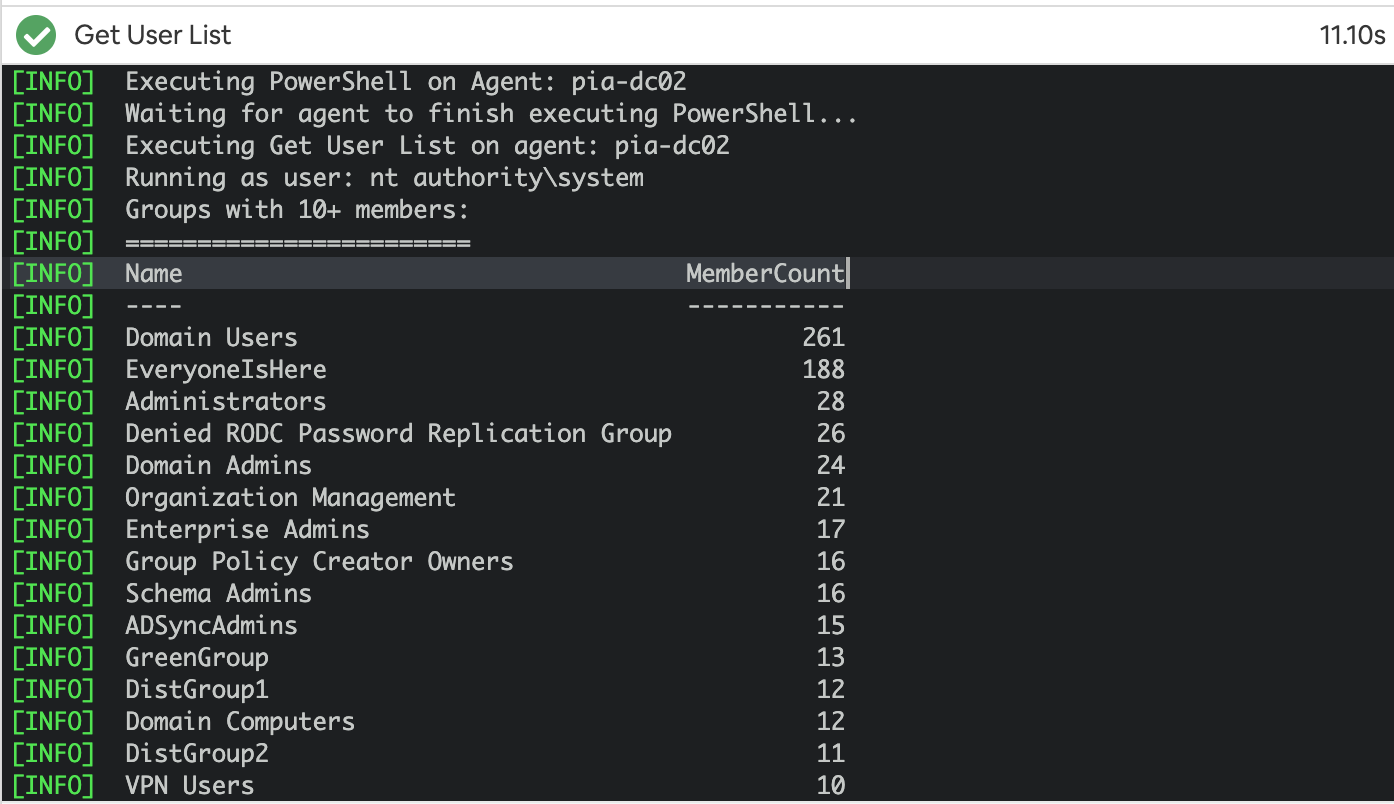
This function uses the Get-ADGroup and Get-ADGroupMember cmdlets from the Active Directory module. It will fail if you run it on an agent that doesn't have this.
Run it from the chatbox and you should get output similar to the below:
Step 6: Retrieving AD Users
To complete this section of the tutorial, we are going to retrieve a list of AD users that have logged in recently along with some of the user properties we want to use in the next tutorial:
- Open the activity
Get User Listthat you created earlier - Create a new function called
GetUserList - Implement the behavior: the function should have no parameters and returns a list of users with the LastLogonDate within the last 30 days.
Querying the entire user table in a large Active Directory can be sloooow 🥱. A few suggestions:
Server-side Filtering: Use the
-Filterand-SearchBaseparameters to limit the number of objects returned from the server. The-Filterparameter allows you to specify conditions that users must meet to be returned by the cmdlet, while-SearchBasecan limit the scope of the search to a particular organizational unit (OU).Indexed Attributes: Use indexed attributes in your filter for faster query execution. Active Directory indexes certain attributes like
sAMAccountName,objectGUID,SID, etc. Using these in your filter can improve performance.Limit Properties: By default,
Get-ADUserreturns a specific set of properties. If you use-Properties *, it retrieves all properties, which can slow down your query. Instead, specify only the properties you need.-ResultSetSizeParameter: If you are just testing or developing your script, you can use the-ResultSetSizeparameter to limit the number of returned results. This can make it faster to iterate and improve your script before running it against all users.Avoid
-LDAPFilter: While-LDAPFiltercan be powerful, it can also be slower than using-Filterdue to differences in how the two are processed. If you can accomplish what you need with-Filter, it's usually the better option.
Here is one possible implementation:
<#
   The GetUserList function retrieves Active Directory users that have logged in
   in the last 30 days and have their names set
#>
Function GetUserList() {
    # Construct our filter
    $today = Get-Date
    $thirtyDaysAgo = $today.AddDays(-30).ToString('yyyy/MM/dd')
    $filter = "LastLogonDate -ge '$thirtyDaysAgo' -and GivenName -ne '*' -and Surname -ne '*'"

    # Get users from AD with required properties
    $users = Get-ADUser -Filter $filter -Properties SamAccountName, DisplayName, EmailAddress, `
    Title, Manager, LastLogonDate, GivenName, SurName

    # Construct the array
    $userList = $users | ForEach-Object {
        New-Object PSObject -Property @{
            SamAccountName = $_.SamAccountName
            DisplayName = $_.DisplayName
            EmailAddress = $_.EmailAddress
            Title = $_.Title
            Manager = $_.Manager
            LastLogonDate = $_.LastLogonDate
            GivenName = $_.GivenName
            LastName = $_.SurName
        }
    }

    return $userList
}
- And again we will just call that function and print the output below the groups table. We will add it to the
ExecuteActivityfunction. Add it just below the code you wrote in the previous step:
Write-Host "Users:"
Write-Host "========================"
$userList = GetUserList
$userList | Format-Table LastName,GivenName,LastLogonDate | Out-Host;
Write-Host "========================================"
- Run it from the chatbox
- Just to mix things up a little. Navigate to the live packages view and have a look at the output there.
It's easier to interact with the powershell console output there.
- Open
Live packagesfrom the left-hand menu. - Click on the most recent package run with a name
Pia aiDesk Tutorial Part3.
- Open
🖥️ Complete code of the Get User List activity
Function VerifyActivity()
{
    # # Put code here to verify the command will work given the variables
    return $true;
}

<#
   The GetGroupList function retrieves all Active Directory groups, counts the number of members
   in each group, and returns a sorted list of groups with their member counts.
#>
Function GetGroupList(){
    # Get all groups
    $groups = Get-ADGroup -Filter *
    $groupList = @()
    foreach ($group in $groups) {
        # Get the members of the group and add their count to the object
        $members = Get-ADGroupMember -Identity $group -Recursive
        $groupList += New-Object PSObject -Property @{
            Name = $group.Name
            DistinguishedName = $group.DistinguishedName
            MemberCount = $members.Count
        }
    }

    # Sort and filter to only display groups with more than 9 members
    $groupList = $groupList | Where-Object { $_.MemberCount -gt 9 } | Sort-Object MemberCount -Descending

    return $groupList
}

<#
   The GetUserList function retrieves Active Directory users that have logged in
   in the last 30 days and have their names set
#>
Function GetUserList() {
    # Construct our filter
    $today = Get-Date
    $thirtyDaysAgo = $today.AddDays(-30).ToString('yyyy/MM/dd')
    $filter = "LastLogonDate -ge '$thirtyDaysAgo' -and GivenName -ne '*' -and Surname -ne '*'"

    # Get users from AD with required properties
    $users = Get-ADUser -Filter $filter -Properties SamAccountName, DisplayName, EmailAddress, `
    Title, Manager, LastLogonDate, GivenName, SurName

    # Construct the array
    $userList = $users | ForEach-Object {
        New-Object PSObject -Property @{
            SamAccountName = $_.SamAccountName
            DisplayName = $_.DisplayName
            EmailAddress = $_.EmailAddress
            Title = $_.Title
            Manager = $_.Manager
            LastLogonDate = $_.LastLogonDate
            GivenName = $_.GivenName
            LastName = $_.SurName
        }
    }

    return $userList
}

Function ExecuteActivity(){
    # Do stuff here
    Write-Host  ("Executing Get User List on agent: " + $($env:computername))
    Write-Host ("Running as user: " + (whoami))
    Write-Host " - "
    Write-Host "Groups with 10+ members:"
    Write-Host "========================"
    $groupList = GetGroupList
    $groupList | Format-Table Name, MemberCount | Out-Host;

    Write-Host " - "
    Write-Host "Users:"
    Write-Host "========================"
    $userList = GetUserList
    $userList | Format-Table DisplayName,SamAccountName,EmailAddress,LastLogonDate | Out-Host;
    Write-Host "========================================"

    # Set output variables
    # $activityOutput.out.Variable1 = "something";

    # Set execution status
    $activityOutput.success = $true;
    return $activityOutput;
}
🧨 Congratulations 🧨 , we covered a lot there. You can now execute powershell on different computers as different users!
In the next and final part of this tutorial we will bring the pieces together and show how you can solve complex problems by plugging together a series of simple forms, chat interactions and activities together 🤪.