AI Analysis
Overview
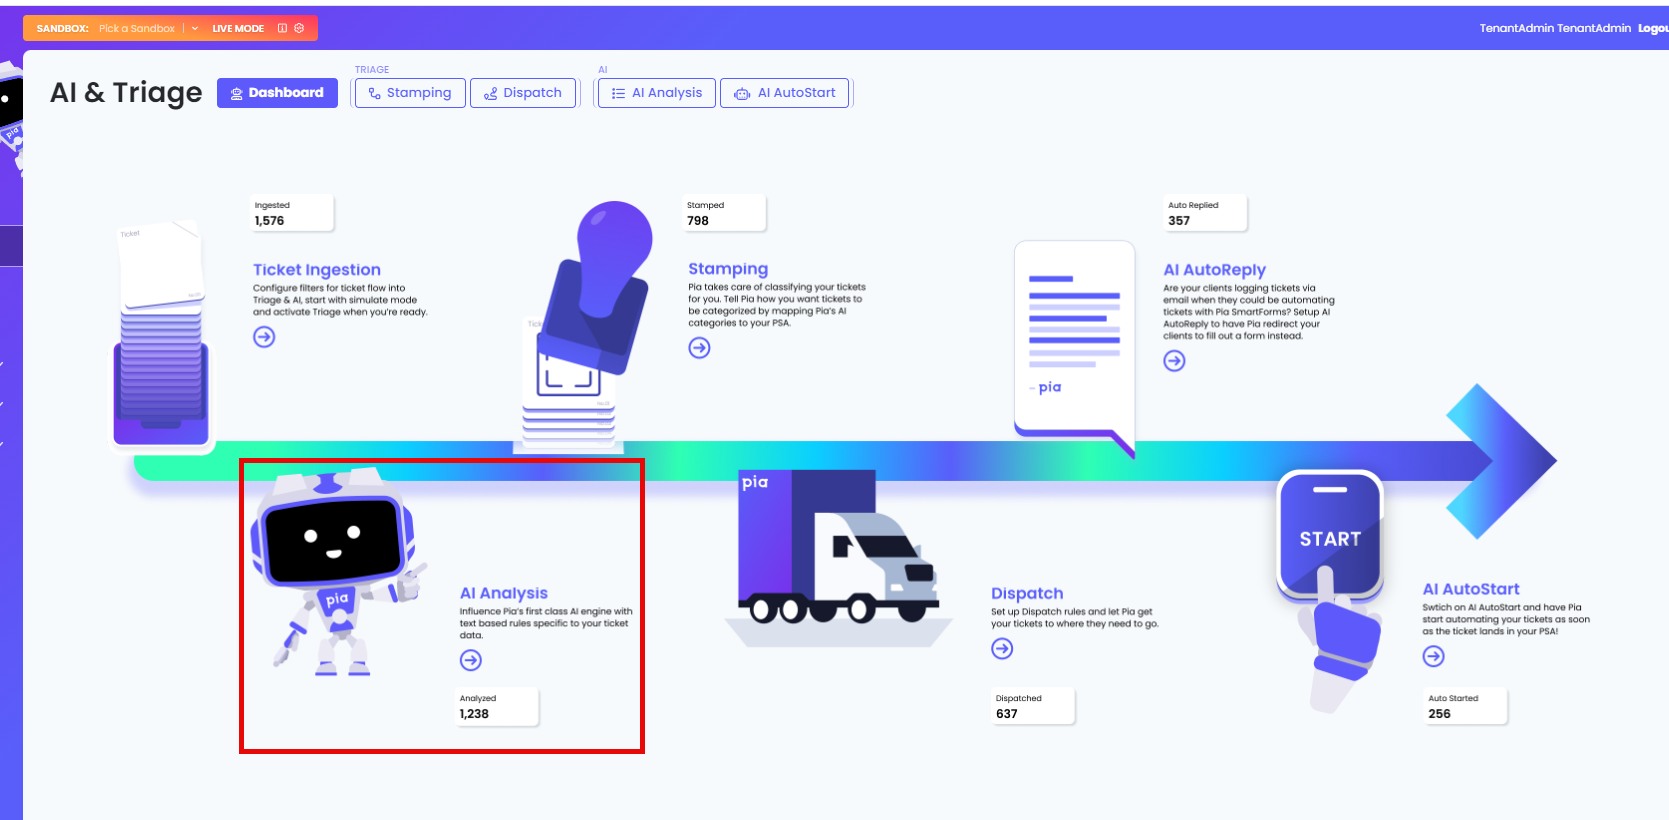
The AI Analysis feature of Pia Triage is responsible for classifying your tickets using Pia's Machine Learning model. Pia's Machine Learning will classify tickets using a standard set of categories which Pia has developed (described further below).
To allow you to further enhance and influence the classification of tickets by Pia, the AI Analysis tab in the Pia Portal allows you to create custom AI Analysis Rules using keywords to match and classify tickets. This allows you to influence Pia's AI Classification process to make it more accurate to your needs or cover additional categories of the ticket which Pia's Machine Learning does not currently cover.
What are Classifications and why use them?
A classification is how Pia's AI engine categorizes incoming tickets in your PSA. These can be Pia Native classifications (which Pia manages and maintains) or custom classifications which you can add to Pia.
Classifying a ticket is very important for a few reasons:
Pia needs to understand what the context of the ticket is about in order to suggest any automation(s). For example, for Pia to recommend you a Staff Onboarding automation it will need to classify the ticket as an onboarding ticket first. Pia reviews the Natural Human Language used within the ticket's Subject and/or Body to determine the classification.
Classifying a ticket through Pia's AI allows you to categorize or "rename" incoming tickets by automatically populating your category fields like
Type|Subtype|Itemin ConnectWise,Ticket Type|Issue Type|Sub-Issue Typein AutoTask orCategory 1|Category 2|Category 3in HaloPSA. This will help save you time and be more accurate in your Triage process.With Pia's latest AI AutoStart feature configured and enabled, Pia relies on its ability to correctly classify an incoming ticket so that it can run the correct automation.
Pia's Native Classifications
Pia aiDesk comes with several native classifications. Each one of them determines what automation(s) the ChatBot will suggest to you in your PSA and/or how Pia will categorize your incoming tickets.
👀 See Pia's Native Classifications and their corresponding automation(s).
| 🧠 AI's Classification | 🤖 Corresponding Automation(s) |
|---|---|
| Alert|Backup| | |
| Incident|Account|Locked Out | Pia: Account Locked Out (Cloud Hybrid) Pia: Account Locked Out (Cloud Only) Pia: Account Locked Out (On Prem) Pia: Account Locked Out (Semi-Hybrid) Pia: Account Locked Out (SmartForms) |
| Incident|Account|Password Reset | Pia: Reset Network Password (Cloud Hybrid) Pia: Reset Network Password (Cloud Only) Pia: Reset Network Password (On Prem) Pia: Reset Network Password (Semi-Hybrid) Pia: Reset Network Password (SmartForms) |
| Incident|Application|Citrix | Pia: Log Out User from Citrix Session |
| Incident|Application|Microsoft Dynamics Nav | |
| Incident|Application|Microsoft Teams | Pia: Microsoft Teams Troubleshooter |
| Incident|Application|Outlook | Pia: Outlook Mail Flow Troubleshooting (Cloud Hybrid) Pia: Outlook Mail Flow Troubleshooting (Cloud Only) Pia: Recover Lost Folder in Outlook Pia: Win10 Outlook Package |
| Incident|Application|PDF | |
| Incident|Application|Remote Desktop | Pia: Log Out User from Windows RDS Pia: Remote Desktop Troubleshooting |
| Incident|Application|SharePoint | |
| Incident|Backup|File Recovery | |
| Incident|Email|SPAM/Junk email | Pia: Blacklist Email (Cloud Hybrid) Pia: Blacklist Email (Cloud Only) |
| Incident|File Share|Permission Request | Pia: Network Drive Troubleshooting |
| Incident|Mail|Email Bouncebacks | Pia: Whitelist Email (Cloud Hybrid) Pia: Whitelist Email (Cloud Only) Pia: Whitelist Email (Manage Protect) |
| Incident|Mail|Mailbox Full | |
| Incident|Mail|Quarantine | Pia: Release Quarantined Emails |
| Incident|Mail|Signature | |
| Incident|Network|Troubleshooting/Connectivity | |
| Incident|Phone|Malfunction/Downtime | |
| Incident|Printing|Fault | Pia: Win10 Printer Troubleshooting Package |
| Incident|Security|Compromised | |
| Incident|Security|Phishing | |
| Incident|Tablet/Mobile|Email | |
| Incident|Tablet/Mobile|Software | |
| Incident|VPN|Issues Connecting | Pia: Troubleshoot Windows VPN Configuration |
| Incident|Website|SSL Certificate Renewal | |
| Incident|Workstation|Disk Space | Pia: Computer Space Cleanup (Combined) |
| Incident|Workstation|Hardware Fault | |
| Incident|Workstation|Operating System | |
| Incident|Workstation|Peripherals | |
| Incident|Workstation|Slow Performance | Pia: Computer Performance Report |
| Incident|Workstation|Web Browser | |
| Service Request|Application|Adobe Acrobat Pro | |
| Service Request|Application|Install | Pia: Install/Uninstall/Reinstall Software |
| Service Request|Application|License | Pia: Manage User Licenses Pia: Re-allocate User License |
| Service Request|Application|Microsoft Office | |
| Service Request|Application|One Drive for Business | Pia: OneDrive Troubleshooter |
| Service Request|Application|Remote Desktop | Pia: Remote Desktop Setup |
| Service Request|File Share|Permission Request | Pia: File Share Security Change Pia: Map Network Drive |
| Service Request|Mail|Calendar Permissions | Pia: Change Calendar Permissions (Cloud Hybrid) Pia: Change Calendar Permissions (Cloud Only) Pia: Change Calendar Permissions (Semi-Hybrid) Pia: Change Calendar Permissions (SmartForms) |
| Service Request|Mail|Create / Delete Contact | Pia: Create Mail Contacts (Cloud Hybrid) Pia: Create Mail Contacts (Cloud Only) Pia: Create Mail Contacts (On Prem) Pia: Delete Mail Contacts (Cloud Hybrid) Pia: Delete Mail Contacts (Cloud Only) Pia: Delete Mail Contacts (On Prem) |
| Service Request|Mail|Edit Distribution Group | Pia: Add/Remove User from Groups (Cloud Hybrid) Pia: Add/Remove User from Groups (Cloud Only) Pia: Add/Remove User from Groups (On Prem) Pia: Add/Remove User from Groups (Semi-Hybrid) Pia: Bulk Add/Remove Contacts to Group Pia: Bulk Add/Remove Users to Group Pia: Create a Group Pia: Modify Distribution Group Settings (Cloud Hybrid) Pia: Modify Distribution Group Settings (Cloud Only) |
| Service Request|Mail|Mail Redirect | Pia: Create or Remove Mail Forwarding Rule (SmartForms) Pia: Setup/Remove Mail Forwarding (Cloud Hybrid) Pia: Setup/Remove Mail Forwarding (Cloud Only) |
| Service Request|Mail|Mailbox Access | Pia: Grant/Revoke Mailbox Permission (Cloud Hybrid) Pia: Grant/Revoke Mailbox Permission (Cloud Only) Pia: Grant/Revoke Mailbox Permission (SmartForms) Pia: Grant/Revoke Mailbox Permission in Bulk (Cloud Hybrid) Pia: Grant/Revoke Mailbox Permission in Bulk (Cloud Only) |
| Service Request|Mail|New Shared Mailbox | Pia: Create Shared Mailbox (Cloud Hybrid) Pia: Create Shared Mailbox (Cloud Only) Pia: Create Shared Mailbox (On Prem) |
| Service Request|Mail|Setup Out of Office | Pia: Setup/Remove Out of Office (Cloud Hybrid) Pia: Setup/Remove Out of Office (Cloud Only) Pia: Setup/Remove Out of Office (SmartForms) |
| Service Request|Network|DNS | |
| Service Request|Phone|Redirect | |
| Service Request|Printing|Configuration | Pia: Win10 Install Network Printer |
| Service Request|Sales|Domain Renewal | |
| Service Request|Sales|Quote | |
| Service Request|SharePoint|Permissions | |
| Service Request|Staff Changes|MFA Setup | Pia: Reset/Modify Users MFA Auth Methods |
| Service Request|Staff Changes|New Staff | Pia: Re-enable Offboarded Staff (Cloud Hybrid) Pia: Re-enable Offboarded Staff (Cloud Only) Pia: Re-enable Offboarded Staff (On Prem) Pia: Staff Onboarding (Cloud Hybrid) Pia: Staff Onboarding (Cloud Only) Pia: Staff Onboarding (On Prem) Pia: Staff Onboarding (Semi-Hybrid) Pia: Staff Onboarding (SmartForms) |
| Service Request|Staff Changes|Staff Exit | Pia: Bulk Staff Offboarding Pia: Staff Offboarding (Cloud Hybrid) Pia: Staff Offboarding (Cloud Only) Pia: Staff Offboarding (On Prem) Pia: Staff Offboarding (Semi-Hybrid) Pia: Staff Offboarding (SmartForms) |
| Service Request|Staff Changes|Update Details | Pia: Bulk Update User Details (Cloud Hybrid) Pia: Bulk Update User Details (Cloud Only) Pia: Change User Details (Cloud Hybrid) Pia: Change User Details (Cloud Only) Pia: Change User Details (On Prem) Pia: Change User Details (Semi-Hybrid) |
| Service Request|Staff Changes|Update Photo | Pia: Upload Staff Photo |
| Service Request|Tablet/Mobile|Setup | |
| Service Request|VPN|Setup | Pia: Deploy SonicWall VPN Pia: OpenVPN Setup/ReInstall Pia: VPN Setup (Cloud Hybrid) Pia: VPN Setup (Cloud Only) |
| Service Request|Workstation|Setup |
🚀 We are continually expanding our classification portfolio, so be sure to keep an eye out for new classifications that we release regularly. Stay tuned for updates that enhance Pia's AI capabilities!
Scenarios
Scenario 1: Classify Tickets for New User Requests in Salesforce.
In instances where a broad ticket request like New User needs to be separated from specific softwares, in this case 'Salesforce New User Requests', you can add your own Custom Classification and AI Rule to train Pia's AI to further categorize your tickets.
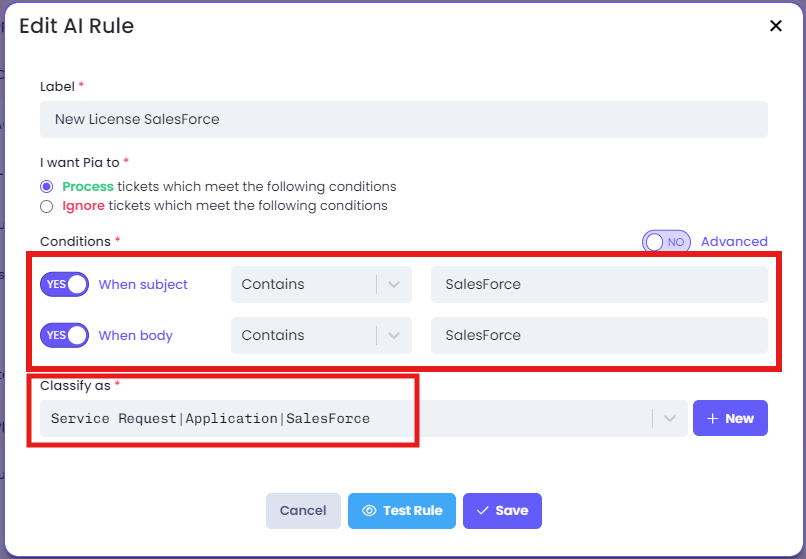
Service Request|Application|Salesforce.What can I do with it now?
Application|SalesForce|Additional User.Scenario 2: I believe Pia is misclassifying a ticket.
This example is when Pia classifies a NOC ticket as a standard service request ticket.
-d2cf664abe8f603d64d7e6777b57c387.png)
Pia has a few ways that you can handle this situation, but before we cover how, we need you to understand some context around Pia's Machine Learning process.
- If there is a rule, it overrides Pia's Machine Learning calculation of the category and hard sets it to 100% confidence in the category you've created.
- If there is not a rule created in the AI Analysis tab, the ticket will be processed by Pia's Machine Learning to determine its category.
With that information, the first (and our recommended) way to manage misclassifications, is to create a User-Defined Classification and match the Subject and/or Body of the ticket for the tickets that are being misclassified so they can be put into their own ticket classification (which means you'll be able to use it to stamp these tickets via the Stamping Tab or AutoStart a Package).
There is also an ignore option which will tell Pia's Machine Learning to not process the ticket at all, that contains keywords in the Subject and/or Body. Creating an ignore rule is really just a quick and easy way to stop processing tickets of a particular type, if you intend on making its own category later.
Scenario 3: Advanced Mode Configuration.
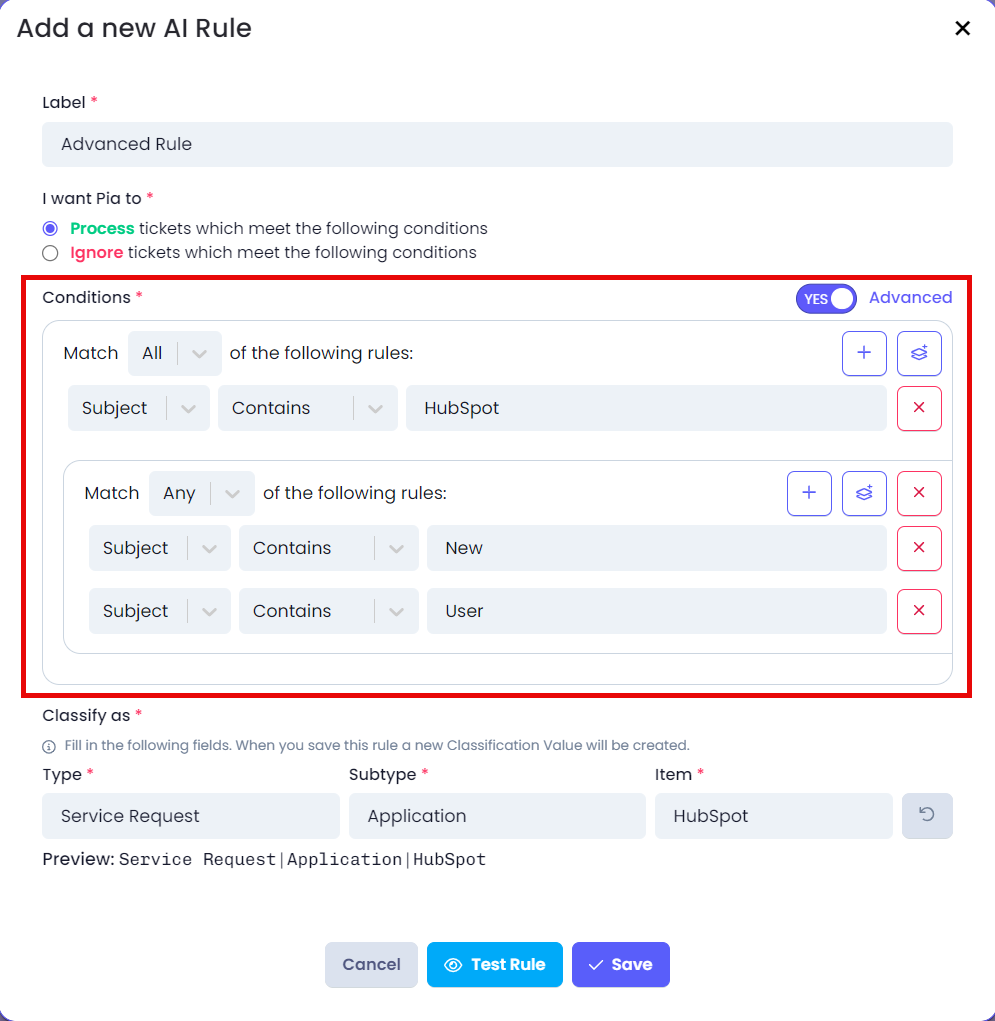
Our Advanced Mode Configuration setting allows multiple conditions for a particular rule. This is relevant for more complex conditions that may require some nuance in producing a new outcome/category, or increased specificity.
In this example we've created an AI Rule that scans all incoming tickets that contain the word HubSpot and either of the words New and User in the Subject. This is achieved by using a nested group, to help Pia distinguish "New User" requests from "HubSpot New User" requests by putting the HubSpot request into its own category Service Request|Application|HubSpot (which means you'll be able to use it to stamp these tickets via the Stamping Tab or AutoStart a Package).
There is no limit to the number of conditions for a rule.
Managing Custom Classifications
You can create custom classifications alongside Pia's native classifications to build more dynamic AI rules that address a wider range of scenarios. Use the "Manage Custom Classification" button to create and delete your custom classifications.

Creating a custom classification
You can create custom classifications either through the 'Manage Custom Classification' button or while configuring AI Analysis rules. This section focuses on the first option.
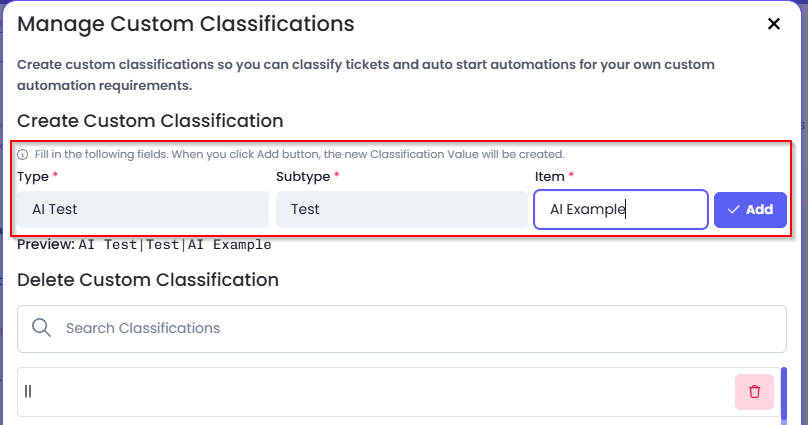
Click on the "Manage Custom Classifications" button. This will open a pop-up where you can add or delete custom classifications.
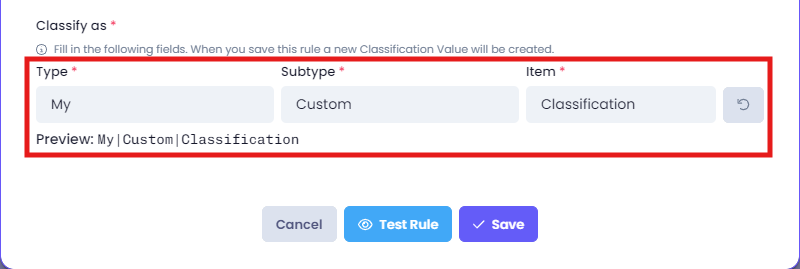
Under the Create Custom Classification section, enter the Type, Subtype and Item.
Click the "Add" button to add your custom classification to the list.
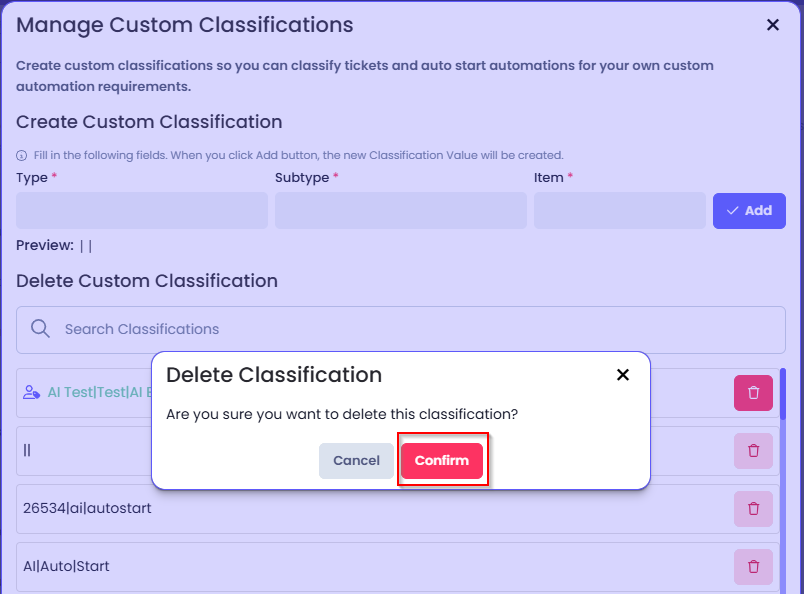
Deleting a custom classification
In the same pop-up, navigate to the Delete Custom Classification section.
A delete icon is available beside each custom classification. Click on the delete icon.
A confirmation pop-up will appear. Click on 'Confirm' to confirm your action.
Once a custom classification has been used in an AI Analysis Rule, it will be locked and cannot be deleted. To delete the classification, you will need to unlink the classification from any AI Analysis rule it has been linked to.
Configuring AI Analysis Rules
To configure AI Analysis rules, navigate to the AI Analysis tab in the AI Triage page. From here, you can easily add, edit, or delete AI rules to influence Pia's AI.

Adding a New AI Rule
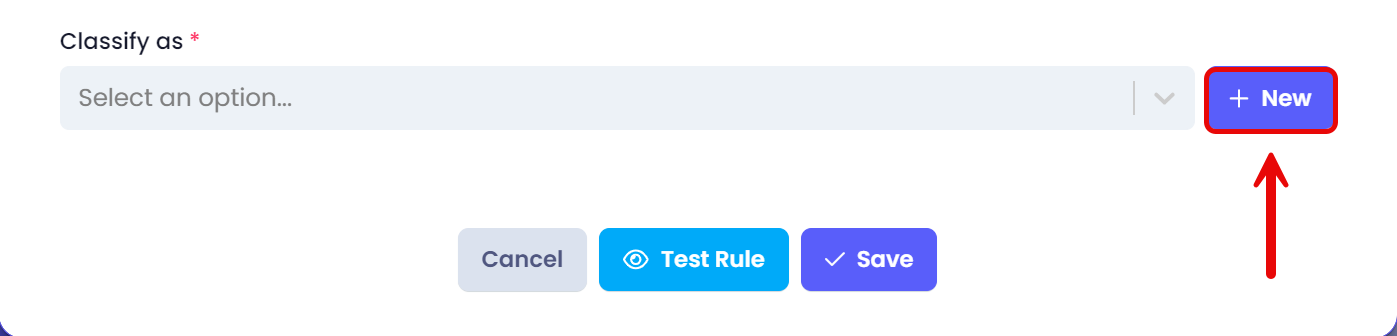
Click on the + New AI Rule or + button (as per the screenshot below).

The Add a New AI Rule pop-up will appear where you can set up your rule.
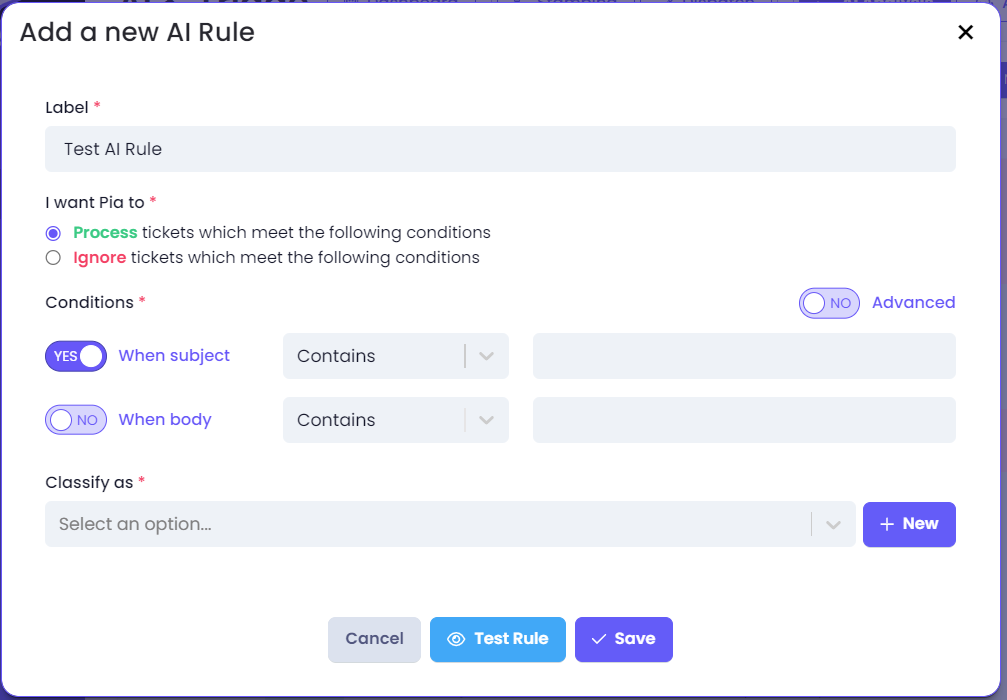
Label(*): Provide a descriptive label for your rule.
I want Pia to (*):
- Process or Ignore: Choose whether you want Pia to process tickets that match your rule or ignore them.
Conditions (*) (default mode):
- When subject: Specify keywords that should trigger the rule based on the ticket subject. Activate the condition toggling YES next to "When subject".
- When body: Specify keywords that should trigger the rule based on the ticket body. Activate the condition toggling YES next to "When body".
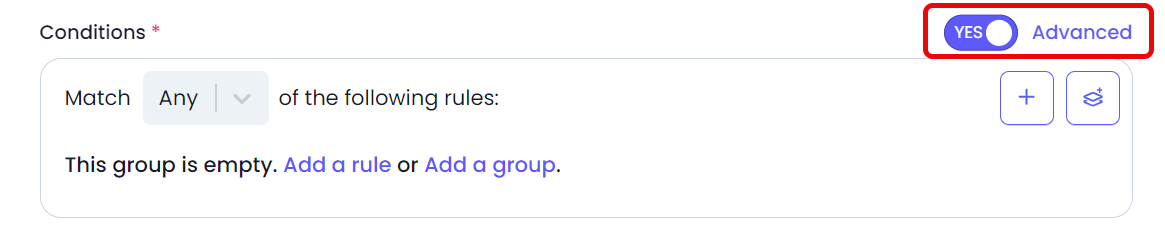
Conditions (*) (Advanced mode): This mode allows you to specify multiple conditions, combining different subjects or body contents using logical operators (e.g., "All" or "Any").
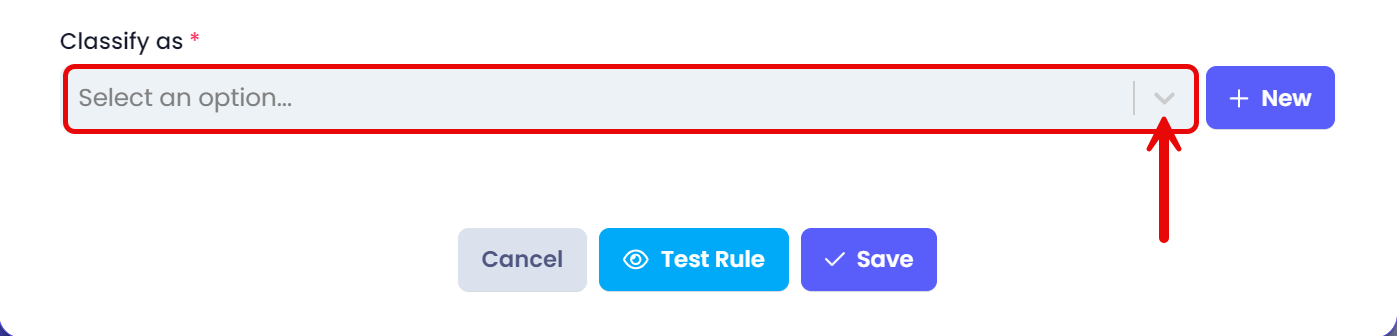
Classify as:
Select from the existing list of classifications. This may be a custom classification which you have created or a Pia Native classification.
Note:When Pia processes a ticket, any custom keyword rules you create are checked first before Pia's Machine Learning Model is consulted for classifying the ticket.
 OR
ORClick on the +New button to create a new custom classification rule
 Preview example:
Please note that AI rules are not case-sensitive. This means that both uppercase and lowercase letters are treated the same when creating or applying rules.
Testing AI Rules
After creating or editing an AI Analysis Rule, you can test it by clicking the Test Rule button.
This feature allows you to see, in real time, which tickets match the rule you've just set up. It's also helpful to create a few mock tickets beforehand to ensure that your rule works as expected (see screenshot below for reference).
-06091cbfabb57764c28b31f842e5cf8a.png)
Sorting and Ordering AI Rules
Ordering your AI Rules by priority order from top to bottom helps ensure that high-priority tickets are processed first, resulting in more effective triage. Similar to rules in email clients like Outlook: they are processed from top to bottom.
You can adjust the order of how Pia processes these rules by following the steps below:
Drag and drop the grip dots on the far left to move the rule's position up or down in the table. Alternatively, you can click the up or down arrows to move the rules one line at a time
Be sure to click Save at the bottom of the page after making changes to the order.
Further Reading
For more information on the new AI Triage experience, be sure to check out the following articles: