Automation Customization and Configuration
By default, most Automations in Pia will be ready to use without any additional configuration/customization required. However, there are still some Automations that allow additional configuration or customization mainly for one of two reasons:
- Further automation of a task i.e. Configuration form is optional for these type of Automations.
- The automation requires additional information to provided to function i.e. Filling up the Configuration form is mandatory for these type of automations.
Below is a list of automations, split into "Optional" and "Mandatory" sections.
- Optional
- Mandatory
The full list of these automations is below:
- Staff Onboarding (Cloud Only)
- Staff Onboarding (Cloud Hybrid)
- Staff Onboarding (Semi-Hybrid)
- Staff Onboarding (On Prem Only)
- Staff Offboarding (Cloud Only)
- Staff Offboarding (Cloud Hybrid)
- Staff Offboarding (Semi-Hybrid)
- Staff Offboarding (Prem Only)
Follow the steps below to locate and setup configuration form for each of the automations listed above:
- Staff Onboarding
- Staff Offboarding
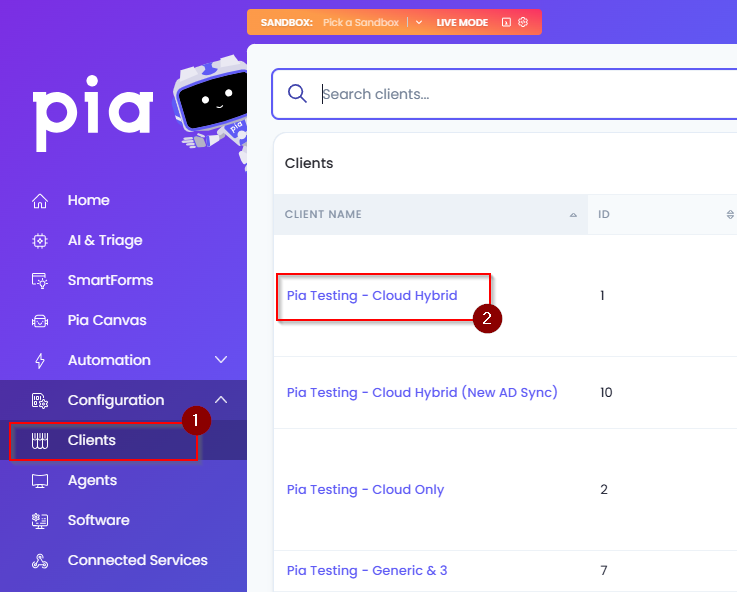
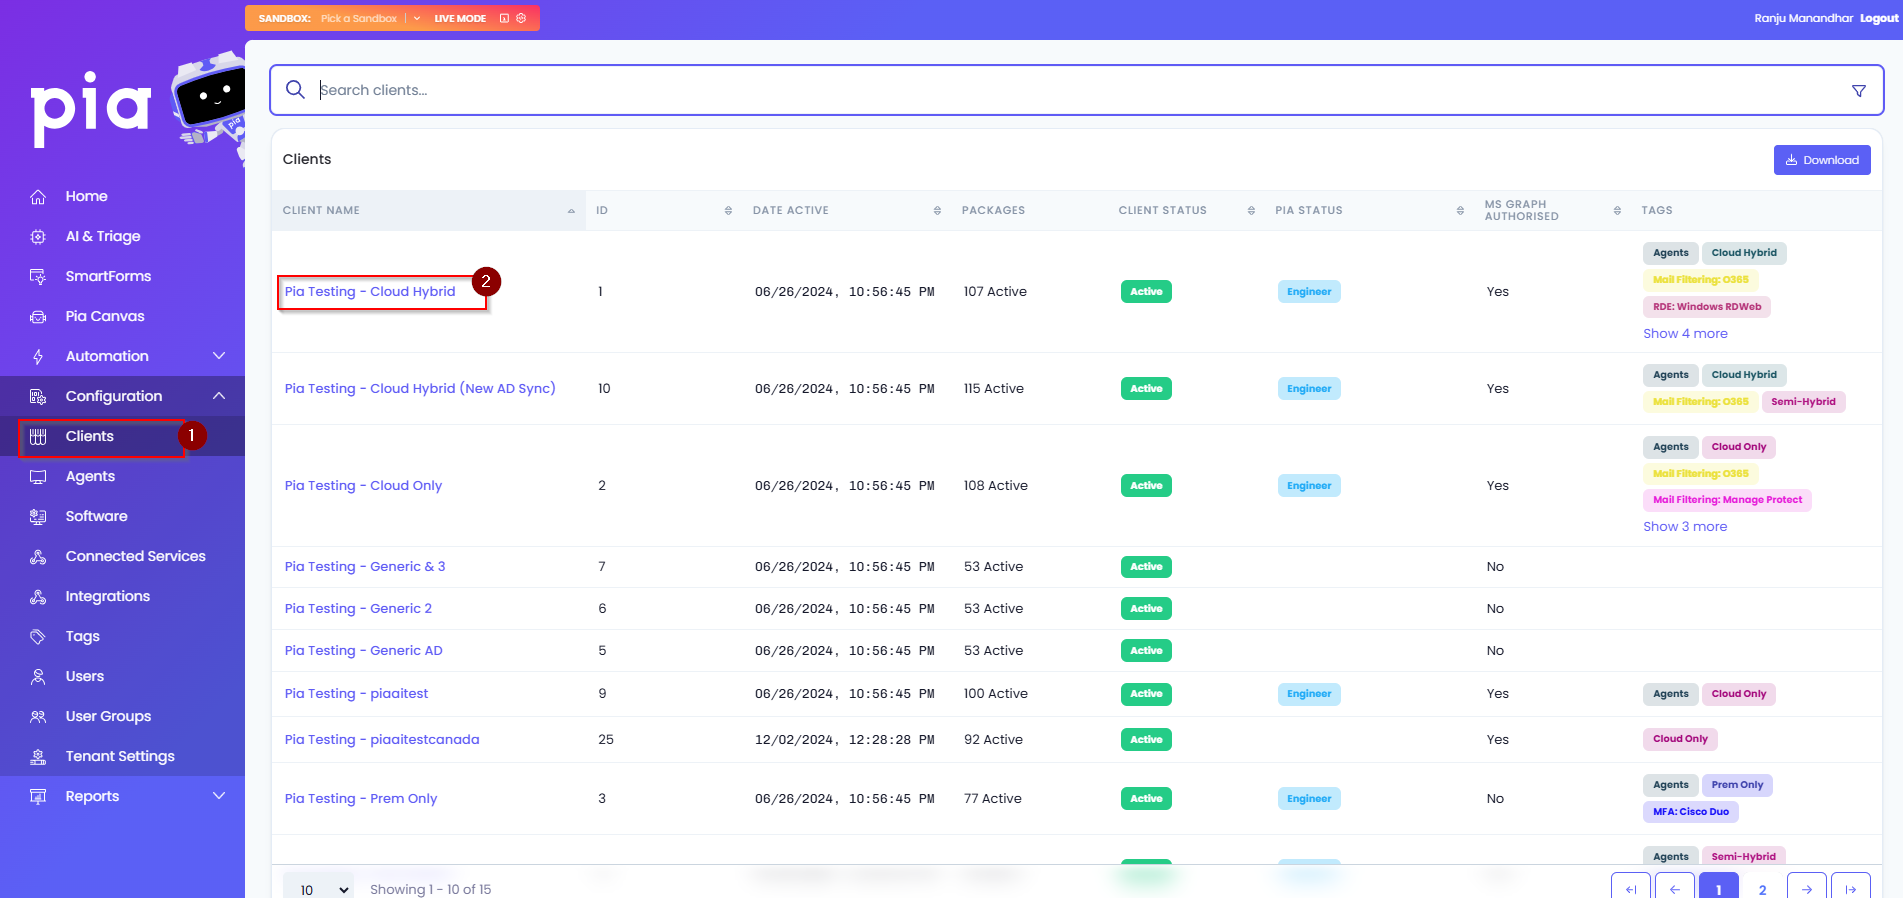
- In the Pia Tenant, click on Clients and select a Client you want to customize either of these Automations for.
On the Client Dashboard, you will see a "Automations" section.
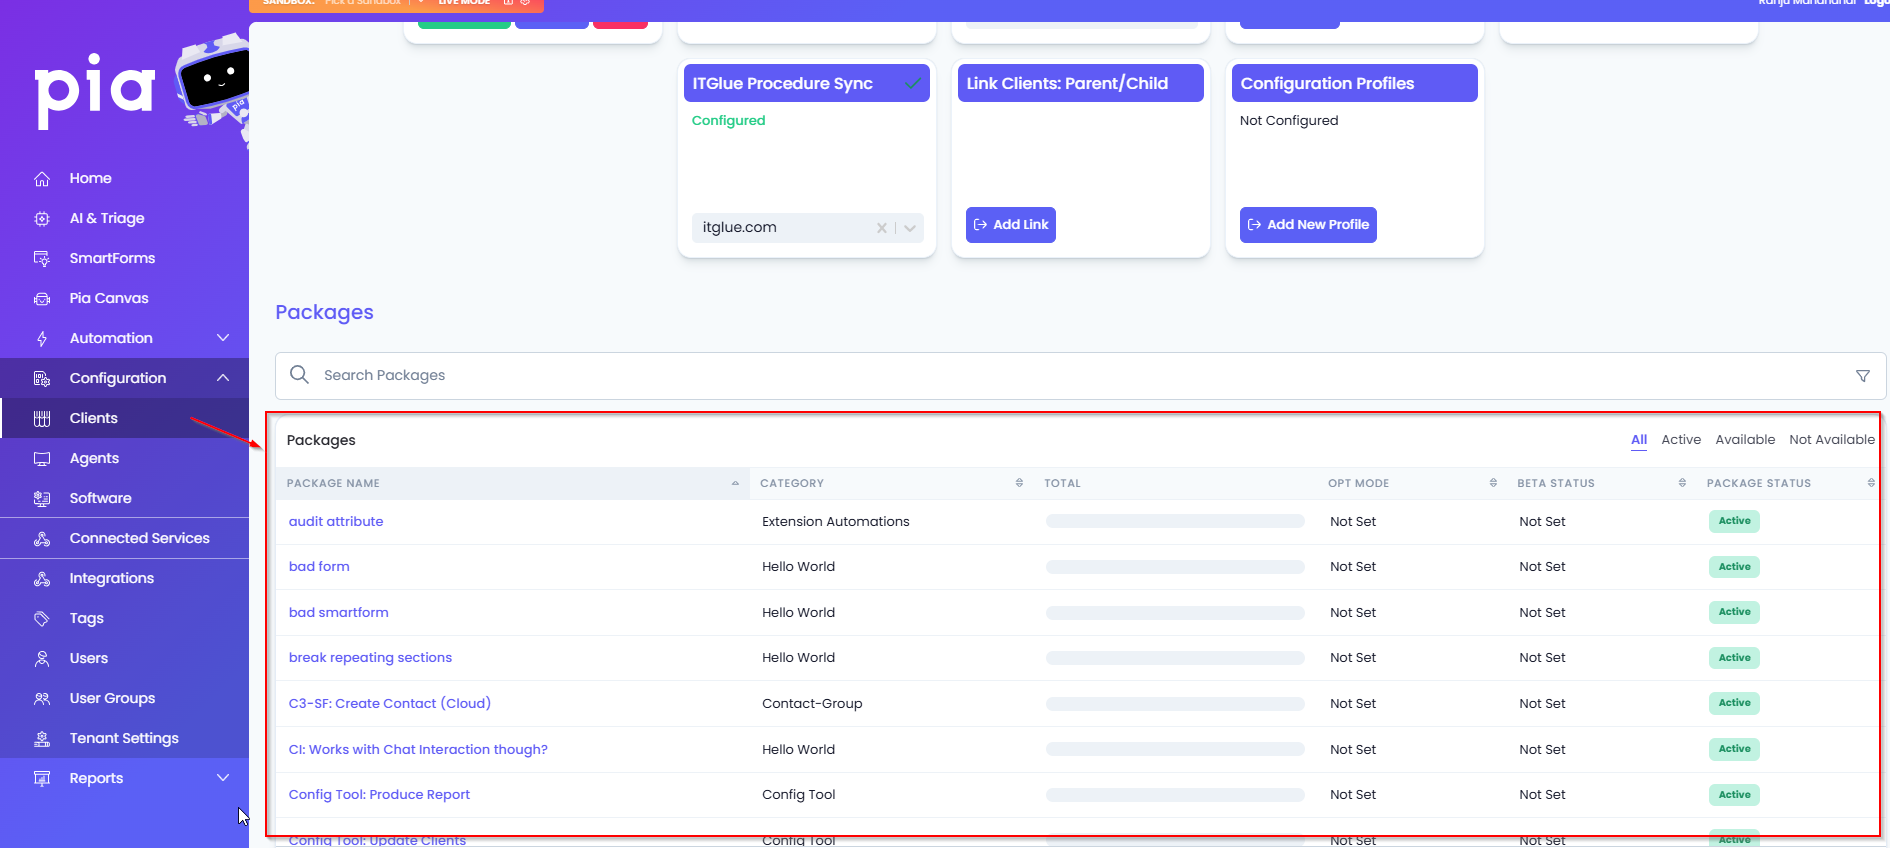
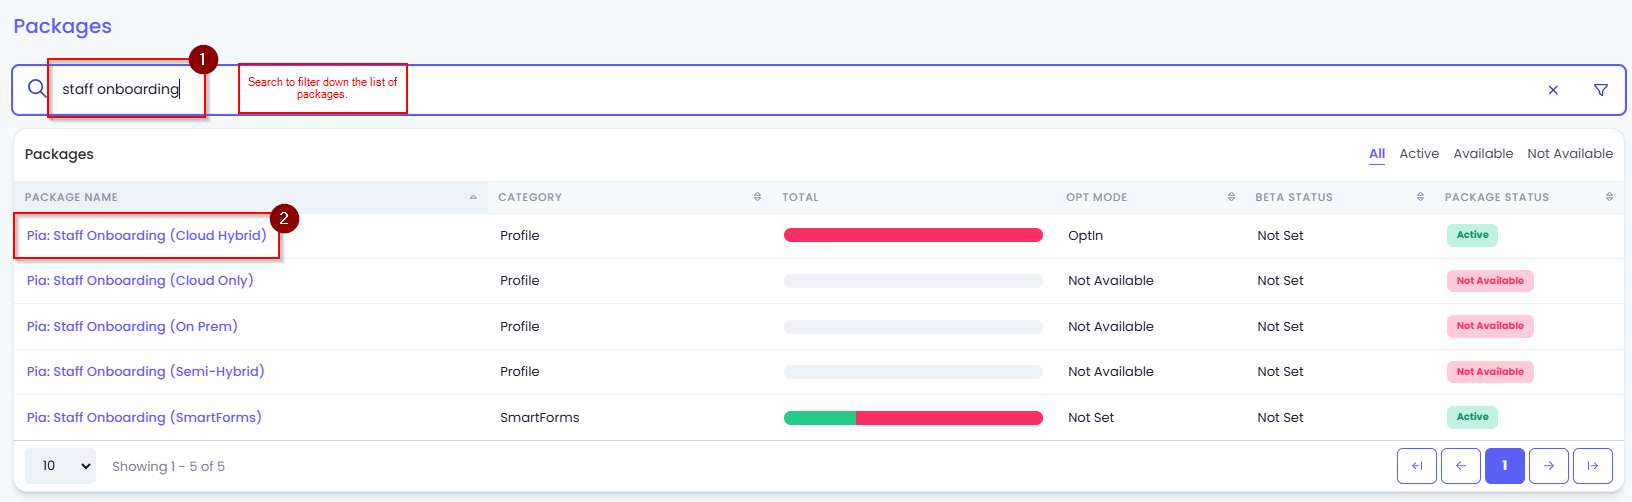
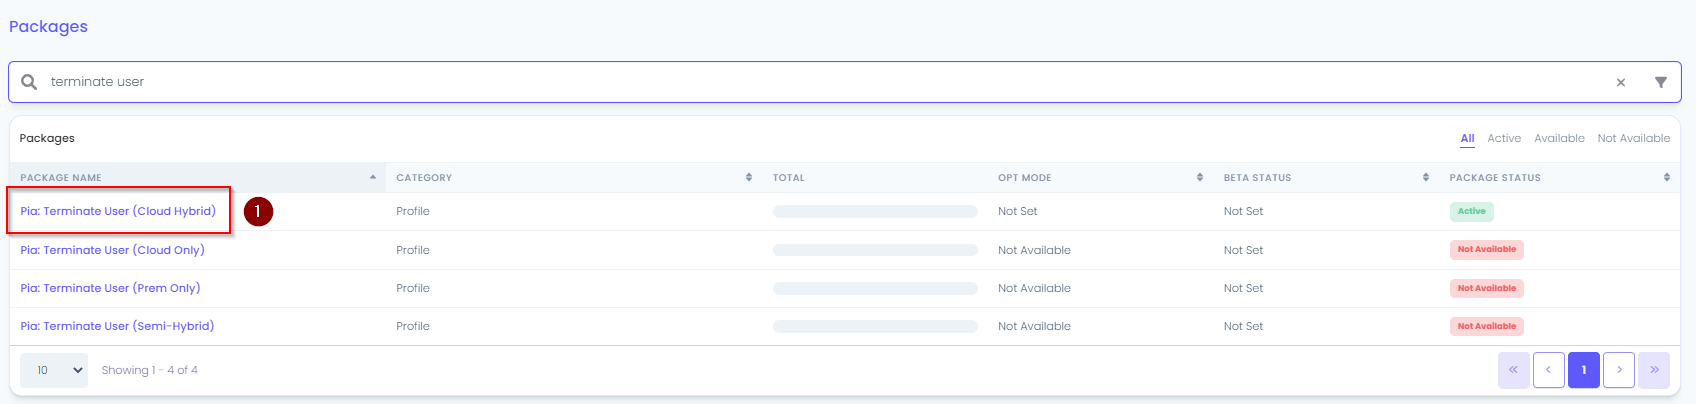
Look through the "Active" section of the Automations to find the Automation you want to customize, it should have the environment type ie. "(Cloud Hybrid)" at the end of the name. In our example below, we'll be looking at the "Staff Onboarding - (Cloud Hybrid)" Automation.
Left-click on the Automation name.
A page will load detailing information relating to the selected Automation, click the "configuration" button in the "Applies To" section.

A Procedure Configuration menu will appear on the page with options for the Automation.
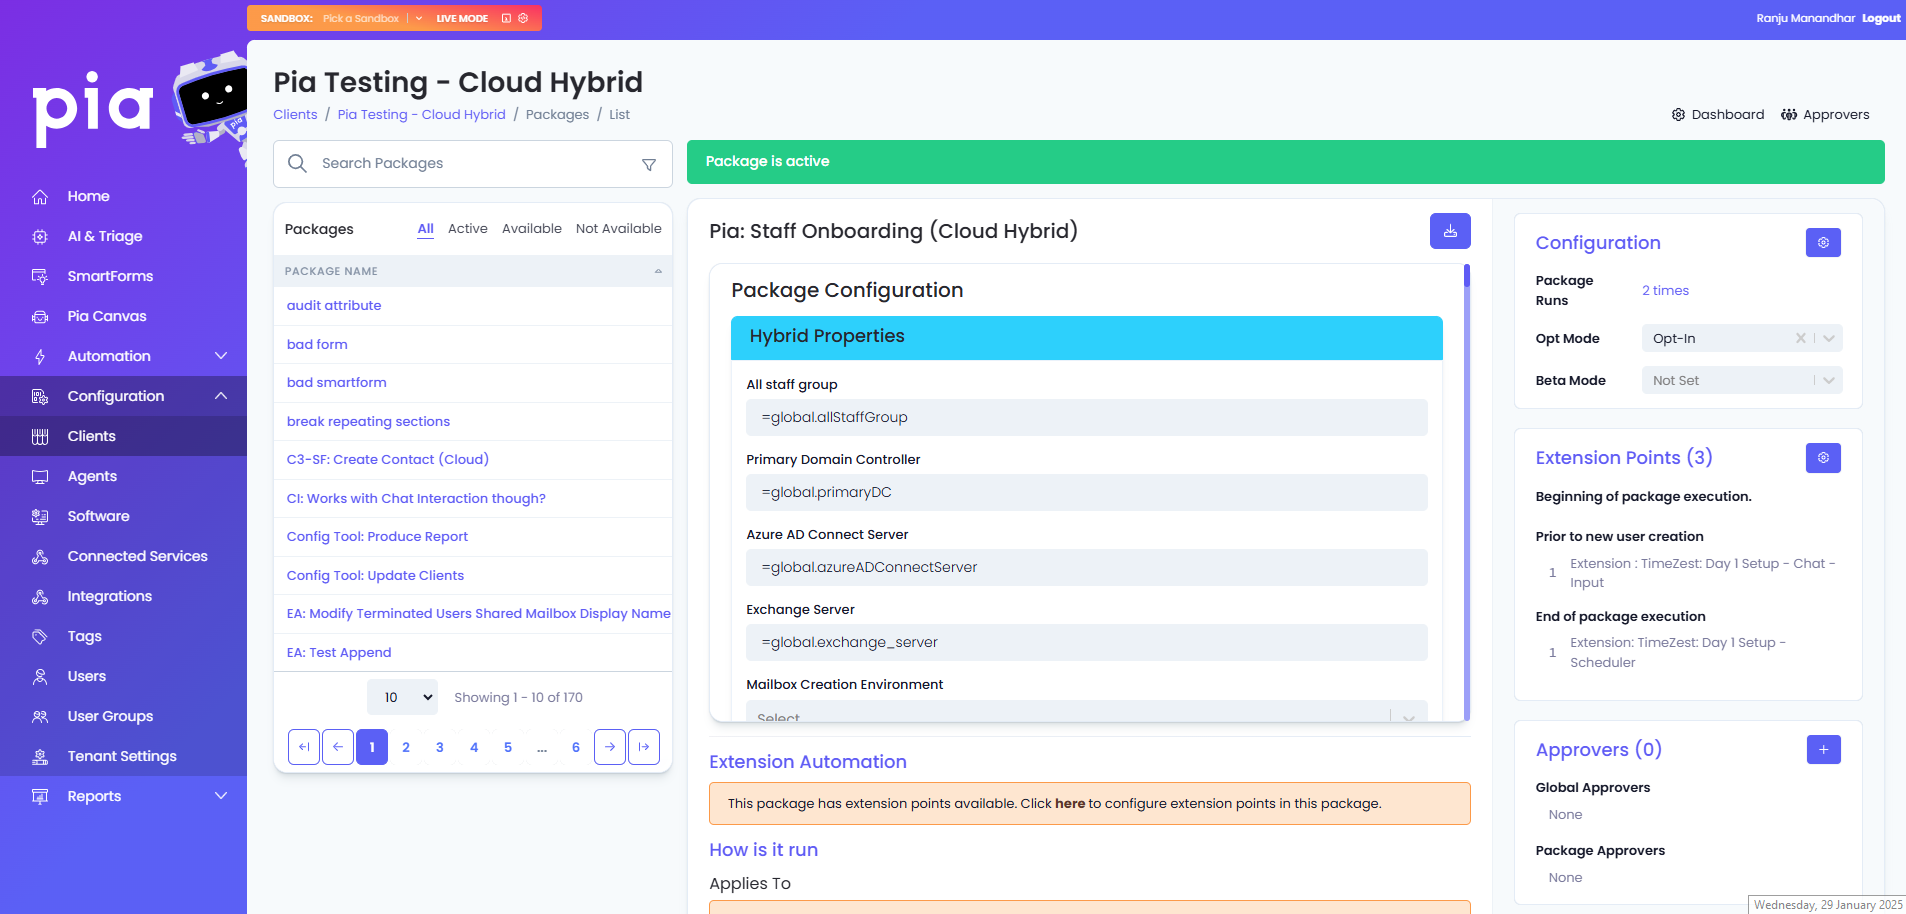
Below is a breakdown of each section and the options available.
- Cloud Only
- Cloud Hybrid
- On Prem
- Semi-Hybrid
Cloud Properties
| Field Name | Default Value | Details |
|---|---|---|
| All staff group (optional) | =global.allStaffGroup | All Staff Group that the Automation will refer to retrieve a list of active users for the client. |
| Username Format | Select the format for the username which Pia will generate for the Staff Onboarding creation. | |
| Action to take when a duplicate UPN is detected | Select from the available actions that Pia can take if the provided UPN already exists such as Append a number to the username (e.g. jsmith1). | |
| Display Name Format | Select from the display name format options. | |
| User Selection Dropdowns Display Format | Select how the user info will be displayed in the Chatbot in user selection drop-downs. e.g. FirstName LastName - Description. | |
| Minimum length for UPN | Set a min limit on the length of UPN and SAM Account Name. You can also set no limit by selecting the 'No Limit' option. | |
| Default Primary UPN Suffix | In environments where multiple UPNs are present, you can specify the default primary UPN. | |
| Default Microsoft365 Licenses | (Optional) Choose a Microsoft 365 license that will be selected by default in the Pia Chatbox. | |
| License Options | Specify how licensing is handled by the automation by selecting from the available options. | |
| Enable wait for exchange capable license as part of group based licensing | This is a tickbox that will enable the waiting period for Exchange capable license as a part of group based licensing. | |
| Mail Propagation Delay (seconds) | 0 | This is a wait period before checking if the mailbox has been provisioned for the user. |
| Extra Proxy Addresses | (One per line) Add any extra addresses which may be selected by the Pia user during user creation. For example: @abc.com | |
| Extra AD Attribute Settings | (One per line) Format: name|value. |
Extra Features
| Field Name | Details |
|---|---|
| Enable Employee ID on Form | This will display an input for an employee ID to be set by the engineer. |
| Enable Litigation Hold on Staff Onboarding Mailbox | Select to enable Litigation Hold by default on the mailbox. |
| Enable Welcome Email | Select if new users will receive the Welcome Email defined further down in the form. |
| Present List of Domains for Primary SMTP Address | A list of suffixes for email addresses to be used during account creation. |
| Enable Ticket Note Auditing for Passwords as Plain Text | Enabling this will allow Pia to post passwords in plain text when adding ticket audit notes. |
| Allow Separate Email Address To User Principal Name | This will allow engineers to create email address that does not match the user's UPN. |
| Enable Full Country Names | This will require the engineers to enter full country names in the new user form. The form field is optional. |
| Disable Contact Creation in Ticketing System | This will skip the contact creation process if the contact does not already exist in the Ticketing System. |
| Enable Default "Password Never Expires" | This will set the password of the newly created user account to never expire. |
| Hide Plain Text Passwords | This will replace plain text passwords with asterisks when posting ticket audit notes in the ticketing system. |
Disable SMS Option
- If 'Yes' is selected, this will hide the SMS message capability during account creation.
- If 'No' is selected, SMS message options are displayed in the chatbot during account creation.
Default Calendar Permission on Staff Onboarding's Calendar This will display the option to set default calendar permission based on user input.
License Provisioning
| Field Name | Details |
|---|---|
| Enable License procurement | When this is enabled, license procurement options are displayed in the chatbot during new staff account creation. |
| Prompt for confirmation before procurement | This will prompt a message in the chatbot before license procurement is processed. |
Password Section
| Field Name | Default Value | Details |
|---|---|---|
| Minimum Length | =global.minLength | This will set the minimum length for the password. By default, this is set based on the configuration of the global configuration form. |
| Password Options | =global.passwordOptions | This will set any additional requirements on the password such as uppercase, lowercase, numbers and special characters. |
| Password Override | (Optional) Set a default initial password. |
Welcome Email
| Field Name | Default Value | Details |
|---|---|---|
| Email Options | A series of checkboxes to confirm Welcome Email details. | |
| Confirm before sending email (checkbox) | Confirm the Welcome Message in the Pia Chatbox before sending. | |
| CC Recipients (checkbox) | When checked the 'CC Recipients' field is displayed. | |
| BCC Recipients (checkbox) | When checked the 'BCC Recipients' field is displayed. | |
| CC Recipients | Enter recipients to be CCed the Welcome Email. - One address per line. | |
| BCC Recipients | Enter recipients to be BCCed the Welcome Email. - One address per line. | |
| Email Subject | Welcome #FirstName# #LastName# | Set the subject line of the Email. |
| Email Body | (Long default message) | Define the body of the email. Short codes that can be used in Email Subject and Email Body fields: #FirstName#, #LastName#, #OfficePhone#, #MobilePhone#, #Department#, #company#, #email#, #JobTitle#, #Manager#, #Location# |
Access Level
| Field Name | Details |
|---|---|
| Access Level | This is the name of the access level which can be selected from the Staff Onboarding creation form. |
| Office 365 groups (one per line) | These are the group names from azure which should be pre-populated when the access level is selected. |
| Extra AD Attribute Settings | This is used to update fields that are not displayed on the Staff Onboarding form. For example: msExchRecipientTypeDetails|2147483648. |
| Contact location / site (must match existing ticketing system site name) | This is the company site location of the contact in the ticketing system. |
| Shared Mailbox Access (One per line) (Smartforms Only) | These are the shared mailboxes that you want the new users to have access to. For Example: Format: upn PIPE permission Permissions: Full| SendAs|SendOnBehalf e.g. john.smith@pia.ai|Full. |
| UPN Suffix (Smartforms Only) | Add the UPN suffix for user creates via SmartForms. |
| Licenses (Smartforms Only) | Add the licenses for users that are assigned by default to the users created via SmartForms. |
- Additional Access Levels can be added by clicking the 'Insert +' link.
- Remove unneeded Access Levels by clicking the 'Delete-' link.
Manual Tasks
| Field Name | Details |
|---|---|
| Task | Detail manual tasks that will be added to the ticket for the Service Desk Engineer to complete. - Additional Tasks can be added by clicking the 'Insert +' link. - Remove unneeded Tasks by clicking the 'Delete-' link. |
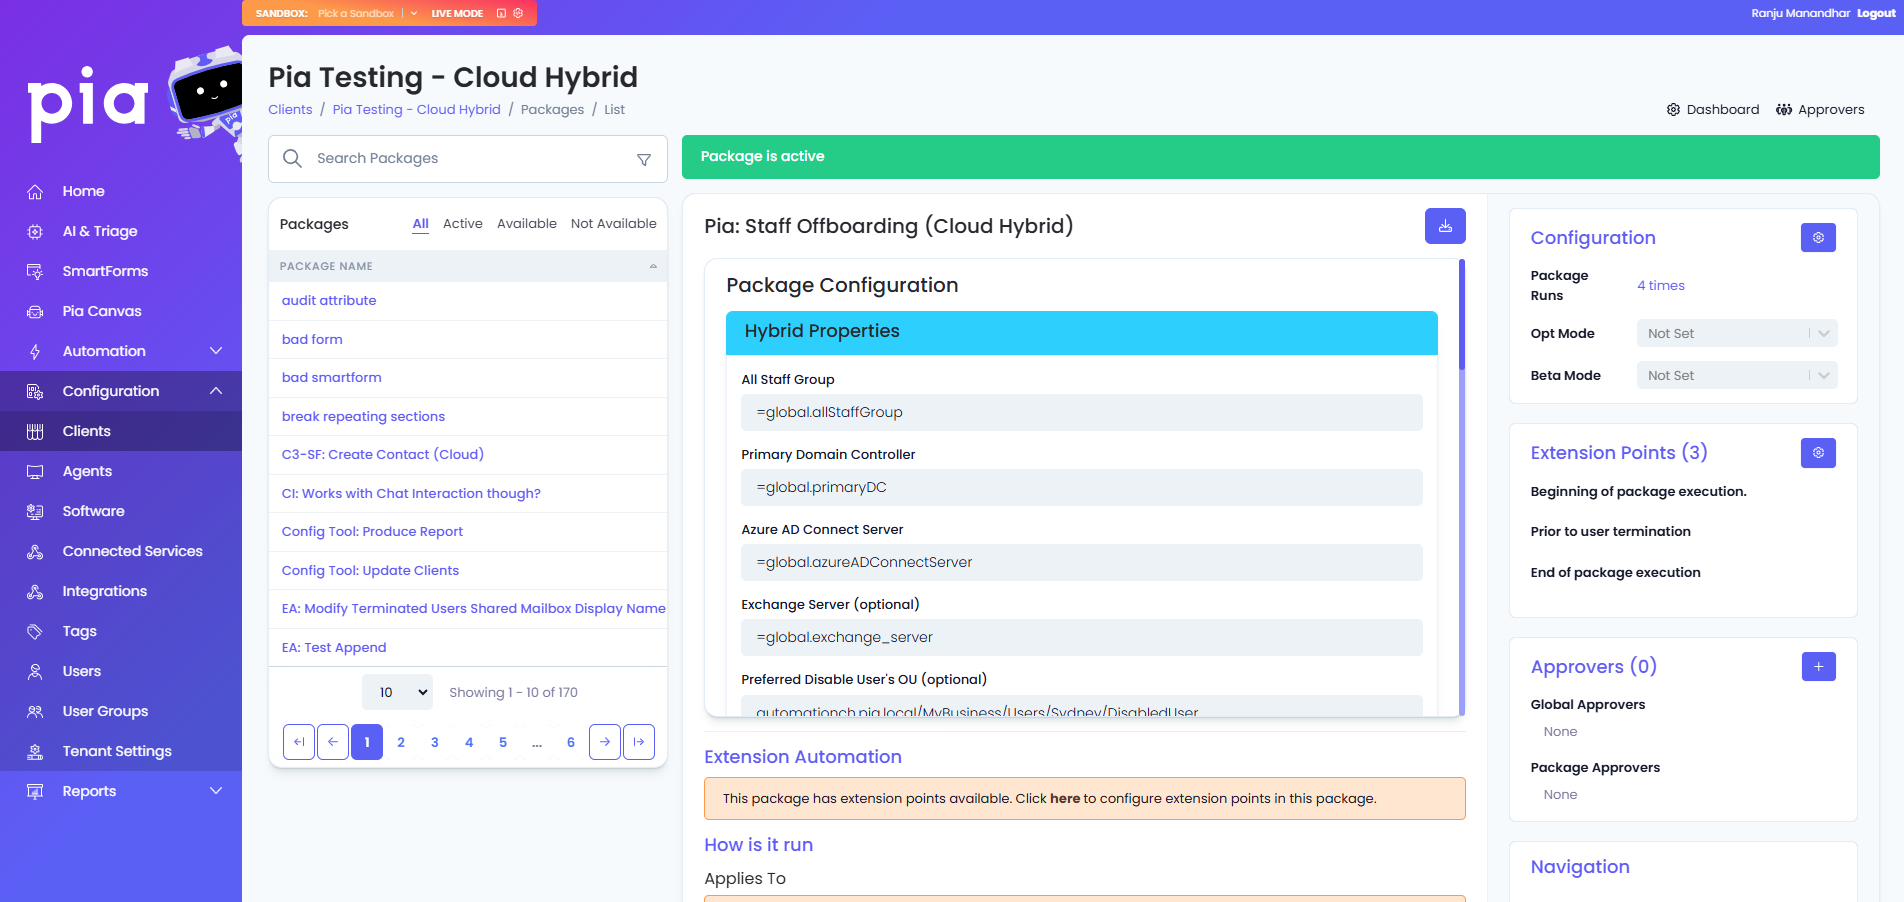
Hybrid Properties
| Field Name | Default Value | Details |
|---|---|---|
| All staff group | =global.allStaffGroup | All Staff Group that the Automation will refer to retrieve a list of active users for the client. |
| Primary Domain Controller | =global.primaryDC | Name of the Primary Domain Controller for the client. |
| Azure AD Connect Server | =global.azureADConnectServer | Name of the server that facilitates synchronizing user details from an on-prem AD to Azure AD for the client. |
| Exchange Server | =global.exchange_server | Name of the Exchange Server for the client. |
| Mailbox Creation Environment | Select the environment where the mailbox will be created from the available options. | |
| Mail Propagation Delay (seconds) | 0 | This is a wait period before checking if the mailbox has been provisioned for the user. |
| License Options | Specify how licensing is handled by the automation by selecting from the available options. | |
| Username Format | Select the format for the username which Pia will generate for the Staff Onboarding creation. | |
| Action to take when a duplicate Username is detected | Select from the available actions that Pia can take if the provided Username already exists such as Append a number to the username (e.g. jsmith1). | |
| User Principal Name Format | Select the format for the user principal name which Pia will generate for the Staff Onboarding creation. | |
| Action to take when a duplicate UPN is detected | Select from the available actions that Pia can take if the provided UPN already exists such as Append a number to the username (e.g. jsmith1). | |
| Minimum length for UPN and SAM Account Name | Set a min limit on the length of UPN and SAM Account Name. You can also set no limit by selecting the 'No Limit' option. | |
| Default Primary UPN Suffix | In environments where multiple UPNs are present, you can specify the default primary UPN. | |
| Display Name Format | Select from the display name format options. | |
| User Selection Dropdowns Display Format | Select how the user info will be displayed in the Chatbot in user selection drop-downs. e.g. FirstName LastName - Description. | |
| Default Microsoft365 Licenses | (Optional) Choose a Microsoft 365 license that will be selected by default in the Pia Chatbox. | |
| Extra Proxy Addresses | (One per line) Add any extra addresses which may be selected by the Pia user during user creation. For example: @abc.com. | |
| Extra AD Attribute Settings: (One per line) | (One per line) Format: name|value. |
Cloud Details
| Field Name | Default Value | Details |
|---|---|---|
| UPN of Admin Account (Graph API Delegated Consent) | =global.adminUpn | User Principal Name of the account that has been delegated via Microsoft Graph API. |
Extra Features
| Field Name | Details |
|---|---|
| Enable Employee ID on Form | This will display an input for an employee ID to be set by the engineer. |
| Enable Litigation Hold on Staff Onboarding Mailbox | Select to enable Litigation Hold by default on the mailbox. |
| Enable Welcome Email | Select if new users will receive the Welcome Email defined further down in the form. |
| Home Drive Setup | Select to setup local home drive for the user. |
| Present List of Domains for Primary SMTP Address | A list of suffixes for email addresses to be used during account creation. |
| Allow Separate Email Address To User Principal Name | This will allow engineers to create email address that does not match the user's UPN. |
| Enable Ticket Note Auditing for Passwords as Plain Text | Enabling this will allow Pia to post passwords in plain text when adding ticket audit notes. |
| Disable Contact Creation in Ticketing System | This will skip the contact creation process if the contact does not already exist in the Ticketing System. |
| Enable Default "Password Never Expires" | This will set the password of the newly created user account to never expire. |
| Hide Plain Text Passwords | This will replace plain text passwords with asterisks when posting ticket audit notes in the ticketing system. |
Disable SMS Option
- If 'Yes' is selected, this will hide the SMS message capability during account creation.
- If 'No' is selected, SMS message options are displayed in the chatbot during account creation.
Default Calendar Permission on Staff Onboarding's Calendar This will display the option to set default calendar permission based on user input.
License Provisioning
| Field Name | Details |
|---|---|
| Enable License procurement | When this is enabled, license procurement options are displayed in the chatbot during new staff account creation. |
| Prompt for confirmation before procurement | This will prompt a message in the chatbot before license procurement is processed. |
Password Section
| Field Name | Default Value | Details |
|---|---|---|
| Minimum Length | =global.minLength | This will set the minimum length for the password. By default, this is set based on the configuration of the global configuration form. |
| Password Options | =global.passwordOptions | This will set any additional requirements on the password such as uppercase, lowercase, numbers and special characters. |
| Password Override | (Optional) Set a default initial password. |
Home Drive
| Field Name | Default Value | Details |
|---|---|---|
| Home Drive Letter | H | Letter to be assigned to the home drive. |
| Home Drive Root Path | Define location path for the home drive. |
Welcome Email
| Field Name | Default Value | Details |
|---|---|---|
| Email Options | A series of checkboxes to confirm Welcome Email details. | |
| Confirm before sending email (checkbox) | Confirm the Welcome Message in the Pia Chatbox before sending. | |
| CC Recipients (checkbox) | When checked the 'CC Recipients' field is displayed. | |
| BCC Recipients (checkbox) | When checked the 'BCC Recipients' field is displayed. | |
| CC Recipients | Enter recipients to be CCed the Welcome Email. - One address per line. | |
| BCC Recipients | Enter recipients to be BCCed the Welcome Email. - One address per line. | |
| Email Subject | Welcome #FirstName# #LastName# | Set the subject line of the Email. |
| Email Body | (Long default message) | Define the body of the email. Short codes that can be used in Email Subject and Email Body fields: #FirstName#, #LastName#, #OfficePhone#, #MobilePhone#, #Department#, #company#, #email#, #JobTitle#, #Manager#, #Location#. |
Access Level
| Field Name | Details |
|---|---|
| Access Level | This is the name of the access level which can be selected from the Staff Onboarding creation form. |
| Groups (one per line) | These are the group names from azure which should be pre-populated when the access level is selected. |
| Microsoft 365 Groups (one per line) | These are the group names from azure which should be pre-populated when the access level is selected. |
| Extra AD Attribute Settings | This is used to update fields that are not displayed on the Staff Onboarding form. For example: msExchRecipientTypeDetails|2147483648 |
| Org Unit (canonicalName or distinguishedName) | This is the location where the user should be created in. For Example: canonicalName: 'business.local/MyBusiness/Users' distinguishedName: 'OU=Users,OU=MyBusiness,DC=business,DC=local'. |
| Contact location / site (must match existing ticketing system site name) | This is the company site location of the contact in the ticketing system. |
| Shared Mailbox Access (One per line) (Smartforms Only) | These are the shared mailboxes that you want the new users to have access to. For Example: Format: upn PIPE permission Permissions: Full| SendAs|SendOnBehalf e.g. john.smith@pia.ai|Full. |
| UPN Suffix (Smartforms Only) | Add the UPN suffix for user creates via SmartForms. |
| Licenses (Smartforms Only) | Add the licenses for users that are assigned by default to the users created via SmartForms. |
- Additional Access Levels can be added by clicking the 'Insert +' link. <br />
- Remove unneeded Access Levels by clicking the 'Delete-' link. |
Manual Tasks
| Field Name | Details |
|---|---|
| Task | Detail manual tasks that will be added to the ticket for the Service Desk Engineer to complete. - Additional Tasks can be added by clicking the 'Insert +' link. - Remove unneeded Tasks by clicking the 'Delete-' link. |
AD Properties
| Field Name | Default Value | Details |
|---|---|---|
| All staff group | =global.allStaffGroup | All Staff Group that the Automation will refer to retrieve a list of active users for the client. |
| Primary Domain Controller | =global.primaryDC | Name of the Primary Domain Controller for the client. |
| Exchange Server | =global.exchange_server | Name of the Exchange Server for the client. |
| Mailbox Creation Environment | Select the environment where the mailbox will be created from the available options. | |
| Username Format | Select the format for the username which Pia will generate for the Staff Onboarding creation. | |
| Action to take when a duplicate Username is detected | Select from the available actions that Pia can take if the provided Username already exists such as Append a number to the username (e.g. jsmith1). | |
| User Principal Name Format | Select the format for the UPN which Pia will generate for the Staff Onboarding creation. | |
| Action to take when a duplicate UPN is detected | Select from the available actions that Pia can take if the provided UPN already exists such as Append a number to the username (e.g. jsmith1). | |
| Minimum length for UPN and SAM Account Name | Set a minimum limit on the length of UPN and SAM Account Name. You can also set no limit by selecting the 'No Limit' option. | |
| Default Primary UPN Suffix | ||
| Display Name Format | Select from the display name format options. | |
| User Selection Dropdowns Display Format | Select how the user info will be displayed in the Chatbot in user selection drop-downs. e.g. FirstName LastName - Description. | |
| Extra Proxy Addresses | (One per line) Add any extra addresses which may be selected by the Pia user during user creation. For example: @abc.com. | |
| Extra AD Attribute Settings: (One per line) | (One per line) Format: name|value. |
Extra Features
| Field Name | Details |
|---|---|
| Enable Employee ID on Form | This will display an input for an employee ID to be set by the engineer. |
| Enable Litigation Hold on Staff Onboarding Mailbox | Select to enable Litigation Hold by default on the mailbox. |
| Enable Welcome Email | Select if new users will receive the Welcome Email defined further down in the form. |
| Home Drive Setup | Select to setup local home drive for the user. |
| Present List of Domains for Primary SMTP Address | A list of suffixes for email addresses to be used during account creation. |
| Allow Separate Email Address To User Principal Name | This will allow engineers to create email address that does not match the user's UPN. |
| Enable Ticket Note Auditing for Passwords as Plain Text | Enabling this will allow Pia to post passwords in plain text when adding ticket audit notes. |
| Disable Contact Creation in Ticketing System | This will skip the contact creation process if the contact does not already exist in the Ticketing System. |
| Enable Default "Password Never Expires" | This will set the password of the newly created user account to never expire. |
| Hide Plain Text Passwords | This will replace plain text passwords with asterisks when posting ticket audit notes in the ticketing system. |
Disable SMS Option
- If 'Yes' is selected, this will hide the SMS message capability during account creation.
- If 'No' is selected, SMS message options are displayed in the chatbot during account creation.
Default Calendar Permission on Staff Onboarding's Calendar This will display the option to set default calendar permission based on user input.
Welcome Email
| Field Name | Default Value | Details |
|---|---|---|
| Email Options | A series of checkboxes to confirm Welcome Email details. | |
| Confirm before sending email (checkbox) | Confirm the Welcome Message in the Pia Chatbox before sending. | |
| CC Recipients (checkbox) | When checked the 'CC Recipients' field is displayed. | |
| BCC Recipients (checkbox) | When checked the 'BCC Recipients' field is displayed. | |
| CC Recipients | Enter recipients to be CC'd the Welcome Email. - One address per line. | |
| BCC Recipients | Enter recipients to be BCC'd the Welcome Email. - One address per line. | |
| Email Subject | Welcome #FirstName# #LastName# | Set the subject line of the Email. |
| Email Body | (Long default message) | Define the body of the email. Short codes that can be used in Email Subject and Email Body fields: #FirstName#, #LastName#, #OfficePhone#, #MobilePhone#, #Department#, #company#, #email#, #JobTitle#, #Manager#, #Location# |
Home Drive
| Field Name | Default Value | Details |
|---|---|---|
| Home Drive Letter | H | Letter to be assigned to the home drive. |
| Home Drive Root Path | Define location path for the home drive. |
Password Section
| Field Name | Default Value | Details |
|---|---|---|
| Minimum Length | =global.minLength | This will set the minimum length for the password. By default, this is set based on the configuration of the global configuration form. |
| Password Options | =global.passwordOptions | This will set any additional requirements on the password such as uppercase, lowercase, numbers and special characters. |
| Password Override | (Optional) Set a default initial password. |
Access Level
| Field Name | Details |
|---|---|
| Access Level | This is the name of the access level which can be selected from the Staff Onboarding creation form. |
| Groups (one per line) | These are the group names from azure which should be pre-populated when the access level is selected. |
| Extra AD Attribute Settings: (One per line) | Format: name|value e.g. msExchRecipientTypeDetails |2147483648. |
| Org Unit (canonicalName or distinguishedName) | Name of the organizational unit that the use will be added to in AD - Additional Access Levels can be added by clicking the 'Insert +' link. - Remove unneeded Access Levels by clicking the 'Delete-' link. |
| Contact location / site (must match existing ticketing system site name) | This is the company site location of the contact in the ticketing system. |
Manual Tasks
| Field Name | Details |
|---|---|
| Task | Detail manual tasks that will be added to the ticket for the Service Desk Engineer to complete. - Additional Tasks can be added by clicking the 'Insert +' link - Remove unneeded Tasks by clicking the 'Delete-' link. |
Server Properties
| Field Name | Default Value | Details |
|---|---|---|
| Primary Domain Controller | =global.primaryDC | Name of the Primary Domain Controller for the client. |
| Azure AD Connect Server | =global.azureADConnectServer | Name of the server that facilitates synchronizing user details from an on-prem AD to Azure AD for the client. |
| Exchange Server | =global.exchange_server | Name of the Exchange Server for the client. |
Azure Properties
| Field Name | Default Value | Details |
|---|---|---|
| All staff group | =global.azure_all_staff_group | All Staff Group that the Automation will refer to retrieve a list of active users for the client. |
| User Principal Name Format | Select the format for the UPN which Pia will generate for the Staff Onboarding creation. | |
| Action to take when a duplicate UPN is detected | Select from the available actions that Pia can take if the provided UPN already exists such as Append a number to the username (e.g. jsmith1). | |
| Default Primary UPN Suffix - Azure | In environments where multiple UPNs are present, you can specify the default primary UPN. | |
| Display Name Format | Select from the display name format options. | |
| FirstName LastName e.g. John Smith | Select how the user info will be displayed in the Chatbot in user selection drop-downs. e.g. FirstName LastName - Description. | |
| Default Microsoft365 Licenses | (Optional) Choose a Microsoft 365 license that will be selected by default in the Pia Chatbox. | |
| Mail Propagation Delay (seconds) | 0 | This is a wait period before checking if the mailbox has been provisioned for the user. |
Active Directory Properties
| Field Name | Details |
|---|---|
| All staff group | All Staff Group that the Automation will refer to retrieve a list of active users for the client. Default value: =global.allStaffGroup |
| Username Format (samAccountName) | Select the format for the username which Pia will generate for the Staff Onboarding creation. |
| Action to take when a duplicate Username is detected | Select from the available actions that Pia can take if the provided Username already exists such as Append a number to the username (e.g. jsmith1). |
| UPN Format (userPrincipalName) | Select the format for the UPN which Pia will generate for the Staff Onboarding creation. |
| Action to take when a duplicate UPN is detected | Select from the available actions that Pia can take if the provided UPN already exists such as Append a number to the username (e.g. jsmith1). |
| Default Primary UPN Suffix - Active Directory | In environments where multiple UPNs are present, you can specify the default primary UPN. |
| Display Name Format | Select from the display name format options. |
| FirstName LastName e.g. John Smith | Select how the user info will be displayed in the Chatbot in user selection drop-downs. e.g. FirstName LastName - Description. |
| Extra AD Attribute Settings: (One per line) | Format: name|value e.g. msExchRecipientTypeDetails|2147483648 . |
Extra Features
| Field Name | Details |
|---|---|
| Enable Employee ID on Form | This will display an input for an employee ID to be set by the engineer |
| Enable Litigation Hold on Staff Onboarding Mailbox | Select to enable Litigation Hold by default on the mailbox |
| Enable Welcome Email | Select if new users will receive the Welcome Email defined further down in the form |
| Home Drive Setup | Select to setup local home drive for the user |
| Present List of Domains for Primary SMTP Address | A list of suffixes for email addresses to be used during account creation |
| Allow Separate Email Address To User Principal Name | This will allow engineers to create email address that does not match the user's UPN |
| Enable Ticket Note Auditing for Passwords as Plain Text | Enabling this will allow Pia to post passwords in plain text when adding ticket audit notes. |
| Disable Contact Creation in Ticketing System | This will skip the contact creation process if the contact does not already exist in the Ticketing System. |
| Enable Full Country Names | This will require the engineers to enter full country names in the new user form. The form field is optional. |
| Enable Default "Password Never Expires" | This will set the password of the newly created user account to never expire. |
| Hide Plain Text Passwords | This will replace plain text passwords with asterisks when posting ticket audit notes in the ticketing system. |
Disable SMS Option
- If 'Yes' is selected, this will hide the SMS message capability during account creation.
- If 'No' is selected, SMS message options are displayed in the chatbot during account creation.
Default Calendar Permission on Staff Onboarding's Calendar
This will display the option to set default calendar permission based on user input.
Minimum length for UPN and SAM Account Name (Both Azure & AD)
Set a min limit on the length of UPN and SAM Account Name. You can also set no limit by selecting the 'No Limit' option.
License Provisioning
| Field Name | Details |
|---|---|
| Enable License procurement | When this is enabled, license procurement options are displayed in the chatbot during new staff account creation. |
| Prompt for confirmation before procurement | This will prompt a message in the chatbot before license procurement is processed. |
Welcome Email
| Field Name | Default Value | Details |
|---|---|---|
| Email Options | A series of checkboxes to confirm Welcome Email details. | |
| Confirm before sending email (checkbox) | Confirm the Welcome Message in the Pia Chatbox before sending. | |
| CC Recipients (checkbox) | When checked the 'CC Recipients' field is displayed. | |
| BCC Recipients (checkbox) | When checked the 'BCC Recipients' field is displayed. | |
| CC Recipients | Enter recipients to be CC'd the Welcome Email. - One address per line. | |
| BCC Recipients | Enter recipients to be BCC'd the Welcome Email. - One address per line. | |
| Email Subject | Welcome #FirstName# #LastName# | Set the subject line of the Email. |
| Email Body | (Long default message) | Define the body of the email. Short codes that can be used in Email Subject and Email Body fields: #FirstName#, #LastName#, #OfficePhone#, #MobilePhone#, #Department#, #company#, #email#, #JobTitle#, #Manager#, #Location# |
Home Drive
| Field Name | Default Value | Details |
|---|---|---|
| Home Drive Letter | H | Letter to be assigned to the home drive. |
| Home Drive Root Path | Define location path for the home drive. |
Password Section
| Field Name | Default Value | Details |
|---|---|---|
| Minimum Length | =global.minLength | This will set the minimum length for the password. By default, this is set based on the configuration of the global configuration form. |
| Password Options | =global.passwordOptions | This will set any additional requirements on the password such as uppercase, lowercase, numbers and special characters. |
| Password Override | (Optional) Set a default initial password. |
Access Level
| Field Name | Details |
|---|---|
| Access Level | This is the name of the access level which can be selected from the Staff Onboarding creation form. |
| Groups (one per line) | These are the group names from azure which should be pre-populated when the access level is selected. |
| 365 Groups (one per line) | These are the group names from azure which should be pre-populated when the access level is selected. |
| Org Unit (canonicalName or distinguishedName) | Name of the organizational unit that the use will be added to in AD - Additional Access Levels can be added by clicking the 'Insert +' link - Remove unneeded Access Levels by clicking the 'Delete-' link. |
| Contact location / site (must match existing ticketing system site name) | This is the company site location of the contact in the ticketing system. |
| Shared Mailbox Access (One per line) (Smartforms Only) | These are the shared mailboxes that you want the new users to have access to. For Example: Format: upn PIPE permission Permissions: Full| SendAs|SendOnBehalf e.g. john.smith@pia.ai|Full. |
| AD UPN Suffix (Smartforms Only) | Add AD UPN suffix for user creates via SmartForms. |
| AZ UPN Suffix (Smartforms Only) | Add Azure UPN suffix for user creates via SmartForms. |
| Licenses (Smartforms Only) | Add the licenses for users that are assigned by default to the users created via SmartForms. |
Manual Tasks
| Field Name | Details |
|---|---|
| Task | Detail manual tasks that will be added to the ticket for the Service Desk Engineer to complete. - Additional Tasks can be added by clicking the 'Insert +' link - Remove unneeded Tasks by clicking the 'Delete-' link |
Look through the "Active" section of the Automations to find the Staff Offboarding Automation you want to customize, it should have the environment type ie. "(Cloud Hybrid)" at the end of the name. In our example below, we'll be looking at the "Staff Offboarding (Cloud Hybrid)" Automation. Left-click on the Automation name.
A page will load detailing information relating to the selected Automation, click the "configuration" button in the "Applies To" section.
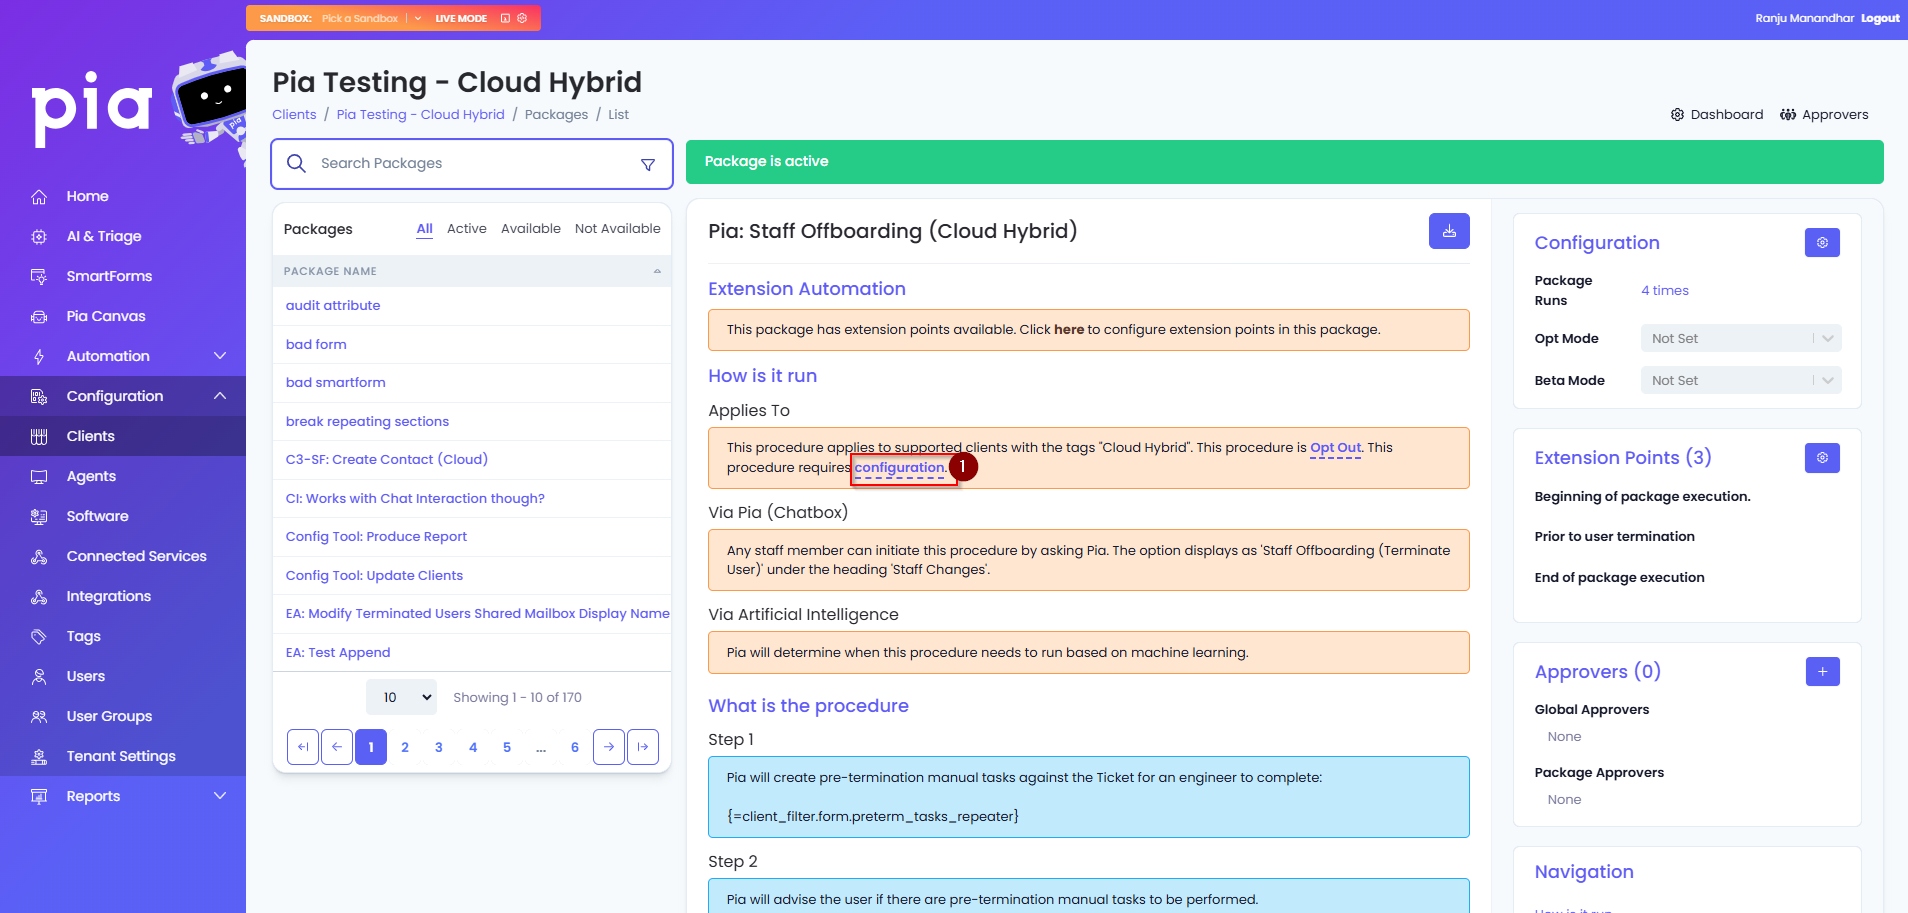
A Procedure Configuration menu will appear on the page with options for the Automation.
Below is a breakdown of each section and the options available.
- Cloud Only
- Cloud Hybrid
- On Prem
- Semi-Hybrid
Cloud Properties
| Field Name | Default Value | Details |
|---|---|---|
| UPN of Admin Account (Graph API Delegated Consent) | =global.adminUpn | The UPN of the account that has access to MS Graph to perform the termination |
| All staff group | =global.allStaffGroup | All Staff Group that the Automation will refer to retrieve a list of active users for the client |
| Extra AD Attribute Settings: (One per line) | Pia allows for stamping of Active Directory Extended/Custom attributes as part of the user account termination process. They can be added in the format of "attribute name" pipe symbol ( | |
| Remove Group Exclusions (One per Line) | If you have a requirement to not remove a user from certain groups when they are terminated, you can specify these groups here. |
License De-Provisioning
| Field Name | Details |
|---|---|
| Enable License de-provisioning | When this is enabled, license de-provisioning feature is enabled while offboarding a user account. |
| Prompt for confirmation before procurement | This will prompt a message in the chatbot before license is de-provisioned for the offboarded user account. |
| Allow de-provisioning licenses with Annual commitments | This will enable de-provisioning of licenses that have annual commitments via Pia chatbot. |
Extra Features
| Field Name | Details |
|---|---|
| Disable Contact Modification in Ticketing System | When this is ON, existing ticketing system contacts are not modified when the user account for the contact is offboarded. |
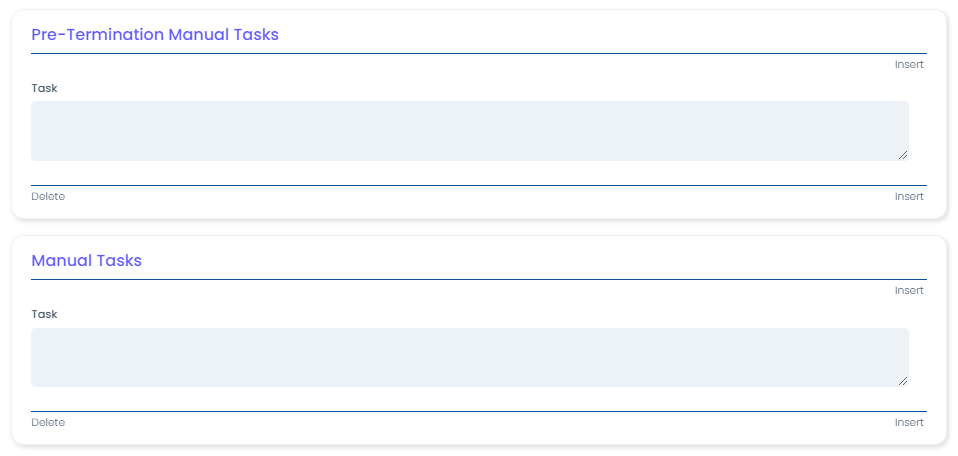
Pre-Termination Manual Tasks and Manual Tasks
Adding manual tasks will prompt the Service Desk Engineer at the end of the Staff Offboarding Automation that there are manual tasks which need to be completed. The pre-termination manual tasks will prompt the Service Desk Engineer prior to offboarding the user account that there are manual tasks which need to be completed first. In your ticketing system, a manual task will be added as a "Task" in ConnectWise Manage and a "To-Do" in AutoTask.
Hybrid Properties
| Field Name | Default Value | Details |
|---|---|---|
| All staff group | =global.allStaffGroup | All Staff Group that the Automation will refer to retrieve a list of active users for the client |
| Primary Domain Controller | =global.primaryDC | Name of the Primary Domain Controller for the client |
| Azure AD Connect Server | =global.azureADConnectServer | Name of the server that facilitates synchronizing user details from an on-prem AD to Azure AD for the client |
| Exchange Server | =global.exchange_server | Name of the Exchange Server for the client |
| Preferred Disable User's OU | You can specify the OU to move the Active Directory user's object to as part of the Staff Offboarding Automation. The field will accept Distinguished Name or Canonical Name format. | |
| UPN of Admin Account (Graph API Delegated Consent) | =global.adminUpn | The UPN of the account that has access to MS Graph to perform the termination |
| Extra AD Attribute Settings: (One per line) | Pia allows for stamping of Active Directory Extended/Custom attributes as part of the user account termination process. They can be added in the format of "attribute name" pipe symbol (|) "value". The text you pre-fill into this field will be editable in the same field on the Staff Offboarding form while running the Automation. | |
| Remove Group Exclusions (One per Line) | If you have a requirement to not remove a user from certain groups when they are terminated, you can specify these groups here. |
Extra Features
| Field Name | Details |
|---|---|
| Allow setting of user's description in Active Directory | This will enable adding a description to the user account in the AD via Pia Chatbot. |
| Disable Contact Modification in Ticketing System | When this is ON, existing ticketing system contacts are not modified when the user account for the contact is offboarded. |
License De-Provisioning
| Field Name | Details |
|---|---|
| Enable License de-provisioning | When this is enabled, license de-provisioning feature is enabled while offboarding a user account. |
| Prompt for confirmation before procurement | This will prompt a message in the chatbot before license is de-provisioned for the offboarded user account. |
| Allow de-provisioning licenses with Annual commitments | This will enable de-provisioning of licenses that have annual commitments via Pia chatbot. |
Pre-Termination Manual Tasks and Manual Tasks
Adding manual tasks will prompt the Service Desk Engineer at the end of the Staff Offboarding Automation that there are manual tasks which need to be completed. The pre-termination manual tasks will prompt the Service Desk Engineer prior to offboarding the user account that there are manual tasks which need to be completed first. In your ticketing system, a manual task will be added as a "Task" in ConnectWise Manage and a "To-Do" in AutoTask.
AD Properties
| Field Name | Default Value | Details |
|---|---|---|
| All staff group | =global.allStaffGroup | All Staff Group that the Automation will refer to retrieve a list of active users for the client |
| Primary Domain Controller | =global.primaryDC | Name of the Primary Domain Controller for the client |
| Preferred Disable User's OU | You can specify the OU to move the Active Directory user's object to as part of the Staff Offboarding Automation. The field will accept Distinguished Name or Canonical Name format. | |
| Extra AD Attribute Settings: (One per line) | Pia allows for stamping of Active Directory Extended/Custom attributes as part of the user account termination process. They can be added in the format of "attribute name" pipe symbol (|) "value". The text you pre-fill into this field will be editable in the same field on the Staff Offboarding form while running the Automation. | |
| Remove Group Exclusions (One per Line) | If you have a requirement to not remove a user from certain groups when they are terminated, you can specify these groups here. |
Extra Features
| Field Name | Details |
|---|---|
| Allow setting of user's description in Active Directory | This will enable adding a description to the user account in the AD via Pia Chatbot. |
| Disable Contact Modification in Ticketing System | When this is ON, existing ticketing system contacts are not modified when the user account for the contact is offboarded. |
Pre-Termination Manual Tasks and Manual Tasks
Adding manual tasks will prompt the Service Desk Engineer at the end of the Staff Offboarding Automation that there are manual tasks which need to be completed. The pre-termination manual tasks will prompt the Service Desk Engineer prior to offboarding the user account that there are manual tasks which need to be completed first. In your ticketing system, a manual task will be added as a "Task" in ConnectWise Manage and a "To-Do" in AutoTask.
Semi-Hybrid Properties
| Field Name | Default Value | Details |
|---|---|---|
| Primary Domain Controller | =global.primaryDC | Name of the Primary Domain Controller for the client |
| Azure AD Connect Server | =global.azureADConnectServer | Name of the server that facilitates synchronizing user details from an on-prem AD to Azure AD for the client |
| Exchange Server (optional) | =global.exchange_server | Name of the Exchange Server for the client |
Azure Properties
| Field Name | Default Value | Details |
|---|---|---|
| All staff group | =global.allStaffGroup | All Staff Group that the Automation will refer to retrieve a list of active users for the client |
| Extra AD Attribute Settings: (One per line) | Pia allows for stamping of Active Directory Extended/Custom attributes as part of the user account termination process. They can be added in the format of "attribute name" pipe symbol (|) "value". The text you pre-fill into this field will be editable in the same field on the Staff Offboarding form while running the Automation. | |
| Remove Group Exclusions (One per Line) | If you have a requirement to not remove a user from certain groups when they are terminated, you can specify these groups here. |
Active Directory Properties
| Field Name | Default Value | Details |
|---|---|---|
| All staff group | =global.allStaffGroup | All Staff Group that the Automation will refer to retrieve a list of active users for the client |
| Preferred Disable User's OU | You can specify the OU to move the Active Directory user's object to as part of the Staff Offboarding Automation. The field will accept Distinguished Name or Canonical Name format. | |
| Extra AD Attribute Settings: (One per line) | Pia allows for stamping of Active Directory Extended/Custom attributes as part of the user account termination process. They can be added in the format of "attribute name" pipe symbol (|) "value". The text you pre-fill into this field will be editable in the same field on the Staff Offboarding form while running the Automation. | |
| Remove Group Exclusions (One per Line) | If you have a requirement to not remove a user from certain groups when they are terminated, you can specify these groups here. |
Extra Features
| Field Name | Details |
|---|---|
| Allow setting of user's description in Active Directory | This will enable adding a description to the user account in the AD via Pia Chatbot. |
| Disable Contact Modification in Ticketing System | When this is ON, existing ticketing system contacts are not modified when the user account for the contact is offboarded. |
License De-Provisioning
| Field Name | Details |
|---|---|
| Enable License de-provisioning | When this is enabled, license de-provisioning feature is enabled while offboarding a user account. |
| Prompt for confirmation before procurement | This will prompt a message in the chatbot before license is de-provisioned for the offboarded user account. |
| Allow de-provisioning licenses with Annual commitments | This will enable de-provisioning of licenses that have annual commitments via Pia chatbot. |
Pre-Termination Manual Tasks and Manual Tasks
Adding manual tasks will prompt the Service Desk Engineer at the end of the Staff Offboarding Automation that there are manual tasks which need to be completed.
The pre-termination manual tasks will prompt the Service Desk Engineer prior to offboarding the user account that there are manual tasks which need to be completed first. In your ticketing system, a manual task will be added as a "Task" in ConnectWise Manage and a "To-Do" in AutoTask.
Click "Save" once you have finished making changes.
The full list of these Automations is below:
- Deploy SonicWall VPN
- OpenVPN Setup/ReInstall
- Troubleshoot Windows VPN Configuration
- VPN Setup (Cloud Hybrid)
- VPN Setup (Cloud Only)
- Remote Desktop Setup
- Remote Desktop Troubleshooting
- Log Out User from Windows RDS
In the Pia Tenant, click on Clients and select a Client you want to customize either of these Automations for.
On the Client Dashboard, you will see an "Articles" section listing Automations.
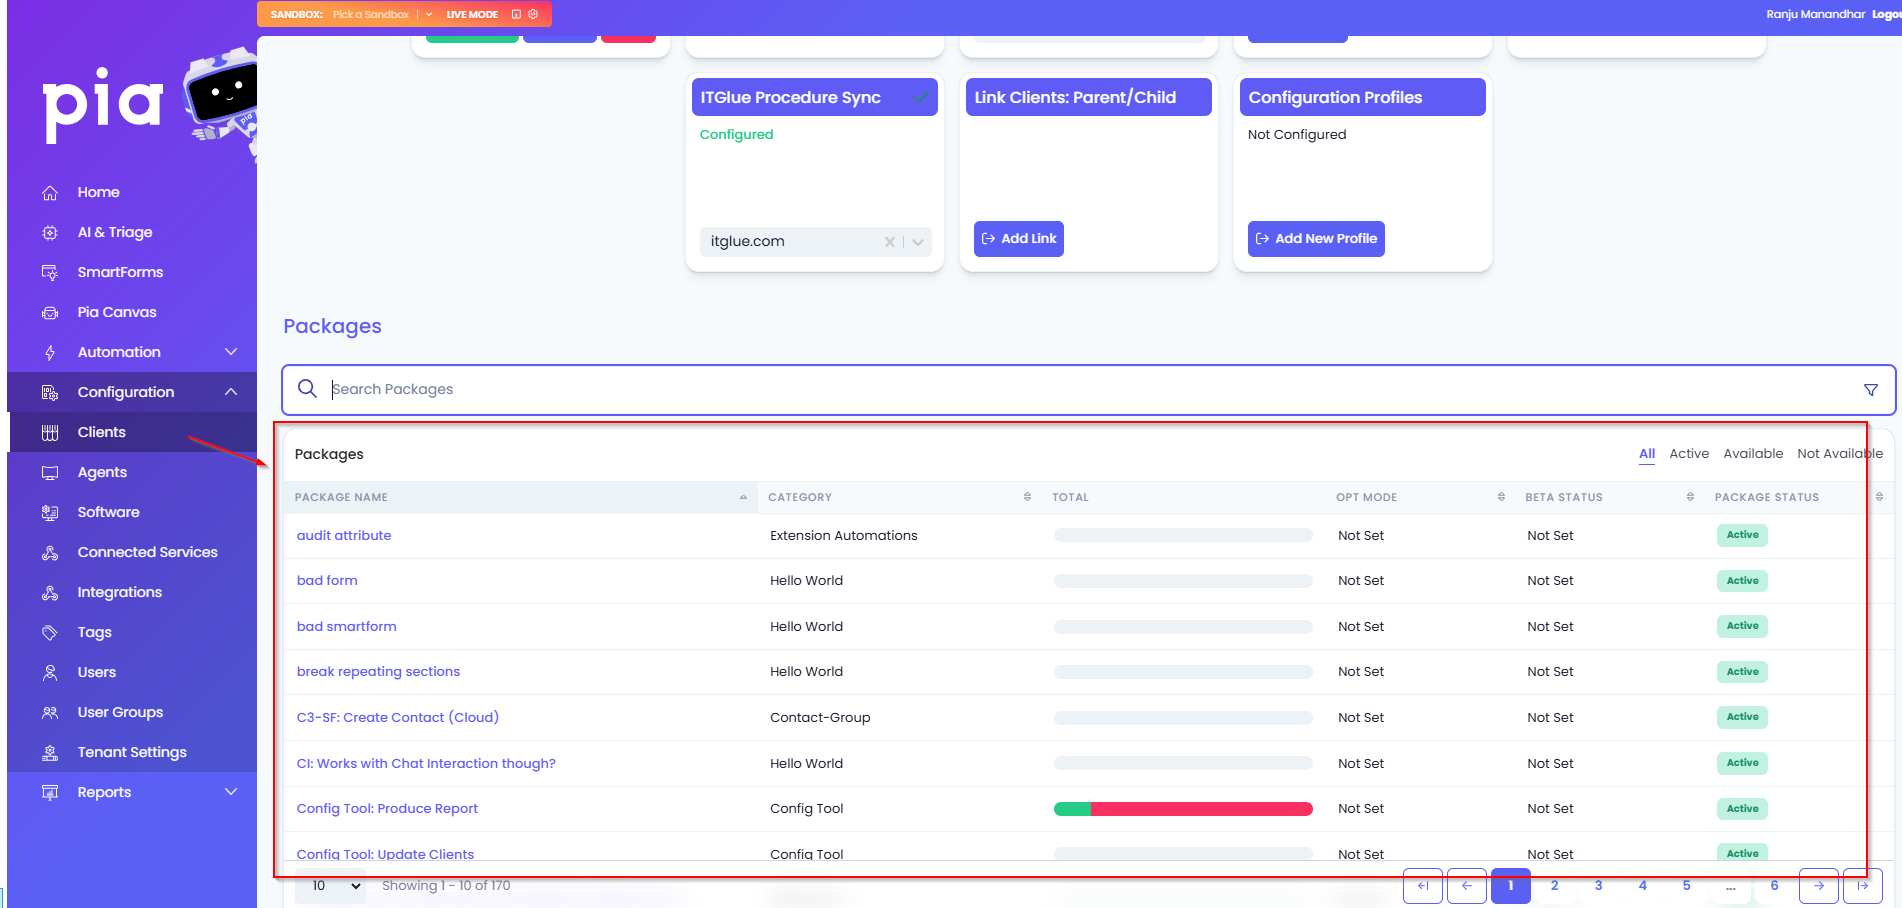
Search through the list of Automations to find the VPN Setup/Remote Desktop Setup/Troubleshoot Windows VPN/Remote Desktop Troubleshooting Automation you want to configure. The VPN setup Automations should have the environment type ie. "(Cloud Hybrid)" at the end of the name. In our example below, we'll be looking at the "VPN Setup (Cloud Hybrid)" Automation.
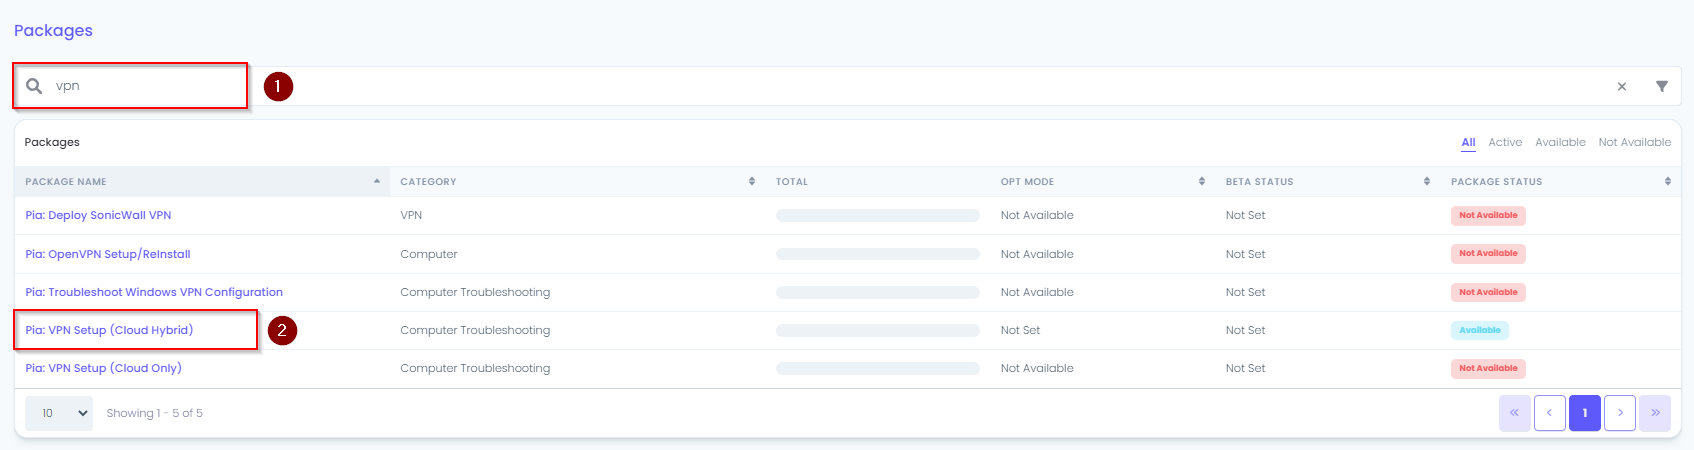
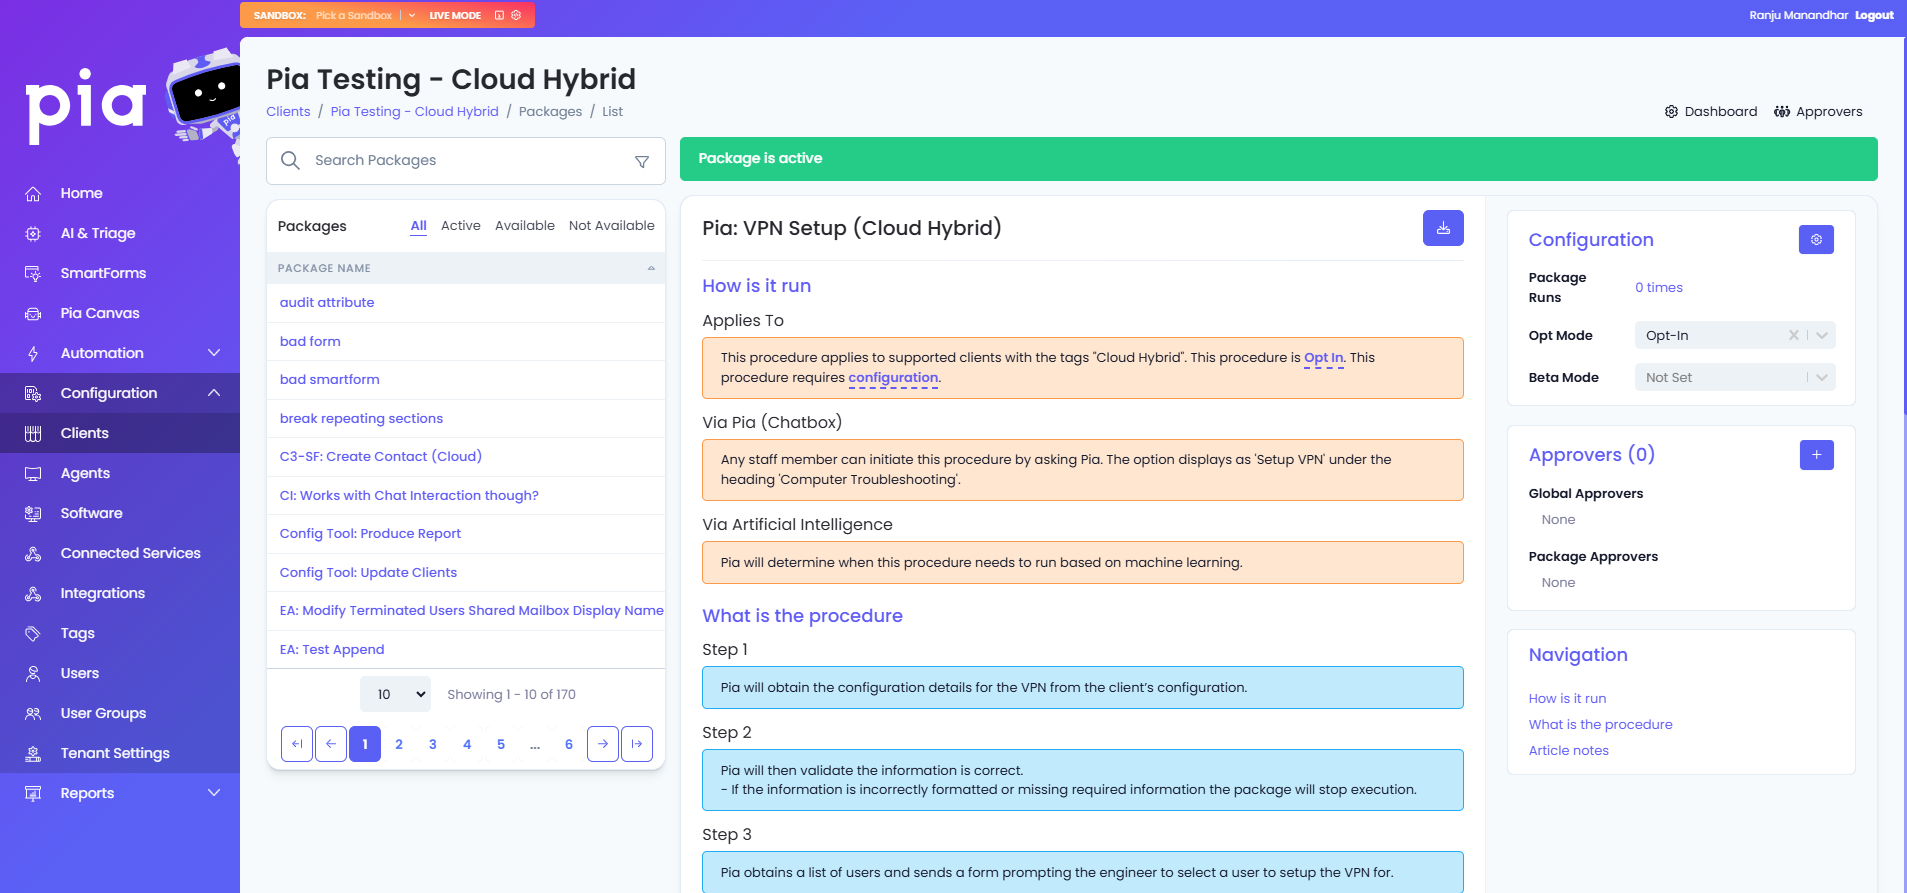
Left-click on the Automation name and then in the main section of the window review the Automation brief.
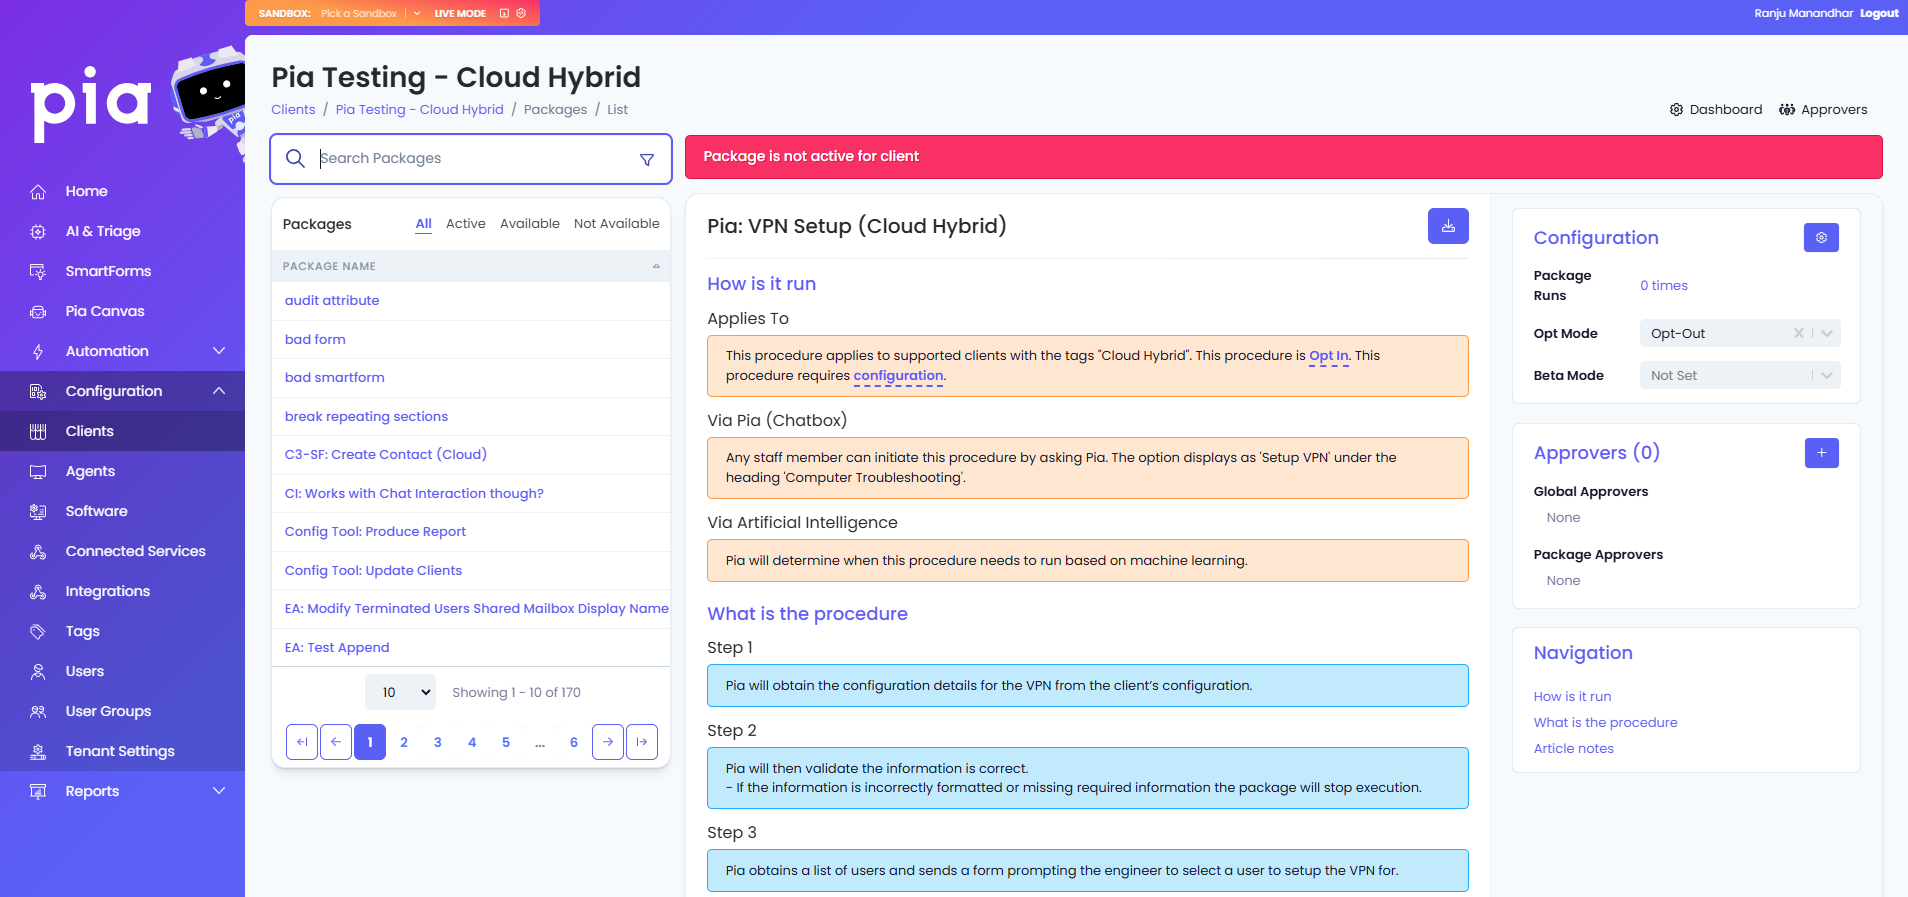
You will notice the following in the example above:
- The Automation is not active for the selected Client
- The Automation applies to Clients with the tags "Cloud Hybrid"
- The procedure is "Opt in"
- The procedure requires configuration
The first step in configuring the Automation for a Client is to ensure the Client has the correct tags against them. If a Automation requires multiple tags, the commas(,) between tag names mean the Automation requires both tags on either side of the "," to be tagged for a Client. If the list of tags has an equals symbol (=) between two tags, then one of the tags on either side of the "=" symbol is required. If a Automation's tag requirements has tags separated by both commas (,) and the equals (=) symbol, both requirements must be met. See the Tagging section on the Clients page here for reference on how to tag Clients.
The below example is from the RDP setup Automation. In this example, the client requires the following combination of tags:
- Either "RDE: Windows RDP" or "RDE: Windows RDWeb" AND
- Agents AND
- Either "Prem Only" or "Cloud Hybrid" Or "Cloud Only
In this context, a client who is tagged with "RDE: Windows RDP", "Agents" and "Prem Only" would have the appropriate tags to continue with the steps below.

The Automation will change from being in the "Not Available" section of the Articles list to being in the "Available" section after being tagged correctly.
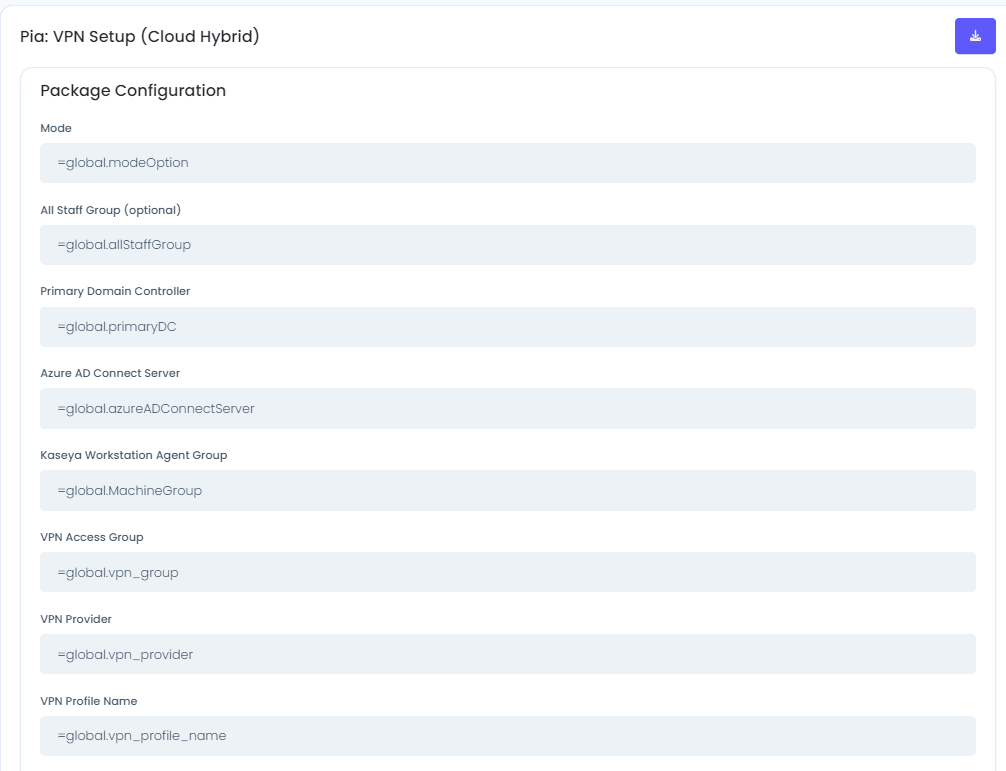
After you have successfully tagged your Client the next step is to review the configuration of the Automation by clicking on the "configuration" link in the "Applies To" text.

In the Procedure Configuration page which appears, you will observe that all the fields are already pre-filled. Like in the Staff Onboarding and Staff Offboarding Automations, the "=global." text means that the values are being pulled from the associated fields on the Global Configuration Form. See the Global Configuration section on the Clients page here for reference on how to configure the VPN/RDP options on the Global Configuration Form.
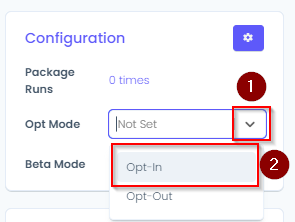
Once you have configured the Global Configuration Form settings for the RDP/VPN configuration, the next step is to opt into the Automation. On the page you will an "Opt Mode" button. Click on the dropdown and choose "Opt-In" from the menu.
Note: If the dropdown for the Opt Mode has the text "Not Available"(see picture below) instead of the dropdown menu, the tagging has not been set correctly for the Client.

- Once you have opted into the Automation, you will see Automation status change to "Active".
13. Repeat these steps for any other VPN and/or RDP Automations relating to Setup or Troubleshooting which are applicable to the Client.