API Key Creation and Configuration
In this section we will cover the required API Keys to facilitate Pia's integration with your internal systems. Not all API Keys are mandatory and you are not required to create API Keys for every type of integration. API Key creation instructions for some Connected Services such as Ticketing Systems will be duplicated below with specific instructions per Ticketing System. Please only follow the instructions applicable to your environment.
At the start of each section, next to the name of the integration type will be the text "(Optional)" or "(Mandatory)" to indicate the difference between mandatory and optional integrations with Pia.
Ticketing Systems (Mandatory)
Ticketing System integration for Pia is mandatory regardless of which ticketing system is in use. Please see the list of ticketing systems below for instructions specific to each system.
- ConnectWise Manage
- Autotask PSA
- Halo PSA
- Log into ConnectWise Manage as an Administrator.
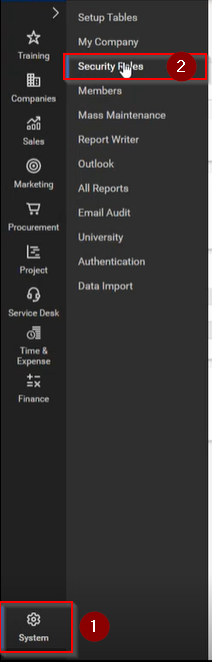
- Click on System > Security Roles
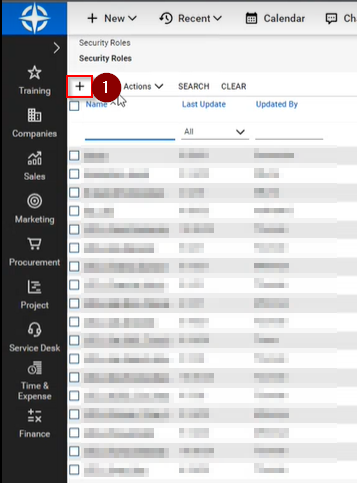
- Click on the "+" symbol to create a new Security Role.
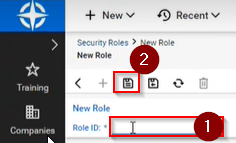
- Name the role "Pia - API" and click the "Save" icon.
 5. Set the permissions to be the same as below and then save the changes.
Note: Some sections are intentionally left blank but included to mirror the layout of the CW Manage permissions page.
| Level | Add | Edit | Delete | Inquire | Notes |
|---|---|---|---|---|---|
| 🗂️ COMPANIES | |||||
| Company Maintenance | All | All | None | All | |
| Company/ Contact Group Maintenance | All | All | None | All | |
| Configuration - Display Passwords | |||||
| Configurations | |||||
| Contacts | All | All | None | All | |
| CRM/ Sales Activities | |||||
| Import Contacts | |||||
| Manage Attachments | All | All | None | All | |
| Management | All | All | None | All | |
| Notes | All | All | None | All | |
| Reports | |||||
| Surveys | |||||
| Team Members | All | All | None | All | |
| Tracks | |||||
| UserCentric | |||||
| 🗂️ FINANCE | |||||
| Accounting Interface | |||||
| Agreement Invoicing | |||||
| Agreement Sales | |||||
| Agreements | None | None | None | All | |
| Billing Rate Maintenance | |||||
| Billing Reconciliation | |||||
| Billing View Time | All | All | None | All | |
| Company Finance | |||||
| Expense Reimbursements | |||||
| Financial Dashboard | |||||
| Invoice Approval | |||||
| Invoicing | |||||
| Reports | |||||
| 🗂️ MARKETING | |||||
| ConnectWise Campaign | |||||
| Marketing Groups | |||||
| Marketing Management | |||||
| Marketing Reports | |||||
| 🗂️ PROCUREMENT | |||||
| Inventory Adjustments | |||||
| Inventory Transfers | |||||
| Product Billable Option | |||||
| Product Catalog | |||||
| Products | |||||
| Purchase Orders | |||||
| Purchasing Approvals | |||||
| Purchasing Demand | |||||
| Reports | |||||
| RMA Entry | |||||
| RMA Processing | |||||
| Serial Number Search | |||||
| 🗂️ PROJECT | |||||
| Close Project Tickets | |||||
| Close Projects | |||||
| Project Contacts | |||||
| Project Finance | |||||
| Project Headers | |||||
| Project Management | |||||
| Project Notes | |||||
| Project Phase | |||||
| Project Product | |||||
| Project Reports | |||||
| Project Scheduling | |||||
| Project Teams | |||||
| Project Templates | |||||
| Project Ticket - Dependencies | |||||
| Project Ticket Tasks | |||||
| Project Tickets | |||||
| 🗂️ SALES | |||||
| Closed Opportunity | |||||
| Opportunity | All | ||||
| Opportunity Finance | |||||
| Reports | |||||
| Sales Dashboard | |||||
| Sales Funnel | |||||
| Sales Order Finance | |||||
| Sales Orders | |||||
| 🗂️ SERVICE DESK | |||||
| Change Approvals | All | All | None | All | |
| Close Service Tickets | All | All | None | All | |
| CloudConsole | |||||
| ConnectWise Chat | |||||
| ConnectWise Control | |||||
| ITBoost | |||||
| Knowledge Base Approver | |||||
| Knowledge Base Creator | |||||
| Launch Remote Access | |||||
| Merge Tickets | All | All | None | All | |
| Print Service Signoff | All | All | None | All | |
| Reports | |||||
| Resource Scheduling | All | All | All | All | |
| Service Ticket - Dependencies | All | All | None | All | |
| Service Ticket - Finance | None | None | None | All | |
| Service Tickets | All | All | None | All | |
| SLA Dashboard | |||||
| Ticket Templates | |||||
| 🗂️ SYSTEM | |||||
| Add Licenses | |||||
| API Reports | |||||
| Chat with ConnectWise Manage Support | |||||
| ConnectWise Manage Labs | |||||
| ConnectWise Next | |||||
| ConnectWise Now | |||||
| Custom Menu Entry | |||||
| Data Import | |||||
| Email Audit | |||||
| List View Export | |||||
| Manage Hosted API | All | All | All | All | |
| Marketplace Sharing | |||||
| Mass Maintenance | |||||
| Member Maintenance | All | ||||
| Member Maintenance - Finance | All | ||||
| My Account | |||||
| My Company | |||||
| Report Writer | |||||
| Security Roles | |||||
| System Reports | |||||
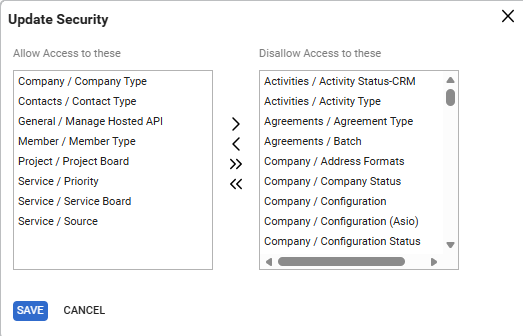
| Table Setup | All | All | All | All | Note: Click on "Customize" and only Allow Access for: Company / Company Type Contacts / Contact Type General / Manage Hosted API Member / Member Type Project / Project Board Service / Service Priority Service / Source Service / Service Board |
| Today Links | |||||
| 🗂️ TIME & EXPENSE | |||||
| Expense Approvals | |||||
| Expense Billable Option | |||||
| Expense Report Entry | |||||
| Reports | |||||
| Stopwatch | |||||
| Time Approval | |||||
| Time Entry | All | All | All | All | |
| Time Entry Billable Option | All | All | All | All |
Set the permission as below in the Table Setup Section.
Note: For the Table Setup section, please keep in mind that unlike most permissions windows, the allowed permissions are in the left hand panel on this window.
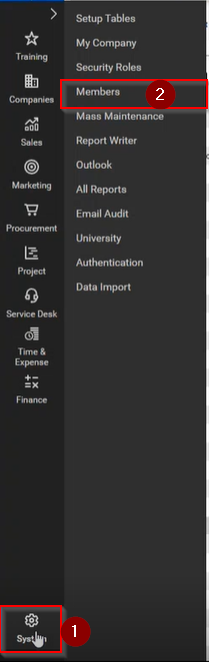
- Click on System > Members
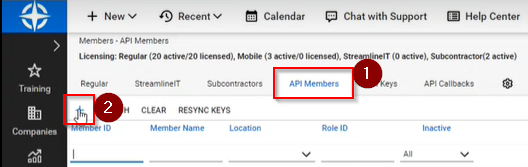
- Click on the API Members tab and then on the "+" symbol.
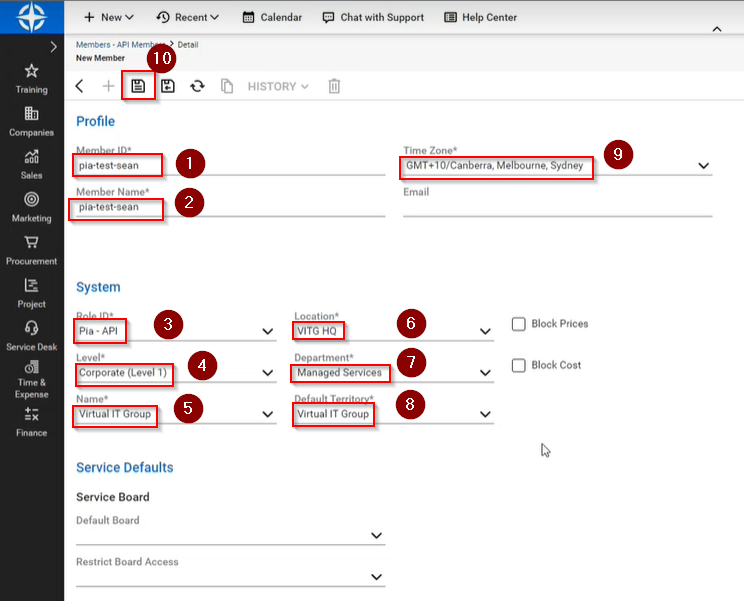
- Fill in the Member ID & Member Name referencing PIA. Set the time zone to your local time zone. For the Role ID, choose the role created previously for Pia. For all other mandatory fields, choose the default option and then click "Save".
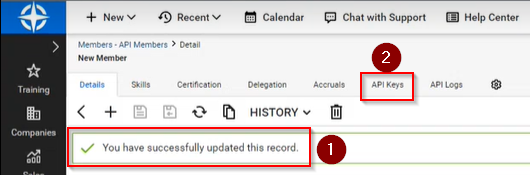
- After ConnectWise saves the information in the step above, click on the "API Keys" tab.
- Click on the "+"symbol to add an API Key.

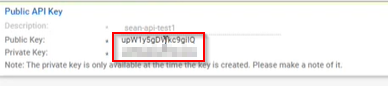
- Enter in a description for the API and then click the save button.
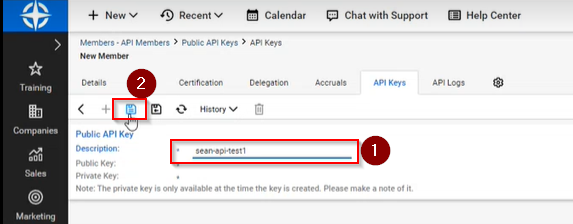
- The Public and Private keys will be created at this point, save them both in a secure location for later reference.
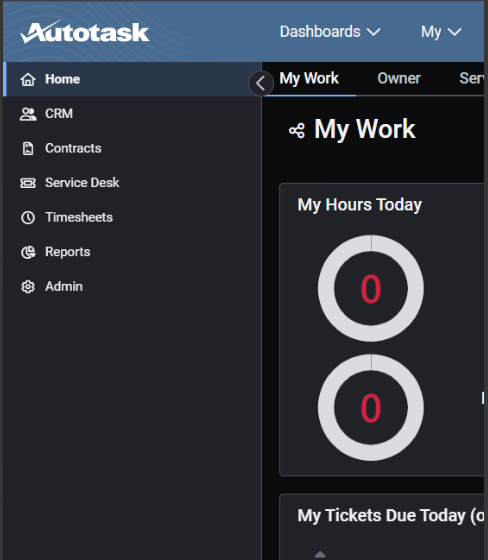
Log into your AutoTask PSA as an Administrator.
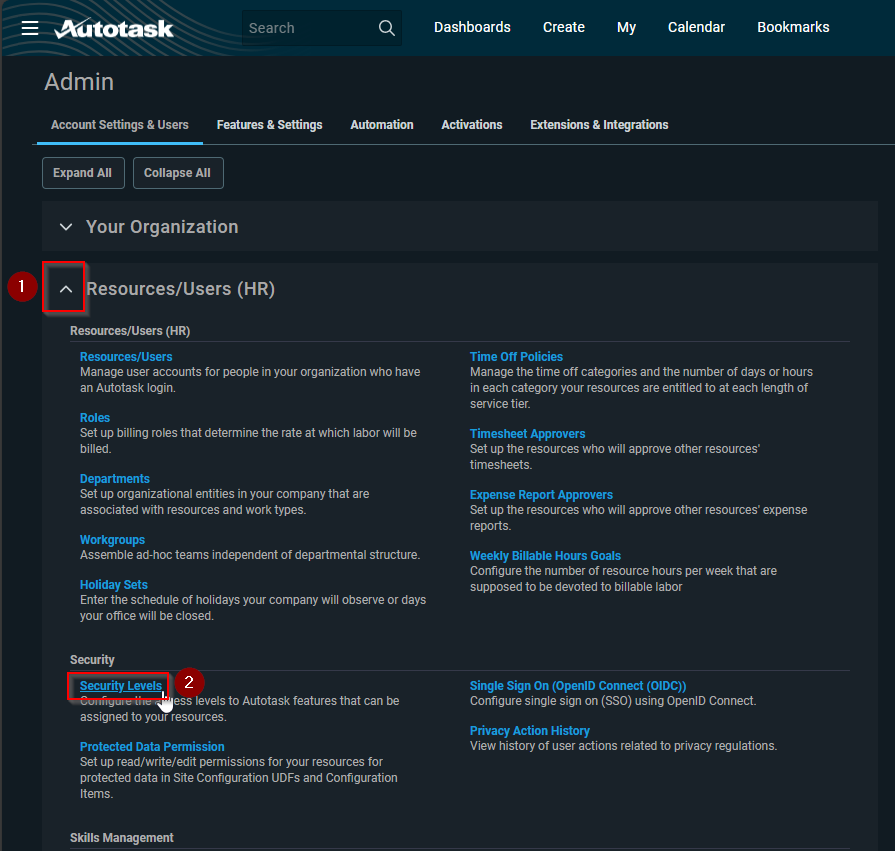
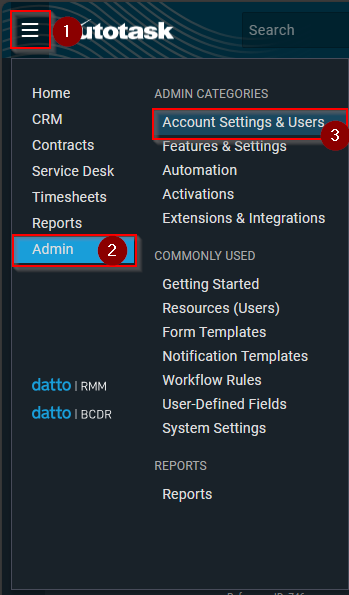
Navigate to Admin > Account Settings & Users
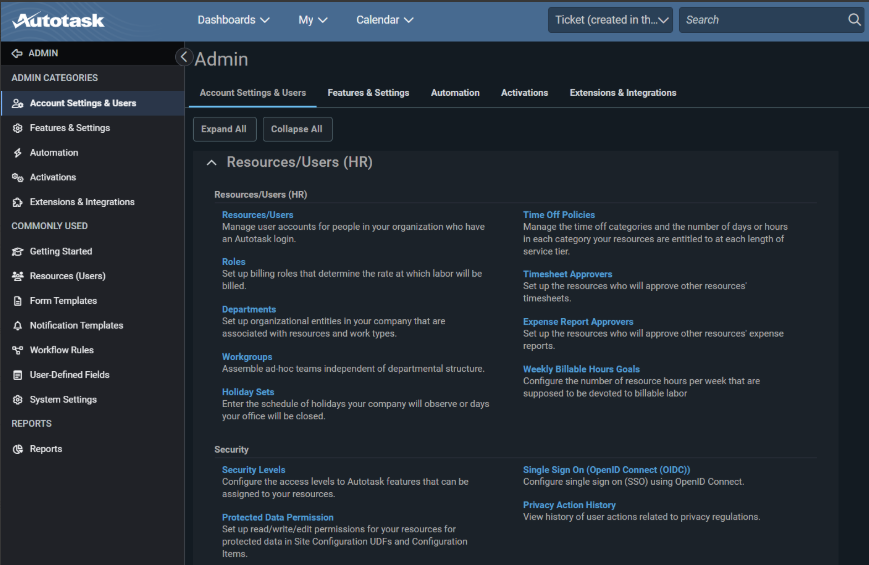
Expand the + icon next to “RESOURCES/USERS (HR)” and then under the Security section, click on “Security Levels”.
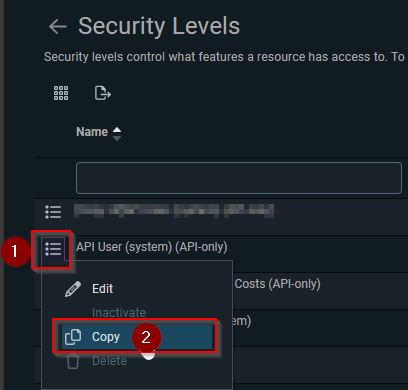
Right-click on the text for “API User (system) (API-only)” and choose “Copy” from the menu.
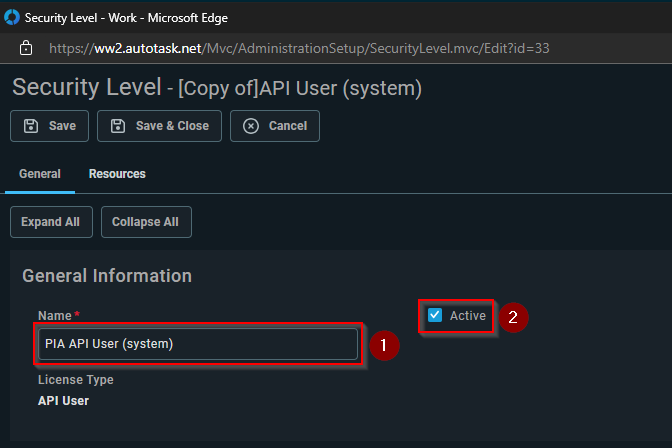
- Call the new Security Level “PIA API User (system)” and ensure that “Active” it ticked.
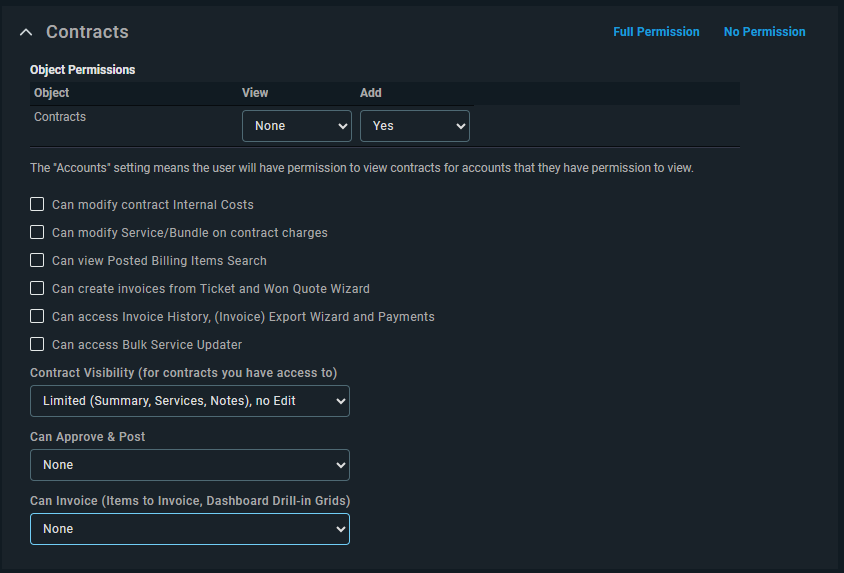
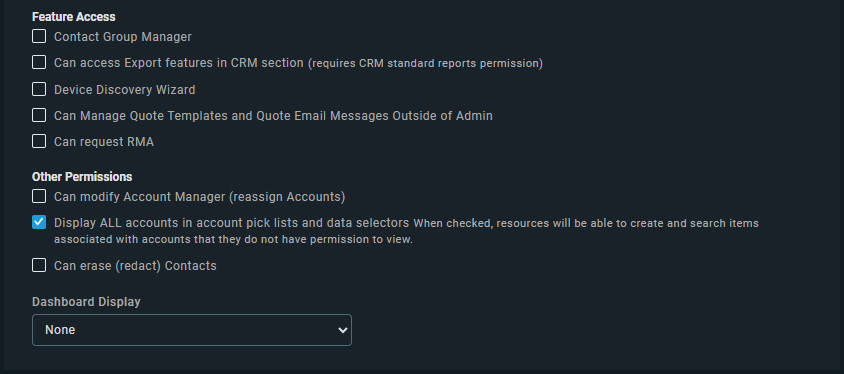
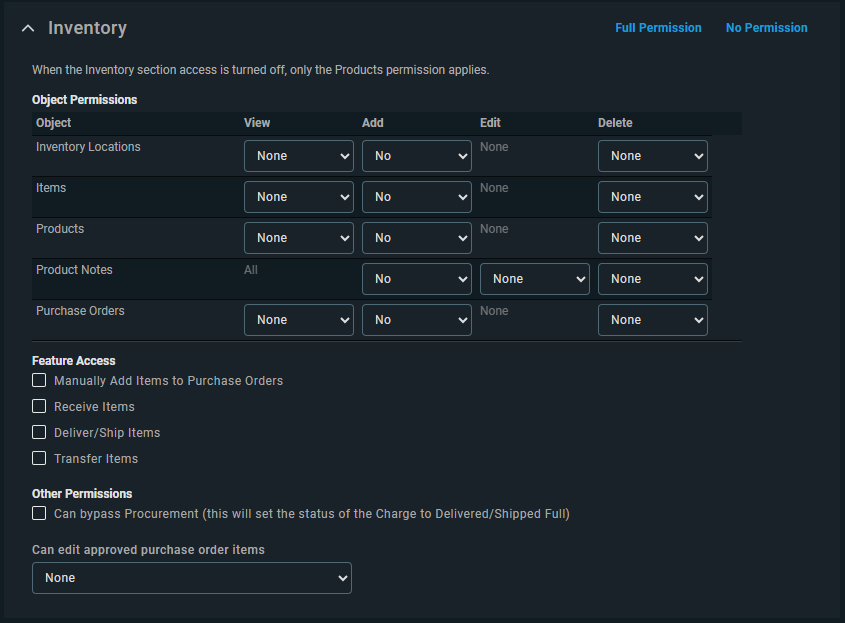
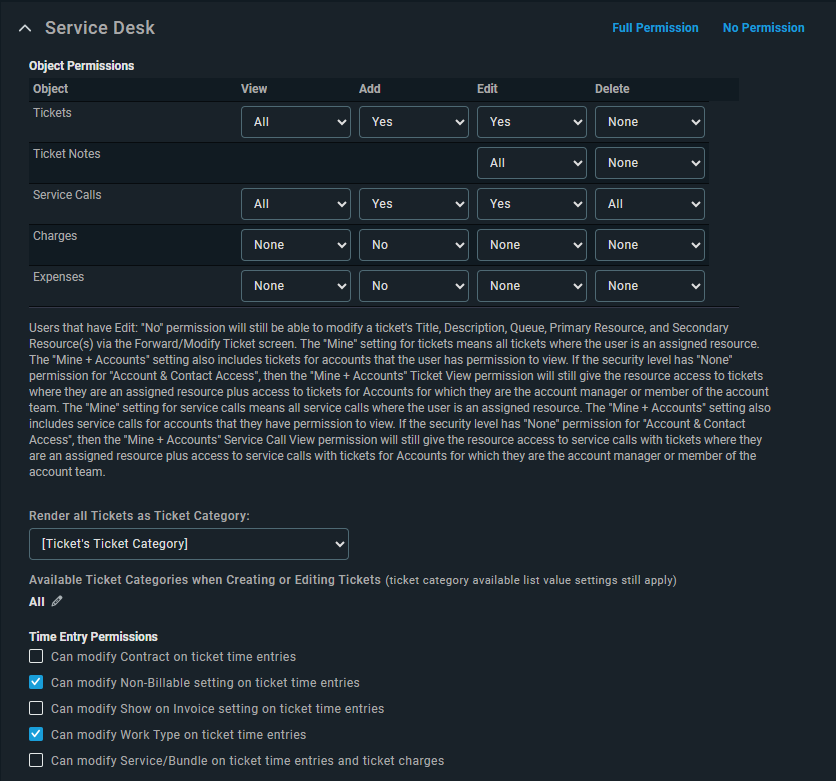
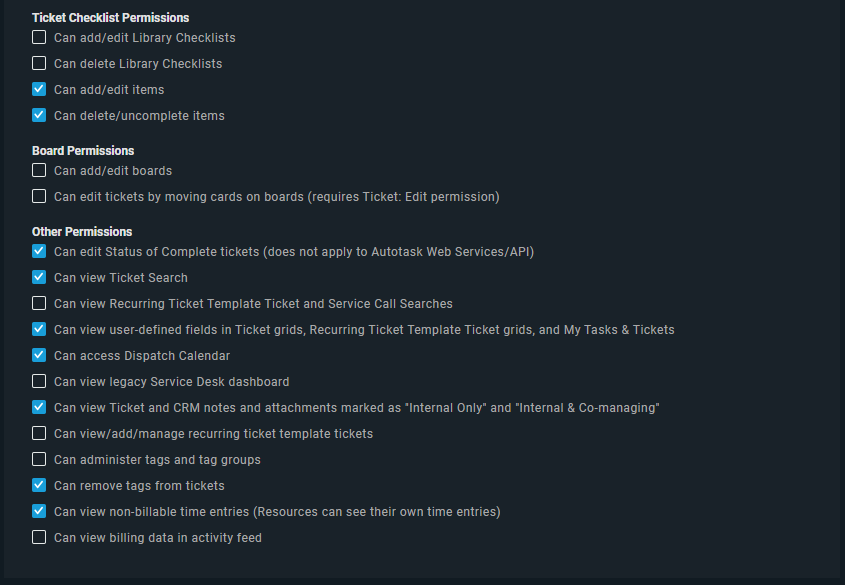
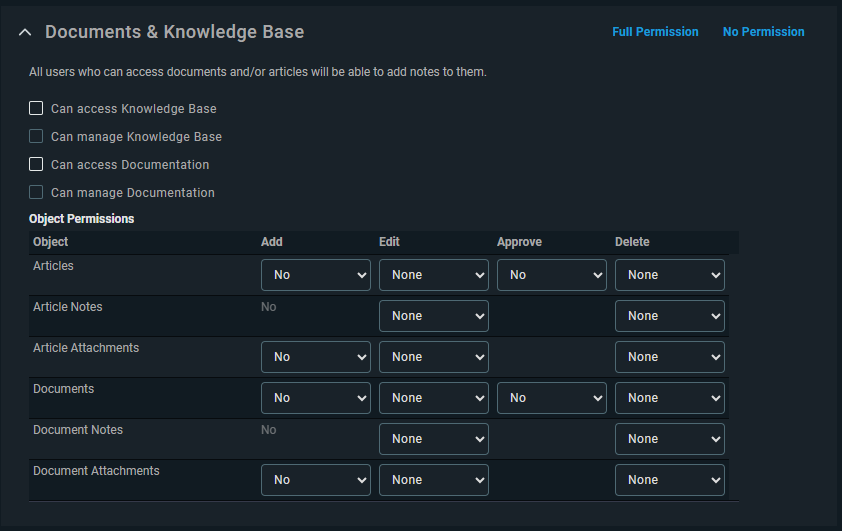
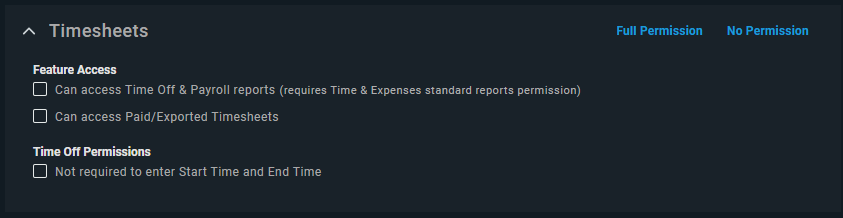
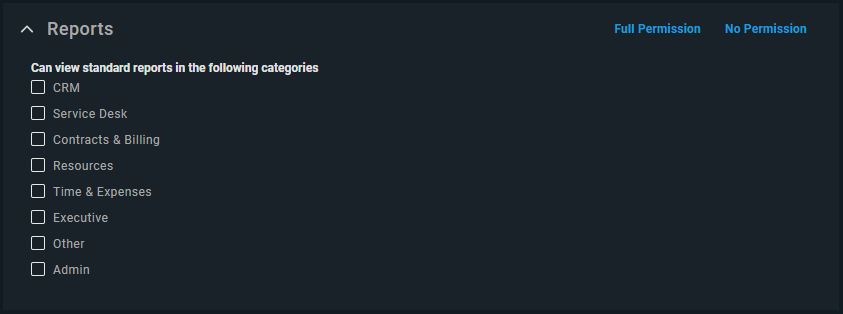
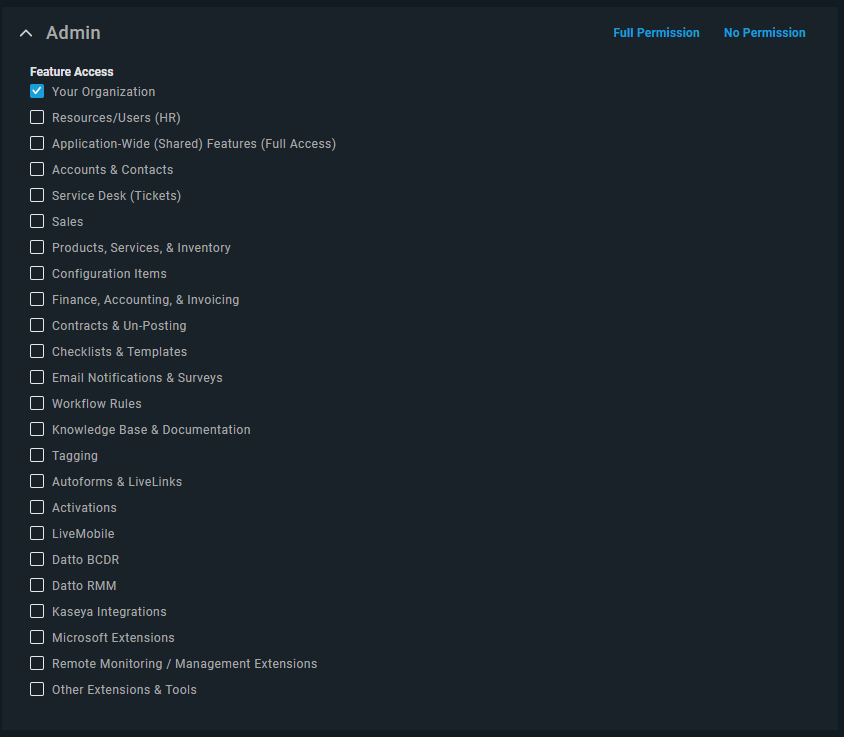
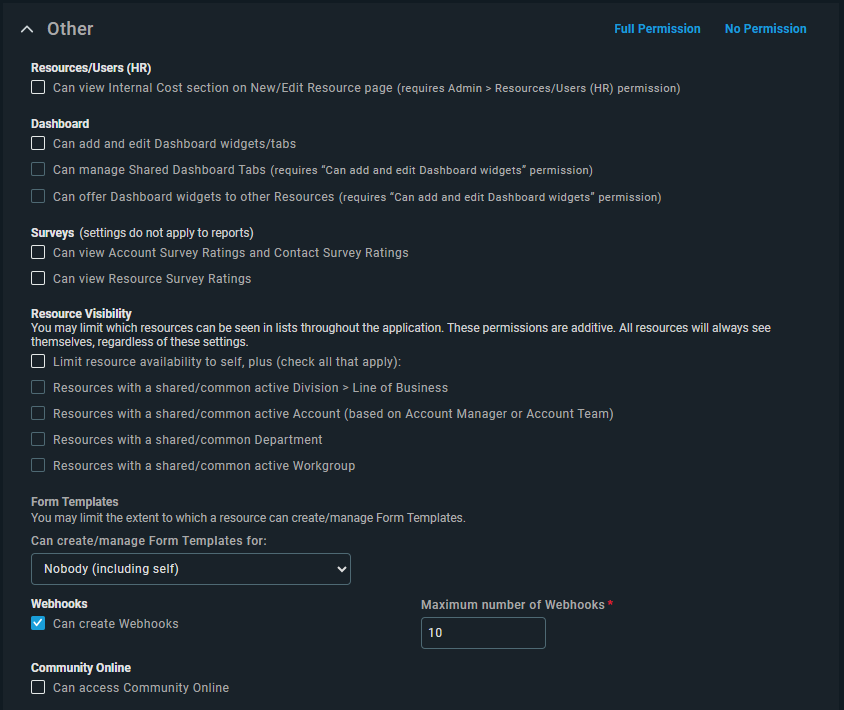
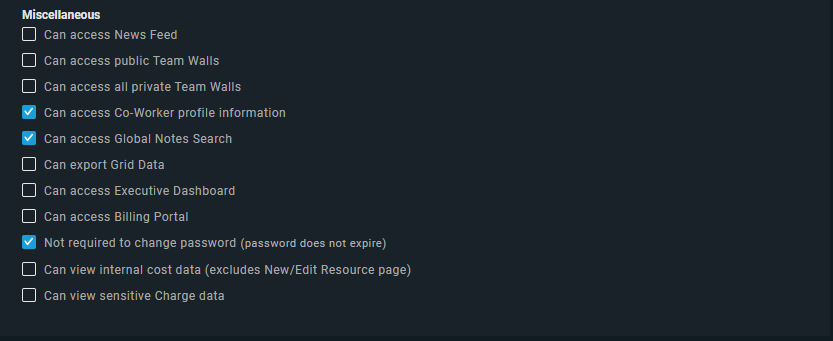
- The permissions for the Security Level are very comprehensive, please set them as per the screenshots below.
Note: Screenshots are section by section.
Note: If you have any custom sections in your Security Level permissions not shown in the screenshots below, please leave them as default.
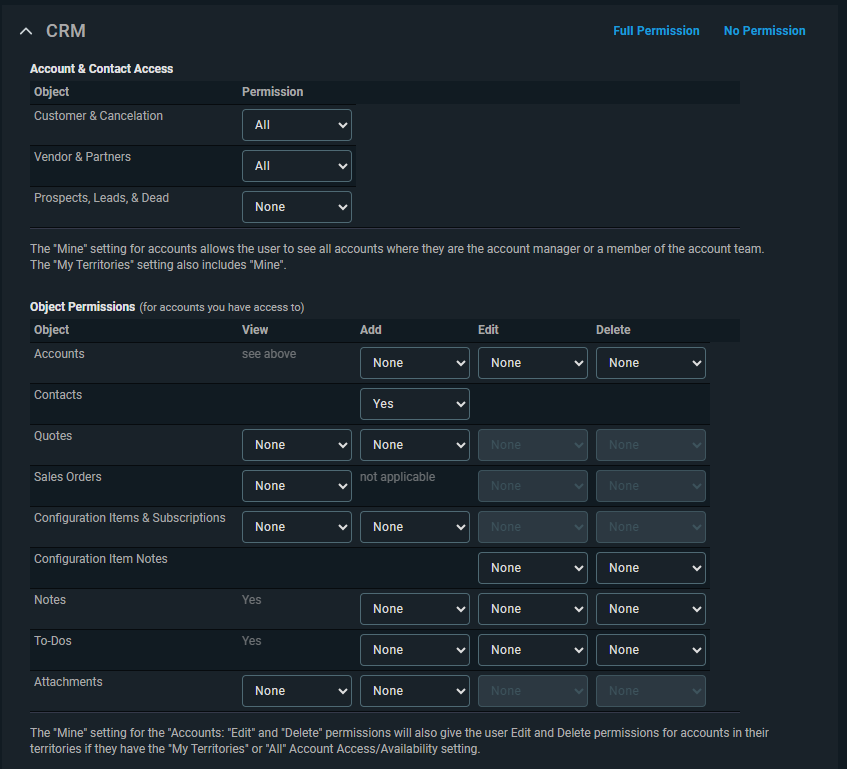
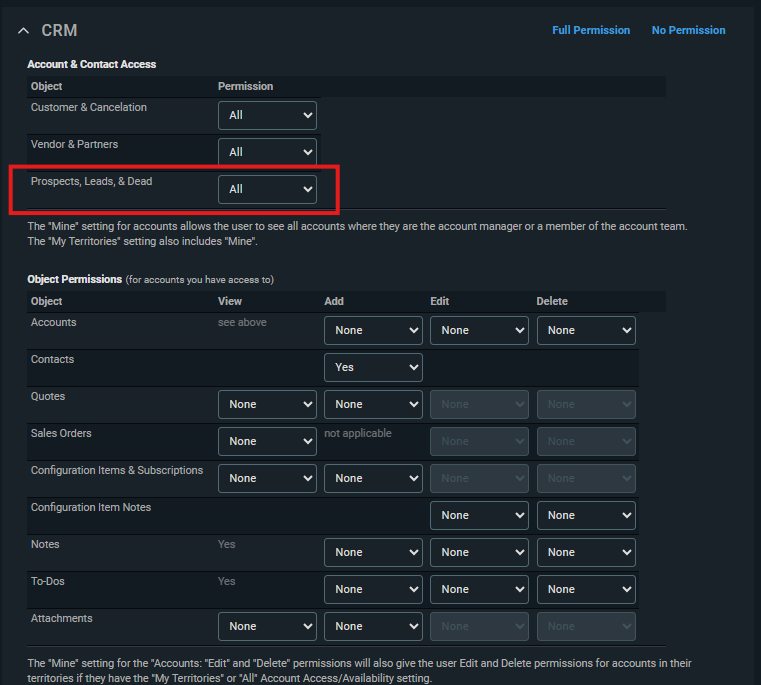
Note: If you have any client with company type set to 'Lead', the permission for Prospects,Leads & Dead under Account & Contact Access must be set to 'All'.
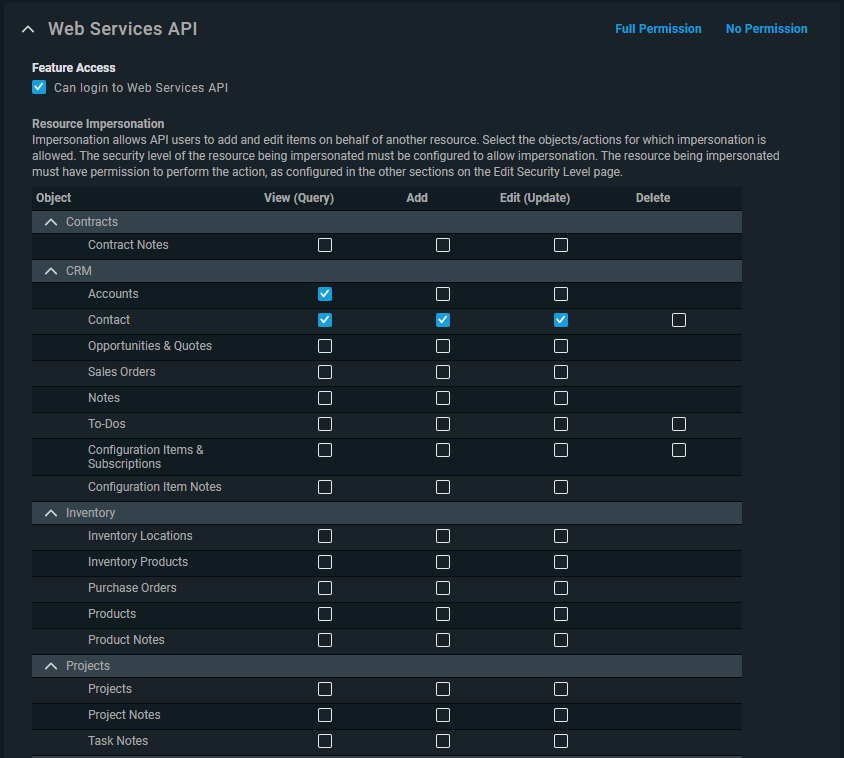
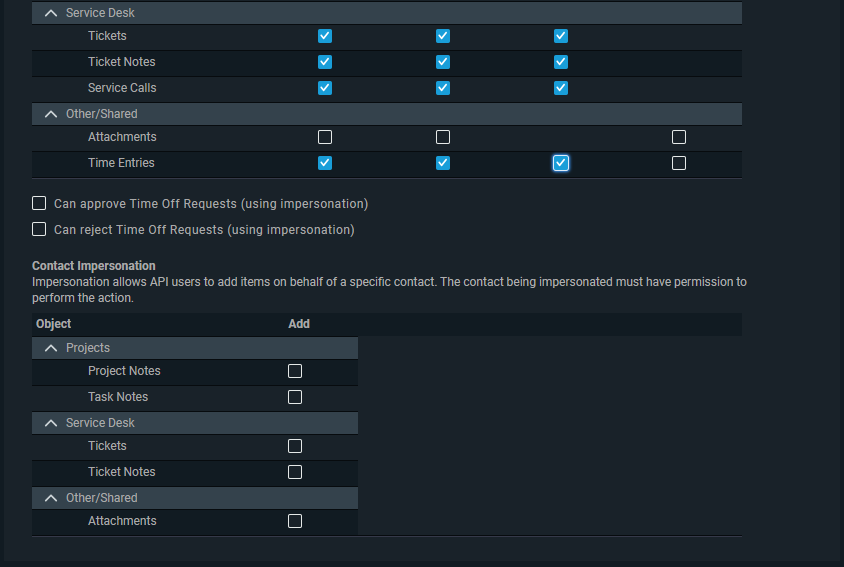
- Save changes once the permissions match what is detailed above.
- Hover over the AutoTask icon and navigate to Admin > Client Settings & Users
- Expand “Resources/Users (HR)” and then click on “Resources/Users”.

- Hover over the down arrow next to “New” and choose “New API User”.

- Enter the fields for the new API User as defined below
- Set the First Name field to “Pia”
- Set the Last Name field to “API”
- Set the Email Address as to your support email address e.g. support@example.com
- Ensure "Active" is ticked
- Set the Security Level as “PIA API User (system)”
- Set the Primary Internal Location field if it exists to the default location
- Click on the “Generate Key” button for the Username
- Click on the “Generate Secret” button for the password
- Select “Custom (Internal Integration)” radio button
- For the “Internal Integration Name”, type “Pia”
- Add “Not Associated” items in Line of Business section to the “Associated” section.
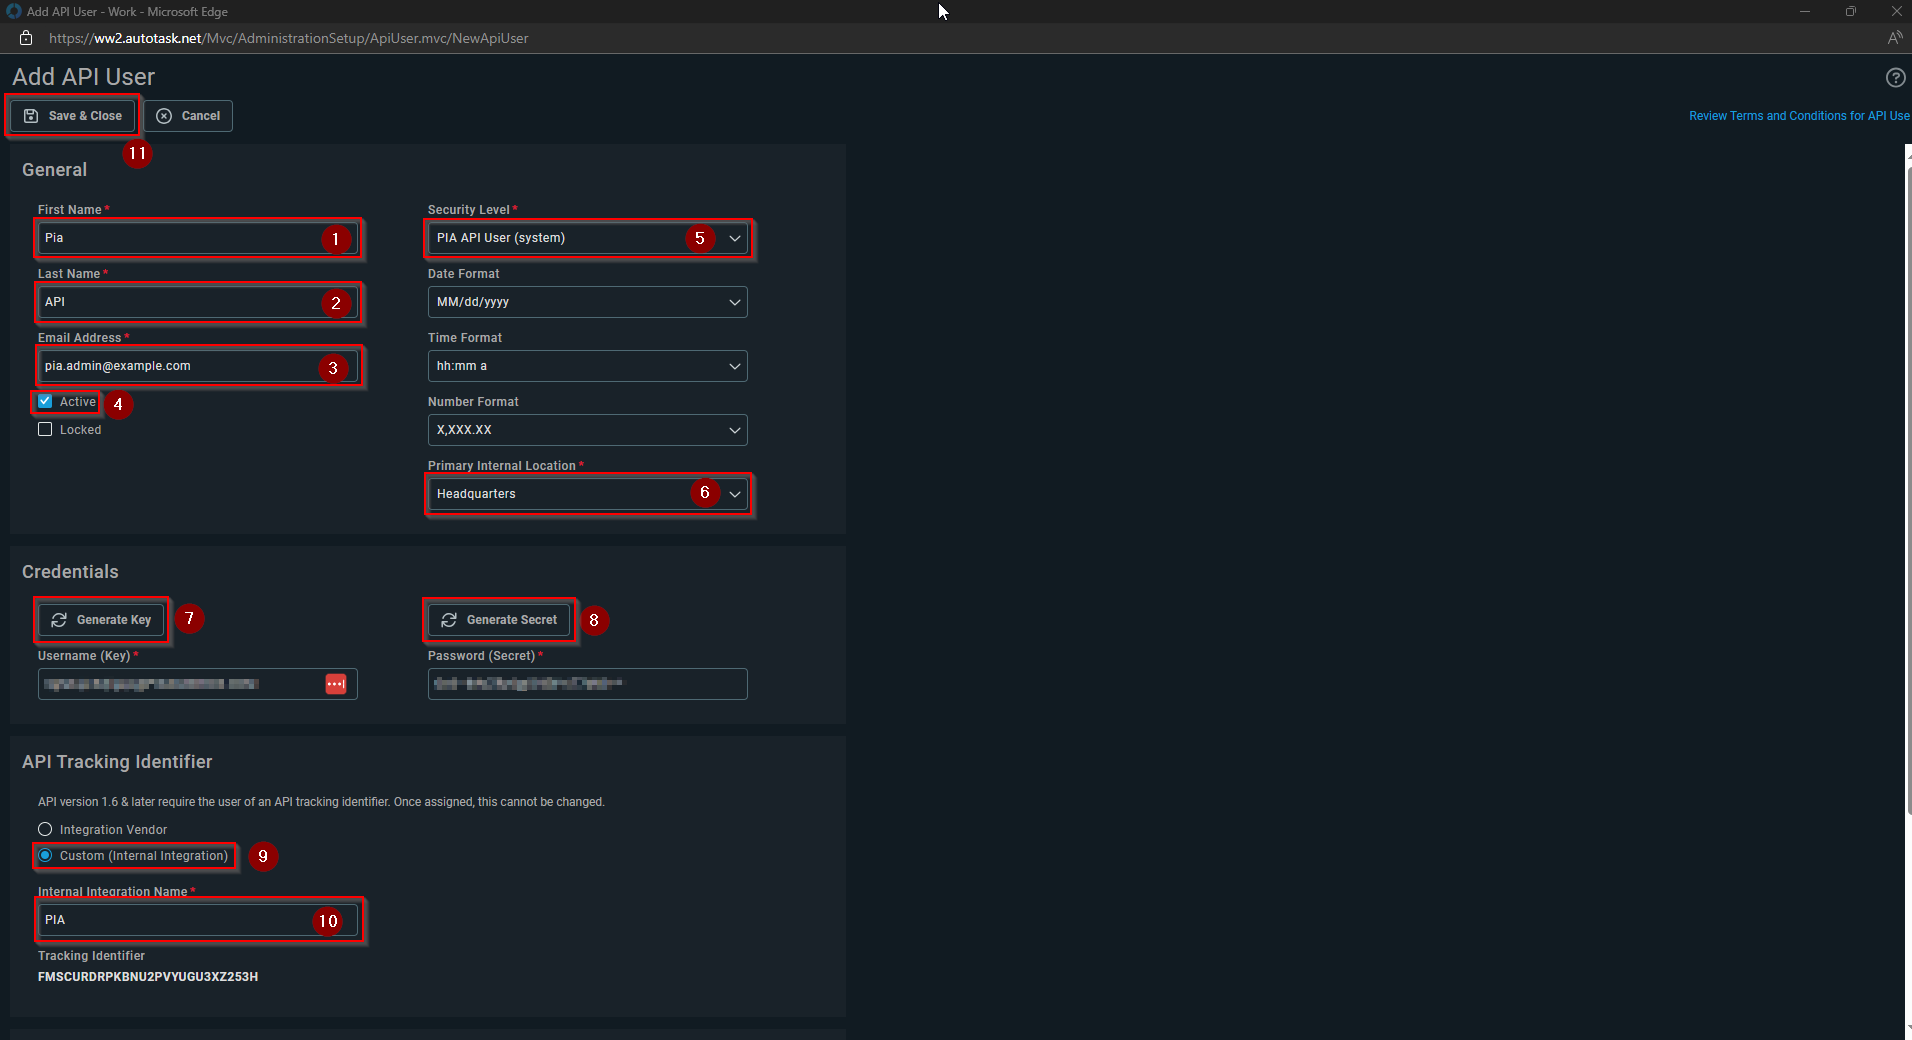
- Record the Public and Private API Keys (referred to as "Username(Key)" and "Password(Secret)" as well as the Tracking Identifier fields in a secure location for later reference).
- Click "Save & Close".
- Log into your HaloPSA as an Administrator.
- Select the "Configuration" option either from the dashboard or from the left hand menu.
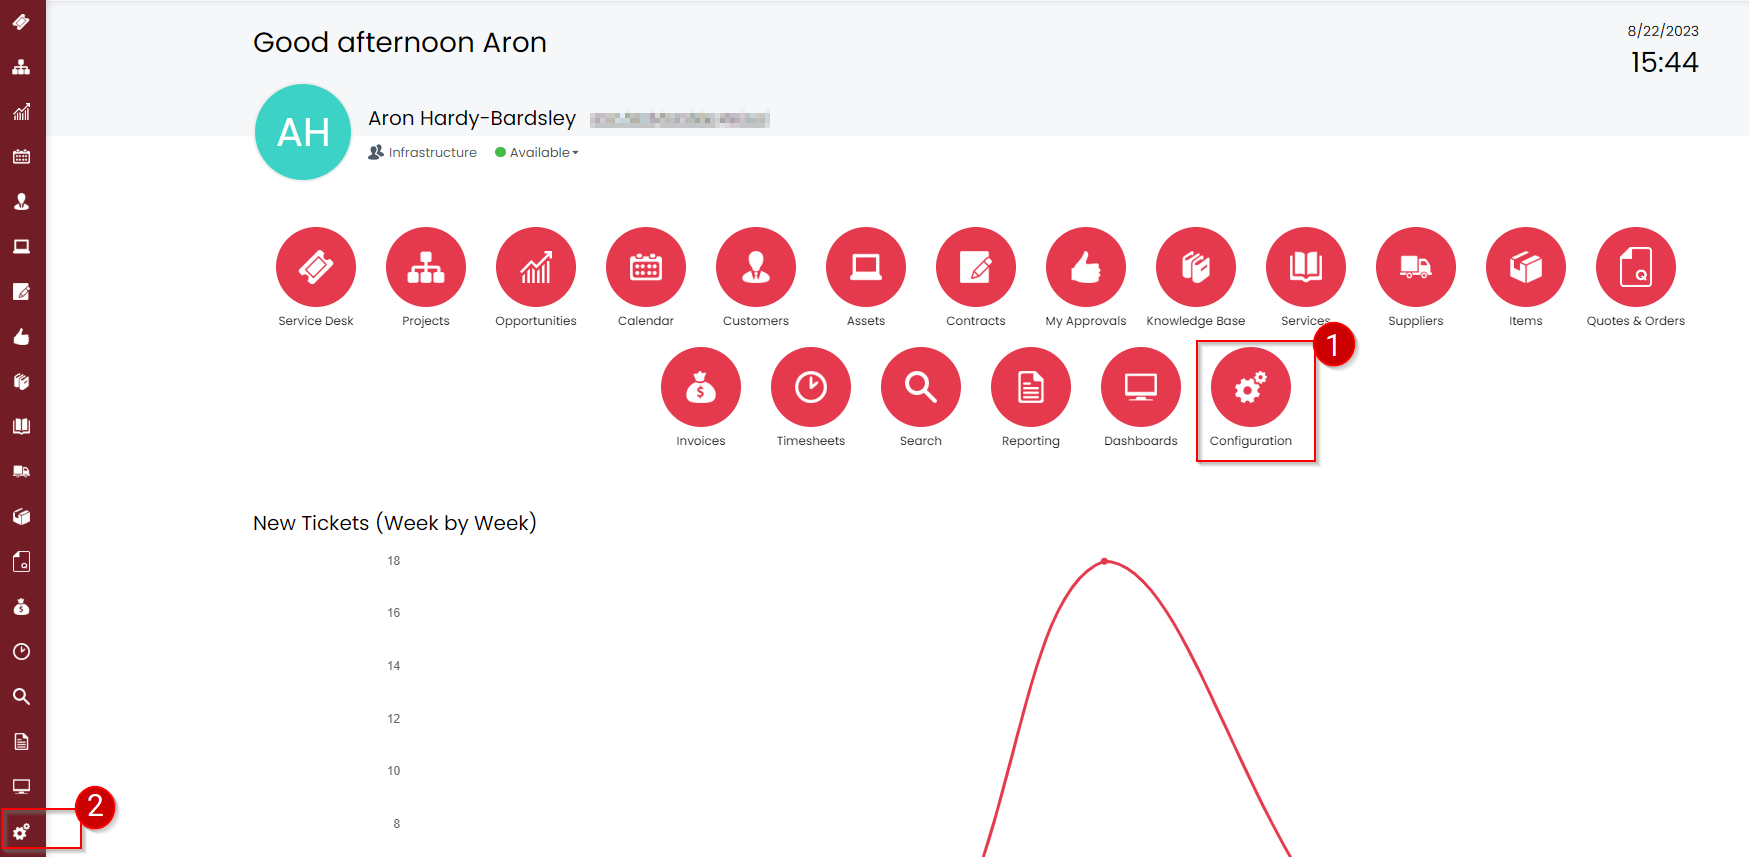
This will take you to the Configuration Screen.
- In the Configuration Screen, Click on the Search bar and search for "API" to filter the list.
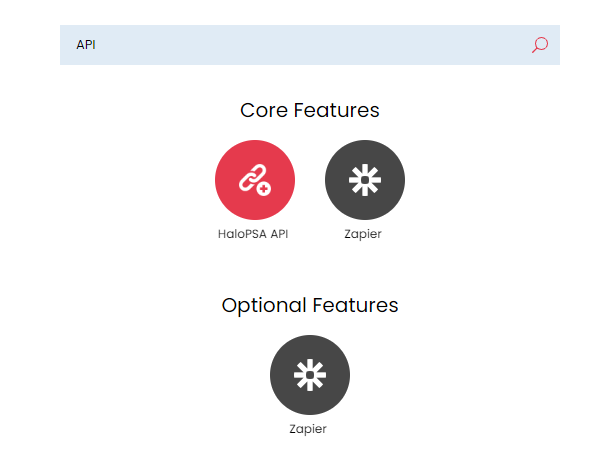
- Select HaloPSA API from the Core Features. This will take you to the HaloPSA API Details screen.

- From the available options, Click on the "View Application" button. This will display a list of applications.
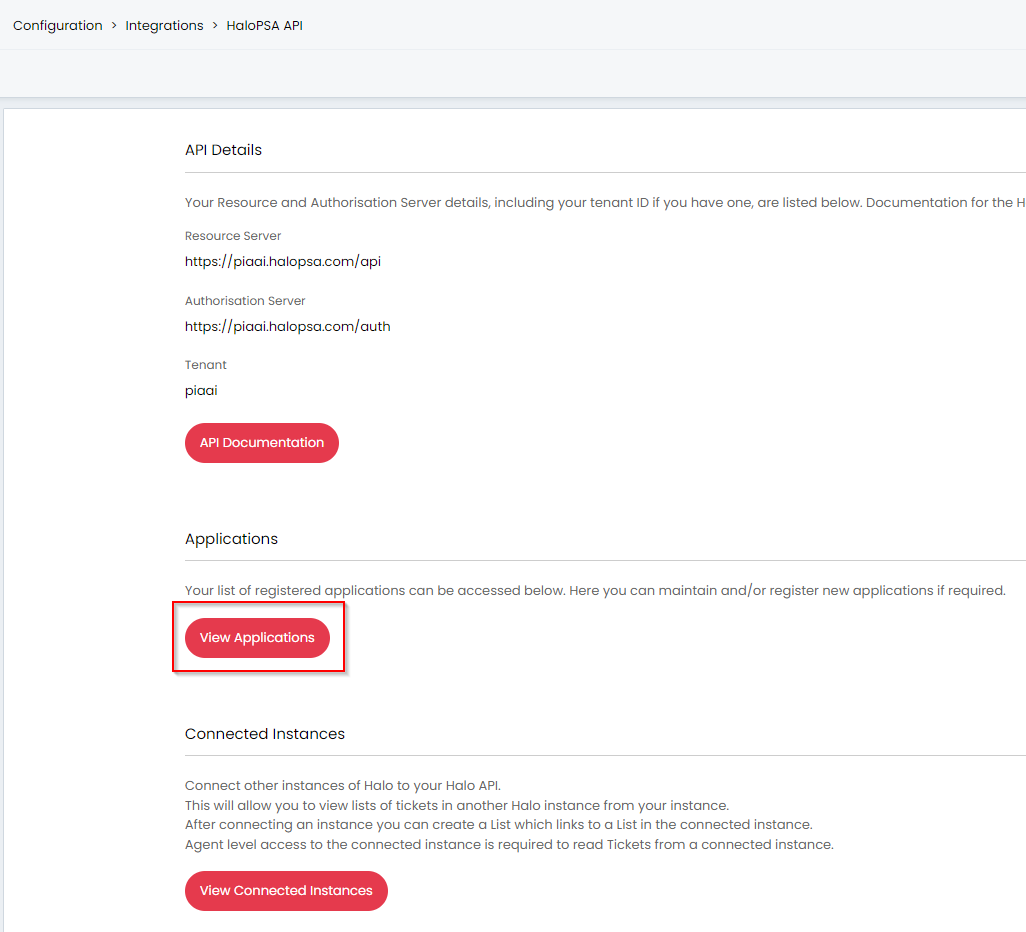
- Select the "New" button from the right corner. You will be directed to a new screen where you can add an application.

- In the "Details" Tab, fill out the following information:
- Application Name: Enter the name of the Application e.g. "Pia"
- Tick on the "Active" checkbox (if it's not ticked)
- Authentication Method: Client ID and Secret (Services)
- Login Type: Agent
- Agent to log in as: Select a user from the list. This should be the admin account that you are creating the user with
Creating a New Agent to Log in as...
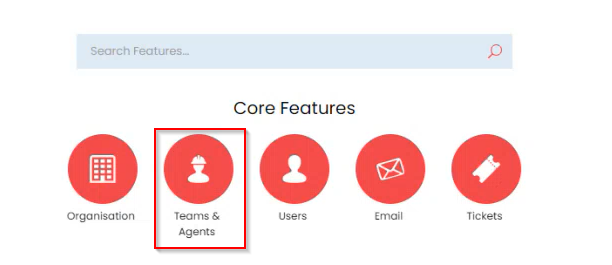
Step 1: In the Configuration Screen, Go to Teams & Agents
Step 2: In the Agents Screen, click on the Agents option
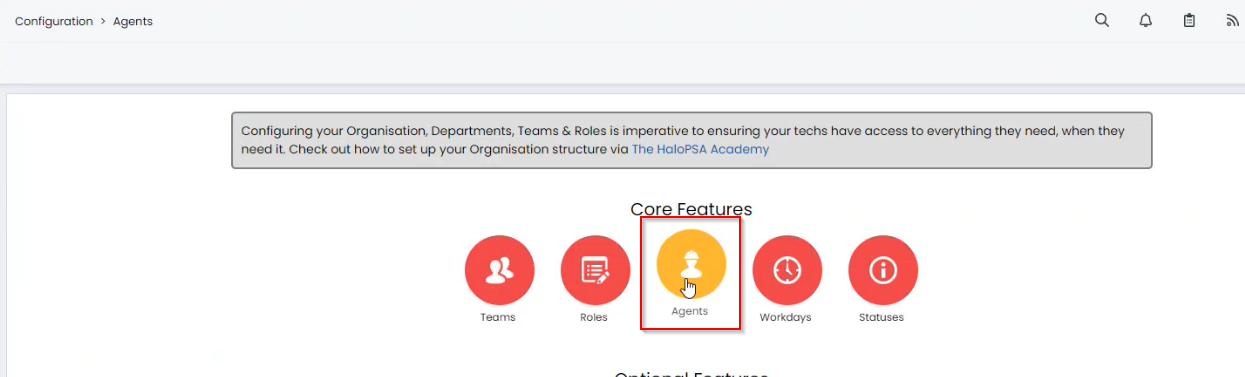
Step 3: You will be taken to the screen with a list of available Agents, Click on the "New" button

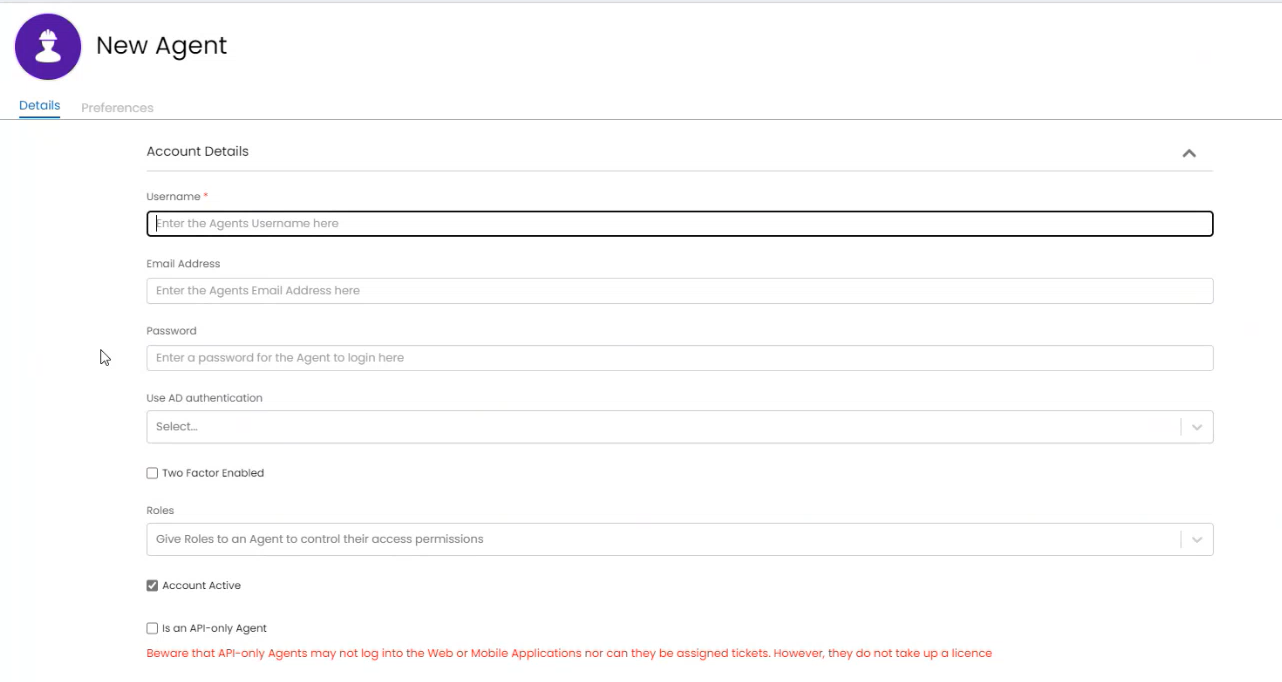
Step 4: Add the New Agent Account Details as follows:
- Username: Name of the new Agent
- Email Address: Agent Email Address
- Password: Password for the Agent to login
- Use AD Authentication: leave it blank
- Roles: Select Administrator from the drop-down
- Is an API-only Agent: Set it to True
- Can Approve Purchase Orders: Set it to False
Rest of the configuration can be set to default and changed as required.
Step 5: Save the details
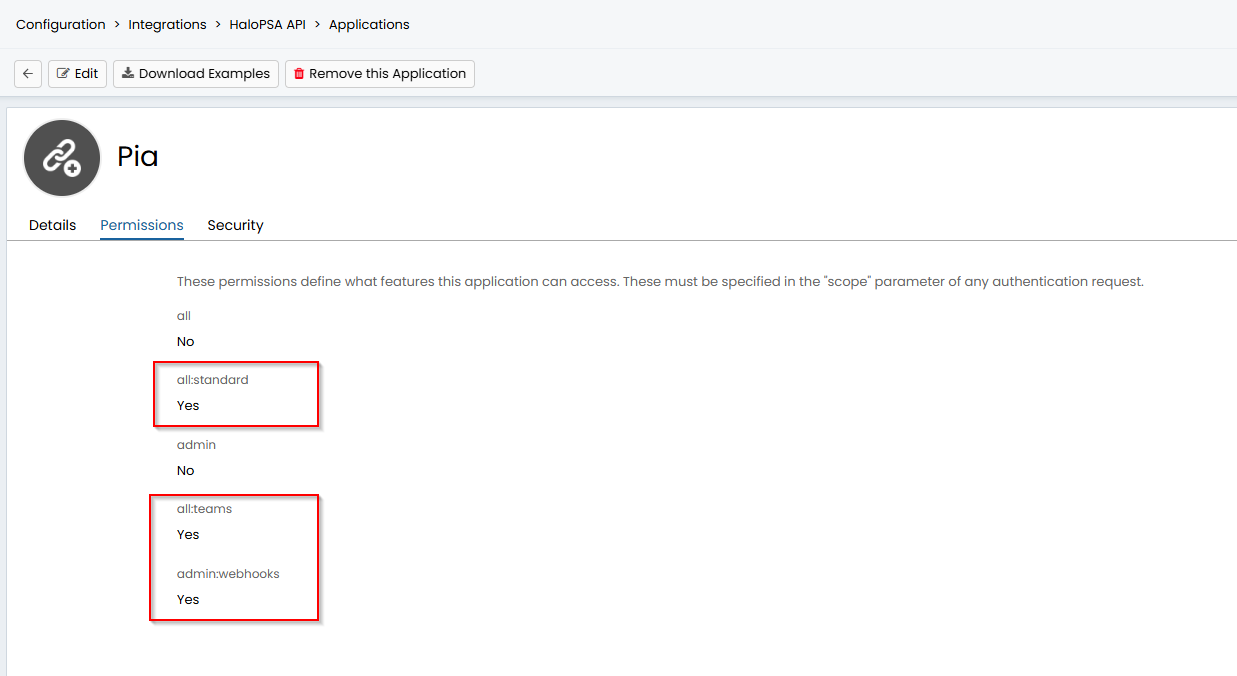
- In the "Permissions" Tab, select the following permissions:
- all:standard
- all:teams
- admin:webhooks
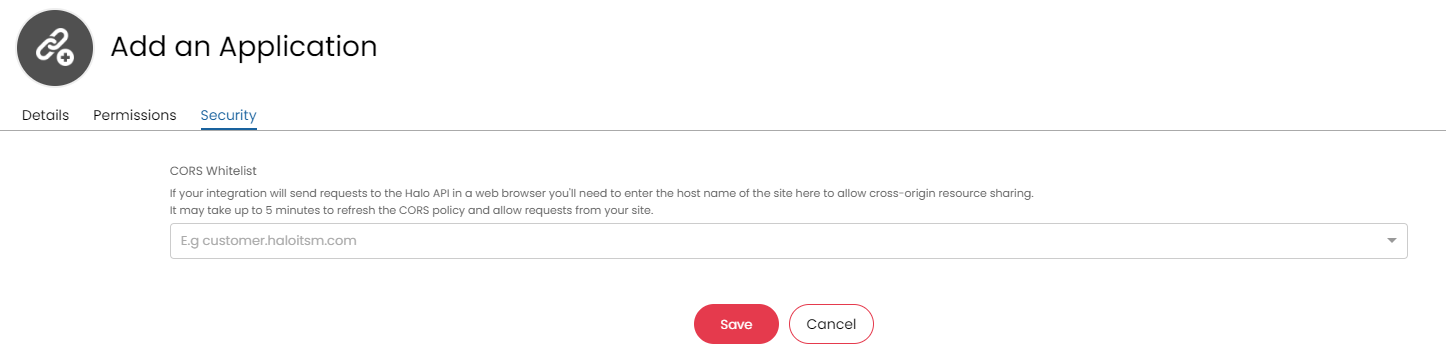
- In the "Security" Tab, enter the host name of the site to allow cross-origin resource sharing eg: test.pia.ai.
Once done, Click on the "Save" button.
Documentation Systems (Optional)
Integration with documentation systems allows Pia to store data of executed packages in a location for your service desk staff to reference.
- ITGlue
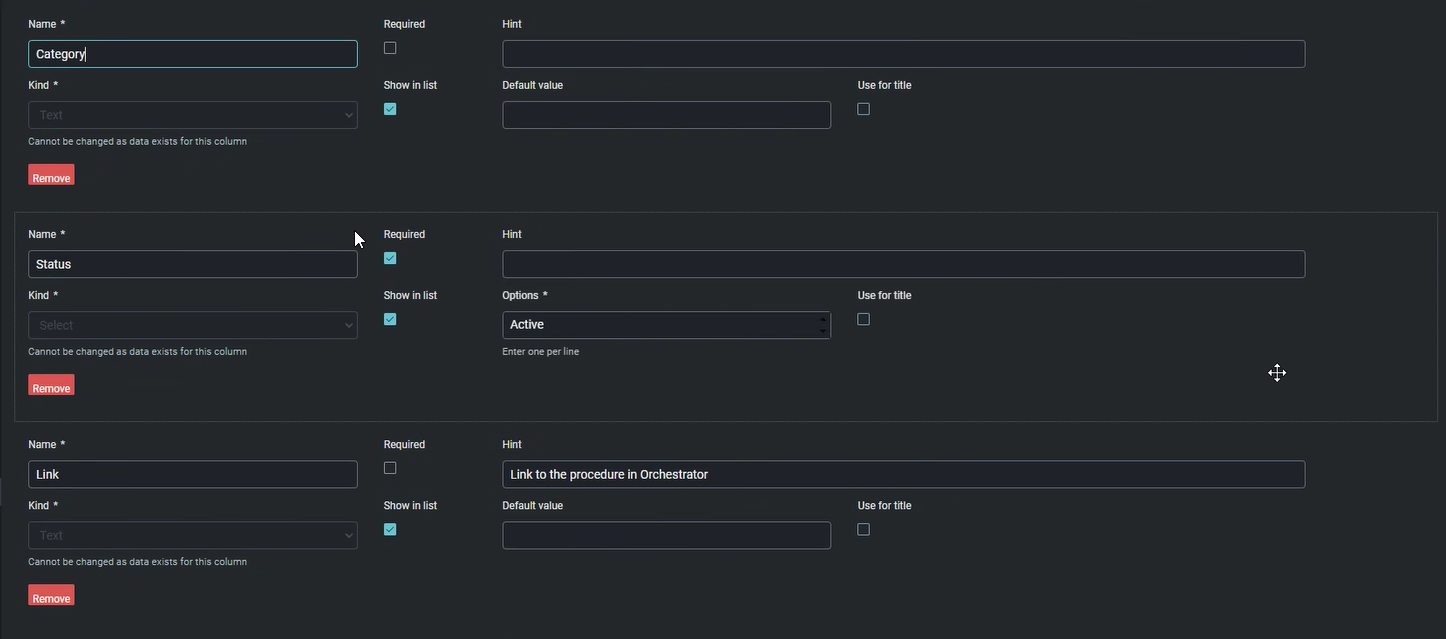
- Name of the Package
- Package Category
- Package Status
- Link
- Package Id
- Procedure Document (Downloadable PDF format)
This is stored in the form of a flexible asset which is also detailed below.
- Log into IT Glue as an Administrator.
- Go to Account > Flexible Asset Types
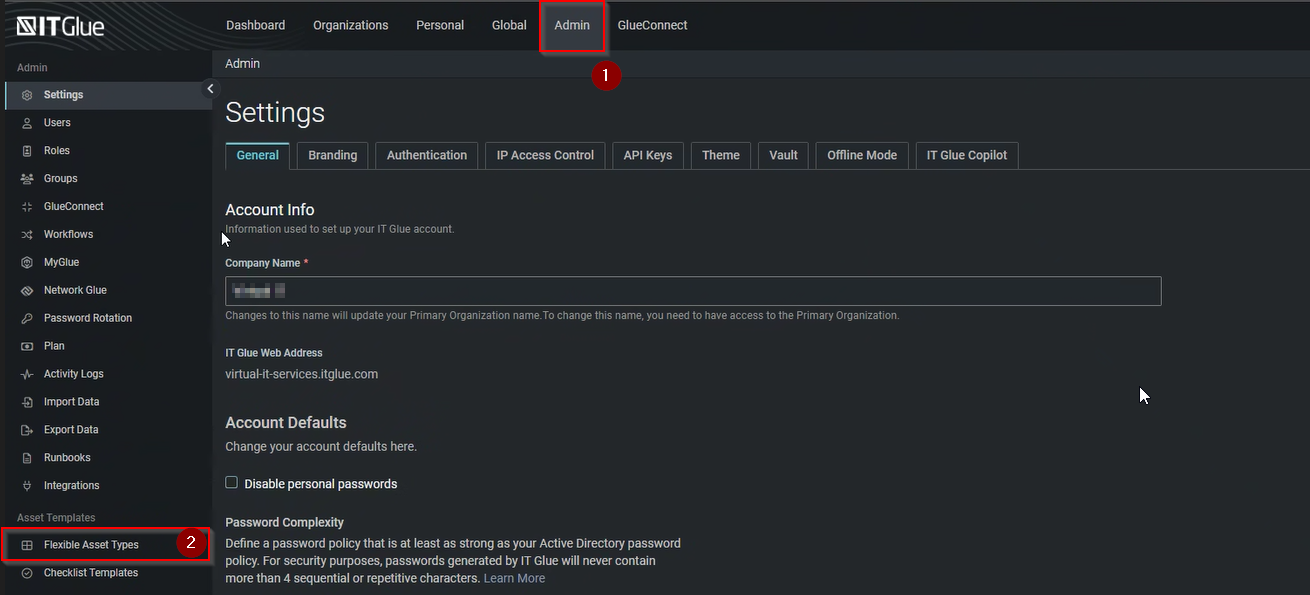
- On the Flexible Assets page, click on “+ New”

- Create the Flexible Asset with the information below;

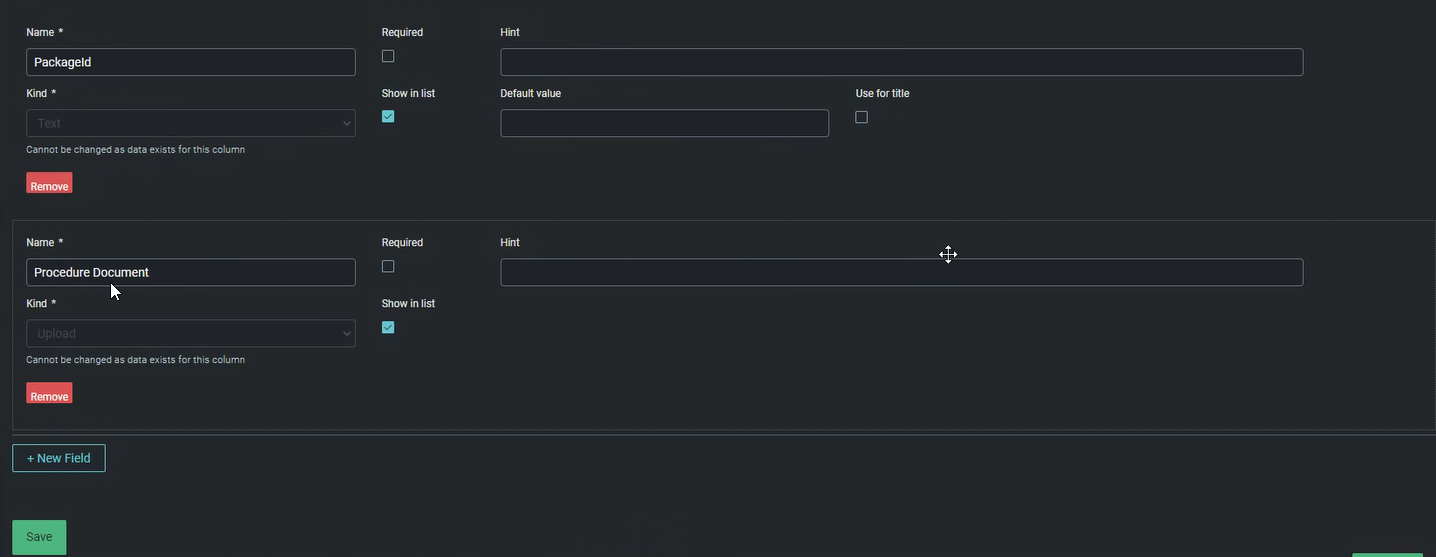
- Click "Save".
To enter data into the Flexible Asset, an API Key must be created, please follow the instructions below.
- Log into IT Glue as an Administrator.
- Click on "Account" on the top bar.

- Click on the “API Keys” tab.

- Under the Custom API Keys section, click on the "+" symbol to create a new line for another API Key.
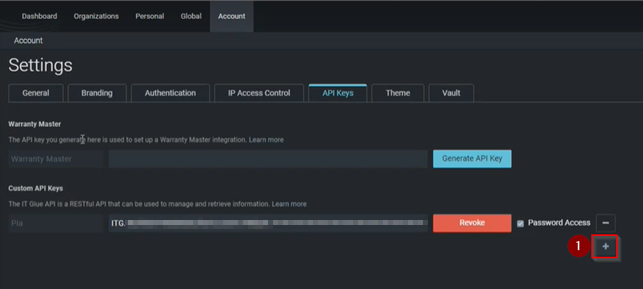
- Enter a descriptive name for the API key and click on “Generate API Key”.
Note: Password Access is NOT required for Pia.
 6. Record the API Key created in the API Key field in a secure location for later reference.