6. Other Integrations
Apart from the Ticketing System, Pia currently supports integration with the following Connected Service system types:
- Communication Channel
- Documentation
- Emailing
- Licensing
- Burst SMS
- Office 365 Email
- Slack
Intro
Burst SMS is a communication channel used to send SMS messages from Pia. This page guides you through the process of setting up an integration via the Burst SMS API.
Reach out to the Pia Team via Partner Support if support is required.
Prerequisites
You will need the following details before setting up your Burst SMS integrations. (More details about these items can be found where you enter them in the sections below.)
- Burst SMS API Key
- Burst SMS Secret
Set Up Process
Here is a quick intro to setting up a new Integration. Details for the fields specific to each service are on the pages linked below.
Summary of the set up process
- Set-up Integration
Set-up Integration
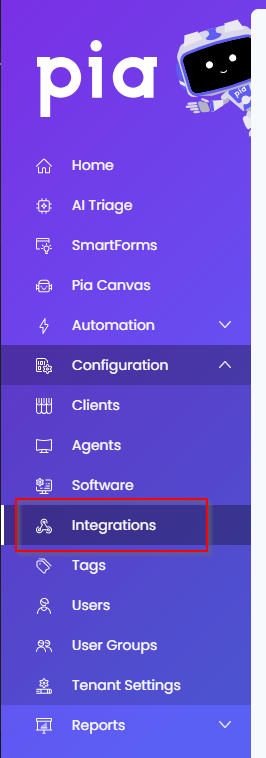
Log in to your Pia portal.
In the left menu click on Integrations
The Integrations page opens. Search for Burst SMS using the search bar at the top.
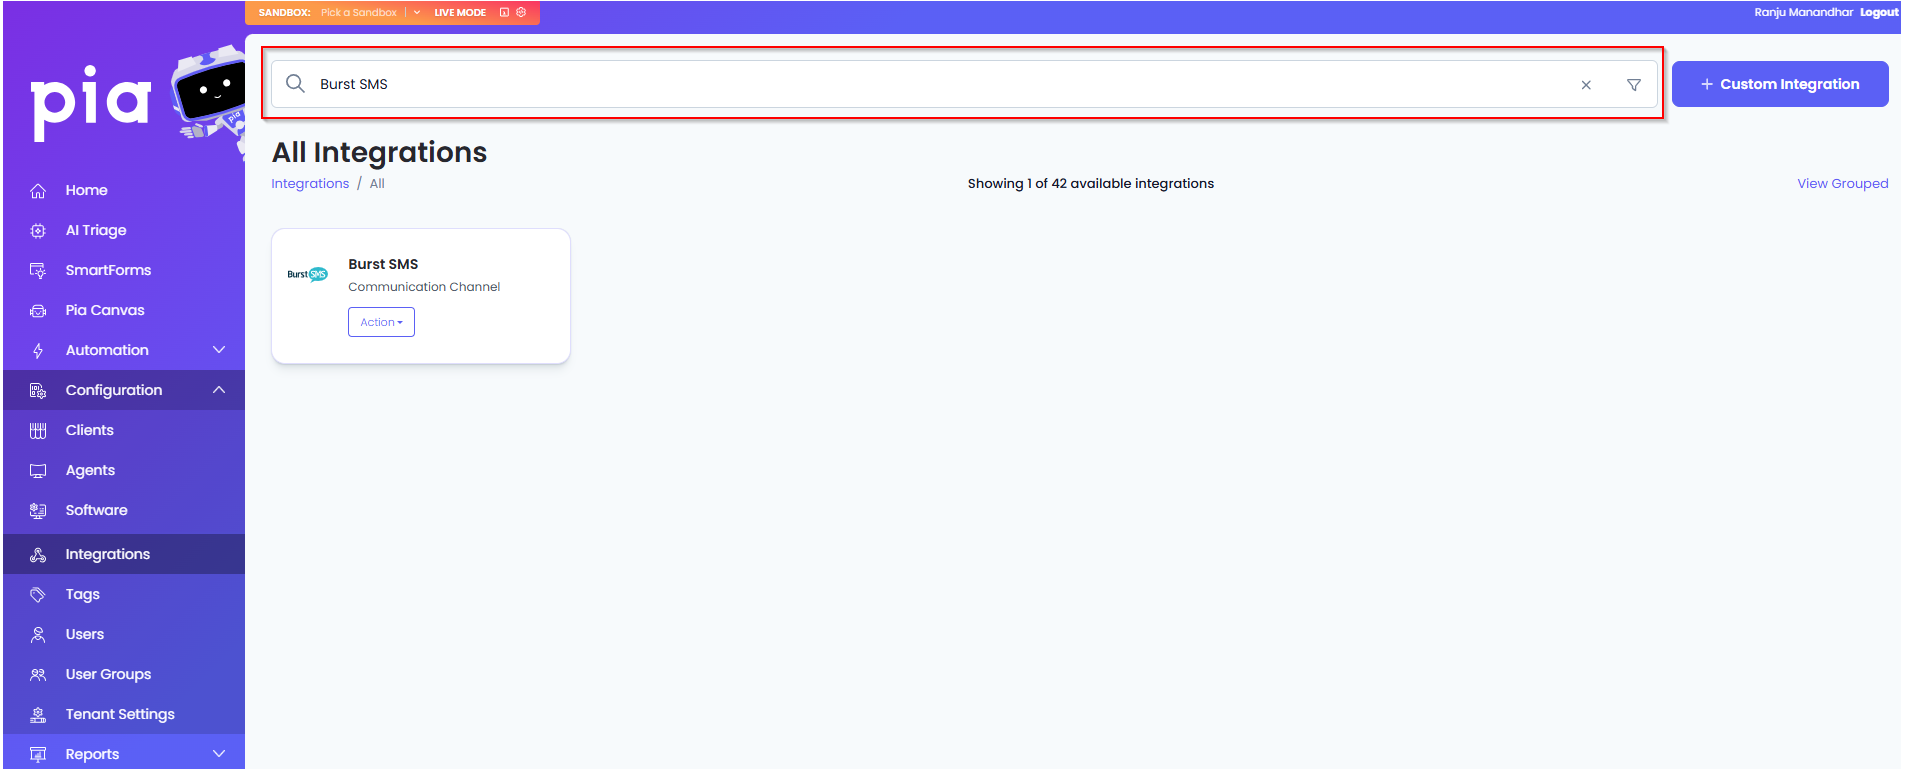
Or, click on the "View All" button available in the All Integration section.

This will open up a screen that displays all the available integrations where you can navigate to Burst SMS.
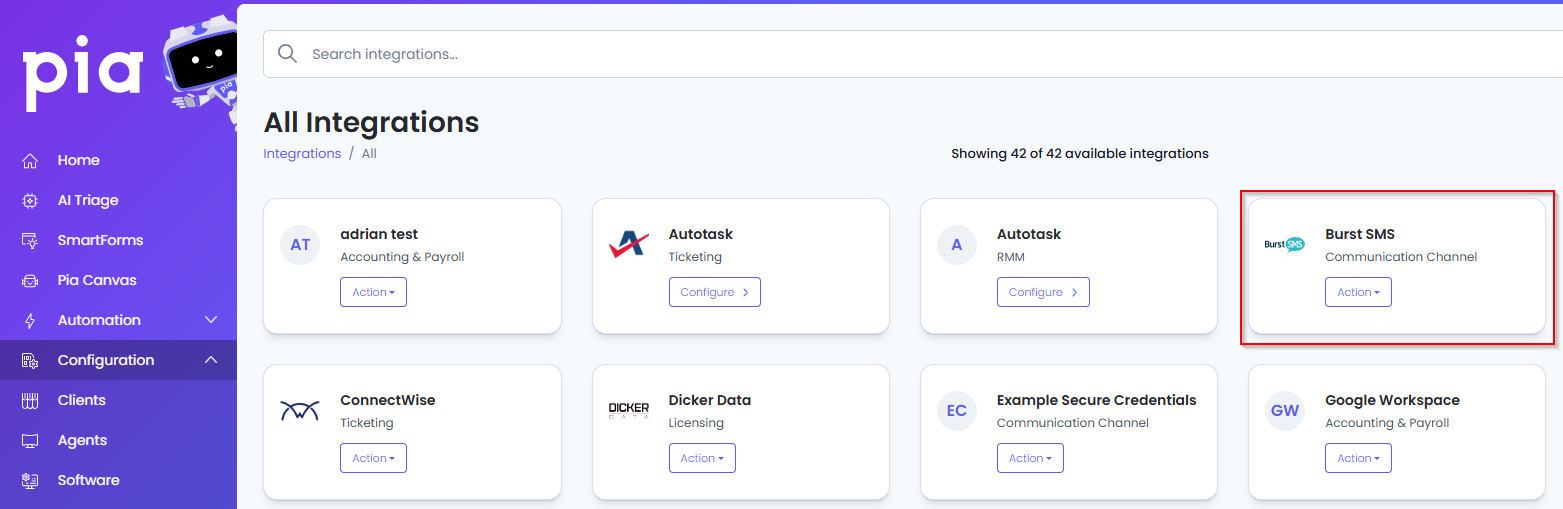
Click on the "Configure" button available in the widget for Burst SMS. This will take you to the configuration page for Burst SMS.

In this page, you can add a friendly name for the configuration in the "Configuration Name" field.
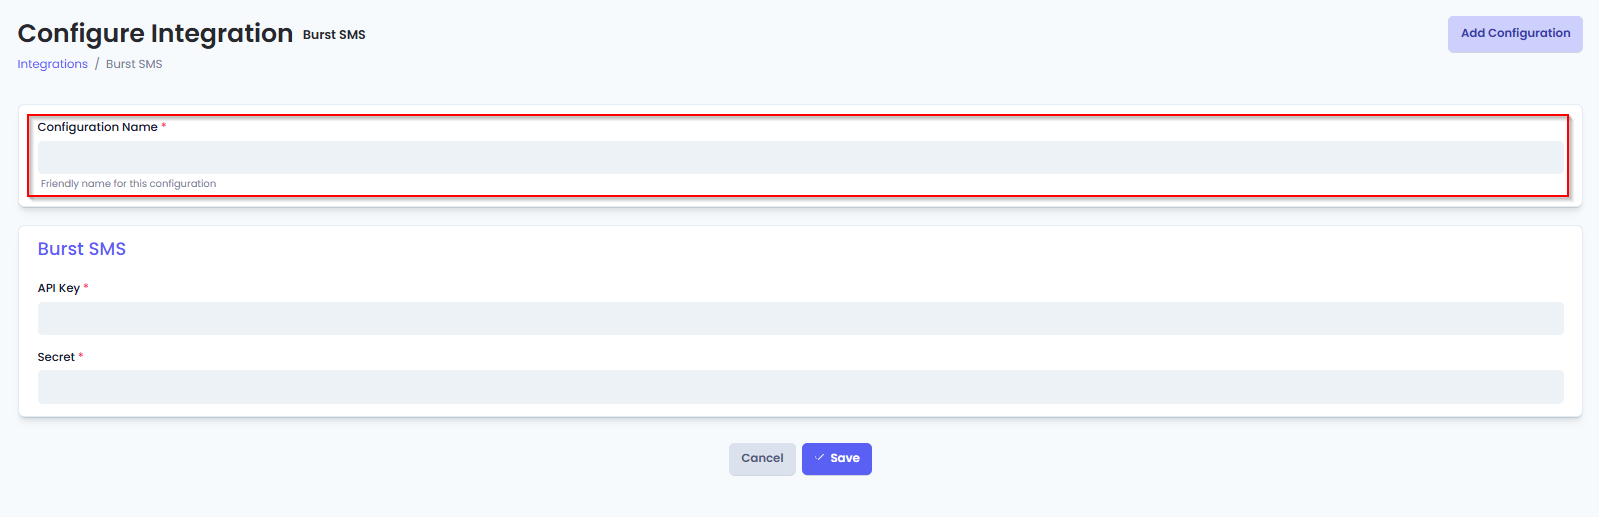
You will also see the following fields that need to be configured for Burst SMS.
- API Key: Enter the 'API Key' value that was generated when creating your Pia API account in Burst SMS.
- Secret: Enter the 'Secret' value that was generated when creating your Pia API account in Burst SMS.
- Click Save to commit the settings. (If any mandatory fields have been left blank you will receive an error message, and the missed field will have a red box around them.)

Intro
Office 365 Email is a communication service designed to make sending email from Pia easier. This page guides you through the process of setting up and authorizing an integration with Office 365 Email.
Reach out to the Pia Team via Partner Support if support is required.
Prerequisites
You will need the following details before setting up your Office 365 Email integration. (More details about these items can be found where you enter them in the sections below.)
- Email Address (that will be used to send email from Pia)
- A Microsoft account that will be used to authorize sending email from this address
Set Up Process
Here is a quick intro to setting up a new Integration. Details for the fields specific to each service are on the pages linked below.
Summary of the set up process
- Set-up Integration
- Authorize with Microsoft
- Test Integration
Set-up Integration
Log in to your Pia portal.
In the left menu click on Integrations
The Integrations page opens. Search for Office 365 Email using the search bar at the top.

Or, click on the "View All" button available in the All Integration section.
This will open up a screen that displays all the available integrations where you can navigate to Office 365 Email.
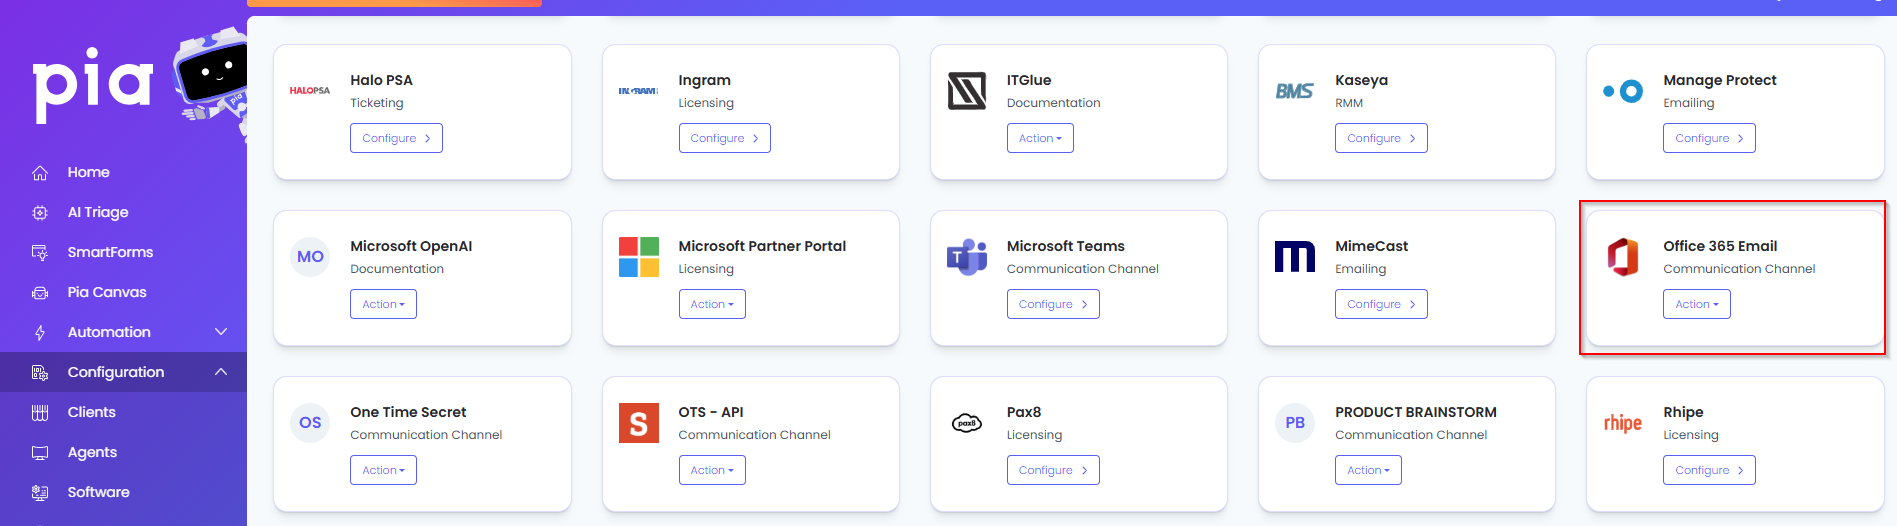
Click on the "Configure" button available in the widget for Office 365 Email. This will take you to the configuration page for Office 365 Email.

In this page, you can add a friendly name for the configuration in the "Configuration Name" field.
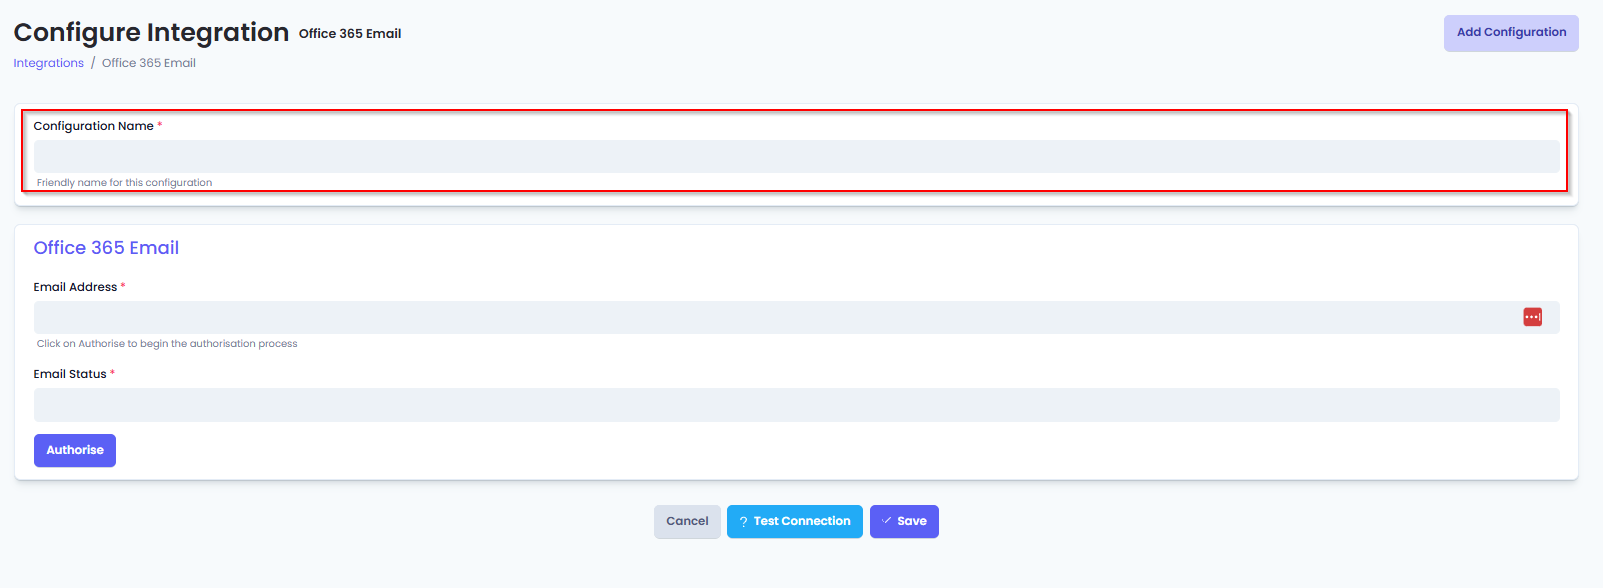
You will also see the following fields that need to be configured for Office 365 Email.
- Email Address: This field displays the email address Pia will send as.
- Initially it will be blank. After Authorization it will be populated with the email address of the account performing the authorization.
- Not user editable.
- Email Status: This field displays the authorization statue of the Integration.
- Initially it will appear blank. After Authorization, it will display the authorization status, including if expired or if there was an error authorizing.
- Not user editable.
Authorize with Microsoft
Next you need to complete the OAuth2 process that will authorize Pia to send email using your Office 365 Email.
Click the Authorization button to start the authorization process.
A new window/tab with the Microsoft login screen with open.
- Login to the Microsoft Account you want to use to send email.
- Authorize Pia to use your Office 365 Email.
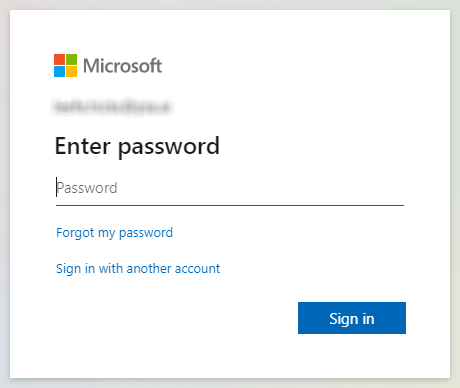
After Authorization you will be returned to the Integrations window with the 'Email Address' and 'Status' fields populated. Click Save to save the Authorization.

Test Integration
Test Connection is having issues. And needs to be revisited when it works.
Test Integration
After setting up your Integration for Office 365 Email, you will need to test the connection works.
Click the Test Connection button to confirm the Integration has been configured correctly.

You should receive a Connection Successful! popup box. If you receive a Can't connect to service. message, re-authorize and try again.
Intro
Slack is a communication service. This page guides you through the process of setting up an integration via the Slack API.
Reach out to the Pia Team via Partner Support if support is required.
Prerequisites
You will need the following details before setting up your Slack integrations. (More details about these items can be found where you enter them in the sections below.)
- Bot-token
Set Up Process
Here is a quick intro to setting up a new Integration. Details for the fields specific to each service are on the pages linked below.
Summary of the set up process
- Set-up Integration
- Test Integration
Set-up Integration
Log in to your Pia portal.
In the left menu click on Integrations
The Integrations page opens. Search for Slack using the search bar at the top.
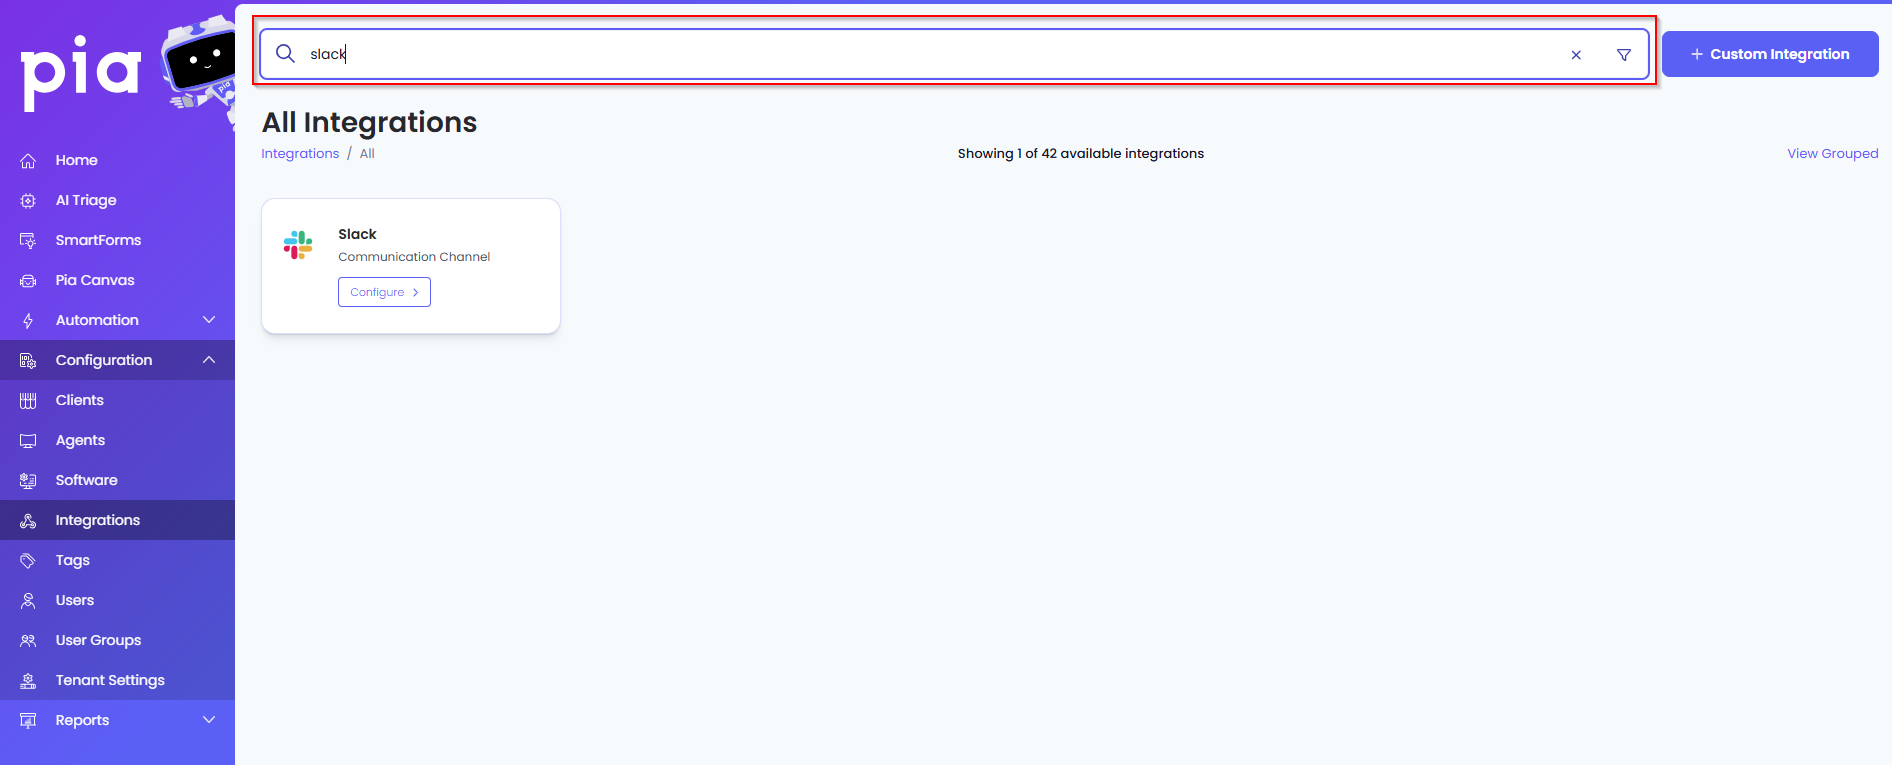
Or, click on the "View All" button available in the All Integration section.
This will open up a screen that displays all the available integrations where you can navigate to Slack.
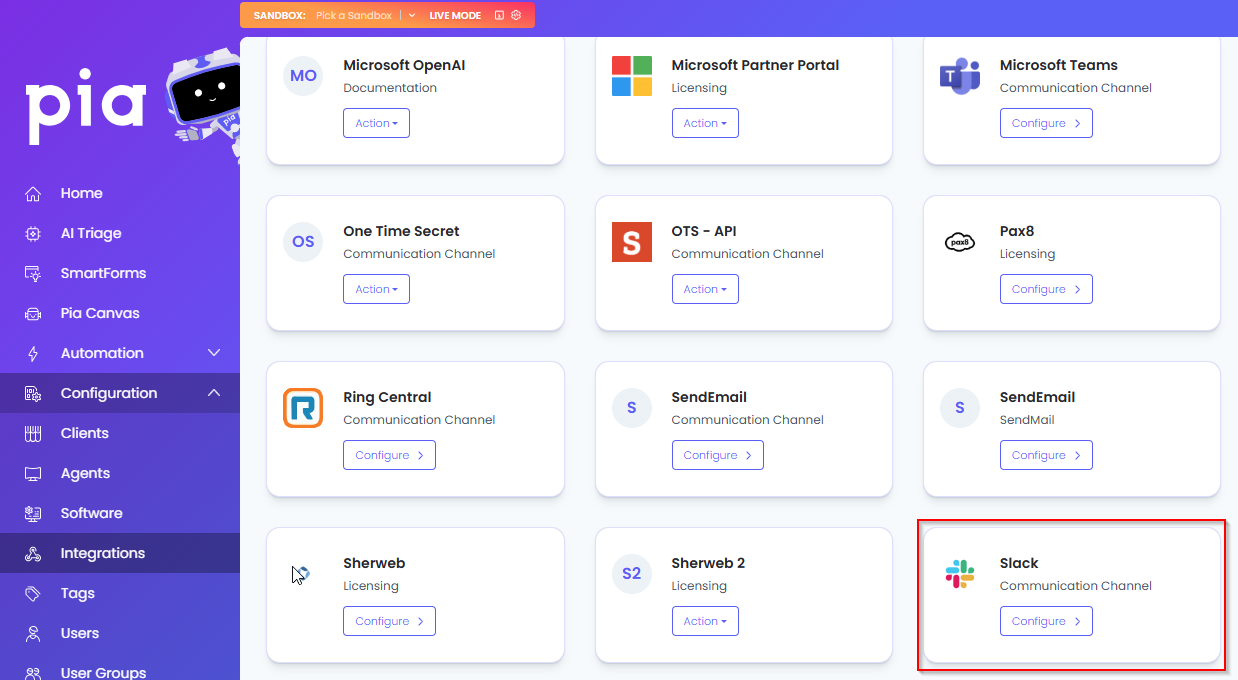
Click on the "Configure" button available in the widget for Slack. This will take you to the configuration page for Slack.

In this page, you can add a friendly name for the configuration in the "Configuration Name" field.

You will also see the following fields that need to be configured for Slack.
- Bot Token: Enter the Bot Token you have from Slack
Click Save to commit the settings. (If any mandatory fields have been left blank you will receive an error message, and the missed field will have a red box around them.)

Test Integration
After setting up your Integration for Slack you will need to test the connection works.
- Click the Test Connection button to confirm the Integration has been configured correctly.
- You should receive a Connection Successful! popup box. If you receive a Can't connect to service. message, double-check the configuration details and try again.
The Slack Integration configuration is now complete.
- IT Glue
- SharePoint
Intro
ITGlue is a documentation service. This page guides you through the process of setting up an integration via the ITGlue API.
Reach out to the Pia Team via Partner Support if support is required.
Prerequisites
You will need the following details before setting up your ITGlue integrations. (More details about these items can be found where you enter them in the sections below.)
- API URL
- API Key
- Flexible Asset Type
Set Up Process
Here is a quick intro to setting up a new Integration. Details for the fields specific to each service are on the pages linked below.
Summary of the set up process
- Set-up Integration
- Test Integration
Set-up Integration
Log in to your Pia portal.
In the left menu click on Integrations
The Integrations page opens. Search for ITGlue using the search bar at the top.

Or, click on the "View All" button available in the All Integration section.
This will open up a screen that displays all the available integrations where you can navigate to ITGlue.

Click on the "Configure" button available in the widget for ITGlue. This will take you to the configuration page for ITGlue.

In this page, you can add a friendly name for the configuration in the "Configuration Name" field.

You will also see the following fields that need to be configured for ITGlue.
- URL: Enter the URL relevant to your geographic location:
- Default data centre:
https://api.itglue.com - European data centre:
https://api.eu.itglue.com - Australian data centre:
https://api.au.itglue.com
- Default data centre:
- API Key: Enter the 'API Key' value that you received from ITGlue.
For partners hosted in the Australian data centre who were migrated from the default US data centre, API access may still be restricted to the default US data centre endpoint.
- Flexible Asset Type: Enter the 'Flexible Asset Type' you set up in ITGlue to receive information from Pia.
See below at the bottom of the page if you need to create Flexible Asset for ITGlue.
- Click Save to commit the settings. (If any mandatory fields have been left blank you will receive an error message, and the missed field will have a red box around them.)
Test Integration
After setting up your Integration for ITGlue you will need to test the connection works.
Click the Test Connection button to confirm the Integration has been configured correctly.
You should receive a Connection Successful! popup box. If you receive a Can't connect to service. message, double-check the configuration details and try again.
The ITGlue Integration configuration is now complete.
Creating a Flexible Asset
- Log into ITGlue as an Administrator.
- Go to Account > Flexible Asset Types
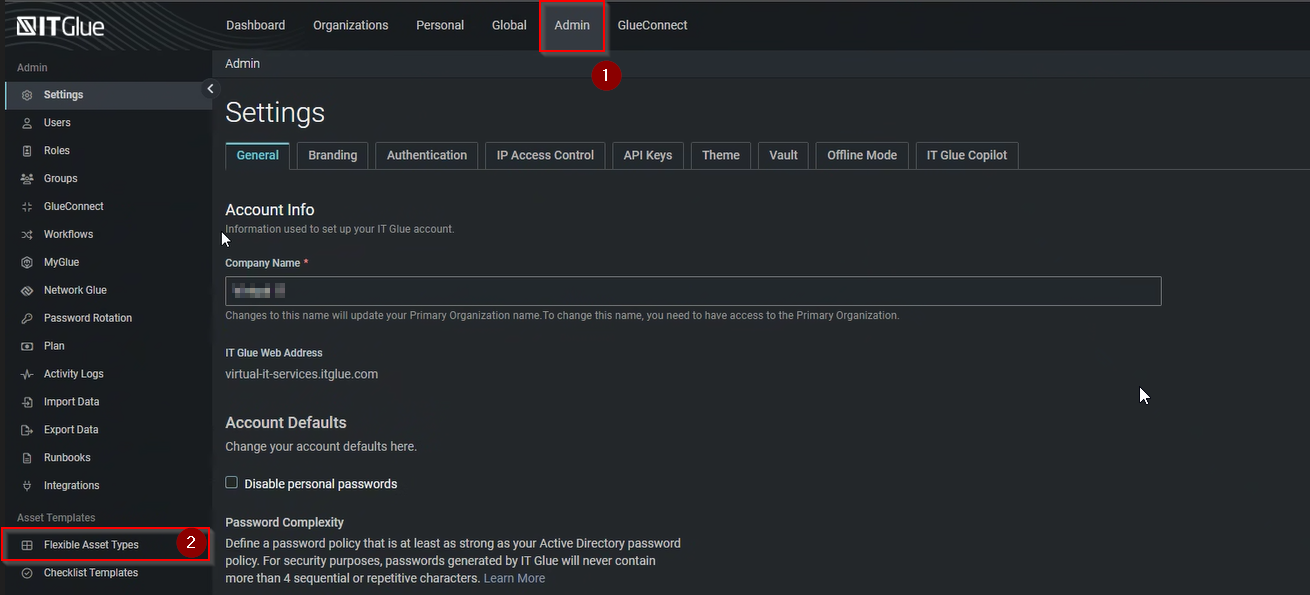
- On the Flexible Assets page, click on “New”

- Create the Flexible Asset with the information below;
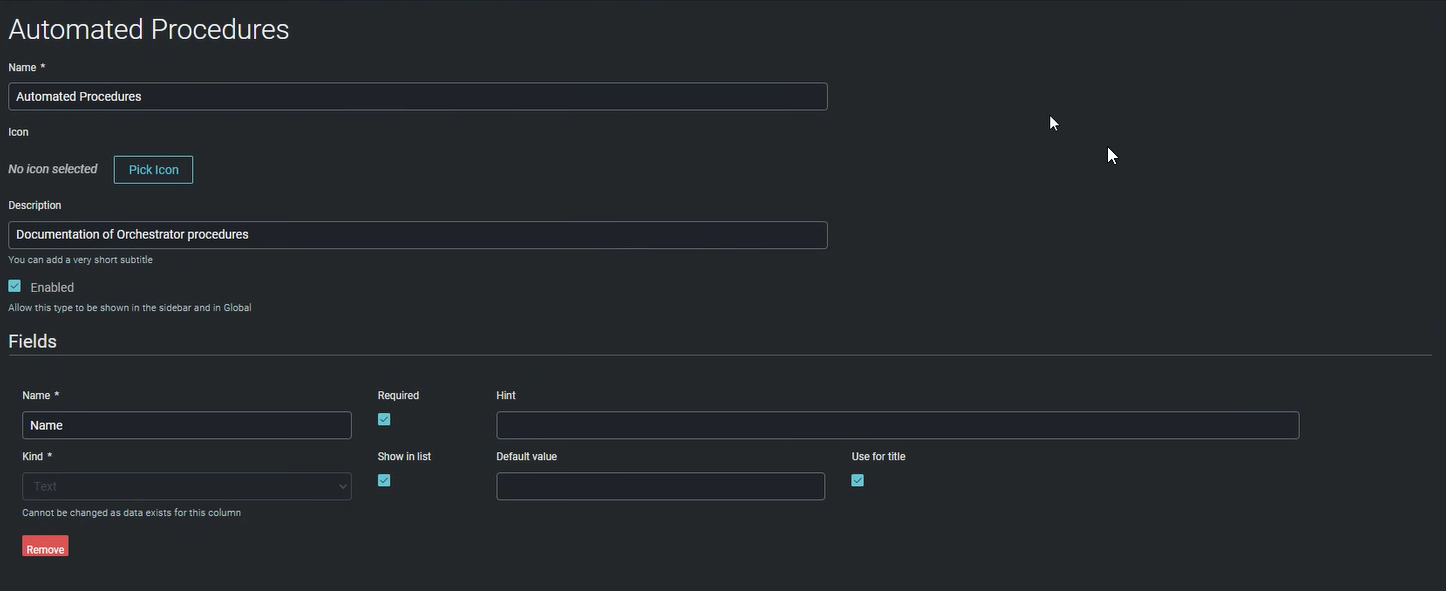
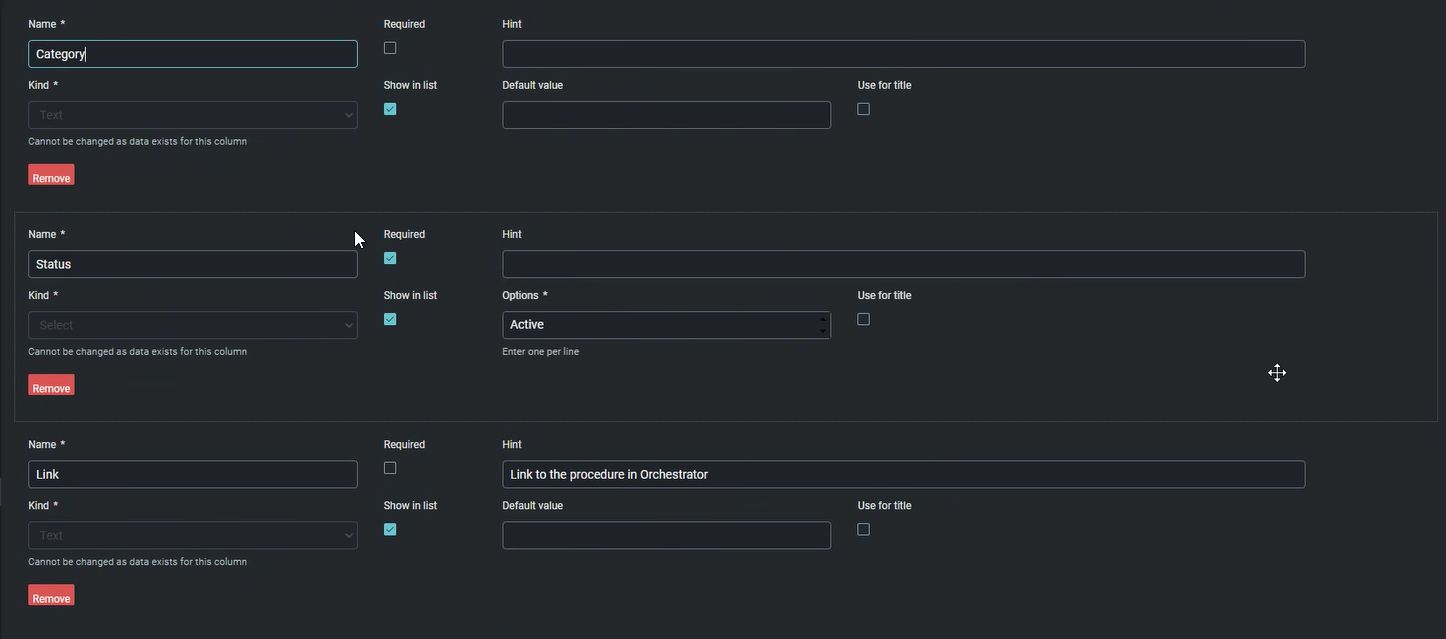
- Click "Save".
Intro
SharePoint is a web-based collaborative platform which is primarily used for document storage and company intranet sites. Using Pia, you can create automations which utilise SharePoint.
While there is a SharePoint Integration in Pia, strictly speaking it is not required for you to use SharePoint in your automations and will be deprecated in the near future. Regardless of whether you configure the Integration, you will need to make sure any client SharePoint sites you wish to integrate with have been appropriately authorised for Pia to access them.
This article covers the steps for how you can authorise your clients to grant access to Pia
For any assistance, feel free to reach out to the Pia Team via Partner Support.
Authorise Pia to Access Your SharePoint Sites
You will need to run the below command for each SharePoint site you wish to authorise for Pia to access.
The below command for "Grant-PnPAzureADAppSitePermission" will require the Pia AppId which you can obtain with the following steps:
- Navigate to the clients screen in the Pia Partner Portal
- Open a Client
- Click the Authorise (or "ReAuthorise") button
- This will take you to a Microsoft login page - there is no need to complete the consent process, you just need to copy the "client_id" value from the URL (as below) and replace the "PIA ID HERE" below with the value:

In the above example, the "PIA ID HERE" value will be "53cbd83e-e6cc-4458-bdbb-d77ff11dad30"
- Using PowerShell, run Install-Module PnP.PowerShell -Scope CurrentUser on your PC
- Run the "Connect-PnPOnline TENANTNAME.sharepoint.com -Interactive" command, replacing "TENANTNAME" with the name of the Office365 tenant for you wish to authorise
- Authenticate with a SharePoint admin account for the purpose of this authorisation process
- Run the following command: Grant-PnPAzureADAppSitePermission -AppId "PIA ID HERE" -DisplayName "Pia App" -Permissions Write -Site "https://TENANTNAME.sharepoint.com/sites/SITENAME"
If you wish to grant Pia access to the SharePoint admin center, you will also need to run the command above against the admin site - just use the URL: "https://TENANTNAME-admin.sharepoint.com" for the "Site" parameter in the command above.
The Grant-PnPAzureADAppSitePermission command has some other options which you can read about here: https://pnp.github.io/powershell/cmdlets/Grant-PnPAzureADAppSitePermission.html
Set Up Process
Here is a quick intro to setting up a new Integration. Details for the fields specific to each service are on the pages linked below.
Summary of the set up process
- Set-up Integration
- Test Integration
Set-up Integration
Log in to your Pia portal.
In the left menu click on Integrations
The Integrations page opens. Search for SharePoint using the search bar at the top.

Or, click on the "View All" button available in the All Integration section.
This will open up a screen that displays all the available integrations where you can navigate to SharePoint.
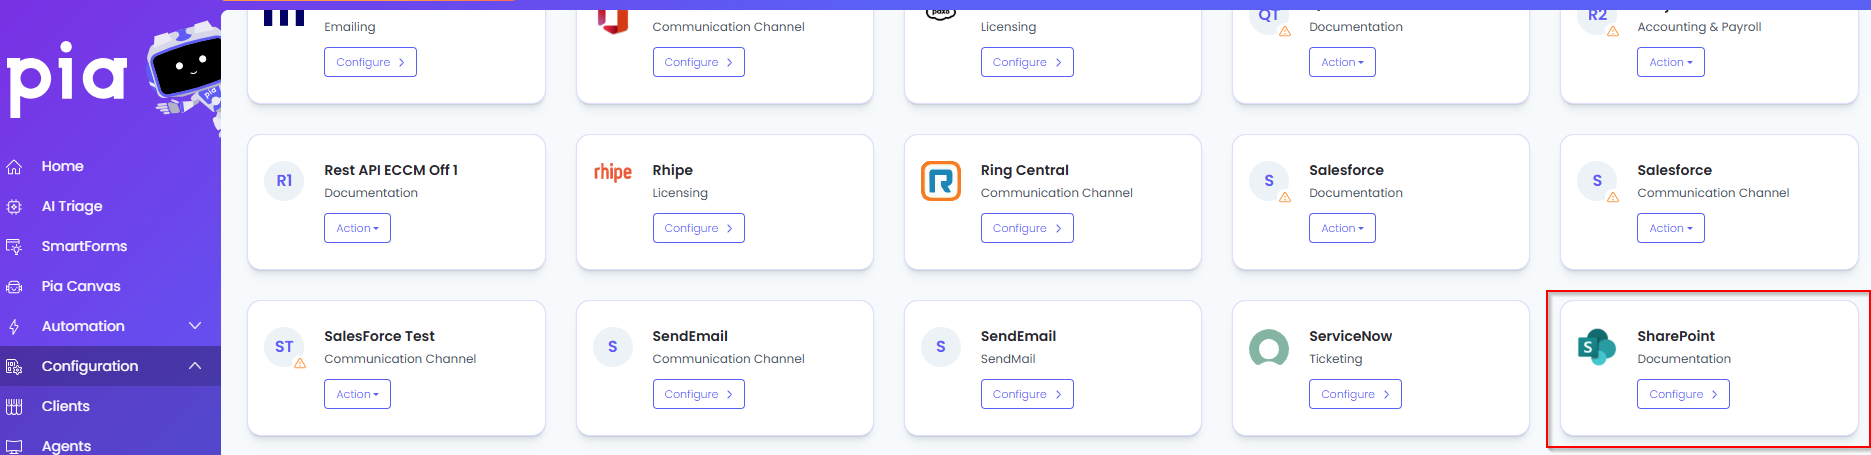
Click on the "Configure" button available in the widget for SharePoint. This will take you to the configuration page for SharePoint.

In this page, you can add a friendly name for the configuration in the "Configuration Name" field.

You will also see the following fields that need to be configured for SharePoint.
- SharePoint URL: Enter your company's SharePoint URL
- Tenant Id: Enter your Tenant Id for SharePoint
- Click Save to commit the settings. (If any mandatory fields have been left blank you will receive an error message, and the missed field will have a red box around them.)
Test Integration
After setting up your Integration for SharePoint you will need to test the connection works.
Click the Test Connection button to confirm the Integration has been configured correctly.
You should receive a Connection Successful! popup box. If you receive a Can't connect to service. message, double-check the configuration details and try again.
The SharePoint Integration configuration is now complete.
- Manage Protect
- Mimecast
- SpamTitan
Intro
Manage Protect is an emailing service. This page guides you through the process of setting up an integration via the Manage Protect API.
For any assistance, feel free to reach out to the Pia Team via Partner Support.
Prerequisites
You will need the following details before setting up your Manage Protect integrations. (More details about these items can be found where you enter them in the sections below.)
- MP Authentication Token
- App ID
Set Up Process
Here is a quick intro to setting up a new Integration. Details for the fields specific to each service are on the pages linked below.
Set-up Integration
Log in to your Pia portal.
In the left menu click on Integrations
The integration page opens.
Search for Manage Protect using the search bar at the top.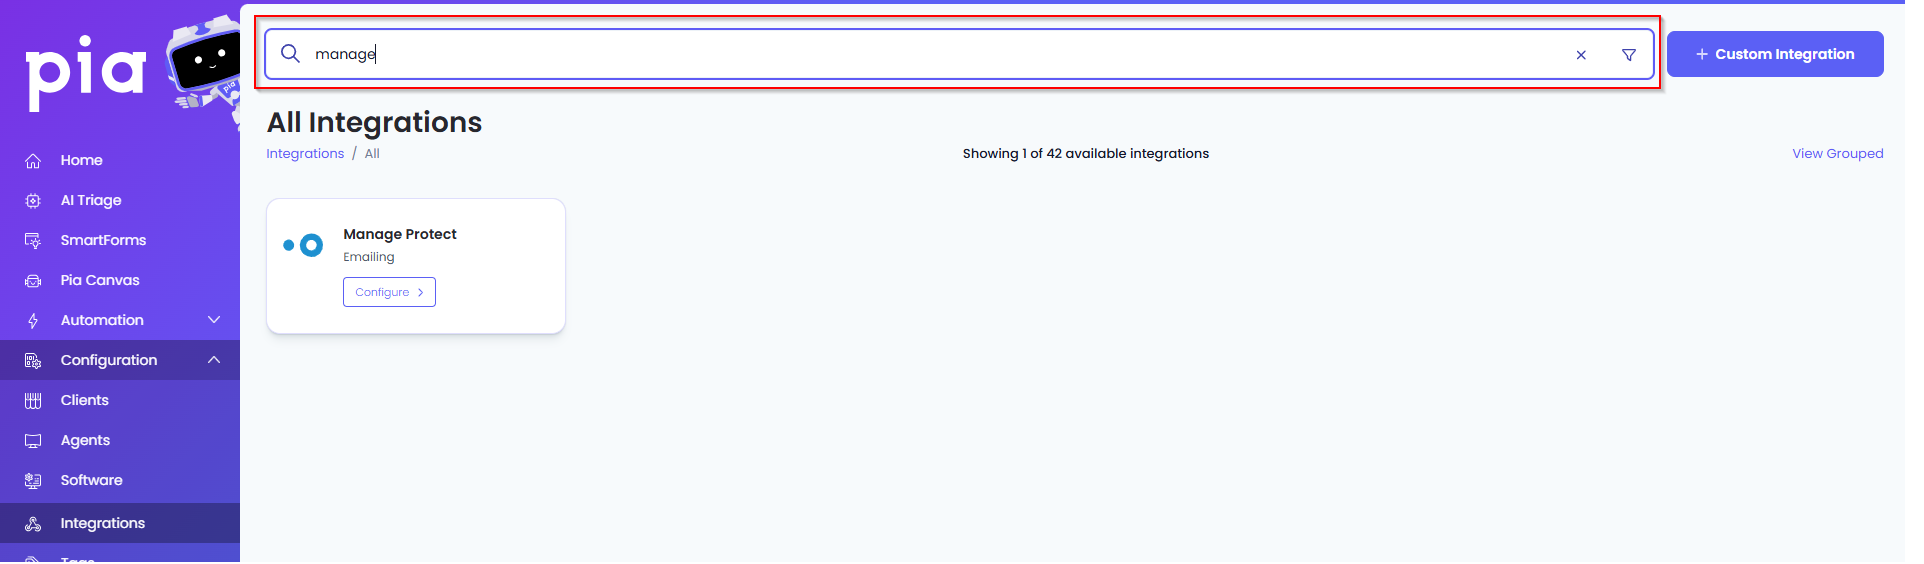
Or, click on the "View All" button available in the All Integration section.
This will open up a screen that displays all the available integrations where you can navigate to Manage Protect.
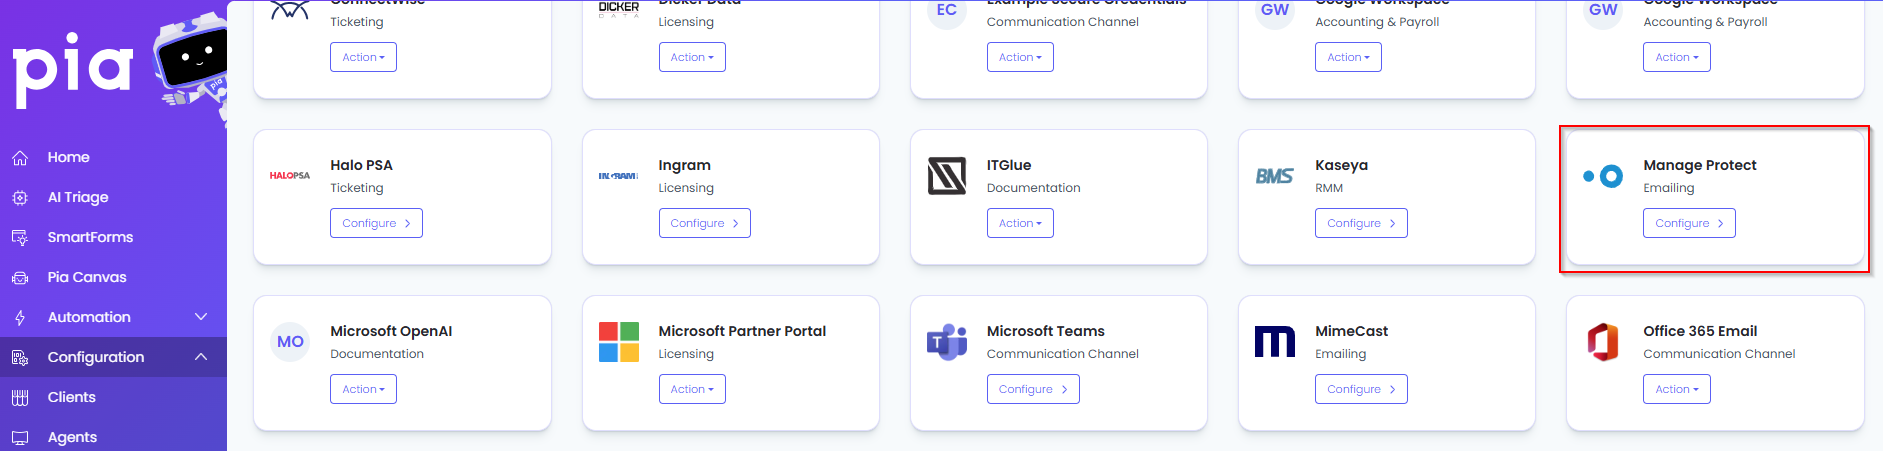
Click on the "Configure" button available in the widget for Manage Protect. This will take you to the configuration page for Manage Protect.

In this page, you can add a friendly name for the configuration in the "Configuration Name" field.
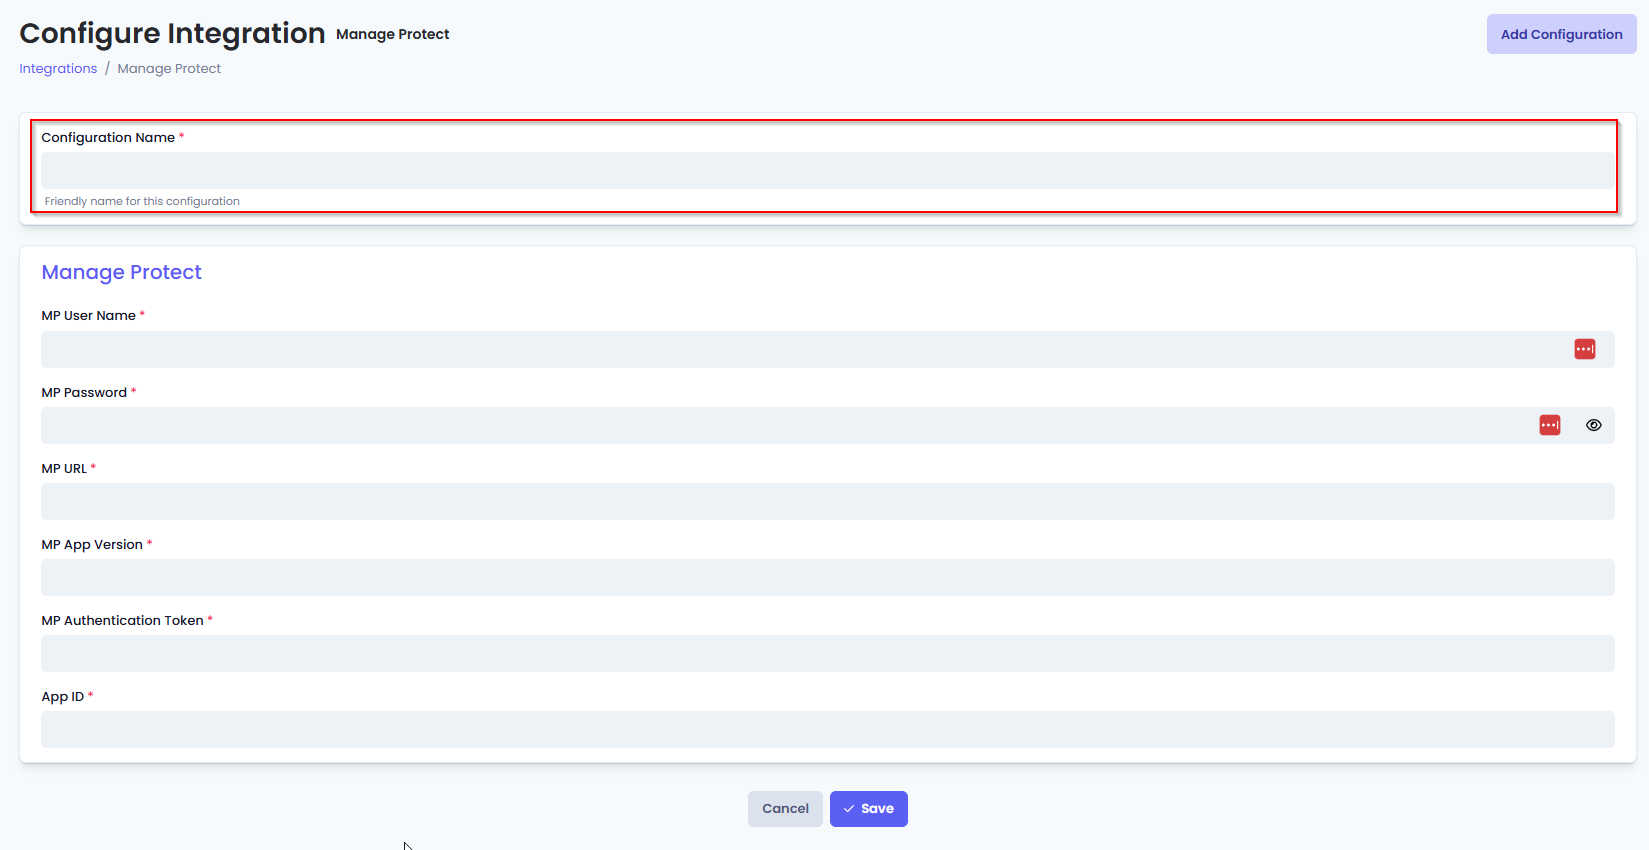
You will also see the following fields that need to be configured for Manage Protect.
- MP User Name: Enter the primary email address that has access to the Manage Protect Account.
- MP Password: Enter the password for the above user name. This is provided by Manage Protect.
- MP URL: Enter the API URL for your Manage Protect Instance.
- MP App version: Enter the current application version you are using for Manage Protect.
- MP Authentication Token: This is the token you have received initially from Manage Protect.
- MP App ID: Enter the Bot Token you have received from Manage Protect
Click Save to commit the settings. (If any mandatory fields have been left blank you will receive an error message, and the missed field will have a red box around them.)

Intro
Mimecast is an emailing service. This page guides you through the process of setting up an integration via the Mimecast API.
For any assistance, feel free to reach out to the Pia Team via Partner Support.
Prerequisites
You will need the following details before setting up your Mimecast integrations. (More details about these items can be found where you enter them in the sections below.)
- Application ID
- Application Secret
- Access Key
- Secret Key
Obtaining the API Credentials from Mimecast
You may follow the steps at Mimecast documentation: Mimecast Authentication
A short process is included below, however please be aware that the vendor application may change and you would be best to consult the vendor documentation for this information.
- Login to the Administration Console and Create a New User
- Add the user to an Administrative Role
- Create a new group and add your new user
- Create a new Authentication Profile
- Create a new Application Setting
- Get your authentication token
For more information on each of the above steps, refer to the linked Mimecast documentation.
Set Up Process
Here is a quick intro to setting up a new Integration. Details for the fields specific to each service are on the pages linked below.
Set-up Integration
Log in to your Pia portal.
In the left menu click on Integrations
The integration page opens.
Search for Mimecast using the search bar at the top.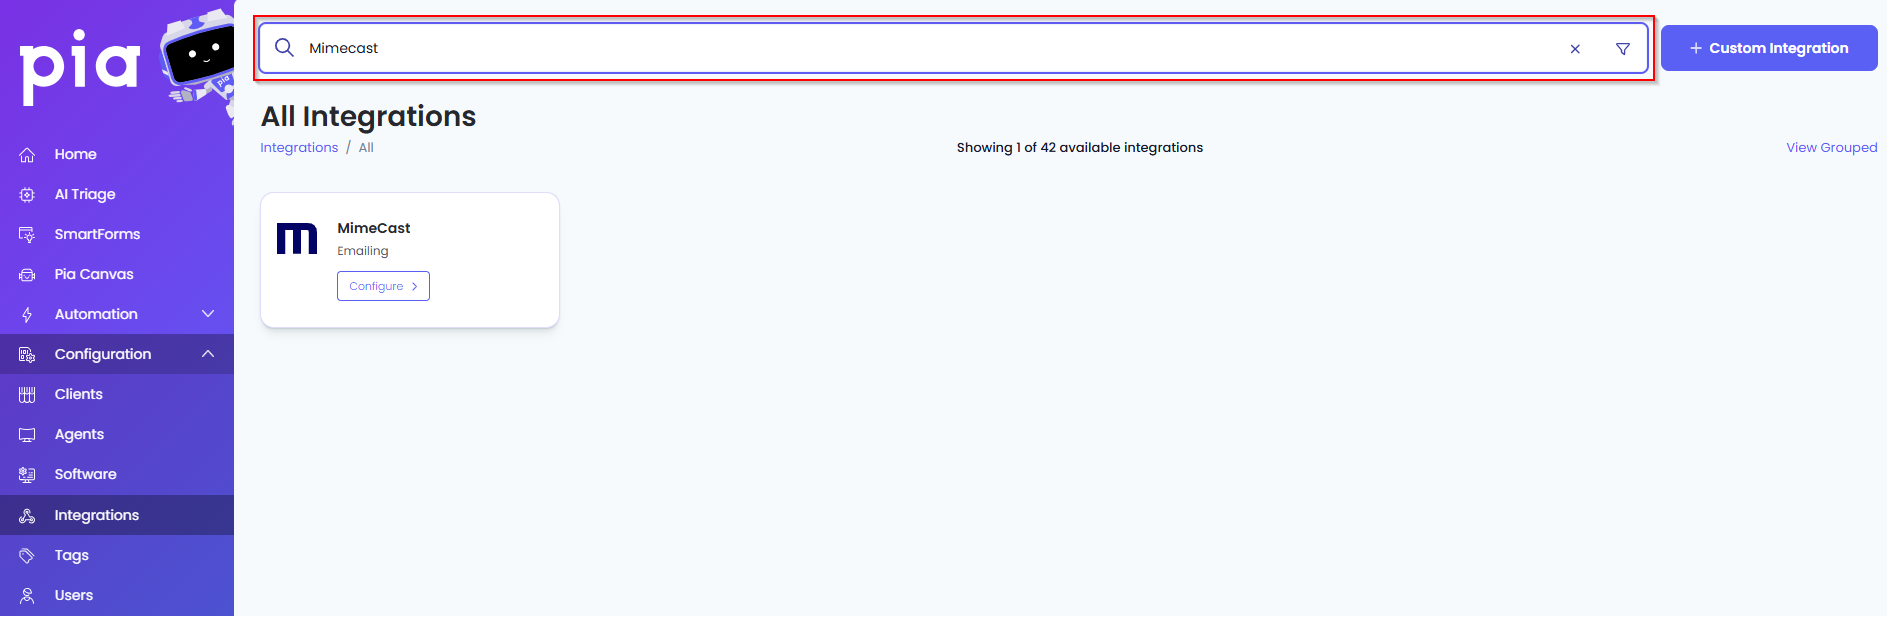
Or, click on the "View All" button available in the All Integration section.
This will open up a screen that displays all the available integrations where you can navigate to Mimecast.
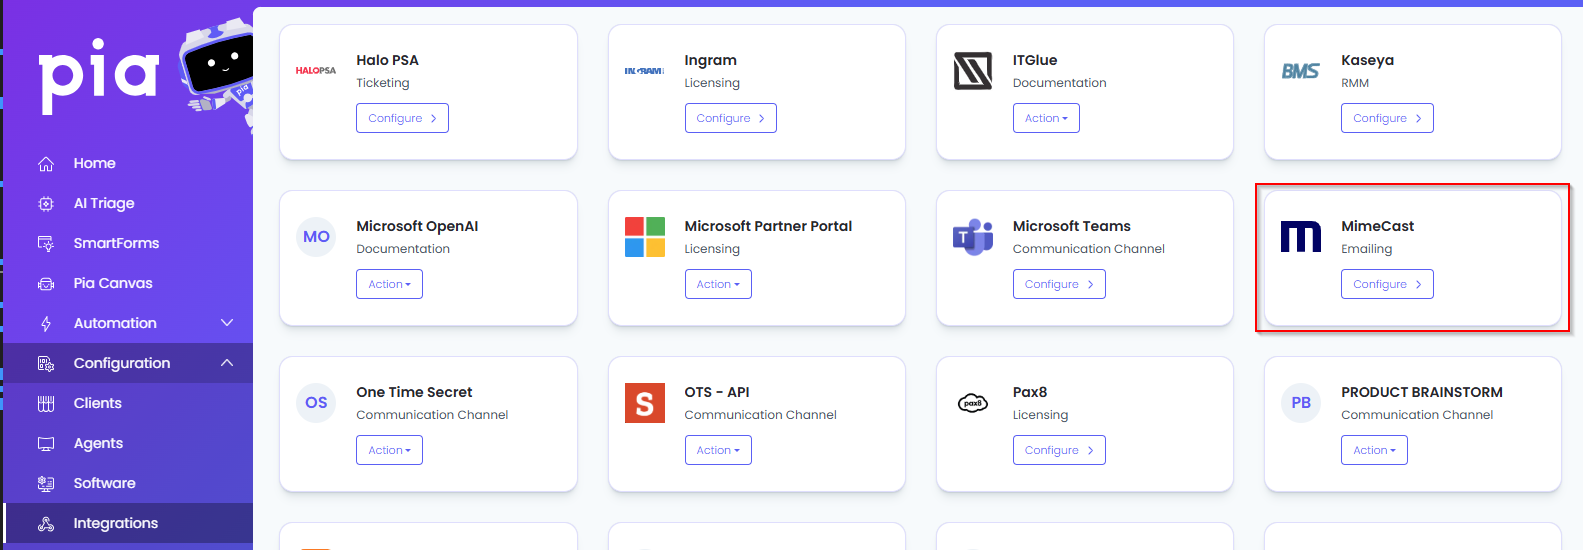
Click on the "Configure" button available in the widget for Mimecast. This will take you to the configuration page for Mimecast.

In this page, you can add a friendly name for the configuration in the "Configuration Name" field.
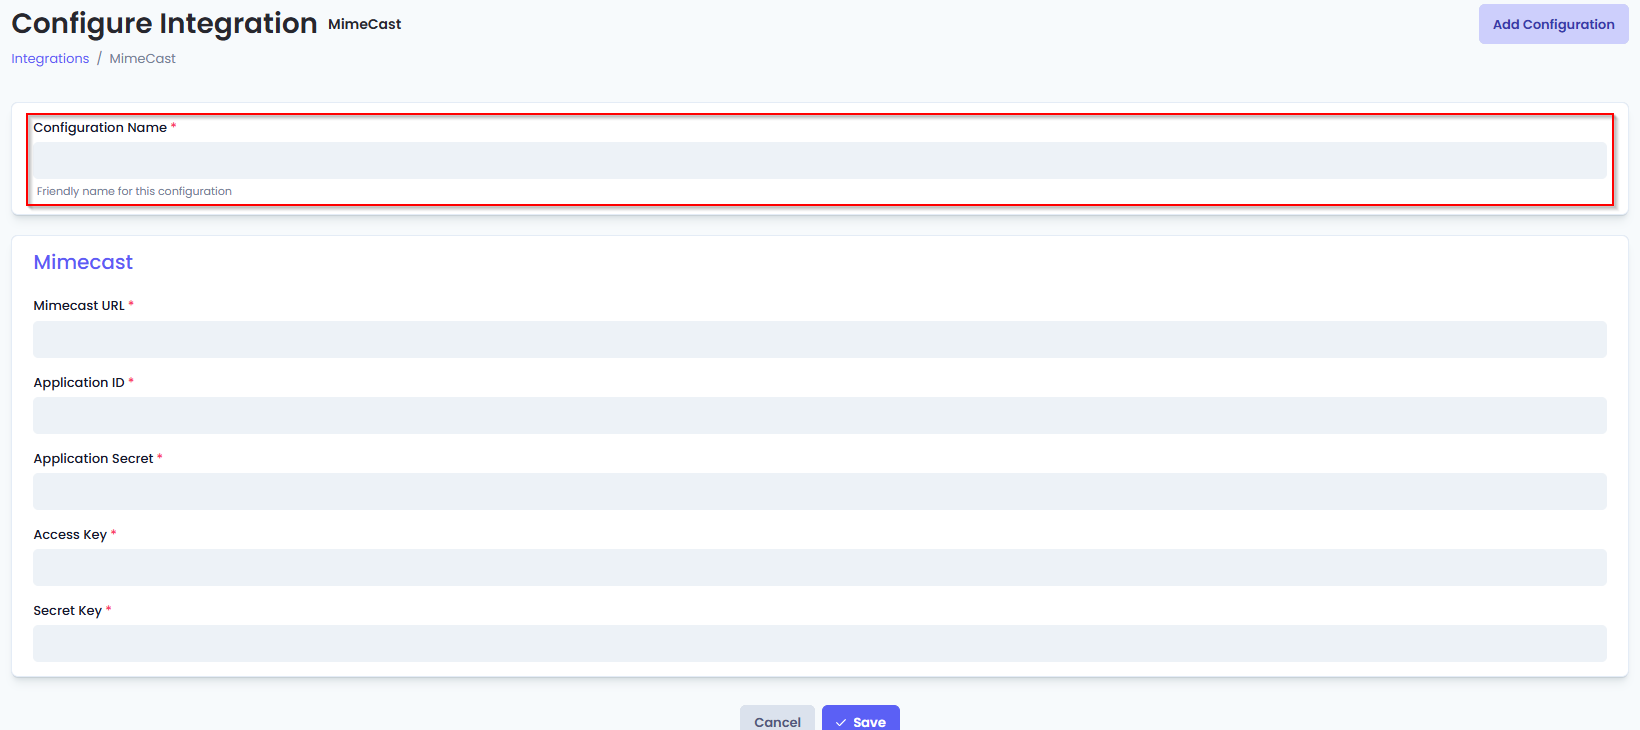
- You will also see the following fields that need to be configured for Mimecast.
- Mimecast URL: This is the URL for your Mimecast API based on the region. For region specific URLs, refer to this link.
- Application ID: This is a Registered Application ID which is generated when you create a new user account in Mimecast.
- Application Secret: This is the Application Secret for your Registered Application.
- Access Key: This value is generated when you create a new user account in Mimecast.
- Secret Key: This value is generated when you create a new user account in Mimecast.
Follow the steps in this link to generate the above values.
- Click Save to commit the settings. (If any mandatory fields have been left blank you will receive an error message, and the missed field will have a red box around them.)
Intro
SpamTitan is an emailing service. This page guides you through the process of setting up an integration via the SpamTitan API.
For any assistance, feel free to reach out to the Pia Team via Partner Support.
Prerequisites
You will need the following details before setting up your SpamTitan integrations. (More details about these items can be found where you enter them in the sections below.)
- SpamTitan ID
- SpamTitan Token
Obtaining the API Tokens from SpamTitan
You may follow the steps at SpamTitan documentation: SpamTitan Gateway
A short process is included below, however please be aware that the vendor application may change and you would be best to consult the vendor documentation for this information.
- Go to Settings > User Management > RestAPI Keys to view, add and revoke tokens.
For more information on each of the above steps, refer to the linked SpamTitan documentation.
Set Up Process
Here is a quick intro to setting up a new Integration. Details for the fields specific to each service are on the pages linked below.
Set-up Integration
Log in to your Pia portal.
In the left menu click on Integrations
The integration page opens.
Search for SpamTitan using the search bar at the top.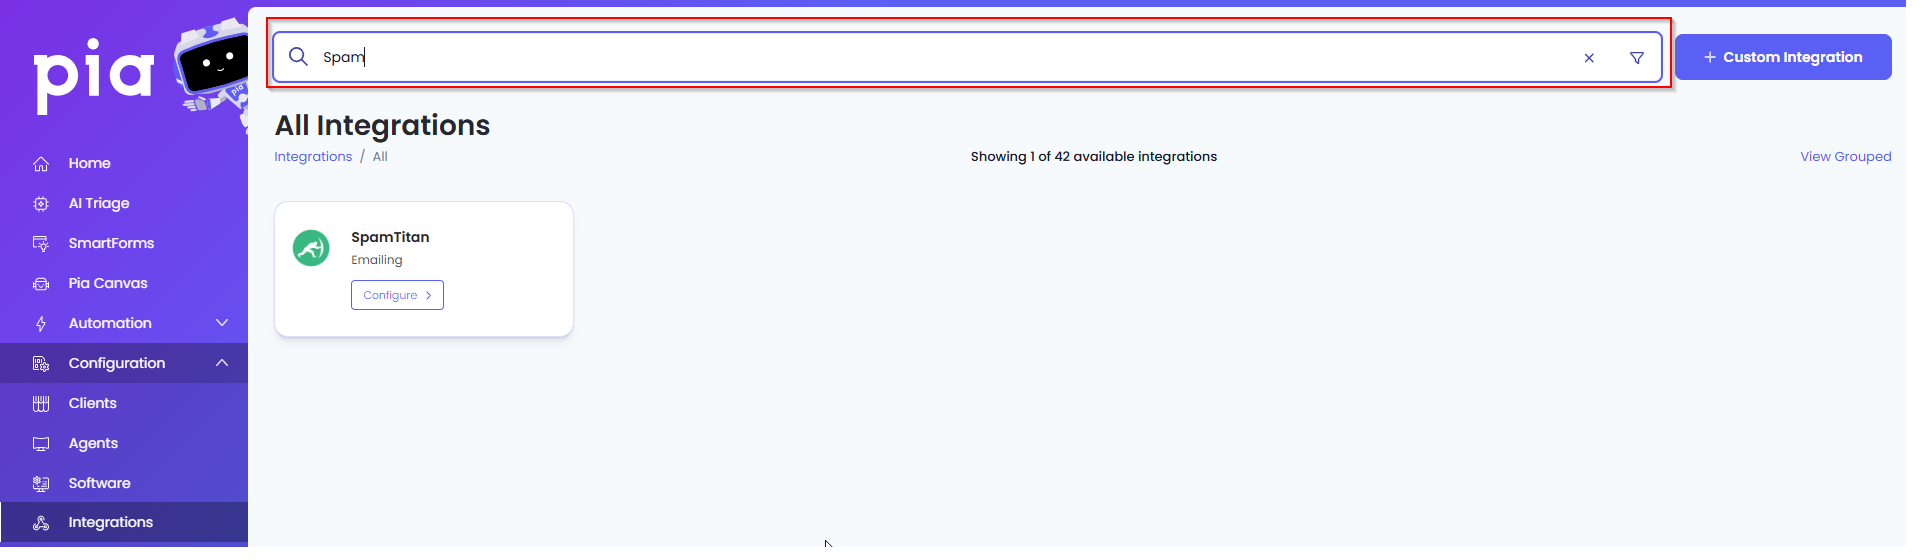
Or, click on the "View All" button available in the All Integration section.
This will open up a screen that displays all the available integrations where you can navigate to SpamTitan.
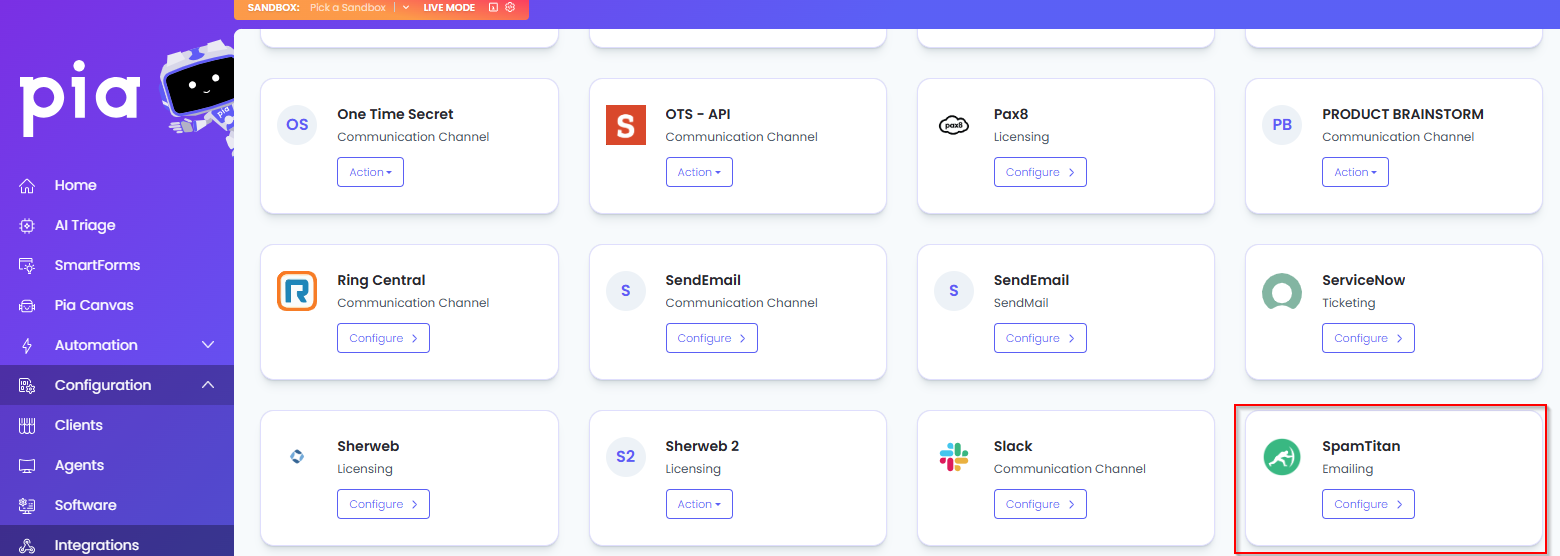
Click on the "Configure" button available in the widget for SpamTitan. This will take you to the configuration page for SpamTitan.

In this page, you can add a friendly name for the configuration in the "Configuration Name" field.
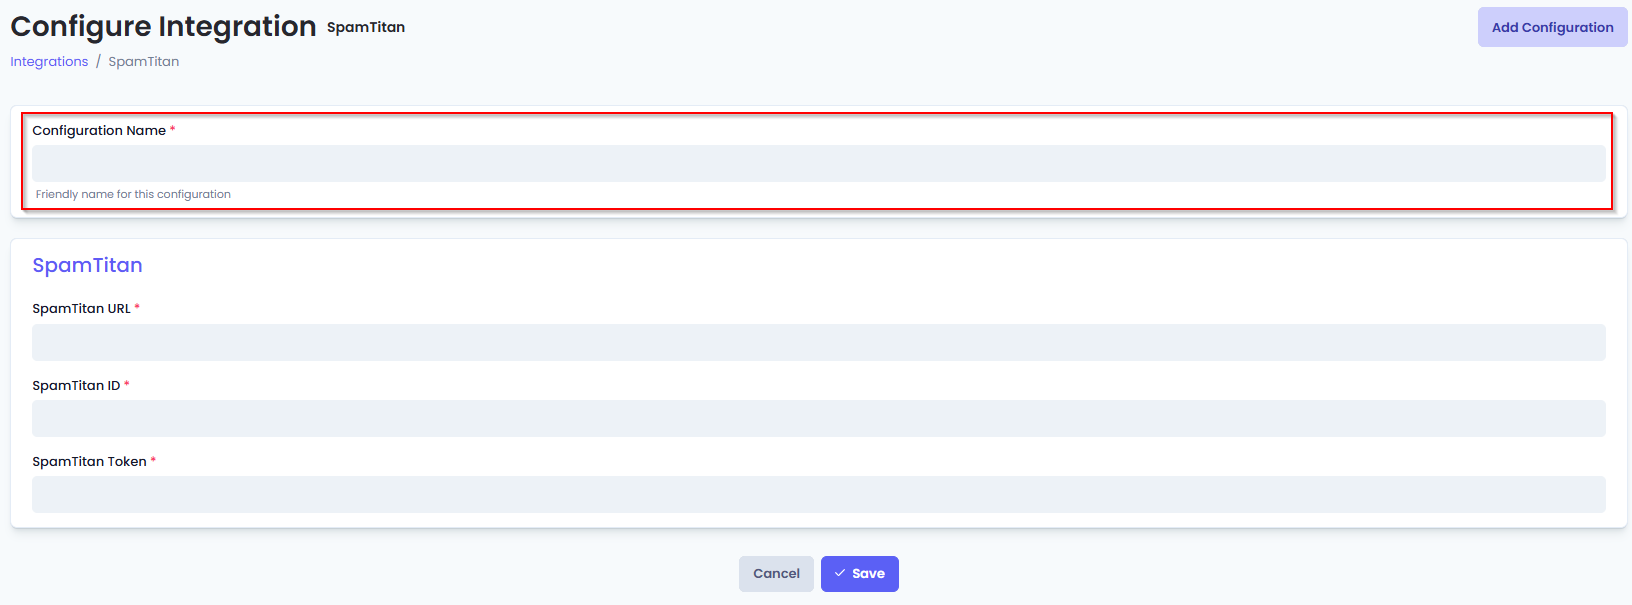
You will also see the following fields that need to be configured for SpamTitan.
- SpamTitan URL: Enter the URL for your SpamTitan Instance.
- Application ID: Enter the Token ID generated for your SpamTitan Account.
- SpamTitan Token: Enter the Token generated for your SpamTitan Account.
Click Save to commit the settings. (If any mandatory fields have been left blank you will receive an error message, and the missed field will have a red box around them.)
- Dicker Data
- Ingrammicro
- Microsoft Partner Portal
- Pax8
- Rhipe
Intro
Dicker Data is a Cloud Service Provider Licensing service. This page guides you through the process of setting up an integration via the Dicker Data API.
For any assistance, feel free to reach out to the Pia Team via Partner Support.
Prerequisites
You will need the following details before setting up your Dicker Data integration. (More details about these items can be found where you enter them in the sections below.)
- Dicker Data Api Url
- Dicker Data Account Code
- Dicker Data Access Token
Obtaining the API Credentials from Dicker Data
You may follow the steps at Dicker Data documentation: Requesting Dicker Data API
A short process is included below, however please be aware that the vendor application may change and you would be best to consult the vendor documentation for this information.
- Email integration.support@dickerdata.com.au, requesting access from Dicker Data's integration support team.
- Make sure to include the following information in your request:
- Company name
- Account number
- Technical contact name
Dicker Data’s support team will provide the Access Code once API access is granted.
Set Up Process
Here is a quick intro to setting up a new integration. Details for the fields specific to each service are on the pages linked below.
Summary of the set up process
- Set-up integration
- Test integration
Set-up integration
Log in to your Pia portal.
In the left menu click on integrations
The integration page opens.
Search for Dicker Data using the search bar at the top.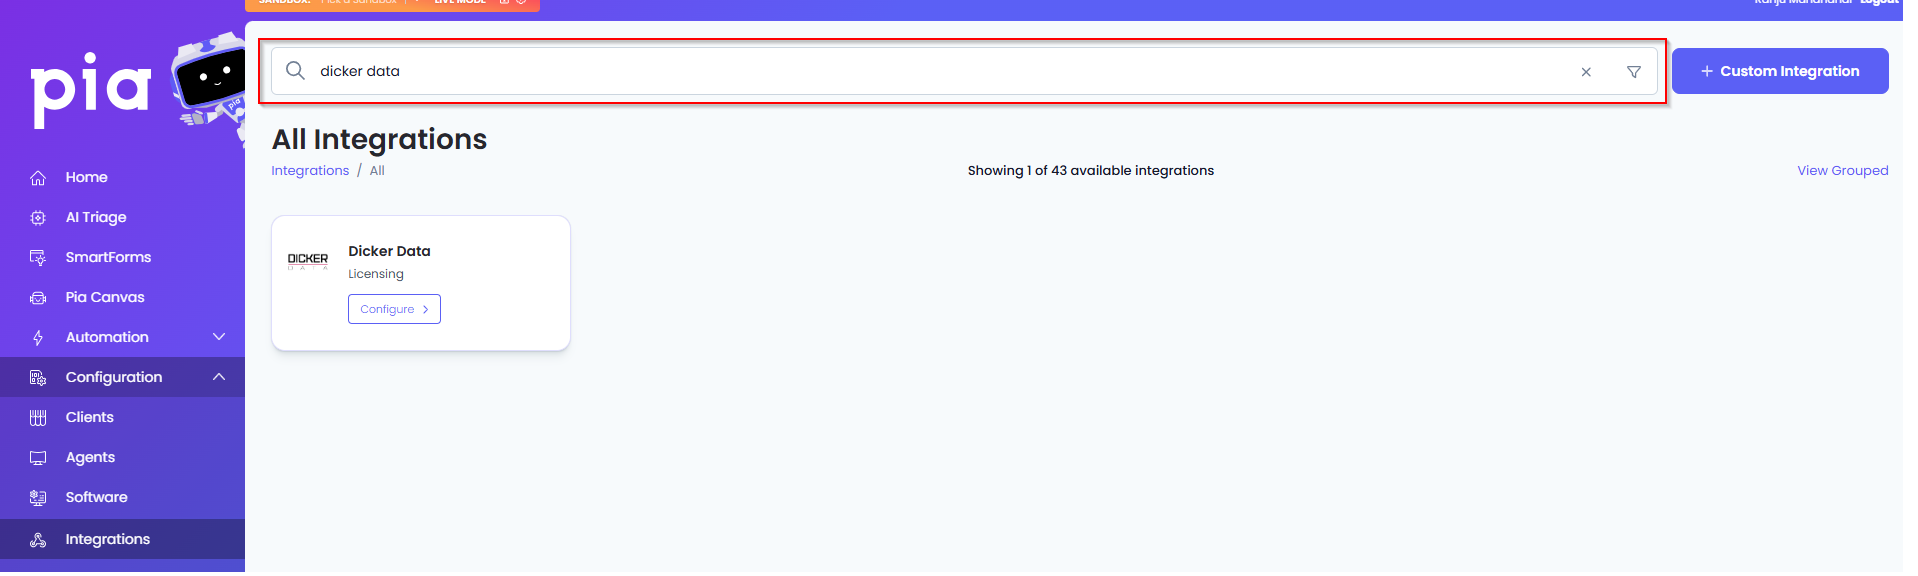
Or, click on the "View All" button available in the All Integration section.
This will open up a screen that displays all the available integrations where you can navigate to Dicker Data.
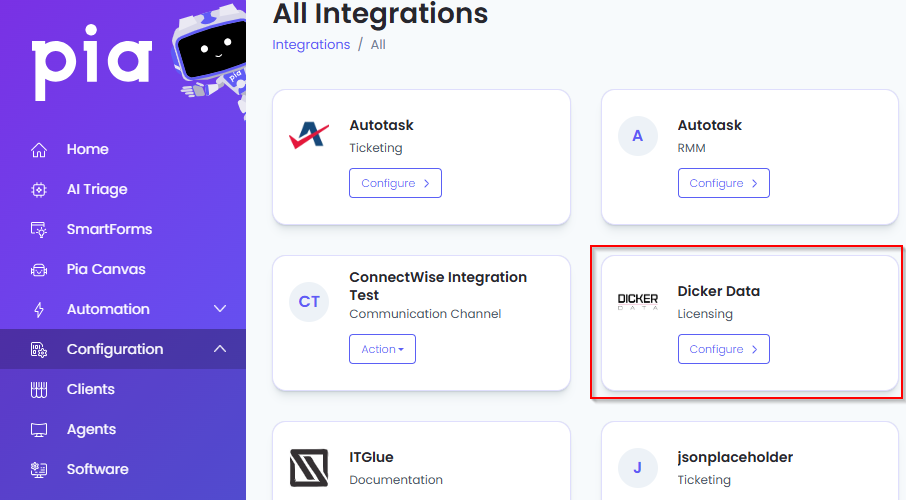
Click on the "Configure" button available in the widget for Dicker Data. This will take you to the configuration page for Dicker Data.

In this page, you can add a friendly name for the configuration in the "Configuration Name" field.
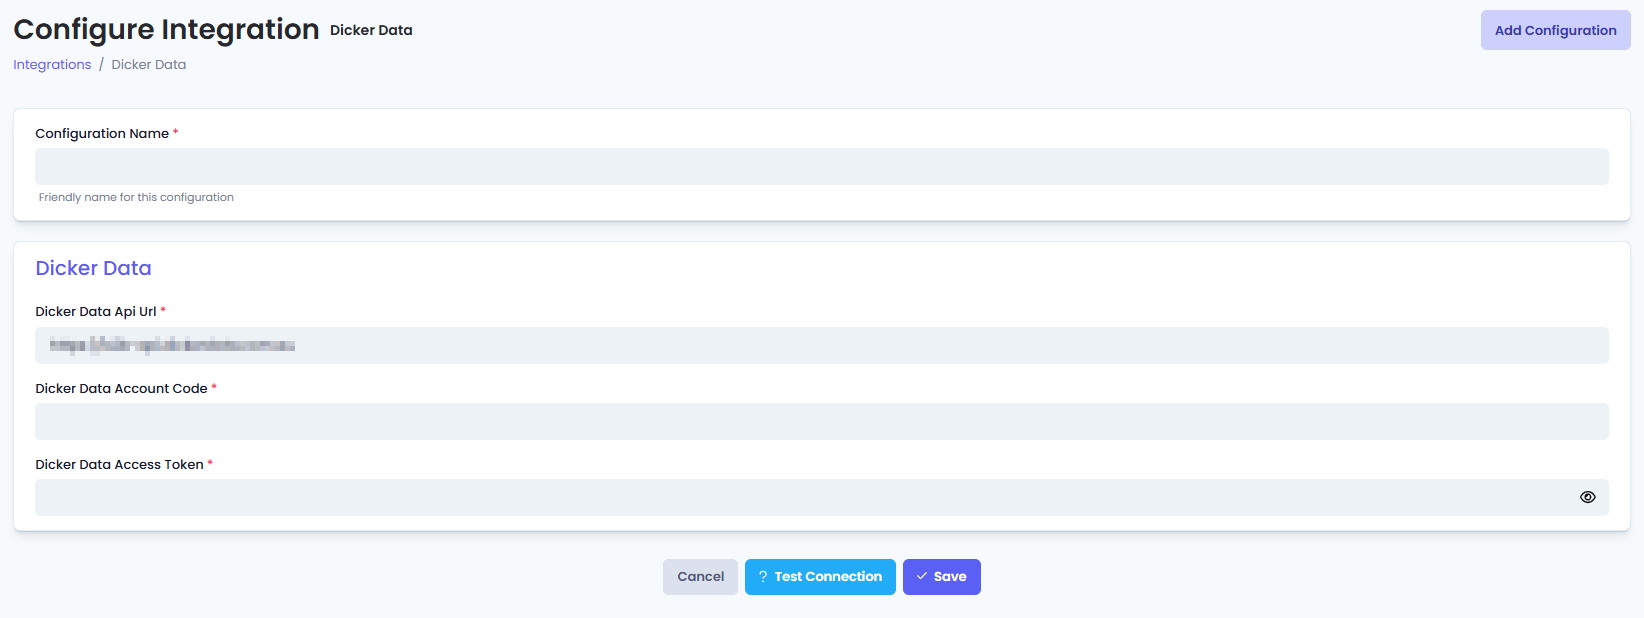
You will also see the following fields that need to be configured for Dicker Data.
- Dicker Data Api Url: Enter the URL of the Dicker Data API including the API version with no following slash (e.g. https://b2b-api.dickerdata.com.au - use this value if you aren't sure what to put in.)
- Dicker Data Account Code: Enter your account code which is retrieved when creating an account with the vendor.
- Dicker Data Access Token: Enter the access token provided by the vendor which are retrieved by following the steps mentioned above in this article.
Click Save to commit the settings. (If any mandatory fields have been left blank you will receive an error message, and the missed field will have a red box around them.)

Test integration
After setting up your integration for Dicker Data you will need to test the connection works.
Click the Test Connection button to confirm the integration has been configured correctly.

You should receive a Connection Successful! popup box. If you receive a Can't connect to service. message, double-check the configuration details and try again.
The Dicker Data integration configuration is now complete.
Intro
Ingram Micro is a Licensing provider. This page guides you through the process of setting up an integration via the Ingram Micro API.
For any assistance, feel free to reach out to the Pia Team via Partner Support.
Prerequisites
You will need the following details before setting up your Ingram Micro integrations. (More details about these items can be found where you enter them in the sections below.)
- Ingram API Url
- Ingram Subscription Key
- Ingram Marketplace
- Ingram Username
- Ingram Password
Obtaining the API Credentials from Ingram Micro
You may follow the steps at Ingram Micro documentation: Ingram Micro API documentation
A short process is included below, however please be aware that the vendor application may change and you would be best to consult the vendor documentation for this information.
- Sign up for a developer account.
- Use the sandbox environment to learn and develop.
- Register your app.
- Access the production system.
Set Up Process
Here is a quick intro to setting up a new integration. Details for the fields specific to each service are on the pages linked below.
Summary of the set up process
- Set-up integration
- Test integration
Set-up integration
Log in to your Pia portal.
In the left menu click on integrations
The integration page opens.
Search for Ingram Micro using the search bar at the top.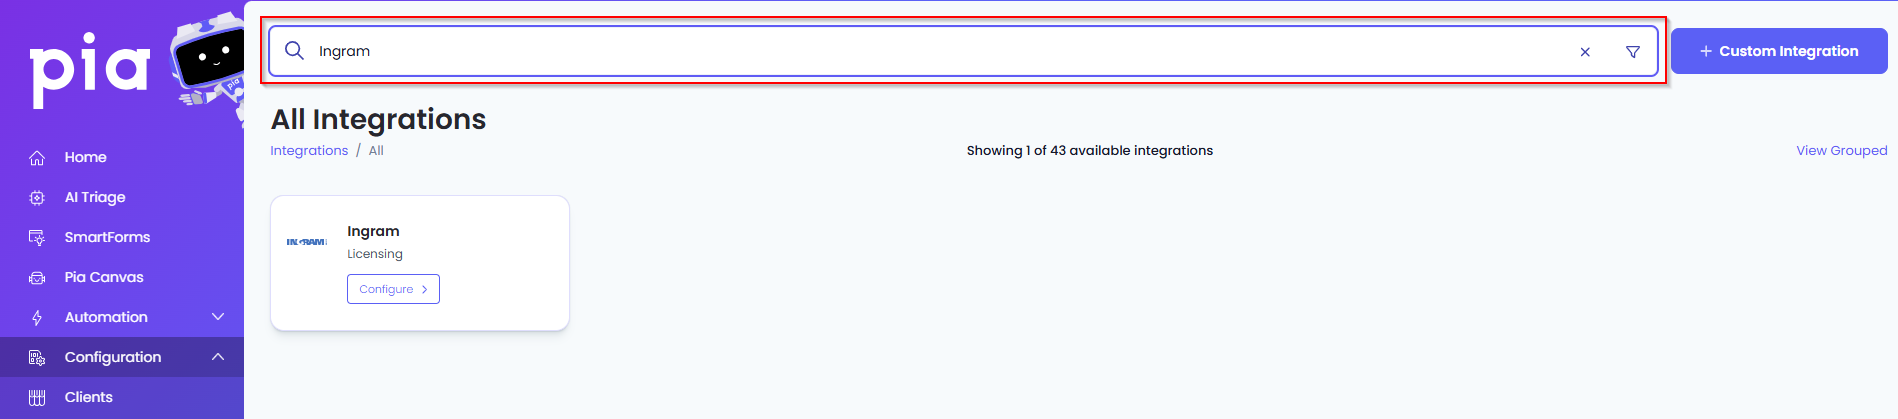
Or, click on the "View All" button available in the All Integration section.
This will open up a screen that displays all the available integrations where you can navigate to Ingram Micro.
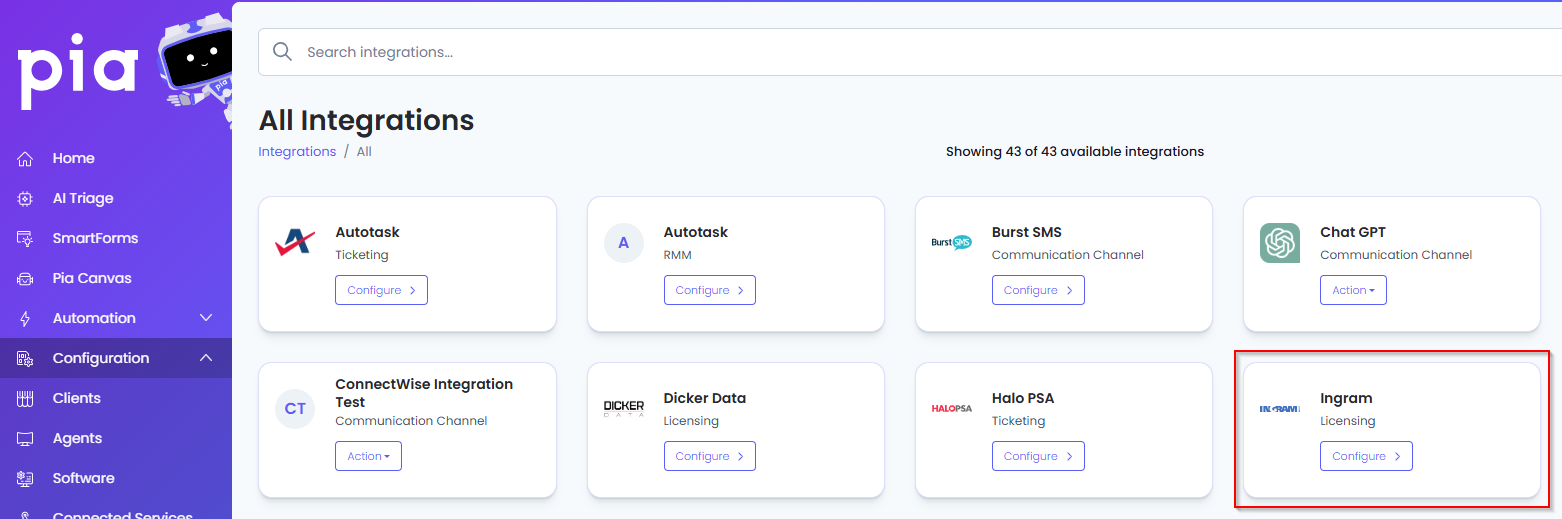
Click on the "Configure" button available in the widget for Ingram Micro. This will take you to the configuration page for Ingram Micro.

In this page, you can add a friendly name for the configuration in the "Configuration Name" field.
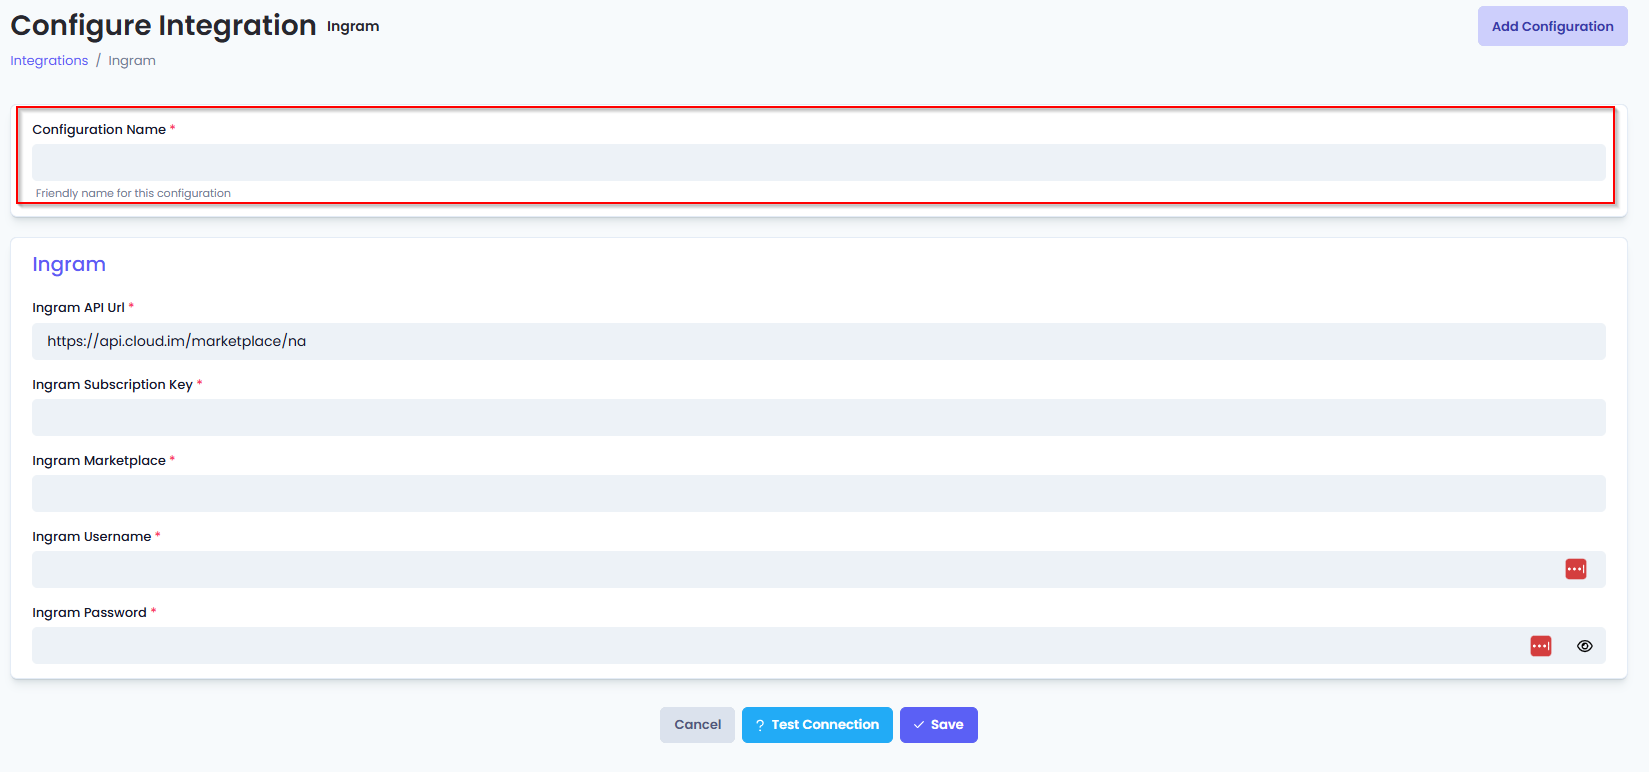
You will also see the following fields that need to be configured for Ingram Micro.
- Ingram API Url: Enter the URL of the Ingram API including the API version with no following slash (e.g. https://api.cloud.im/marketplace/na - use this value if you aren't sure what to put in.)
- Ingram Subscription Key: Enter your Subscription Key which is retrieved when creating an account with the vendor.
- Ingram Marketplace: You can get the code from the Reseller control panel URL, for example, https://api.cloud.im/marketplace/na. In this example, the code will be us for a US based reseller.
Here are some of the more common country codes:
Country Code Australia au Canada ca England/United Kingdom uk New Zealand nz United States us - Ingram Username: Enter your username that is used to log into your Ingrammicro Account.
- Ingram Password: Enter your password that is used to log into your Ingrammicro Account.
- Click Save to commit the settings. (If any mandatory fields have been left blank you will receive an error message, and the missed field will have a red box around them.)

Test integration
After setting up your integration for Ingram Micro you will need to test the connection works.
Click the Test Connection button to confirm the integration has been configured correctly.
You should receive a Connection Successful! popup box. If you receive a Can't connect to service. message, double-check the configuration details and try again.
The Ingram Micro integration configuration is now complete.
Intro
Microsoft Partner Portal is a Licensing service. This page guides you through the process of setting up an integration via the Microsoft Partner Portal API.
For any assistance, feel free to reach out to the Pia Team via Partner Support.
Prerequisites
You will need the following details before setting up your Microsoft Partner Portal integrations. (More details about these items can be found where you enter them in the sections below.)
- API Key
- App ID
Obtaining the API Credentials from Microsoft Partner Portal
Please note that you need to be a Global Administrator to retrieve the configuration values.
A short process is included below, however please be aware that the vendor application may change and you would be best to consult the vendor documentation for this information.
- Go to https://partner.microsoft.com
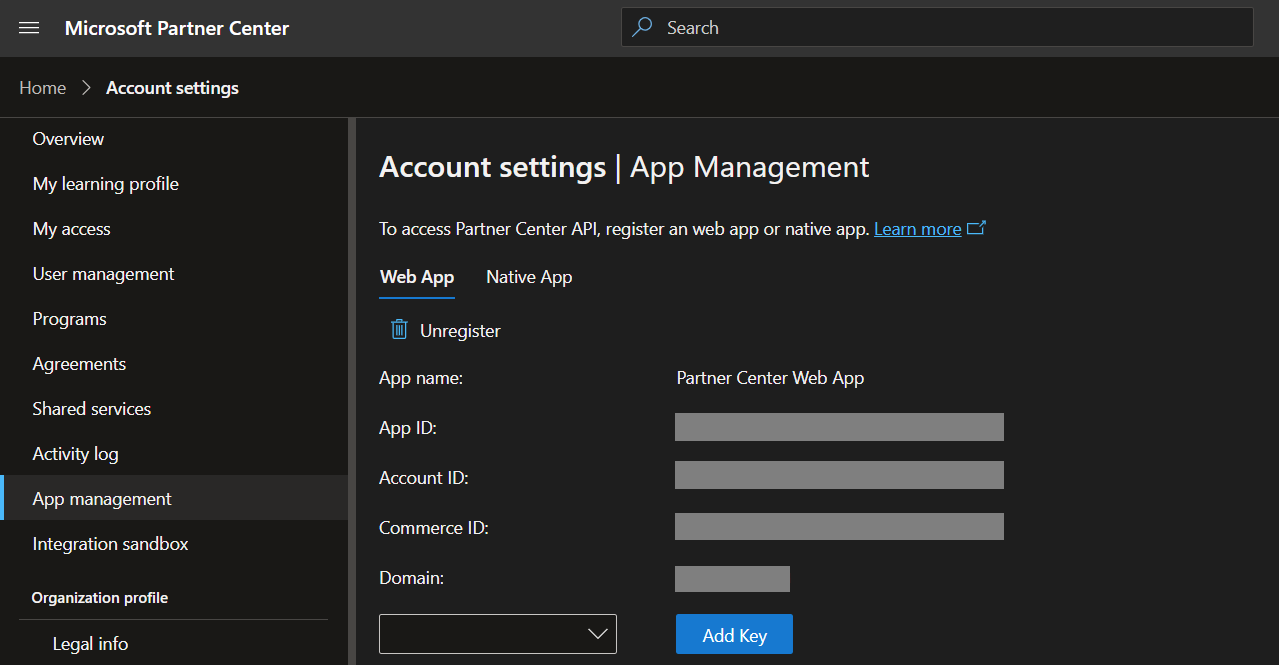
- Click on the "Gear" icon in the top right, and go to "Account settings"
- Go to "App Management" on the left hand menu
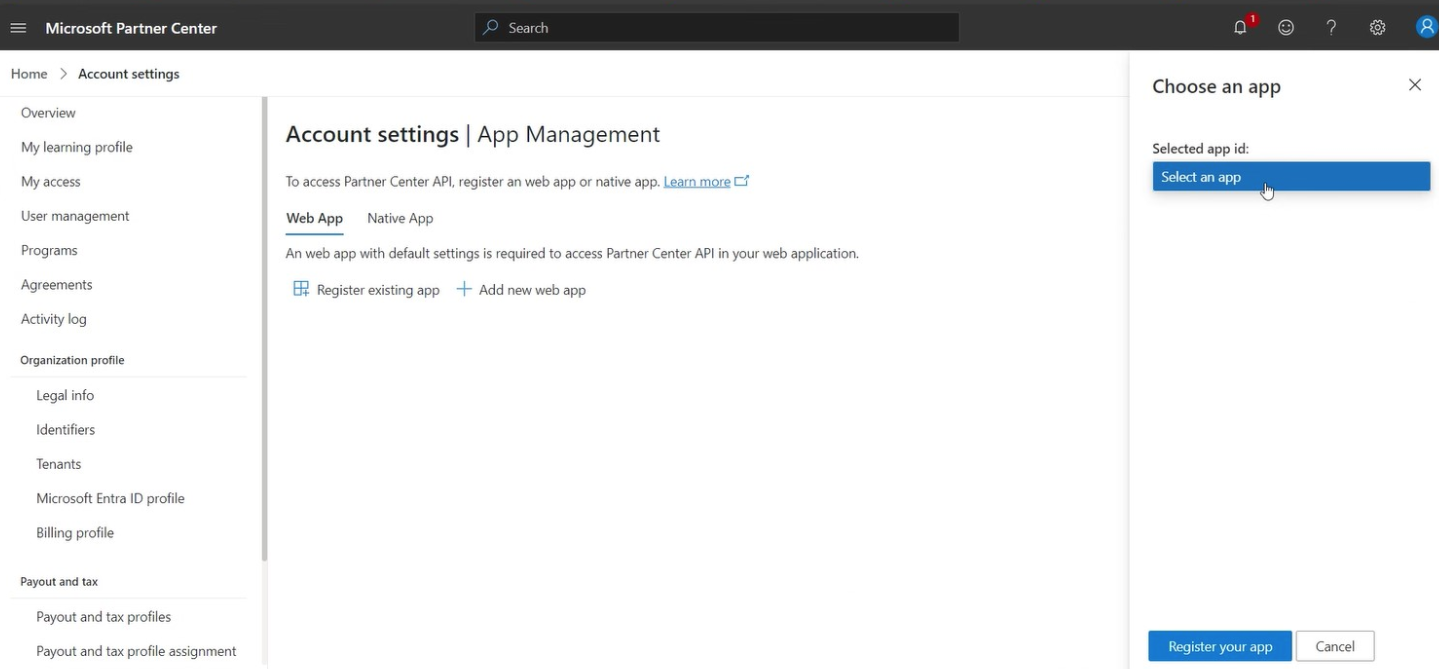
- If you do not have a "Web App" registered, Click the Add new web app button and follow the prompts.
 4. Select the drop down menu next to the "Add Key" button and select a Duration for the new key, then click the "Add Key" button.
5. Store the newly created Key in your companies password vault.
Set Up Process
Here is a quick intro to setting up a new Integration. Details for the fields specific to each service are on the pages linked below.
Summary of the set up process
- Set-up Integration
- Test Integration
Set-up Integration
Log in to your Pia portal.
In the left menu click on Integrations
The integration page opens.
Search for Microsoft Partner Portal using the search bar at the top.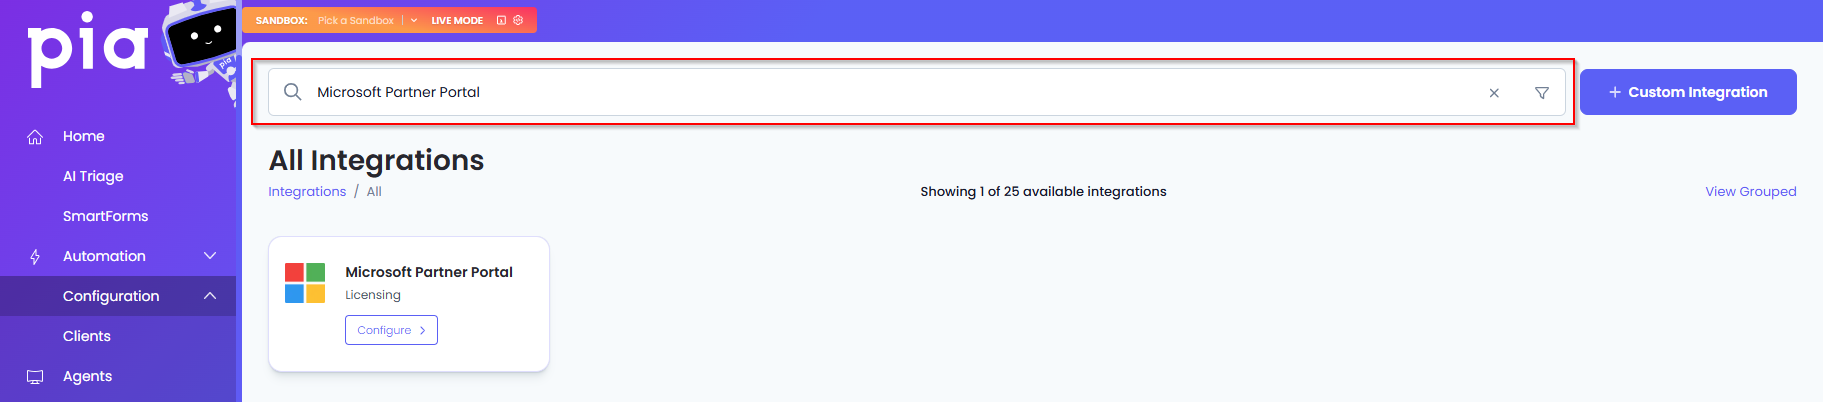
Or, click on the "View All" button available in the All Integration section.
This will open up a screen that displays all the available integrations where you can navigate to Microsoft Partner Portal.
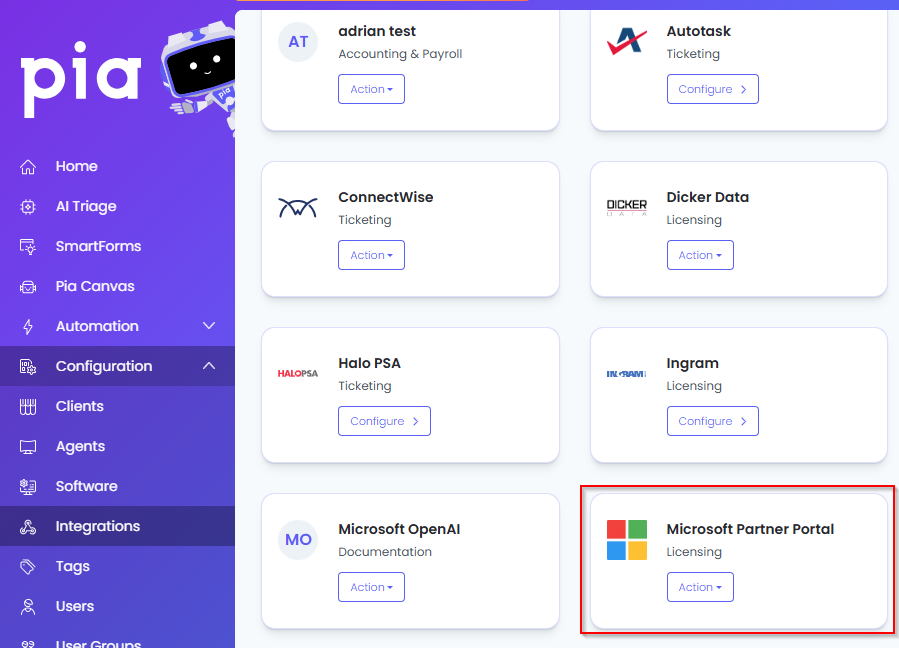
Click on the "Configure" button available in the widget for Microsoft Partner Portal. This will take you to the configuration page for Microsoft Partner Portal.

In this page, you can add a friendly name for the configuration in the "Configuration Name" field.
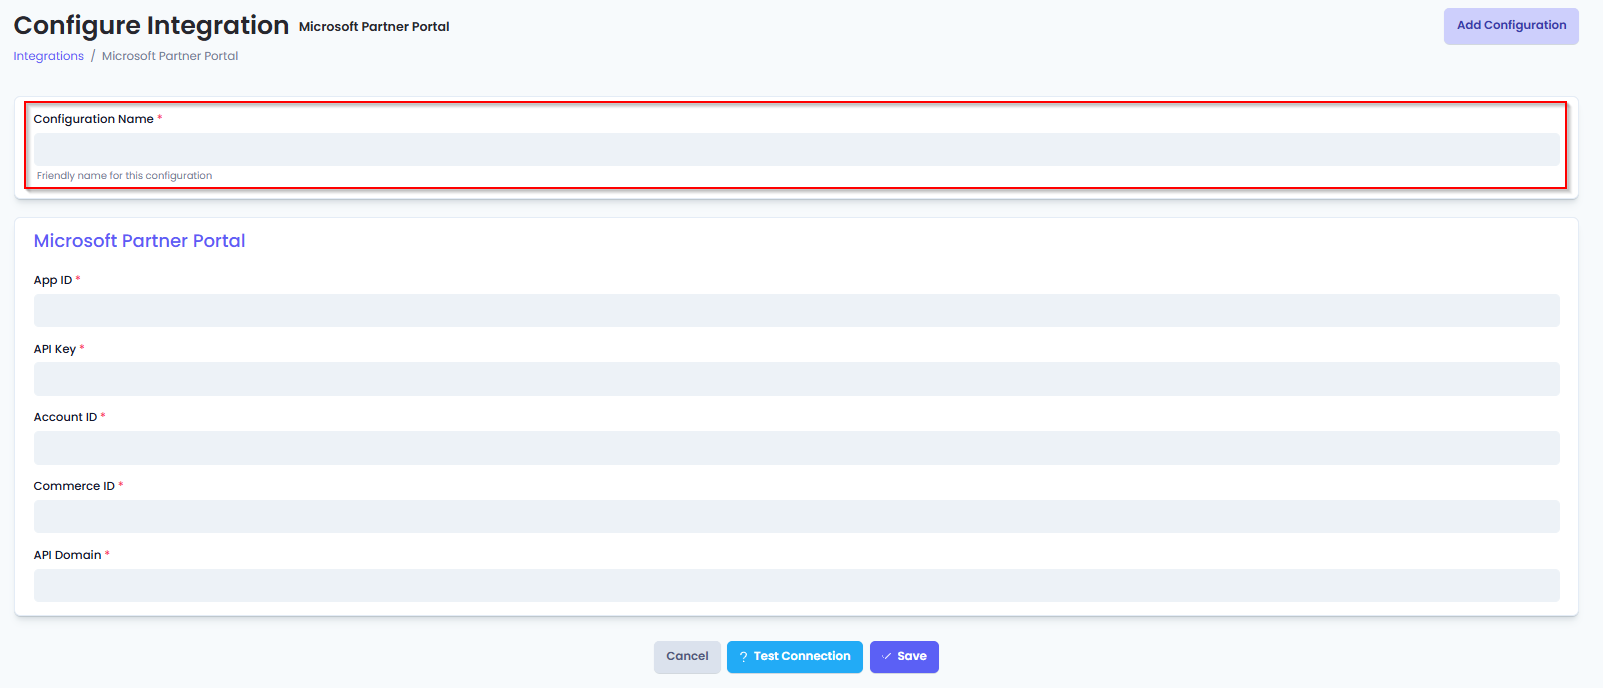
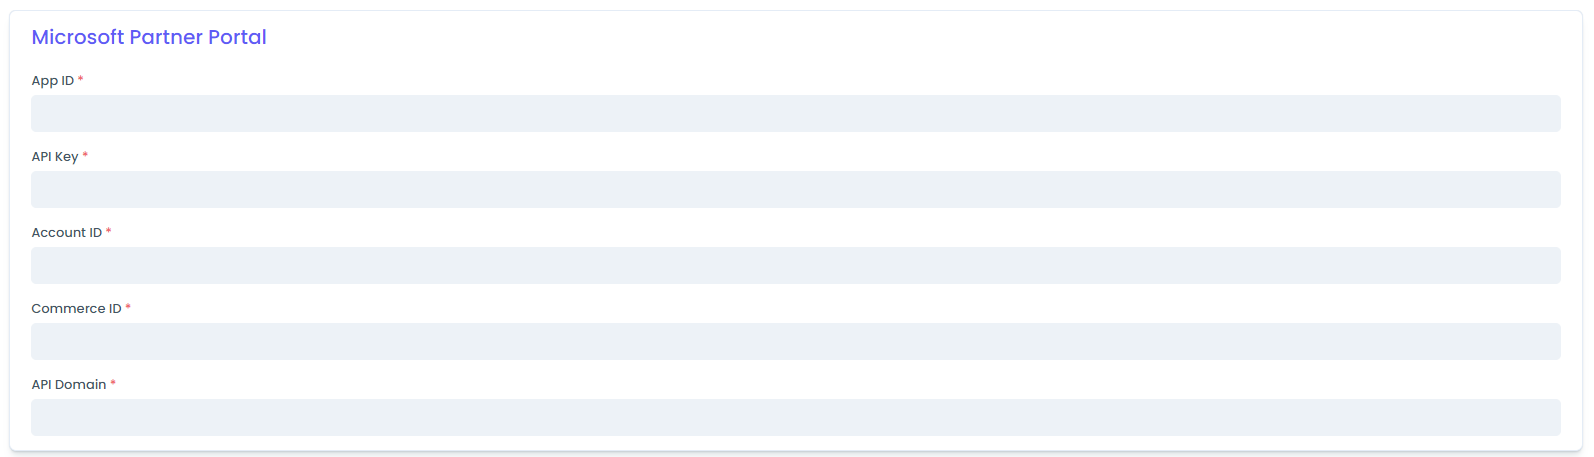
You will also see the following fields that need to be configured for Microsoft Partner Portal.
- App ID: Enter the Application ID received from your Microsoft Partner Portal account.
- API key: Enter the API key to access the Microsoft Partner Portal.
- Account ID: Enter the Account ID that has access to the portal.
- Commerce ID: Enter the Commerce ID available in the Web App Tab of the App management screen
- API Domain: Enter the Domain available in the Web App Tab of the App management screen
Click Save to commit the settings. (If any mandatory fields have been left blank you will receive an error message, and the missed field will have a red box around them.)

Test Integration
After setting up your Integration for IT Glue you will need to test the connection works.
Click the Test Connection button to confirm the Integration has been configured correctly.
You should receive a Connection Successful! popup box. If you receive a Can't connect to service. message, double-check the configuration details and try again.
The Microsoft Partner Portal Integration configuration is now complete.
Intro
Pax8 is a Cloud Service Provider Licensing service. This page guides you through the process of setting up an integration via the Pax8 API.
For any assistance, feel free to reach out to the Pia Team via Partner Support.
Prerequisites
You will need the following details before setting up your Pax8 integrations.
- A valid email address that can be authenticated via Pax8 API
Set Up Process
Here is a quick intro to setting up a new Integration. Details for the fields specific to each service are on the pages linked below.
Summary of the set up process
- Set-up Integration
- Test Integration
Set-up Integration
Log in to your Pia portal.
In the left menu click on Integrations
The integration page opens.
Search for Pax8 using the search bar at the top.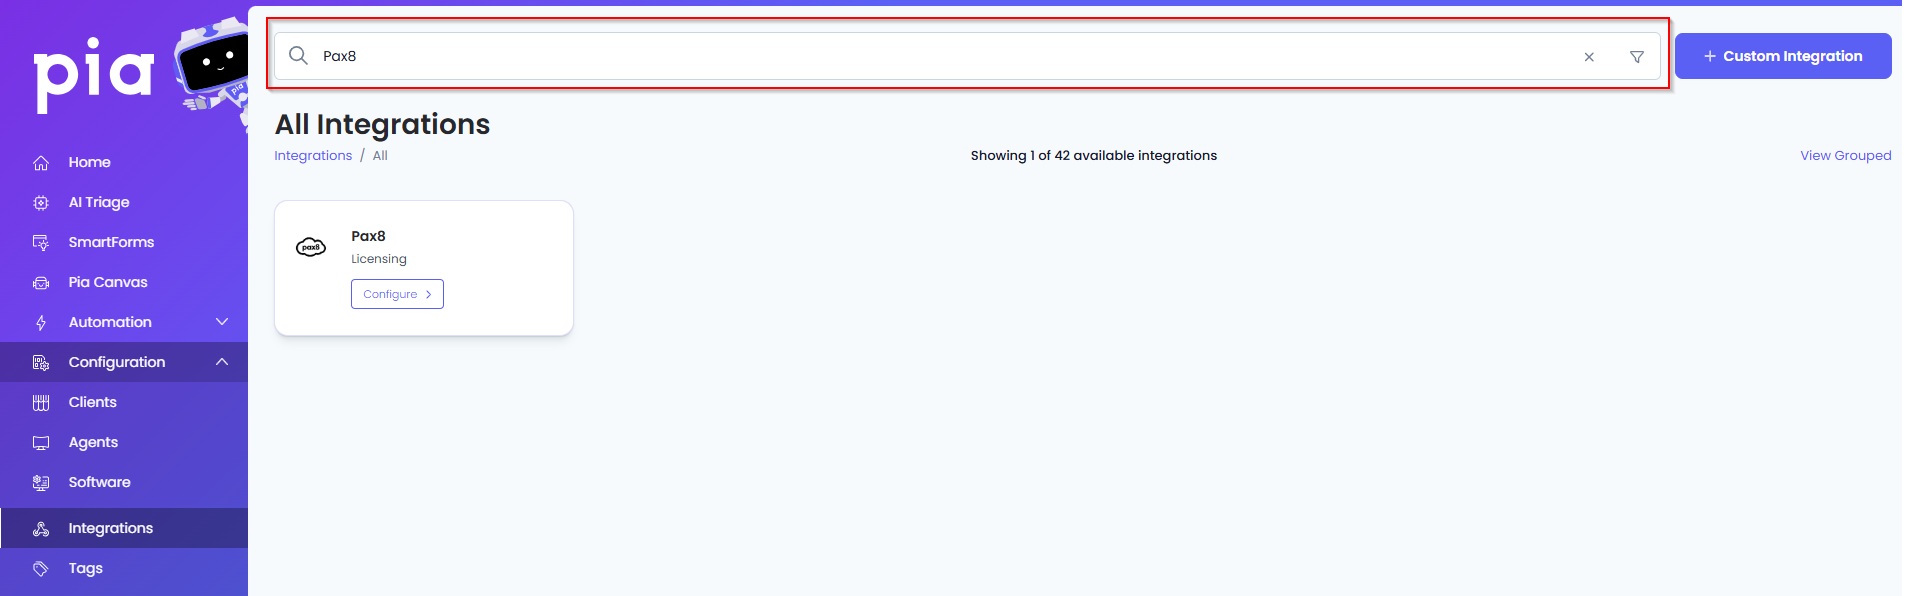
Or, click on the "View All" button available in the All Integration section.
This will open up a screen that displays all the available integrations where you can navigate to Pax8.
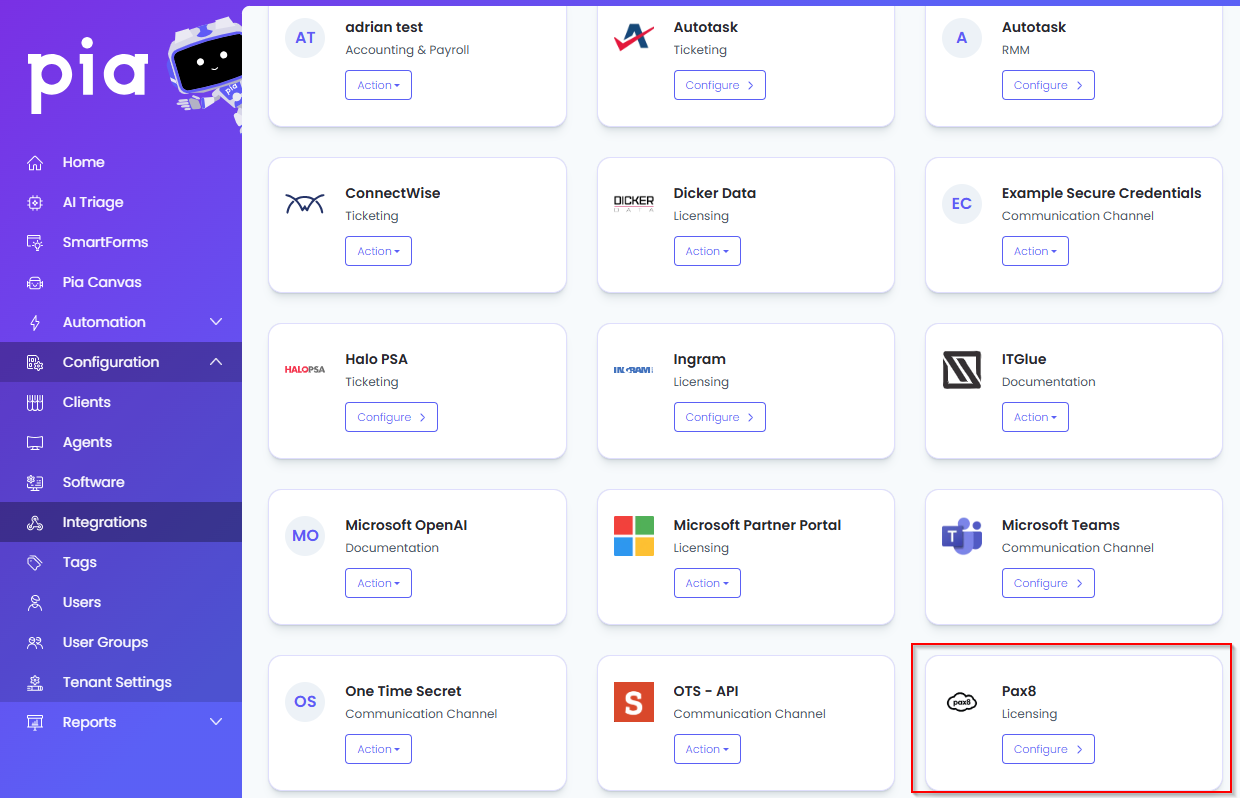
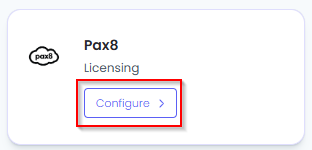
Click on the "Configure" button available in the widget for Pax8. This will take you to the configuration page for Pax8.
In this page, you can add a friendly name for the configuration in the "Configuration Name" field.
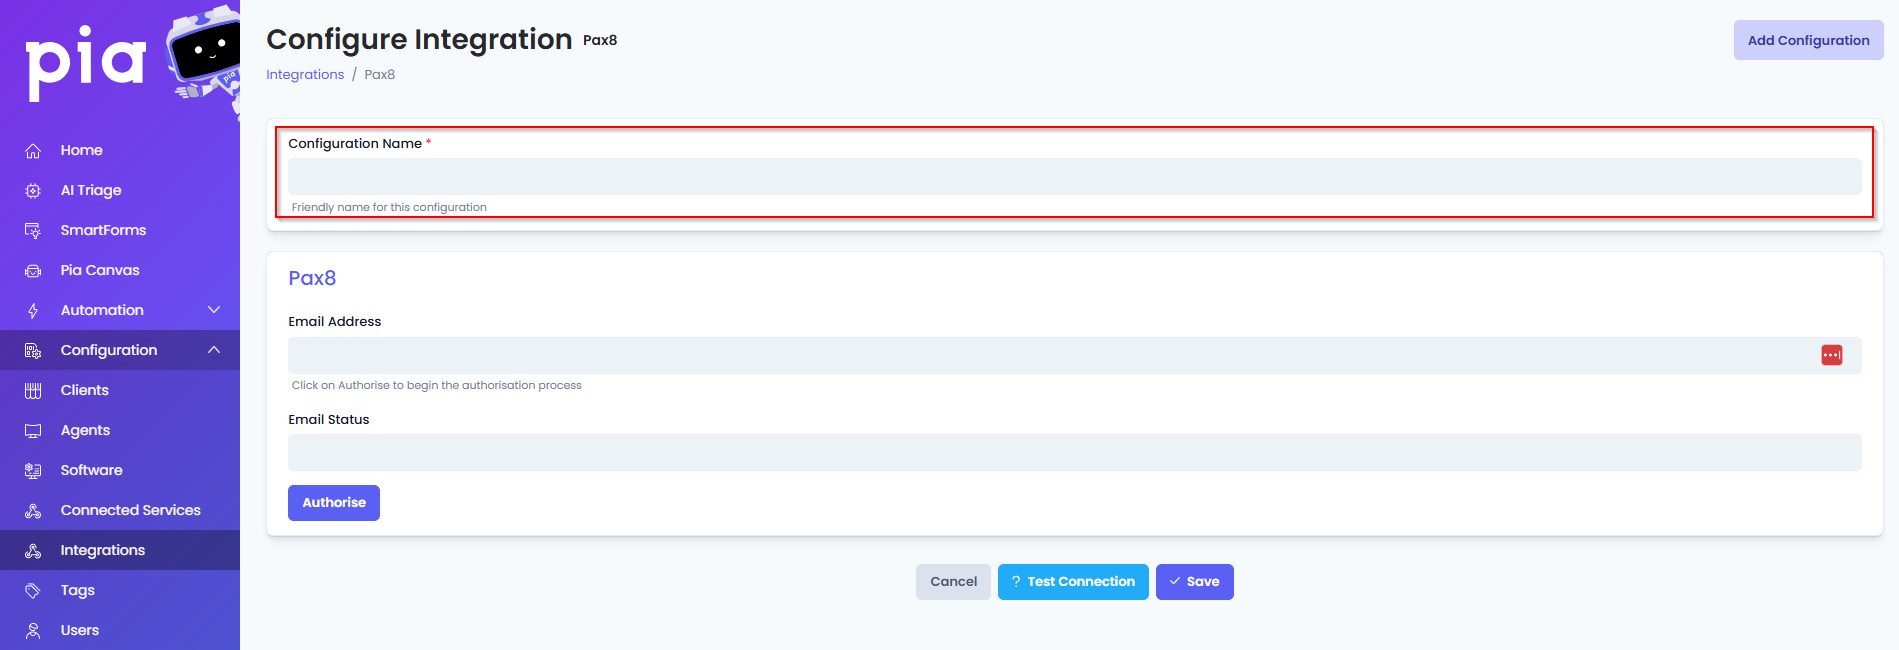
You will also see the following fields that need to be configured for Pax8.
- Email Address: This field will auto populate with the authenticated email address.
- Email Status: This field will auto populate based on the authentication status of the user account that has been used.
- Authorize: Click this button to authenticate your user account via OAuth mechanism for Pax8.
Click Save to commit the settings.
Test Integration
After setting up your Integration for Pax8 you will need to test the connection works.
Click the Test Connection button to confirm the Integration has been configured correctly.
You should receive a Connection Successful! popup box. If you receive a Can't connect to service. message, double-check the configuration details and try again.
The Pax8 Integration configuration is now complete.
Intro
Rhipe provides licenses of software subscriptions and cloud-related services to IT service providers. This page guides you through the process of setting up an integration via the Rhipe API.
RFor any assistance, feel free to reach out to the Pia Team via Partner Support.
Prerequisites
You will need the following details before setting up your Rhipe integrations. (More details about these items can be found where you enter them in the sections below.)
- Rhipe Url
- Rhipe Authentication Url
- Rhipe Client Id
- Rhipe Client Secret
- Rhipe Subscription Id
- Rhipe Partner Customer Id
Obtaining the API Credentials from Rhipe
A short process is included below, however please be aware that the vendor application may change and you would be best to consult the vendor documentation for this information.
- Log into PRISM Portal for Rhipe
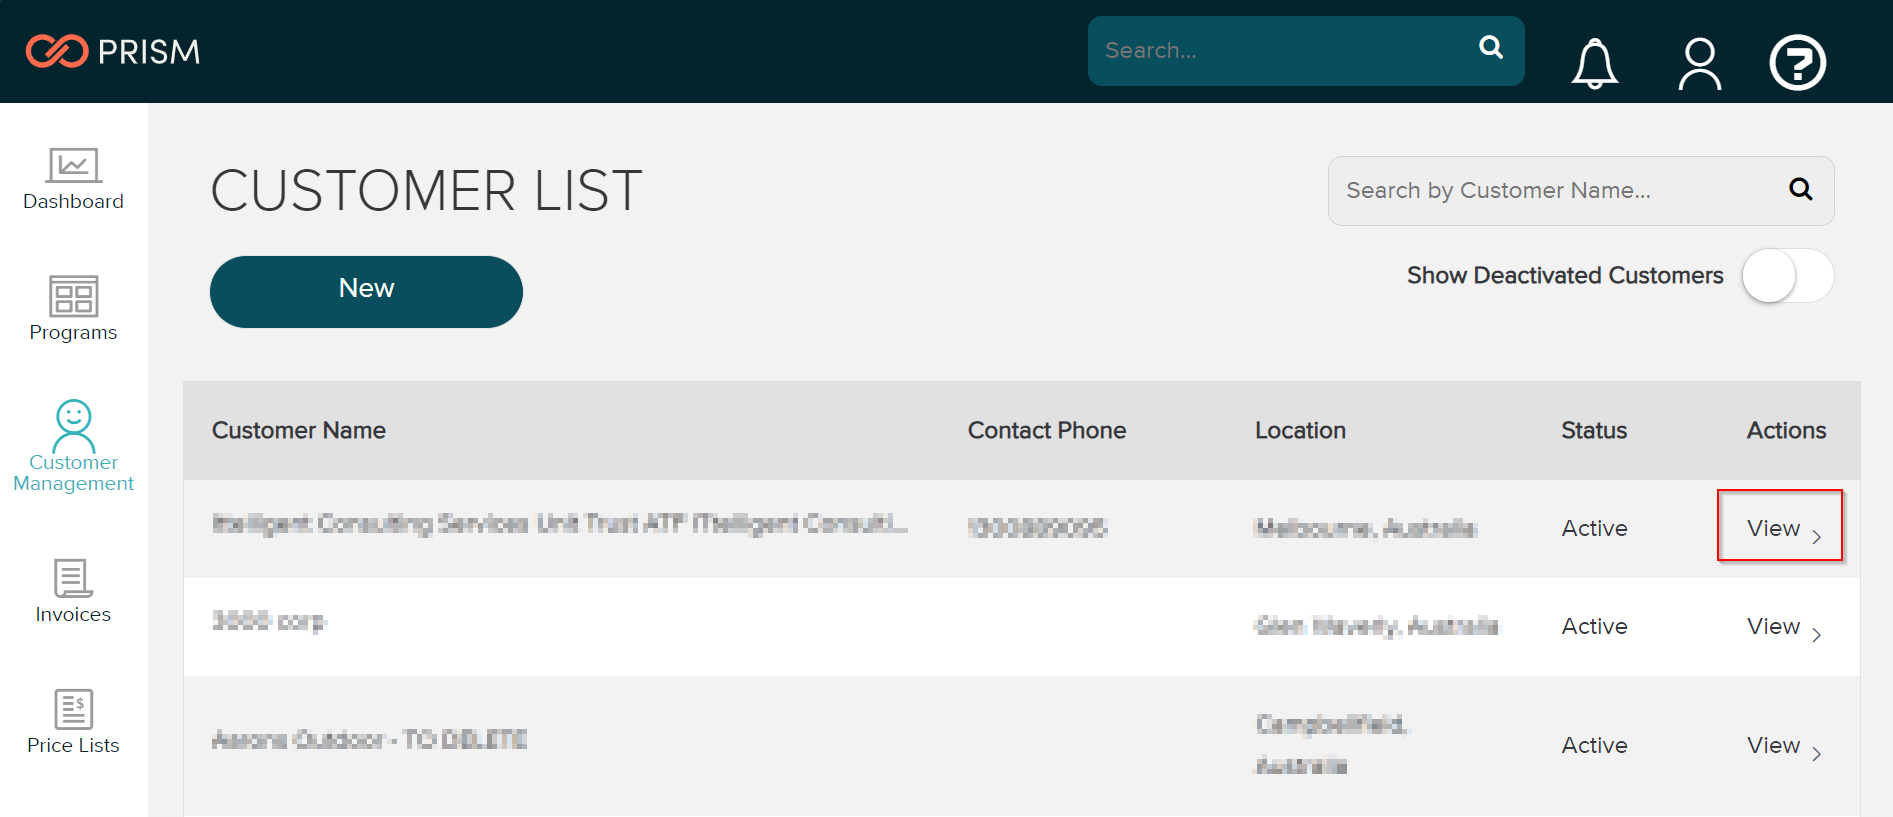
- Click into the “Customer Management” section

- Click the "View" button available against your company
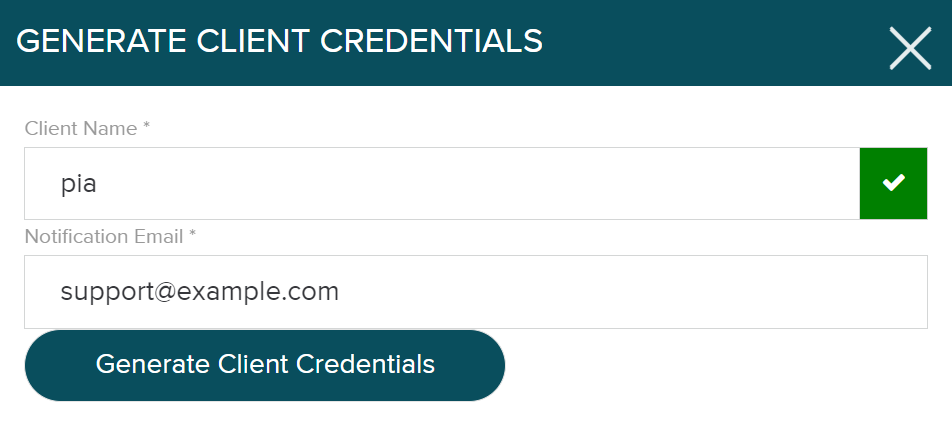
- On the “Customer Details” page you will see a “Manage Client Credentials” button where you can request a client id and secret

- Here you can click the "Generate Client Credentials" button, fill out the details and submit the form.
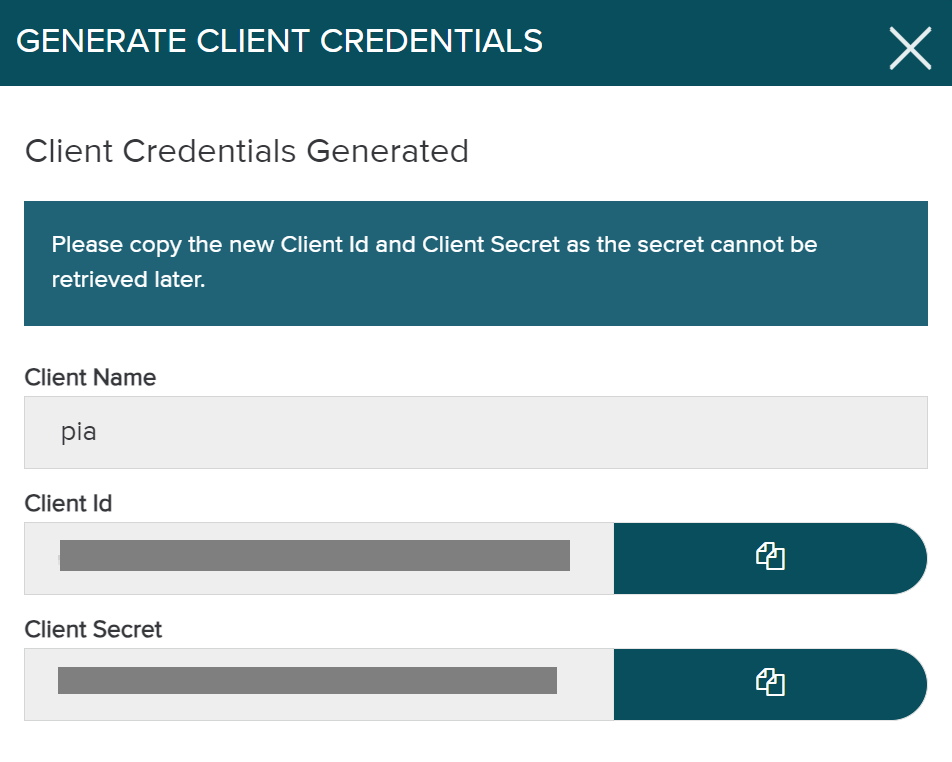
- You will be presented with the Client ID and Client Secret codes. Please store these within your company’s password vault as they will not be retrieved from this portal once you close this window.
- You can now proceed with setting up the Integration in Pia.
Set Up Process
Here is a quick intro to setting up a new Integration. Details for the fields specific to each service are on the pages linked below.
Summary of the set up process
- Set-up Integration
- Test Integration
Set-up Integration
Log in to your Pia portal.
In the left menu click on Integrations
The integration page opens.
Search for Rhipe using the search bar at the top.
Or, click on the "View All" button available in the All Integration section.
This will open up a screen that displays all the available integrations where you can navigate to Rhipe.
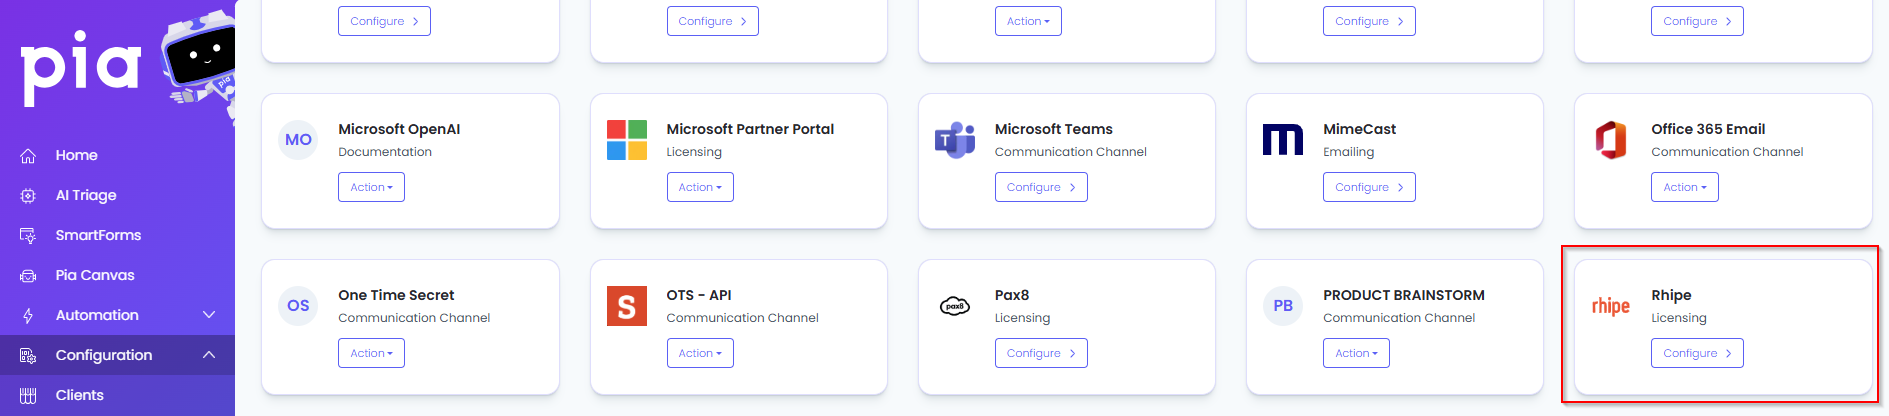
Click on the "Configure" button available in the widget for Rhipe. This will take you to the configuration page for Rhipe.

In this page, you can add a friendly name for the configuration in the "Configuration Name" field.

You will also see the following fields that need to be configured for Rhipe.
- Rhipe Url: Enter the URL of the Rhipe API including the API version with no following slash (e.g. https://api.prismportal.online - use this value if you aren't sure what to put in).
- Rhipe Authentication Url: Enter the authentication URL for Rhipe API - leave this as default if you have no reason to change it (https://identity.prismportal.online/core/connect/token).
- Rhipe Client Id: Enter the client id of the api credentials you created for Rhipe.
- Rhipe Client Secret: Enter the secret for the api credentials you created for Rhipe.
- (Optional) Rhipe Subscription Id: Enter the Subscription Id for your Rhipe account.
- (Optional) Rhipe Partner Customer Id: Enter the Partner Customer Id for your Rhipe account.
- Click Save to commit the settings. (If any mandatory fields have been left blank you will receive an error message, and the missed field will have a red box around them.)

Test Integration
After setting up your Integration for Rhipe you will need to test the connection works.
Click the Test Connection button to confirm the Integration has been configured correctly.
You should receive a Connection Successful! popup box. If you receive a Can't connect to service. message, double-check the configuration details and try again.
The Rhipe Integration configuration is now complete.