Clients Configuration Tasks
Overview
The Client Dashboard (or "Clients" option on the side menu of the Pia Partner Portal) is where we can configure settings which affect the way Pia works for any specific client.
Clients which are displayed in this list are synchronized from the ticketing system on a daily basis. There is no way to add or remove a client directly via Pia - instead, clients which meet a certain criteria will be added automatically during the daily synchronization or disabled if that criteria is no longer met. The synchronization time and criteria can be configured via the connected service screen.
During the on-boarding of a client into Pia, you should use the client dashboard to configure the client for use in Pia (Client Onboarding Configuration).
To get started on the client dashboard, pick a client from the list and you will be taken to the dashboard for that client.
The Client Dashboard includes the ability to:
- Enable and configure individual packages for a client
- Configure Pia to connect to the client's Office 365 / Azure AD tenant via the Microsoft Graph API
- Configure tags for the client where applicable - this will automatically enable certain automation packages and make others available for opt in
- Set the status of Pia as ready for use for the particular client
- Set global configuration for the client which is used across all packages
Client Tags
Tags are used to describe the capabilities and environment of the client. Automations will be automatically enabled or disabled when tags are added/removed from a client.
The below table describes each type of tag currently in use and the category of each one. Generally, one tag per category would be configured - although in some categories it may be required to add multiple tags, for example, if a client utilizes multiple VPN technologies.
| Category | Tags |
|---|---|
| Microsoft Active Directory | Cloud Only, Cloud Hybrid, Semi-Hybrid, Prem Only (See table below for definitions) |
| Mail Filtering | Mail Filtering: O365, Mail Filtering: Manage Protect |
| VPN Providers | VPN: SonicWall NetExtender, VPN: Generic-SSL (OpenVPN), VPN: Palo-Alto GlobalProtect, VPN: Azure, VPN: WatchGuard, VPN: Windows |
| Shared Desktop | RDE: Citrix Workspace / Receiver, RDE: VMWare Horizon |
For example, each client should have 1 of the "Microsoft Active Directory" tags. If the client is not tagged with one of these 4 tags, then the automation will not be available. Tags can be added by using the dropdown. To remove a tag - simply click on the name of the tag.
For reference, the built-in tags are defined as below.
| Category | Tags |
|---|---|
| Cloud Hybrid | On-premise Active Directory with AADC syncing to O365/Azure and Entra Cloud Sync |
| Cloud Only | Office 365/Azure and no on-premise Active Directory |
| On-Prem Only | On-premise Active Directory and no Office 365 |
| Semi-Hybrid | On-premise Active Directory and Office 365/Azure but, with no AADC sync between the two environments |
| Agents | Windows workstations/laptops |
Warning: Removing tags on a client will likely disable certain automation packages for that client!
Pia Status
Pia automations can be used in the Pia chatbot by Service Desk Engineers or by Clients directly (coming soon). During client onboarding configuration, you will need to click the "Engineer" option before your service desk engineers will be able to use Pia automations via the Pia chatbot.
To enable or disable pia for either engineer/client - simply click on the "Engineer" or "Client" option under the Pia Status heading - this will switch the state into Enabled (green tick) or Disabled (red cross).
Package Articles
On the left of the client dashboard, you will see a list of packages broken down into 3 categories; Active, Available and Unavailable. Active packages are enabled for the client - meaning they are useable via Pia, Available packages can be activated by using the "Opt In" feature, whereas Unavailable packages may be "locked" to a specific client and cannot be changed or simply not available as the client does not have a matching tag required.
Selecting a package name on the left will take you to the "Article" for that package. The package article has information about that package specific to the client - you can think of it as a knowledge base article.
The package article screen has the following features:
- The ability to opt in/out of a package (you can override this behavior for any client/package)
- The number of times the package has been run for that client - click on the number to view more details on the Live Packages screen
- Detailed documentation of what conditions the package will run under and what actions it takes
- The ability to modify Package Configuration for that client
- The ability to post notes to the article for that client.
Creating your own automation? Package configuration allows packages to be built in a generic way, configurable to each individual client's needs. Automations must have the client filter condition and a "variables form" defined to be configurable under the client dashboard. Read more about the client filter condition here.
Microsoft Graph API Authorisation
For each client, the Microsoft Graph API Authorisation for Pia must be granted against their Azure Tenant.
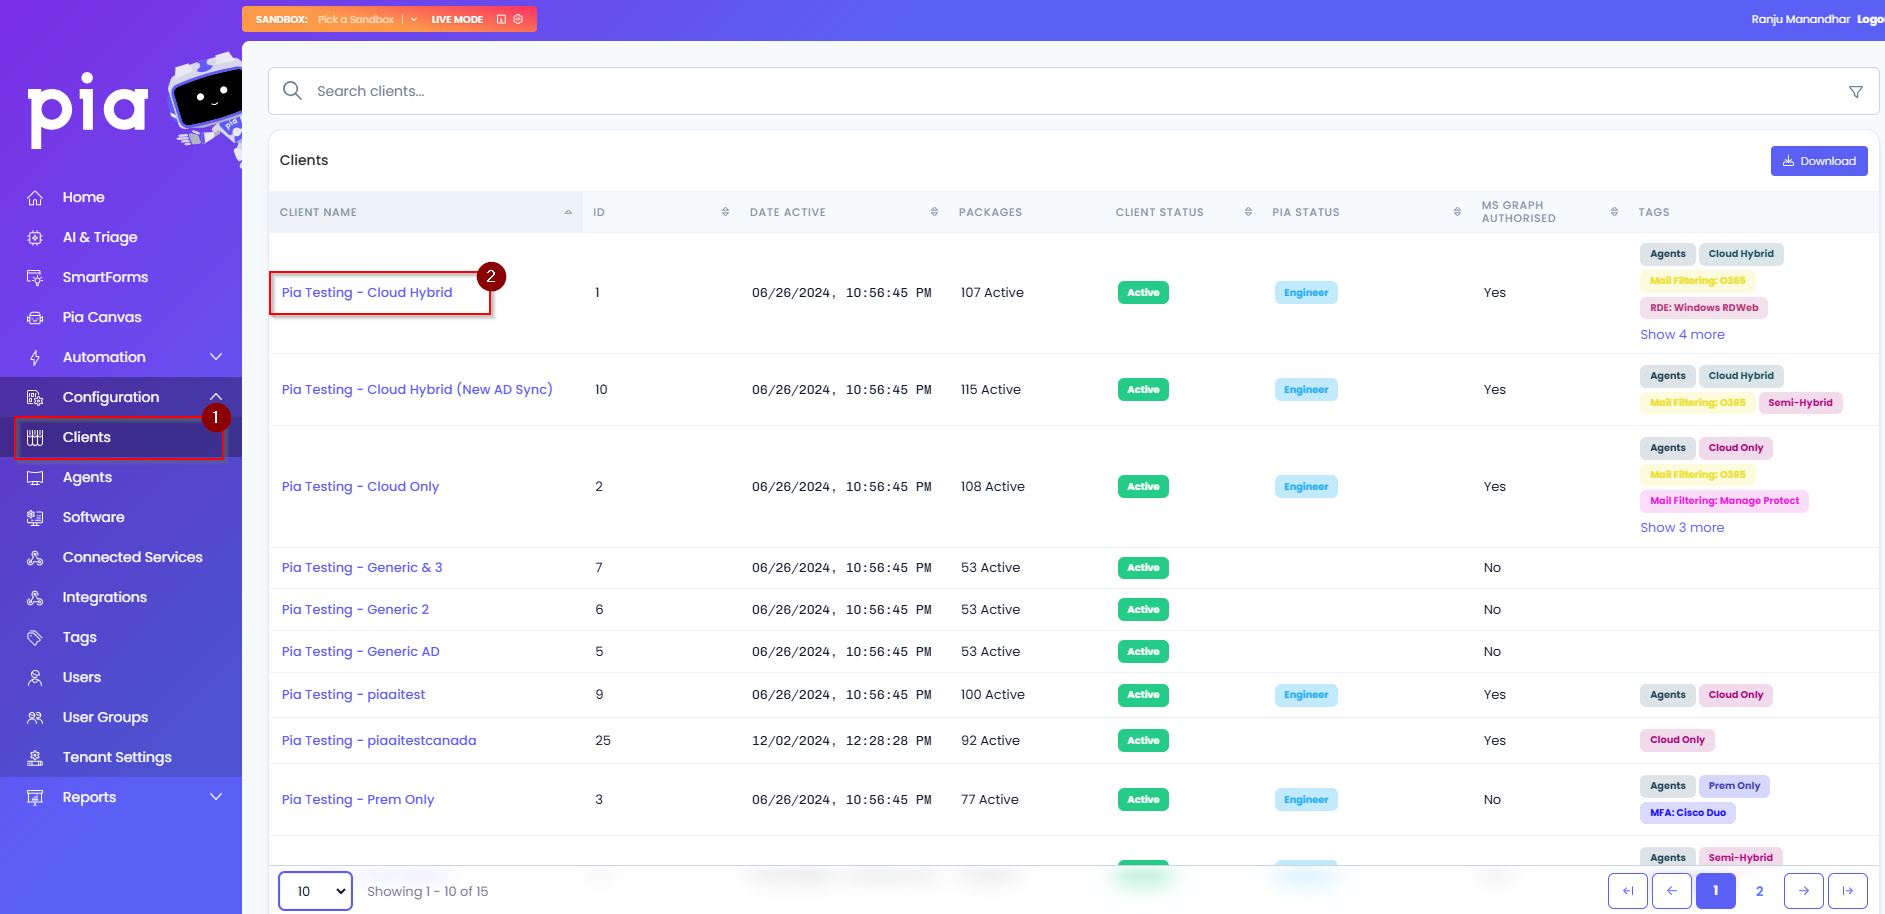
- In the Pia Tenant, click on "Clients" and select a Client to be authorised.
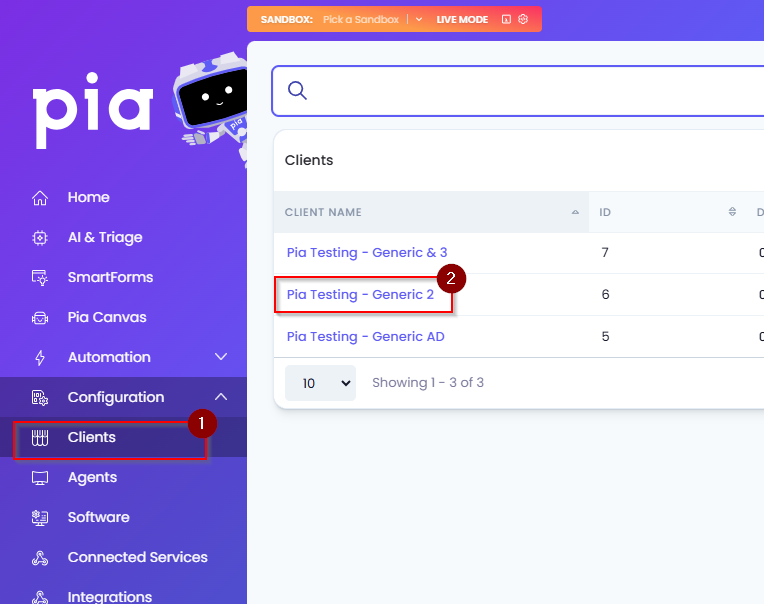
- On the Client Dashboard, click on the green “Authorise” button on the Microsoft Graph API tile.
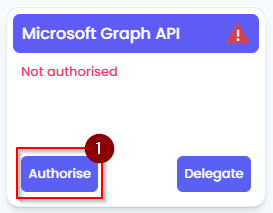
You will be taken to a Microsoft 365 sign-in page, sign in with the Client’s Microsoft 365 credentials.
You will be presented with a list of permissions to be approved for Pia’s functionality, scroll to the bottom of the list and click “Accept”.
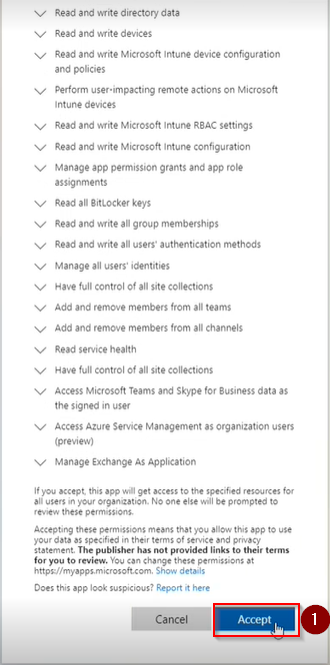
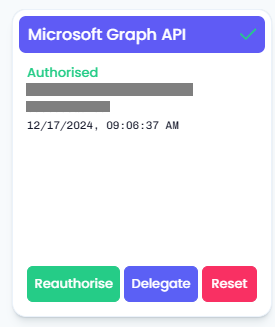
- Refresh the page and the Microsoft Graph API tile will show an “Authorised” status.
Troubleshooting
In rare events, you may observe that one of your Clients is failing the Microsoft Graph API authorisation. This behaviour may show as any of the following:
- The "Accept" permissions window shown above in Step 5 does not appear after entering in Office 365 Global Admin credentials.
- Clicking the "Accept" button for the permissions does not turn the Microsoft Graph API tile to a green colour with an "authorised" status, even after repeated attempts.
This sometimes happens if the Office 365 tenant is new or, they don’t use Teams/have any licenses with Teams entitlements. What this means is that the Service Principal for Microsoft Teams is missing from the Office 365 tenancy.
We can forcefully create the Service Principal via Powershell however, instructions are below.
- Start Powershell as an Administrator.
- Install the Az module if not already installed, the command for this is below;
$ProgressPreference = 'SilentlyContinue'; Invoke-WebRequest -Uri https://aka.ms/installazurecliwindows -OutFile .\AzureCLI.msi; Start-Process msiexec.exe -Wait -ArgumentList '/I AzureCLI.msi /quiet'; rm .\AzureCLI.msi
- After the module installs, close Powershell and run again as Administrator.
- Enter the command
Az login
- A browser window/tab should appear with a Microsoft 365 sign-in page.
- Log in with the Global Admin credentials for the tenant.
- After logging in, return to the Powershell window.
- Enter the command
az ad sp create --id 48ac35b8-9aa8-4d74-927d-1f4a14a0b239
- The Service Principal should now be created.
- Wait 5-10mins and try the MS Graph API authorisation again.
Microsoft Graph API Delegation Consent
The ability to reset passwords of users in Office 365 requires additional permissions which are not part of the Microsoft Graph API authorisation. We recommend configuring this for all Clients with Office 365, even ones which have Azure AD Connect to sync password hashes from on-prem.
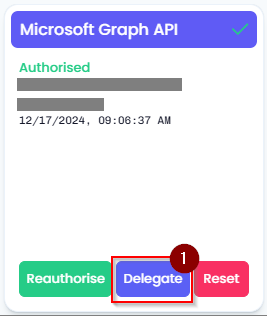
- Click on the “Delegate” button on the Microsoft Graph API tile.
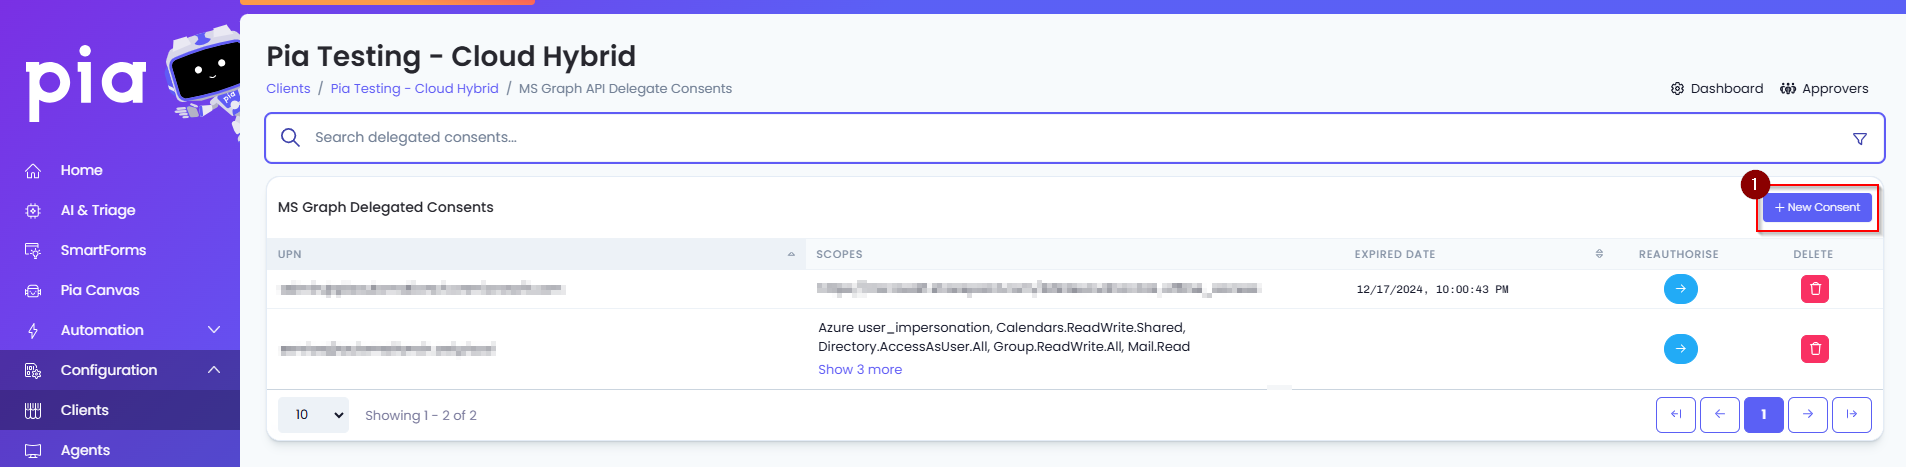
- Click on the "New Consent" button.
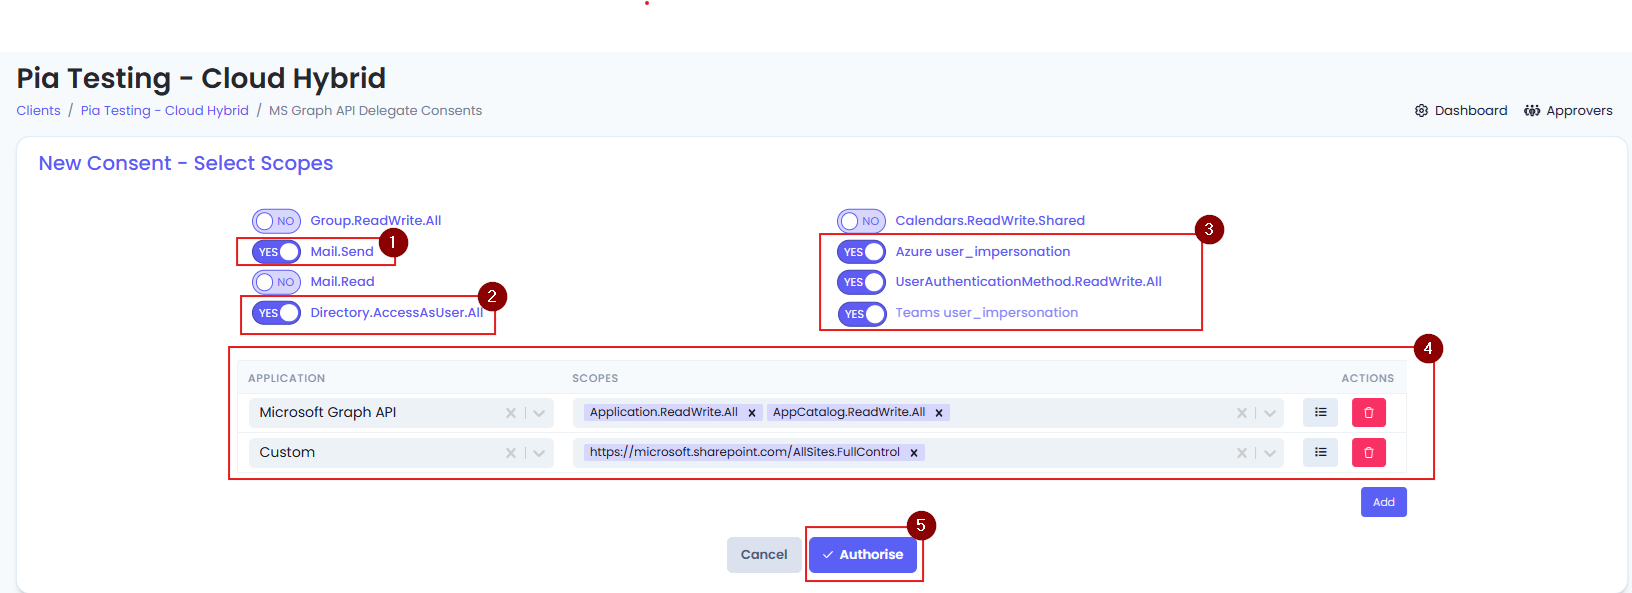
- To use the full Pia platform, you only need to grant the permissions that match the features you plan to enable. Below is a simple breakdown so you can choose the right access for your organization.
Core Permissions (Required for all Pia Products)
These permissions power Tech Assist, Engage (Pia Chat) and Automation Hub:
- Mail.Send
- Azure user_impersonation
- UserAuthenticationMethod.ReadWrite.All
- Directory.AccessAsUser.All
Additional Permissions for Automation Hub
Only required if you plan to use the following PiaPacks:
- Challenge User Identity — Application.ReadWrite.All
- OneDrive Data Management — https://microsoft.sharepoint.com/AllSites.FullControl
Additional Permissions for Pia Chat
To unlock the full Pia Chat experience, enable the above permissions plus:
- AppCatalog.ReadWrite.All
Optional (If you want to use Teams left‑rail pinning feature):
- teams/user_impersonation
Once you've selected the required permissions, click "Authorise".
You will see a Microsoft 365 log-in page, enter in the Client’s Microsoft 365 credentials into the prompt.
You will be taken back to the Client Dashboard for the Client again.
Click on the "Delegate" button again.
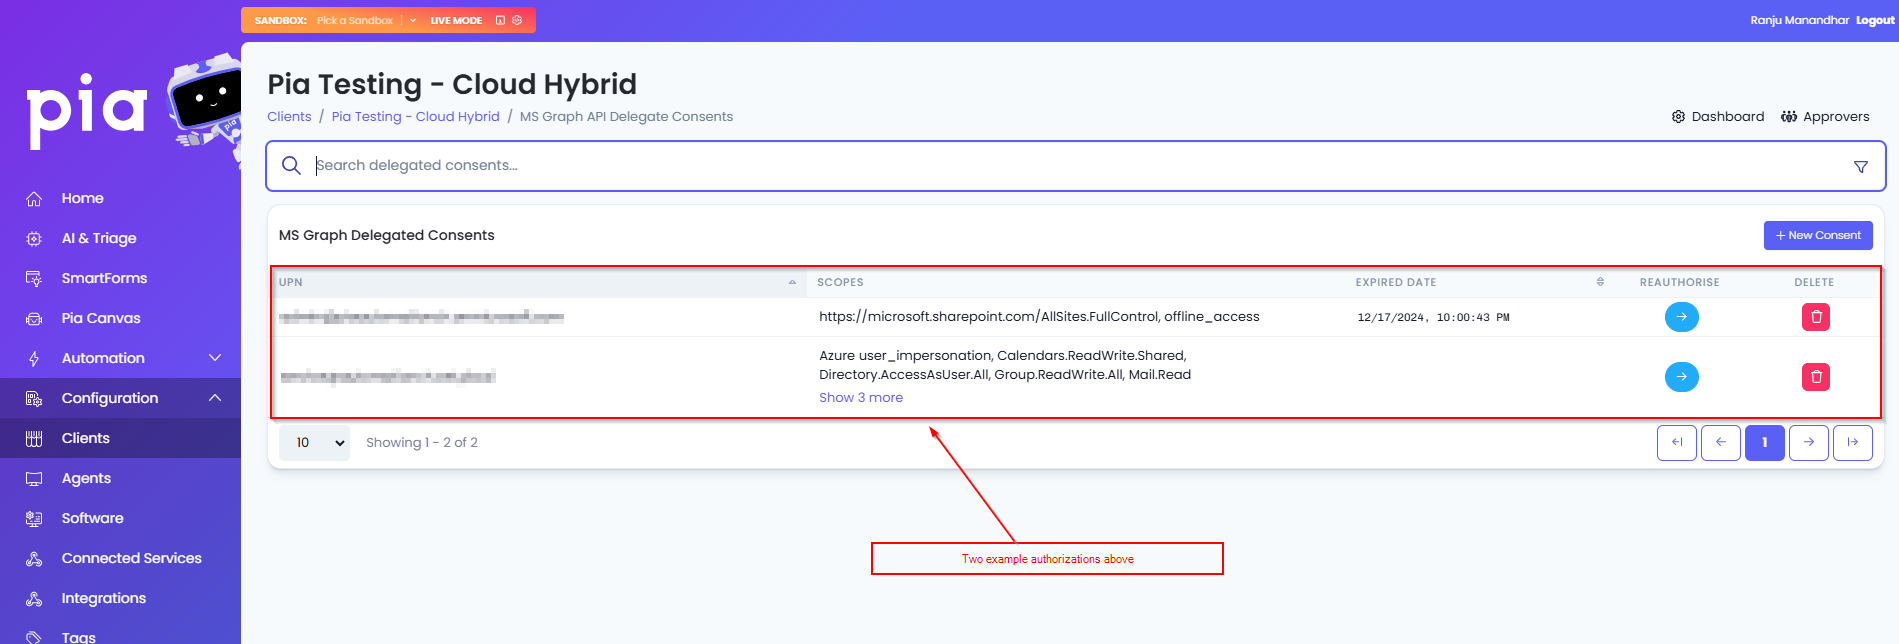
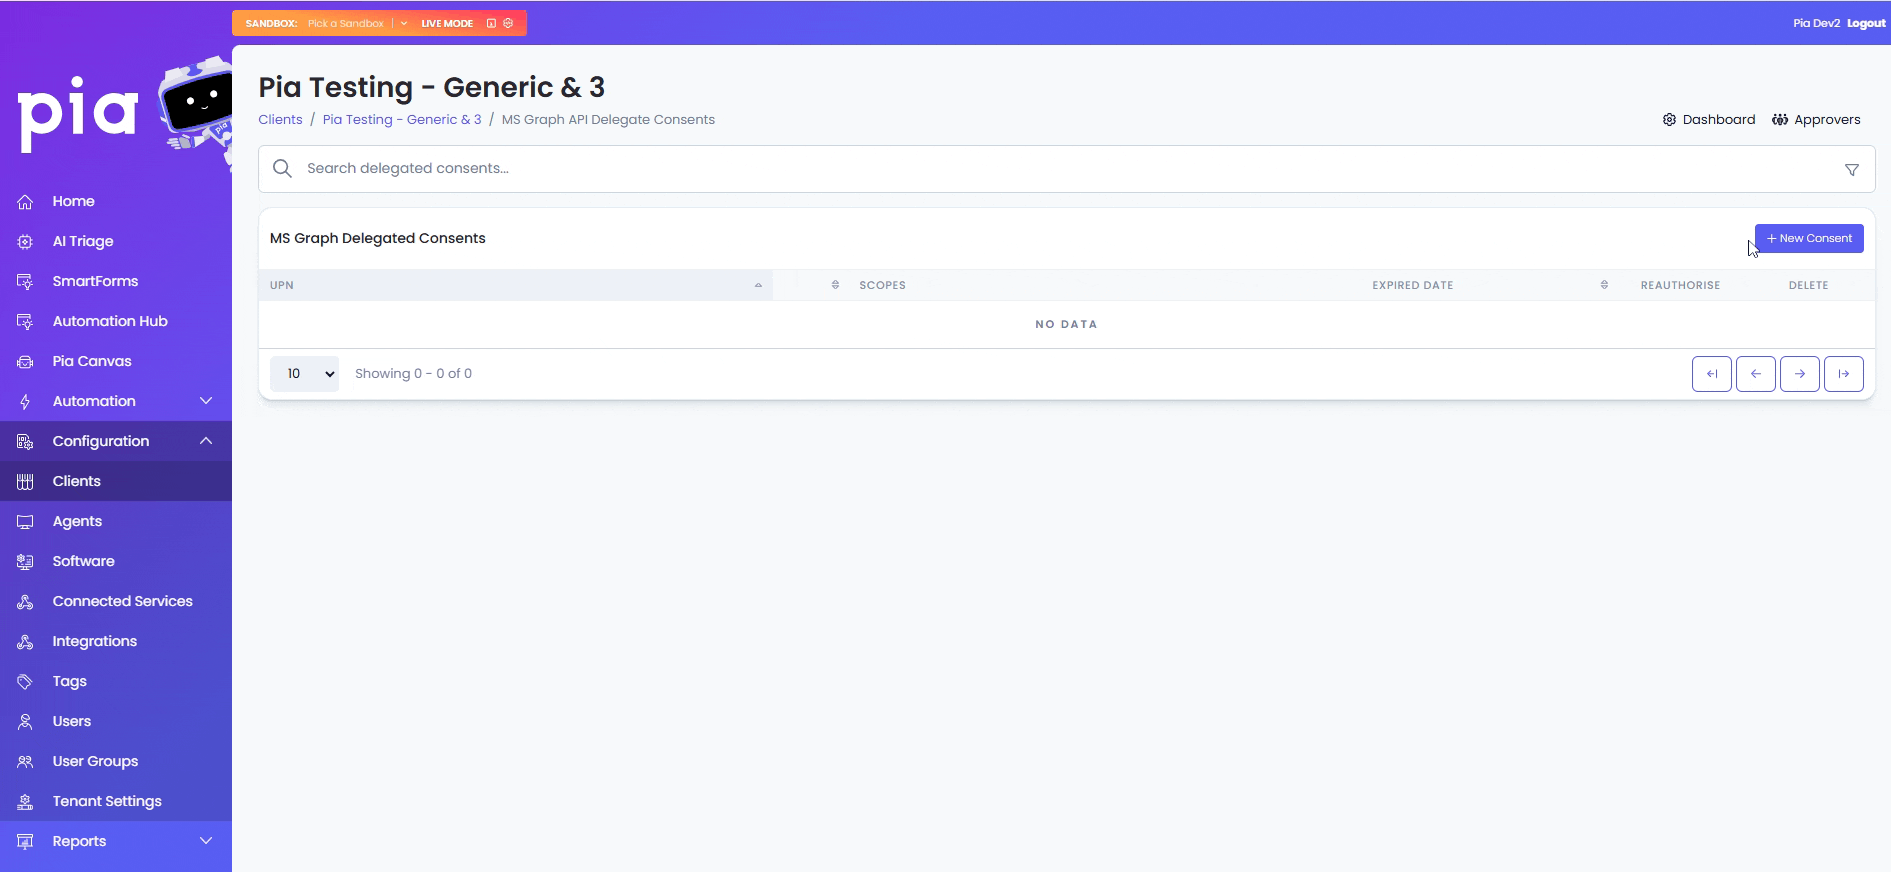
You should now see the delegated consents page with the user you entered credentials for in Step 4 in the list.
Additional Consent for custom automations
The above scopes are required by Pia for its built-in automation. However, you can also assign additional scopes to Pia for your custom automations. You can add these scopes by selecting from commonly used applications and scopes available in the table just below the toggles.
To add a new scope in your consent:
- Click on the "Add" button in the table
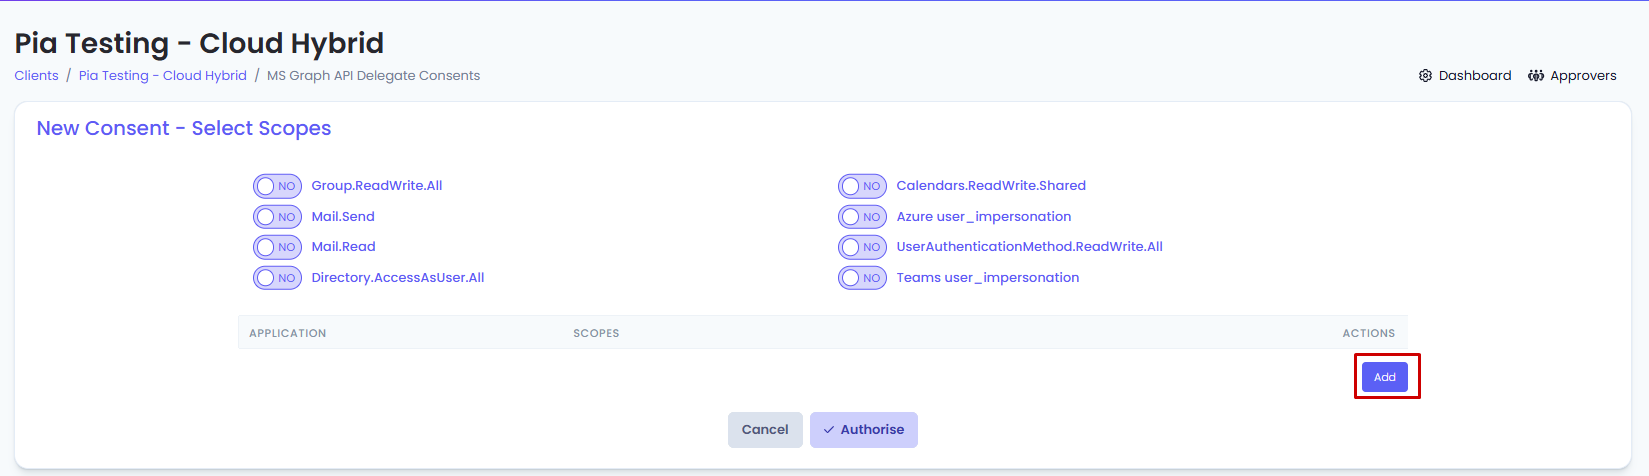
- From the first drop-down, select the Application and from the second drop-down, select the relevant scopes.
For custom scopes, you can select 'Custom' from the Application drop-down and add one or multiple scopes in a comma separated format in the Scopes text box.
The name of the custom scope added should be EXACT match to the name defined by Microsoft.
- Click "Authorise"
Global Configuration
Each client has a set of global configuration properties which influence the behavior of packages enabled for that client. For example, a global configuration property called "Primary DC" allows packages to read the primary domain controller when executing actions such as Password Reset or Staff Onboarding.
For further information on how to configure the Global Configuration Form, please expand the 'see more...' section below.
See more...
The Global Configuration Form details static settings for a Client and is referenced by Pia to execute packages on the environment based on what has been entered in the form.
The global configuration is set per Client as these details are unique per Client.
- Click on the Configuration> Clients option in the Pia Partner Portal and then select the client from the list.
- On the Global Configuration tile, click on the "Configure" button.

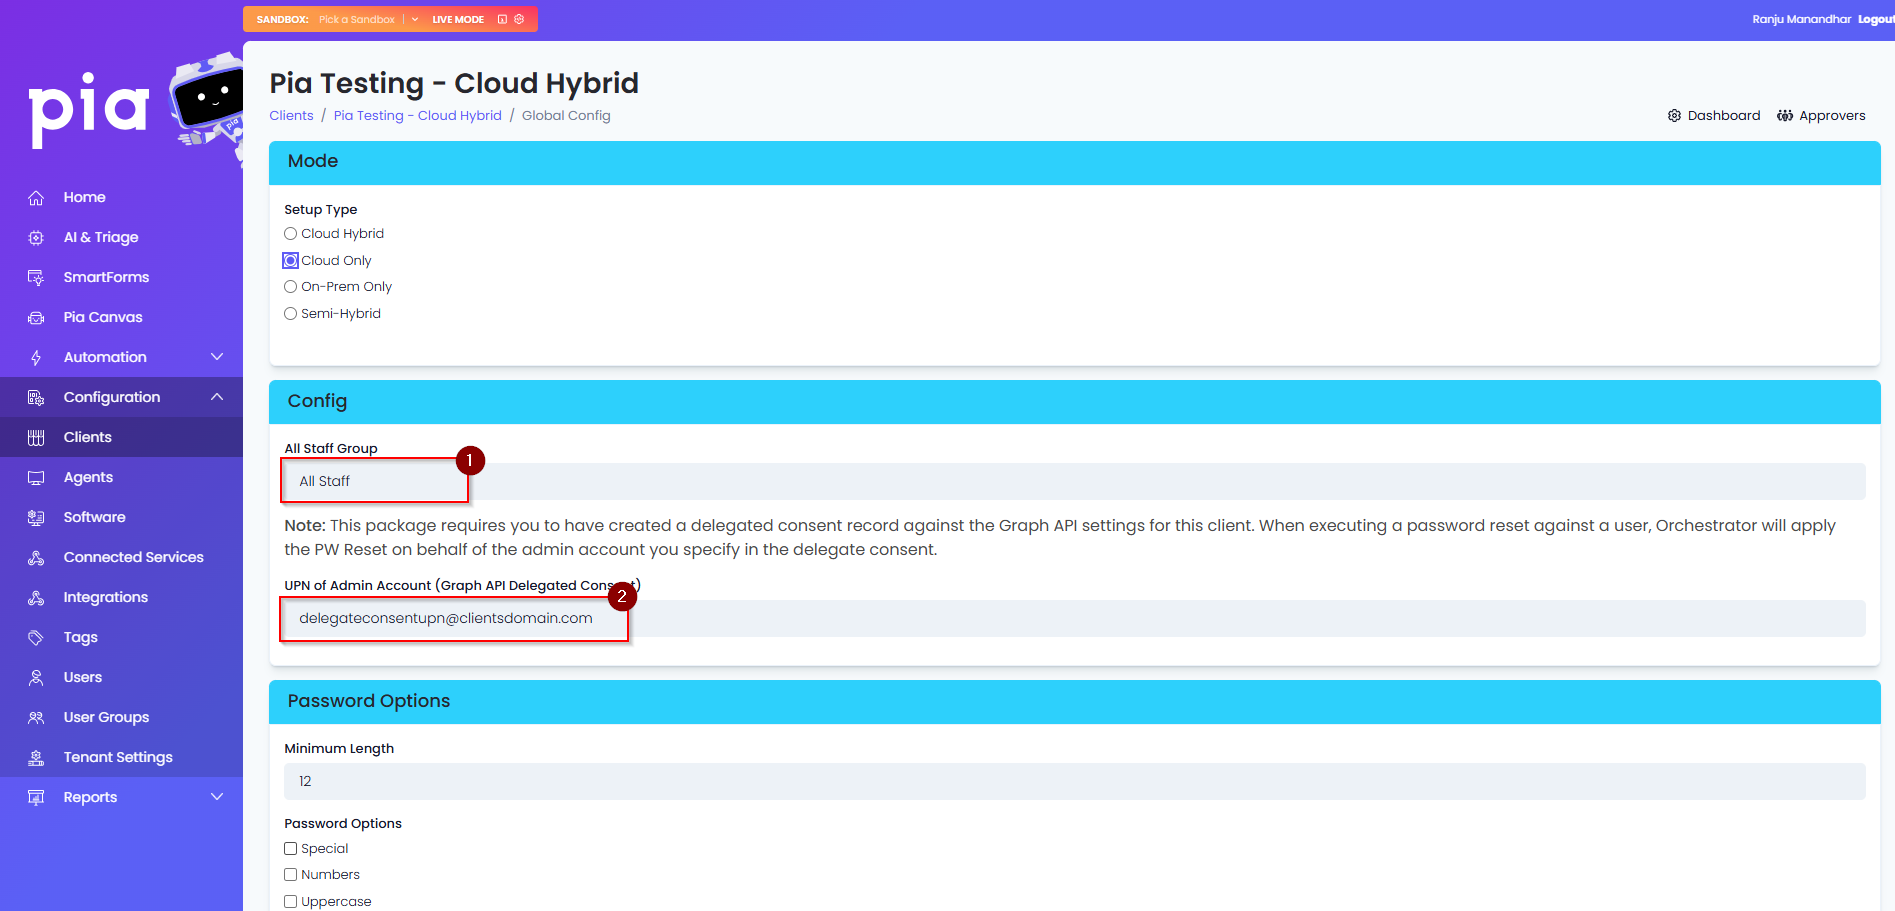
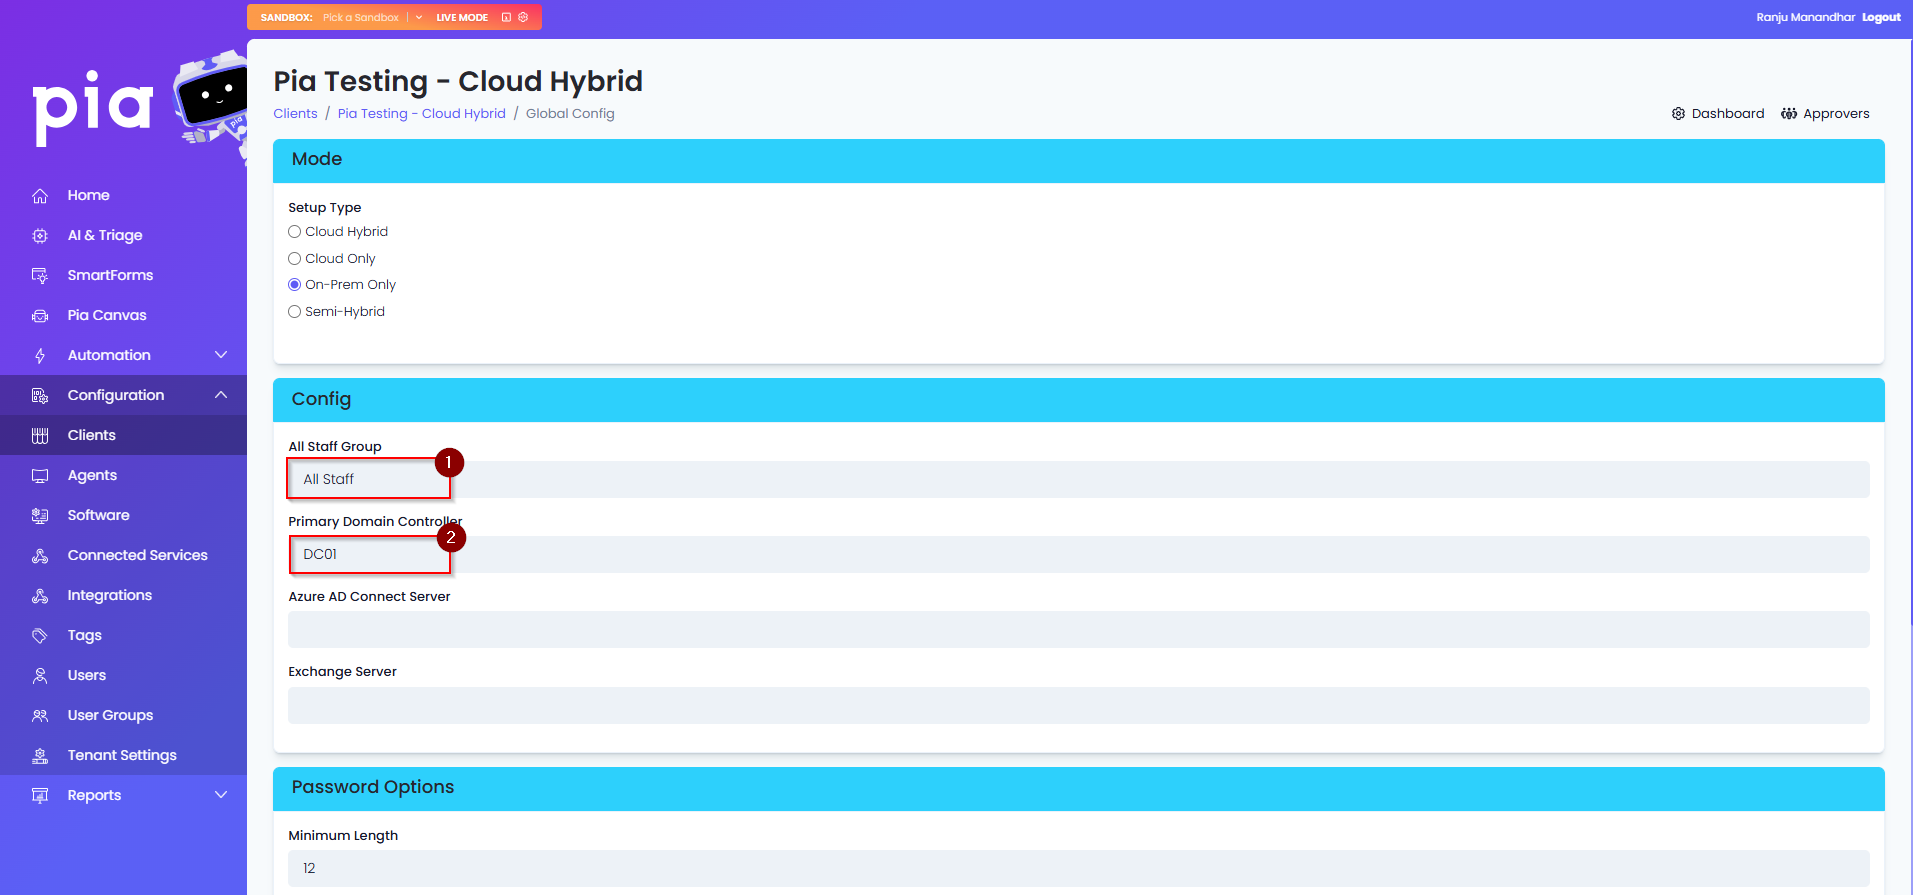
- On the page, choose the appropriate option for the Mode Setup Type from the 4 radio buttons. The definition of each type is below.
Cloud Hybrid: On-premise Active Directory with AADC syncing to O365/Azure.
Cloud Only: Office 365/Azure and no on-premise Active Directory.
On-Prem Only: On-premise Active Directory and no Office 365.
Semi-Hybrid: On-premise Active Directory and Office 365/Azure but, with no AADC sync between the two environments.
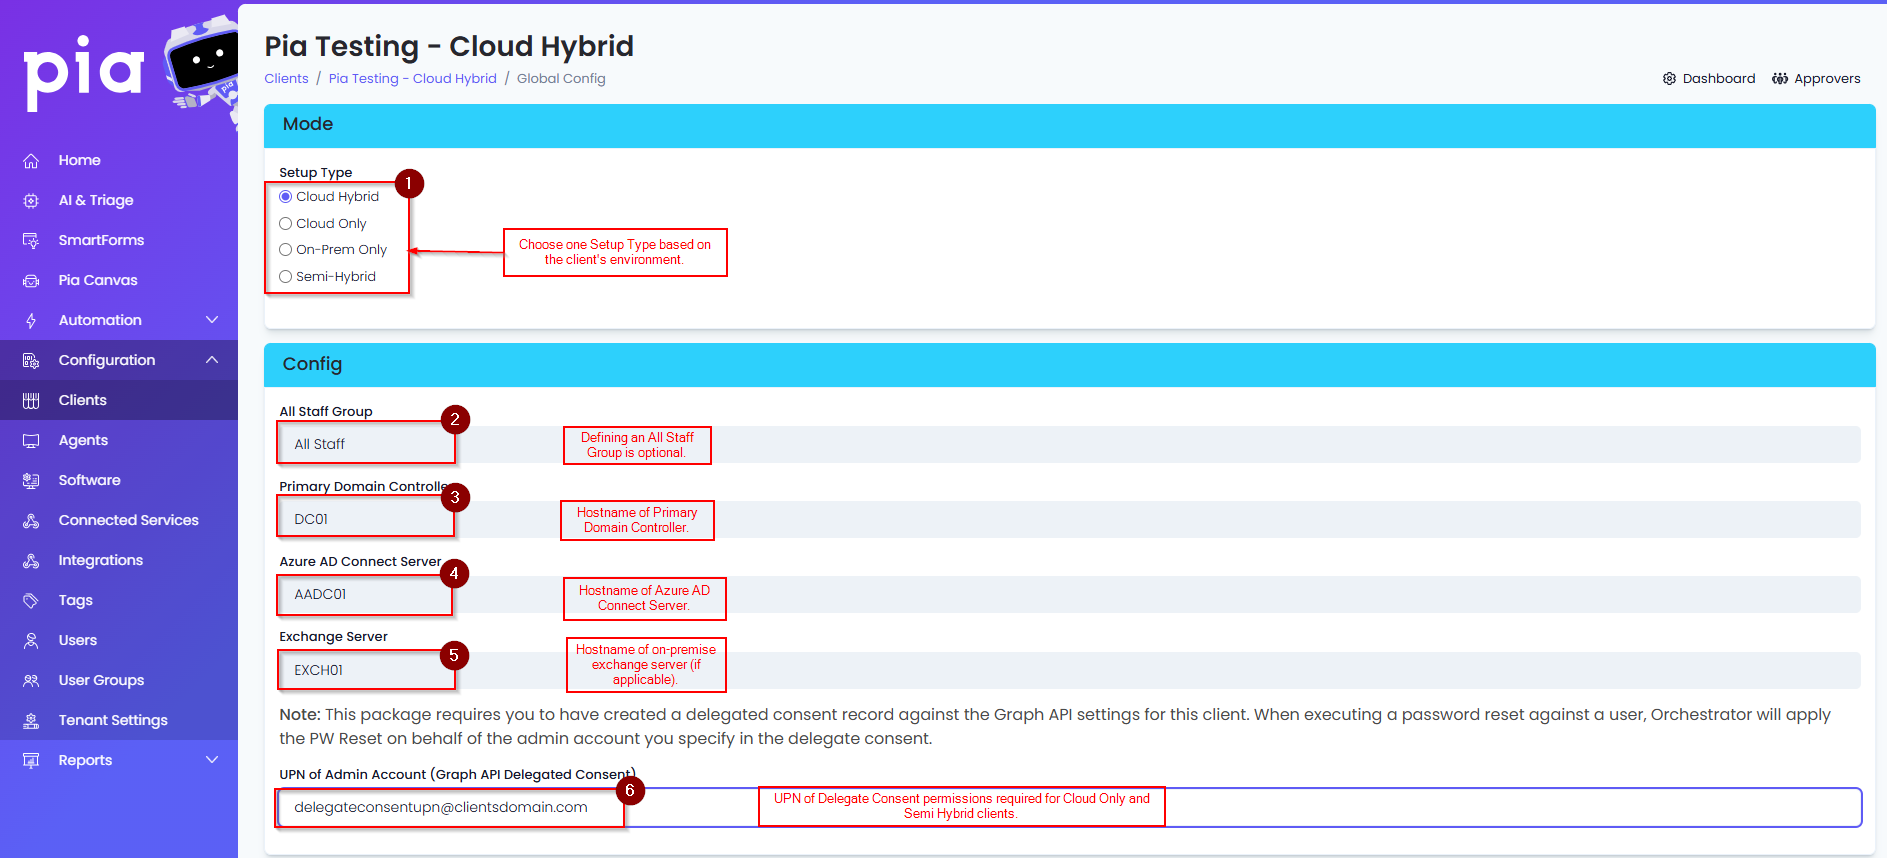
Based on which Mode Setup Type is chosen in Step 3 above, the Config section will present different options.
If Cloud Hybrid is chosen, enter in the Primary Domain Controller and Azure AD Connect Server for the Client. You can add the All Staff Group if one exists.
- If Cloud Only is selected, you will need to enter in the "UPN of Admin Account (Graph API Delegated Consent)" which was delegated access in the Microsoft Graph API Delegate section above. The All Staff Group is also optional if the Client has one in Office 365.
- If On-Prem Only is chosen, only the Primary DC needs to be entered. All staff group is optional.
- If Semi-Hybrid is chosen, the Primary DC and "UPN of Admin Account (Graph API Delegated Consent)" must be entered. All Staff Group is optional.

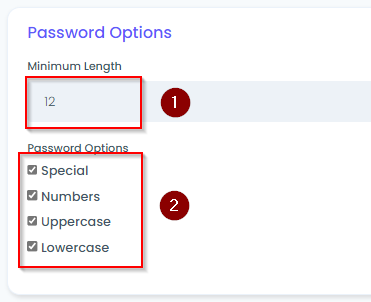
- If the Client has any specific requirements for their password complexity, configure those in the Global Configuration Form as this is what Pia will use when generating a password.
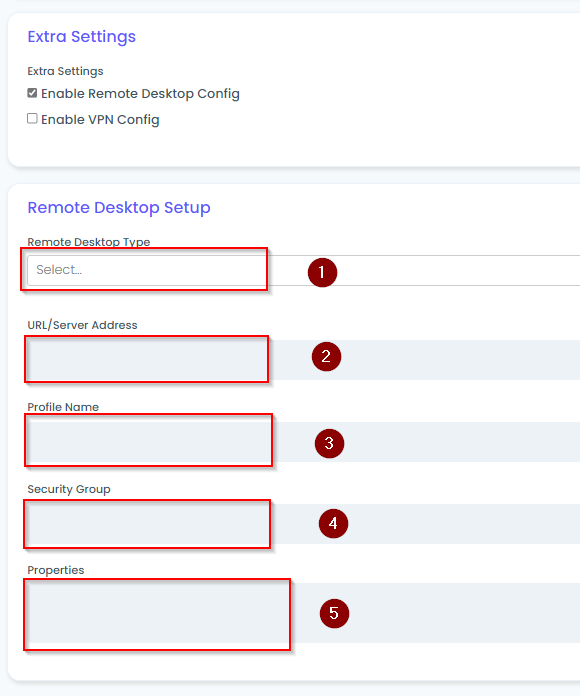
- If the Client has a Remote Desktop solution in their environment, please enter the configuration into the Global Configuration Form.
- If the Client has a Client-To-Site VPN solution in their environment, please enter the configuration in to the Global Configuration Form.
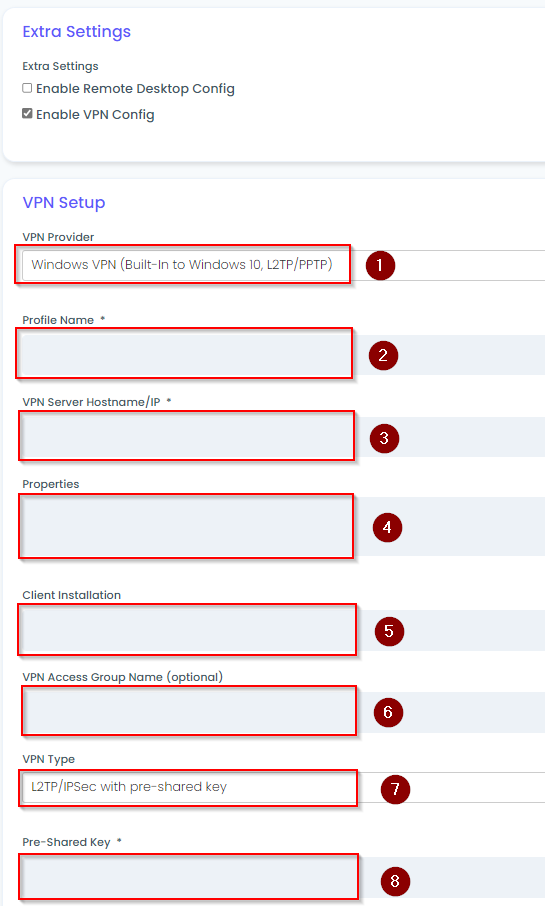

- Click "Save" when finished.